168N© 2014 ALEX BRANDS: 4280 S Haggerty Road Canton, MI 48188
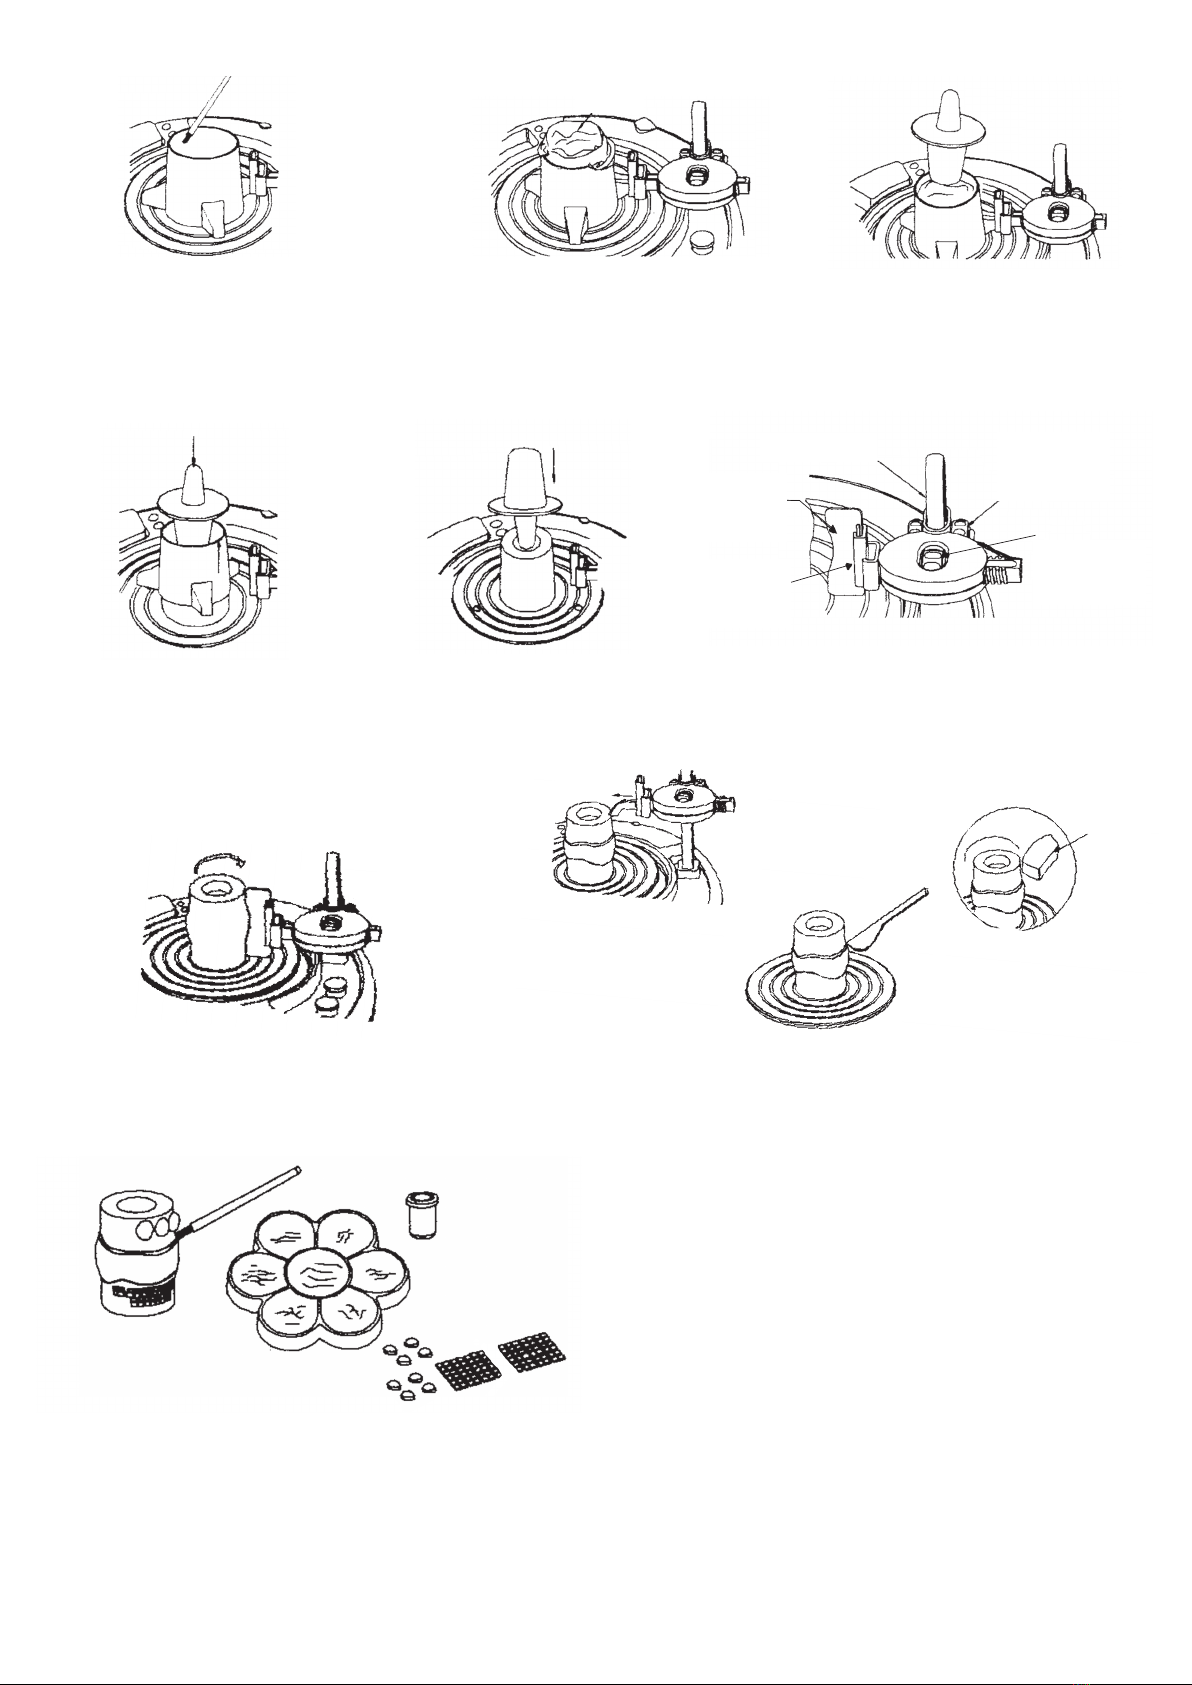
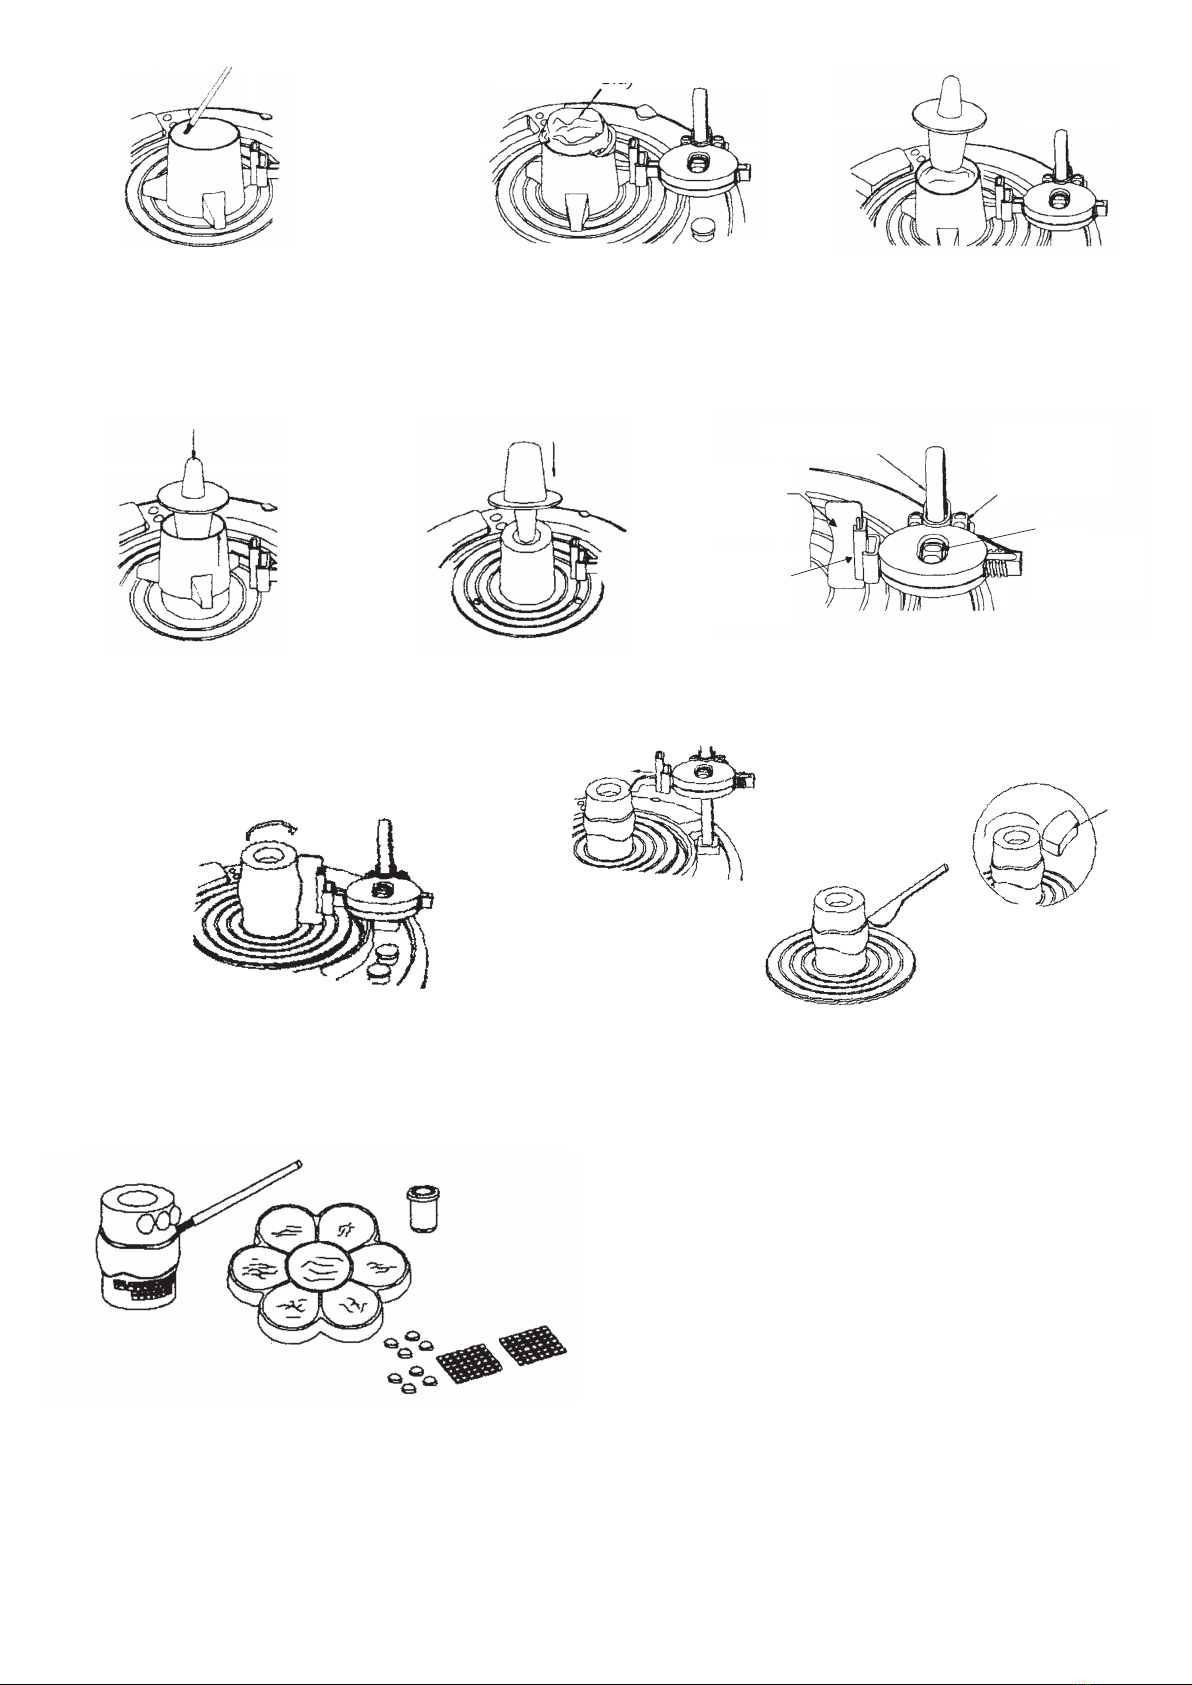
Sponge
7. Step on the foot pedal to make
the turntable spin. If the clay is
rotating stably, adjust the position
of the shaping blade on the tool
arm. When you are happy with
the shape, remove your foot from
the foot pedal to stop the wheel.
8. You can use the other shaping tools and the spatula to add
lines, rings and spirals to you work. Use the sponge to smooth
your clay pot when you are finished. Remove the turntable
from the base with the pot on it, and let dry for 24 hours.
Once your piece is dry, use the cord to remove it from
the turntable by sliding the cord underneath the clay.
You can decorate your work with mosaic tiles, glass
marbles and paint. Continue to work on your protected
surface. You have 6 colors of paint, and you can mix
them to make new ones. Make sure to rinse and dry
your brushes when you change colors. Let your work
dry again in a ventilated area.
NOTES:
Clean up the pottery wheel carefully, making sure that water does not get into the motor or battery
compartment. Save unused clay in an airtight plastic bag or container.
Adult supervision is recommended. Do not dry the crafts in the microwave or oven.
Paints are water soluble only while wet. Dried paint can be removed by an adult with rubbing alcohol. Use
caution when cleaning up with rubbing alcohol as it is toxic and can ruin some surfaces.
Clay pots are for decorative uses only. They are not suitable for use with food, liquids or exposure to heat.
PARENTS:
Periodically examine toy and AC adapter for worn and/or damaged parts. Replace any damaged parts
to reduce risk of electric shock.
WARNING:
Do not mix old and new batteries. Do not mix alkaline, standard (carbon-zinc) or rechargeable
(nickel-cadmium batteries). Non-rechargeable batteries are not to be recharged. Only batteries of the same
or equivalent type as recommended are to be used. Batteries are to be inserted with the correct polarity.
Exhausted batteries are to be removed from the toy. The supply terminals are not to be short-circuited. Do
not use rechargeable batteries.
Visit our website at www.alextoys.com
©ALEX: Northvale, NJ 07647 168N
• Insert batteries with correct polarity as shown.
• Remove exhausted batteries from the toy.
• Only batteries of the same or equivalent type as
recommended are to be used.
• Do not charge non-rechargeable batteries.
• Rechargeable batteries are to be charged under
adult supervision only.
• Remove Rechargeable batteries before charging.
• Do not mix old and new batteries.
• Do not mix standard (carbon-zinc), alkaline, or
Rechargeable batteries.
• Do not short circuit supply terminals.
• Remove batteries from product before extended
storage.
1. Establish a work area that is large enough for you to work comfortably.
You’ll need a sturdy table and chair, and something to protect your surface
(an ALEX® Drop Cloth or newspaper works well). You’ll also need a small
bucket of water and paper towels.
2. Take everything out of the box and put the paints and brushes out of the way
until you are ready to use them.
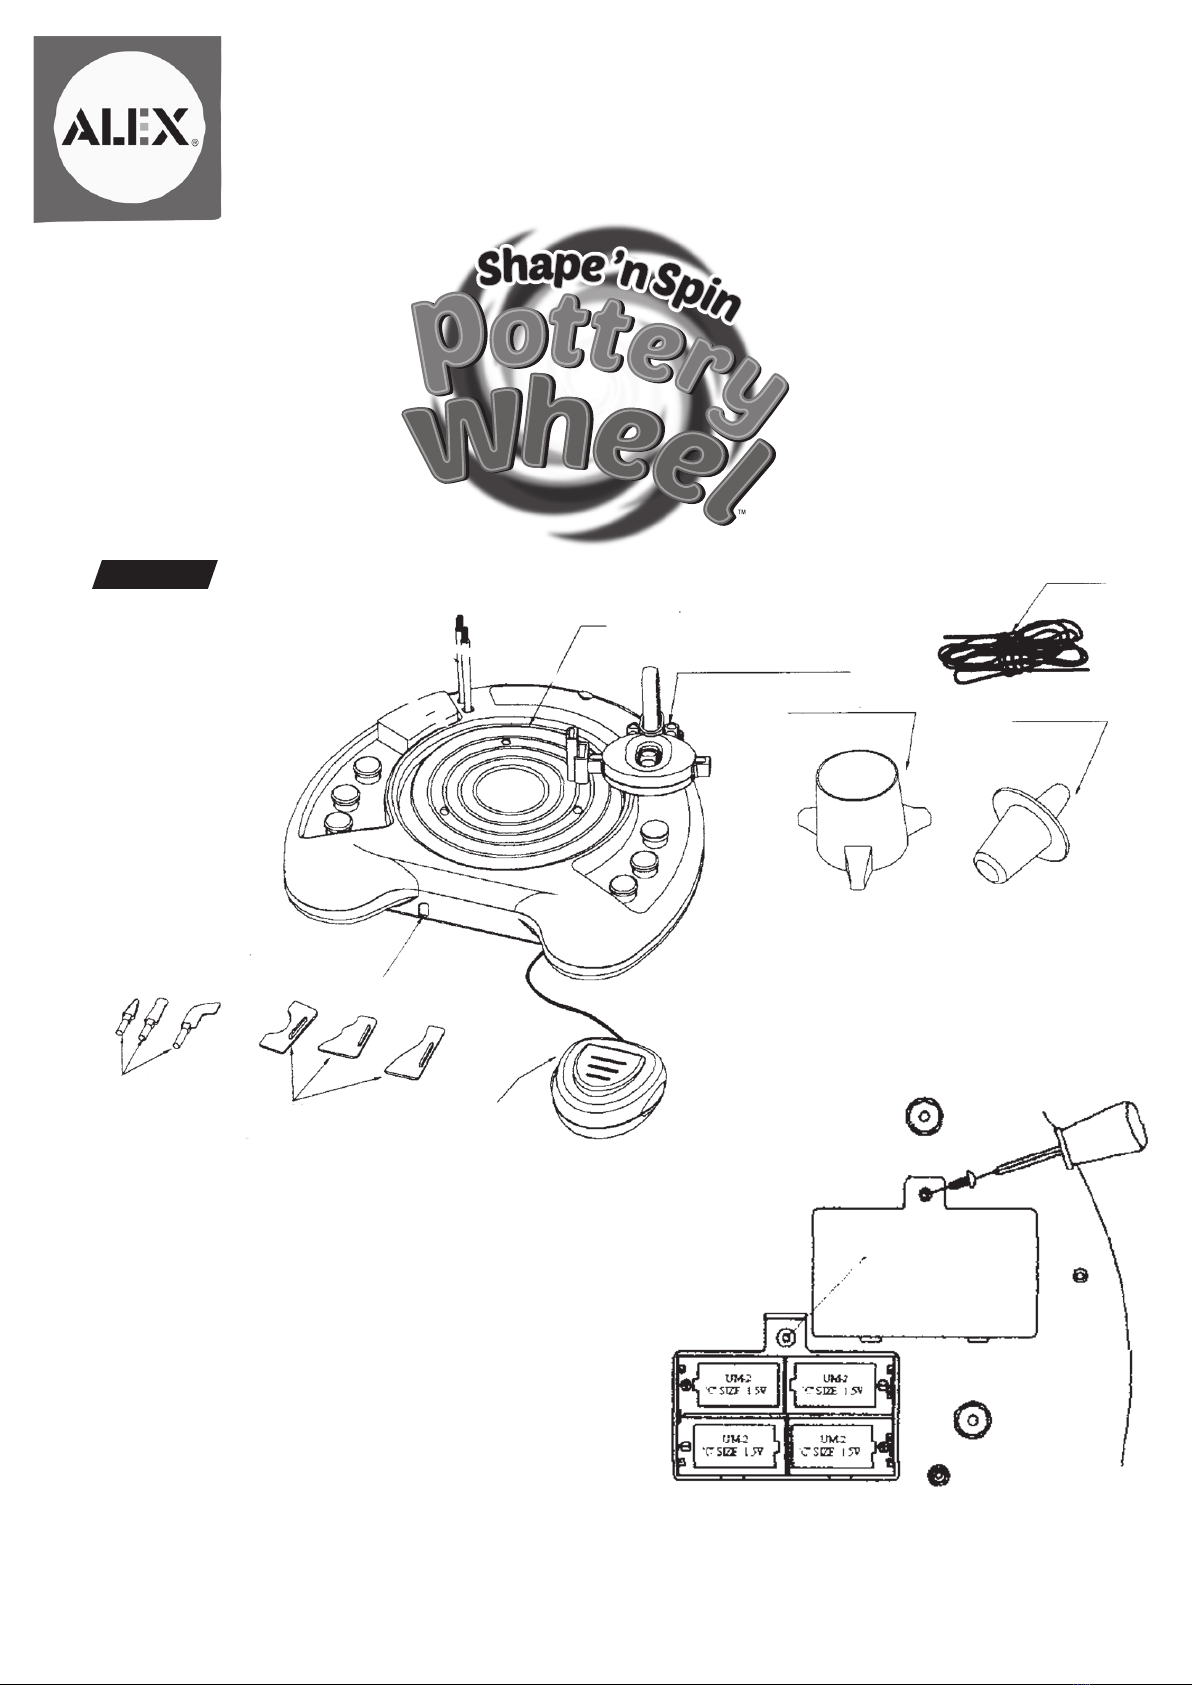
3. Assemble your Pottery Wheel by either inserting 4 size C batteries (not included) according to Figure 1, or
inserting the AC adapter and plugging it into a wall socket. Insert the stem of the turntable into the center
of the base. Keep the rim of the turntable and the area underneath it clean while you’re working.
Slot Horizontal
adjustment
knob
Support rod
Clay
Outline
shaping
blade
Vertical
adjustment
knob
1. Place the shaping tube on the
turntable by aligning the feet with
the holes in the turntable. Use a
paint brush to wet the inside of
the shaping tube with water.
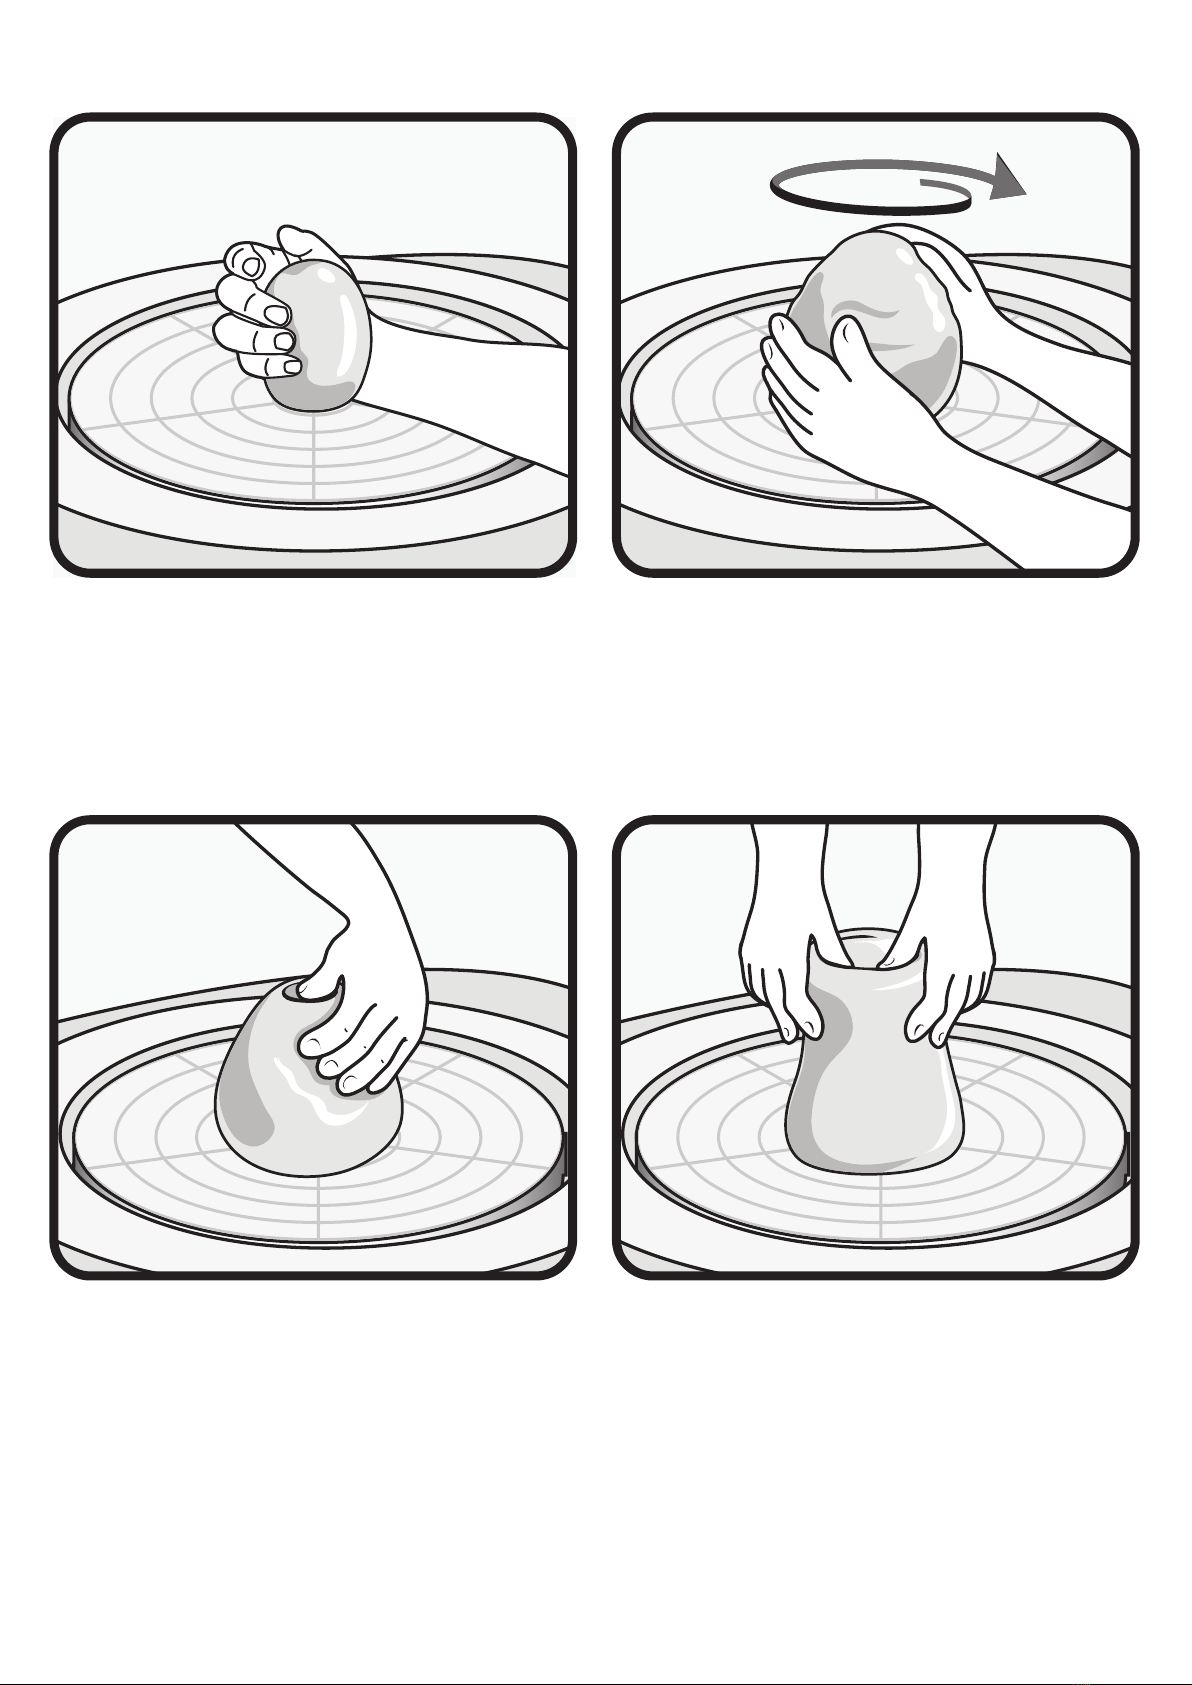
2. Start with a softball-size piece
of clay. Add some water and roll
it into a cylinder so that it fits into
the shaping tube.
4. Separate the shaping tube from
the clay by slowly pulling the tube
up while pressing down on the
clay with the excavator.
5. You may then refine the shape
of the clay cylinder with the
smaller end of the excavator.
3. Press the bigger side of the
excavator down into the shaping
tube until the clay takes a
cylindrical shape.
6. Insert an outline shaping blade
into the slot of the adjustable
tool arm.
Multiple Battery Instructions
GO!
GET READY!
• Insert batteries with correct polarity as shown.
• Remove exhausted batteries from the toy.
• Only batteries of the same or equivalent type as
recommended are to be used.
• Do not charge non-rechargeable batteries.
• Rechargeable batteries are to be charged under
adult supervision only.
• Remove Rechargeable batteries before charging.
• Do not mix old and new batteries.
• Do not mix standard (carbon-zinc), alkaline, or
Rechargeable batteries.
• Do not short circuit supply terminals.
• Remove batteries from product before extended
storage.
1. Establish a work area that is large enough for you to work comfortably.
You’ll need a sturdy table and chair, and something to protect your surface
(an ALEX® Drop Cloth or newspaper works well). You’ll also need a small
bucket of water and paper towels.
2. Take everything out of the box and put the paints and brushes out of the way
until you are ready to use them.
3. Assemble your Pottery Wheel by either inserting 4 size C batteries (not included) according to Figure 1, or
inserting the AC adapter and plugging it into a wall socket. Insert the stem of the turntable into the center
of the base. Keep the rim of the turntable and the area underneath it clean while you’re working.
Slot Horizontal
adjustment
knob
Support rod
Clay
Outline
shaping
blade
Vertical
adjustment
knob
1. Place the shaping tube on the
turntable by aligning the feet with
the holes in the turntable. Use a
paint brush to wet the inside of
the shaping tube with water.
2. Start with a softball-size piece
of clay. Add some water and roll
it into a cylinder so that it fits into
the shaping tube.
4. Separate the shaping tube from
the clay by slowly pulling the tube
up while pressing down on the
clay with the excavator.
5. You may then refine the shape
of the clay cylinder with the
smaller end of the excavator.
3. Press the bigger side of the
excavator down into the shaping
tube until the clay takes a
cylindrical shape.
6. Insert an outline shaping blade
into the slot of the adjustable
tool arm.
Multiple Battery Instructions
GO!
GET READY!
1. Coloca el Tubo Moldeador sobre
la Placa Giratoria de modo que los
pies coincidan con los orificios de la
Placa Giratoria. Utiliza un pincel para
humedecer el interior del tubo.
2. Comienza utilizando una bola
pequeña de escayola. Añade
agua y enróllala hasta formar un
cilindro que quepa en el tubo.
3. Empuja el extremo grande
del Excavador hasta
introducirlo en el tubo.
5. Después puedes redefinir la
forma del cilindro de escayola
con el extremo pequeño del
Excavador.
7. Pisa el pedal del pie para que la placa giratoria
dé vueltas. Ajusta la posición de la Cuchilla
Rasante. Cuando estés satisfecho con la forma de
la pieza de cerámica, puedes levantar el pie para
detener la rueda.
8. Utiliza otras herramientas moldeadoras y la
espátula para añadir líneas a tu pieza de cerámica. Utiliza
la esponja para alisar la superficie de escayola cuando
hayas finalizado. Retira la placa giratoria con la pieza de
cerámica y déjalo secar durante 24 horas.
9. Cuando la pieza de cerámica esté seca, desliza
la cuerda por la debajo para separarla de la placa.
Puedes decorarla con pintura, canicas o azulejos.
Trabaja siempre sobre el paño protector. Enjuaga y
seca el pincel antes de cambiar de color. Permite
que tu pieza decorada se seque.
6. Introduce una Cuchilla Rasante en la
ranura del Brazo Ajustable.
4. Separa el tubo de la escayola
estirando lentamente del
tubo hacia arriba mientras
empujas la escayola con el
Excavador.
Sponge
7. Step on the foot pedal to make
the turntable spin. If the clay is
rotating stably, adjust the position
of the shaping blade on the tool
arm. When you are happy with
the shape, remove your foot from
the foot pedal to stop the wheel.
8. You can use the other shaping tools and the spatula to add
lines, rings and spirals to you work. Use the sponge to smooth
your clay pot when you are finished. Remove the turntable
from the base with the pot on it, and let dry for 24 hours.
Once your piece is dry, use the cord to remove it from
the turntable by sliding the cord underneath the clay.
You can decorate your work with mosaic tiles, glass
marbles and paint. Continue to work on your protected
surface. You have 6 colors of paint, and you can mix
them to make new ones. Make sure to rinse and dry
your brushes when you change colors. Let your work
dry again in a ventilated area.
NOTES:
Clean up the pottery wheel carefully, making sure that water does not get into the motor or battery
compartment. Save unused clay in an airtight plastic bag or container.
Adult supervision is recommended. Do not dry the crafts in the microwave or oven.
Paints are water soluble only while wet. Dried paint can be removed by an adult with rubbing alcohol. Use
caution when cleaning up with rubbing alcohol as it is toxic and can ruin some surfaces.
Clay pots are for decorative uses only. They are not suitable for use with food, liquids or exposure to heat.
PARENTS:
Periodically examine toy and AC adapter for worn and/or damaged parts. Replace any damaged parts
to reduce risk of electric shock.
WARNING:
Do not mix old and new batteries. Do not mix alkaline, standard (carbon-zinc) or rechargeable
(nickel-cadmium batteries). Non-rechargeable batteries are not to be recharged. Only batteries of the same
or equivalent type as recommended are to be used. Batteries are to be inserted with the correct polarity.
Exhausted batteries are to be removed from the toy. The supply terminals are not to be short-circuited. Do
not use rechargeable batteries.
Visit our website at www.alextoys.com
©ALEX: Northvale, NJ 07647 168N
NOTAS: Limpia la rueda de cerámica minuciosamente, asegurándote de que no se introduce agua en el motor ni el
compartimento de las pilas. Guarda la escayola no utilizada en una bolsa de plástico o recipiente que se puedan
cerrar herméticamente.
Se recomienda utilizar bajo la supervisión de un adulto. Las piezas no se deben secar en el microondas u horno.
La pintura es soluble al agua solo cuando está mojada. Adultos pueden remover la pintura seca utilizando alcohol.
Tenga cuidado, pues el alcohol puede deteriorar ciertas superficies.Las piezas de escayola solo sirven como
decoración. No se pueden utilizar con alimentos, líquidos y no se deben exponer al calor.
• Insert batteries with correct polarity as shown.
• Remove exhausted batteries from the toy.
• Only batteries of the same or equivalent type as
recommended are to be used.
• Do not charge non-rechargeable batteries.
• Rechargeable batteries are to be charged under
adult supervision only.
• Remove Rechargeable batteries before charging.
• Do not mix old and new batteries.
• Do not mix standard (carbon-zinc), alkaline, or
Rechargeable batteries.
• Do not short circuit supply terminals.
• Remove batteries from product before extended
storage.
1. Establish a work area that is large enough for you to work comfortably.
You’ll need a sturdy table and chair, and something to protect your surface
(an ALEX® Drop Cloth or newspaper works well). You’ll also need a small
bucket of water and paper towels.
2. Take everything out of the box and put the paints and brushes out of the way
until you are ready to use them.
3. Assemble your Pottery Wheel by either inserting 4 size C batteries (not included) according to Figure 1, or
inserting the AC adapter and plugging it into a wall socket. Insert the stem of the turntable into the center
of the base. Keep the rim of the turntable and the area underneath it clean while you’re working.
Slot Horizontal
adjustment
knob
Support rod
Outline
shaping
blade
Vertical
adjustment
knob
1. Place the shaping tube on the
turntable by aligning the feet with
the holes in the turntable. Use a
paint brush to wet the inside of
the shaping tube with water.
2. Start with a softball-size piece
of clay. Add some water and roll
it into a cylinder so that it fits into
the shaping tube.
4. Separate the shaping tube from
the clay by slowly pulling the tube
up while pressing down on the
clay with the excavator.
5. You may then refine the shape
of the clay cylinder with the
smaller end of the excavator.
3. Press the bigger side of the
excavator down into the shaping
tube until the clay takes a
cylindrical shape.
6. Insert an outline shaping blade
into the slot of the adjustable
tool arm.
Multiple Battery Instructions
GO!
GET READY!
Cuchilla
Rasante
Ajuste hacia
Arriba y Abajo
Ajuste de
Lado a Lado
Varilla de Soporte
Ranura
Uso del tubo de modelado