Allied Telesis AT003-HDR User manual

AT003-HDR

SAFETY PRECAUTION
Important Safety Instructions
1, Read these instructions
2, Keep these instructions
3, Heed all warnings
4, Follow all instructions
5, Do not use this apparatus near water
6, Clean only with dry cloth
7, Do not block any ventilation openings. Install in accordance with the
manufacturer‟s instructions.
8, Do not install near any heat sources such as radiators, heat registers, stoves,
or other apparatus (including amplifiers) that produce heat.
9, Do not defeat the safety purpose of the polarized or grounding-type plug. A
polarized plug has two blades with one wider than the other. A grounding type
plug has two blades and a third grounding prong. The wide blade or the third
prong are provided for your safety. If the provided plug does not fit into your
outlet, consult an electrician for replacement of the obsolete outlet.
10, Protect the power cord from being walked on or pinched particularly at plugs,
convenience receptacles, and the point where they exit from the apparatus.
11, Only use attachments/accessories specified by the manufacturer.
12, Use only with the cart, stand, tripod, bracket, or table specified by the
manufacturer, or sold with the apparatus. When a cart is used, use cautions
when moving the cart/apparatus combination to avoid injury from tip-over.
13, unplug this apparatus during lighting storms or when unused for long
periods of time.
14, Refer all servcing to qualified service personnel. Servicing is required when
the apparatus has been damaged in any way, such as power-supply cord or
plug is damaged. Liquid has been spilled or objects have falled into the
apparatus, the apparatus has been exposed to rain or moisture, does not
operate normally, or has been dropped.
15, WARNING: to reduce the risk of fire or electric shock, do not expose this
apparatus to rain or moisture.
16, The mains plug is used as the disconnect device, the disconnect device
shall remain readily operable.

SAFETY PRECAUTION
CAUTION:
The lightning flash with
arrowhead symbol, within an
equilateral triangle, is
intended to alert the user to
the presence of "dangerous
voltage" withink the product
enclosure that may be so
sufficient magnitude to
constitute a risk of electric
shock to a person.
Warning:
To reduce the risk of electric
shock, do not open the cover
or cabinet. No user
serviceable parts inside.
Refer servicing to qualified
personnel only.
The exclamation point within
an equilateral triangle is
intended to alert the user to
important operating and
maintenance (servicing)
instructions in the literature
accompanying the
apparatus.
Caution: The user is cautioned that changes or modifications not expressly
approved by the party responsible for compliance could void the user's authority
to operate the equipment.
For a Class B digital device or peripheral, the instructions furnished the user
shall include the following or similar statement, placed in a prominent location in
the text of the manual:
Note: This equipment has been tested and found to comply with the limits for a
Class B digital device, pursuant to part 15 of the FCC Rules. These limits are
designed to provide reasonable protection against harmful interference in a
residential installation. This equipment generates, uses and can radiate radio
frequency energy and, if not installed and used in accordance with the
instructions, may cause harmful interference to radio communications.
However, there is no guarantee that interference will not occur in a particular
installation. If this equipment does cause harmful interference to radio or
television reception, which can be determined by turning
the equipment off and on, the user is encouraged to try to correct the
interference by one or more of the following measures:
—Reorient or relocate the receiving antenna.
—Increase the separation between the equipment and receiver.
—Connect the equipment into an outlet on a circuit different from that to which
the receiver is connected.
—Consult the dealer or an experienced radio/TV technician for help
WARNING: The apparatus shall not be exposed to dripping or splashing of liquids.
No objects filled with liquids, such as vases, shall be placed on the apparatus.
WARNING: Do not put a candle or lamp on the cabinet, as this can cause a risk of fire.
WARNING: The unit should be connected to a power supply only of the type described in
the operating instructions or as marked on the unit. If you are not sure of the type of
power supply to your home, consult your local dealer or power company.
WARNING: The batteries of the remote control should not be exposed to excessive heat

such as fire, direct sun, or similar.
WARNING: Maintenance personnel must use the appropriate tools and replacement
parts as specified by the manufacturer.
Note: Do not open the cabinet on this unit, as this may expose you to dangerous
voltages and radiation.
Unit Cleaning: After the unit power is turned off, you can clean the cabinet, panel and
remote control with a soft cloth lightly moistened with a mild detergent solution.
Attachments: Never add any attachments and/or equipment without the manufacturer‟s
approval, as this may result in the risk of fire, electric shock or other personal injury.
Locating: Slots and openings in the cabinet are provided for ventilation to protect it from
overheating. Do not block these openings or allow them to be blocked by placing the unit
on a bed, sofa or other similar surface.
Power-Cord Protection: Place the power-supply cord out of the way, where it will not be
walked on or pinched, particularly at plugs, convenience receptacles, and the point
where they exit from the unit.
Object and Liquid Entry: Never put objects of any kind into this unit through openings,
as they may touch dangerous voltage points or short-out parts that could result in a fire or
electric shock. Never spill any liquid on the unit.
Note: Moisture may be formed inside the unit under the following conditions:
When the unit is suddenly moved from a cold environment, or an air-condition
room, to a warm place.
Immediately after a heater has been turned on.
In a steamy or very humid room.
If moisture forms inside the unit, it may not operate properly. To correct this problem, wait
several hours for the moisture to evaporate before operating the unit.
Parts Replacement: When the unit parts need to be replaced, user should make sure
the service technician uses the replacement parts specified by the manufacturer or
having the same characteristics as the original part. Unauthorized replacement may
create a risk of fire, electric shock or other hazards.
Safety Check: After all the maintenance and repairs are done, the user should request
the service technician conduct an overall safety check, to ensure the unit is in proper
operating condition.

Contents
1
Contents
1. Settop Description & Remote Control..................................................................3
1.1 Settop Description............................................................................................... 3
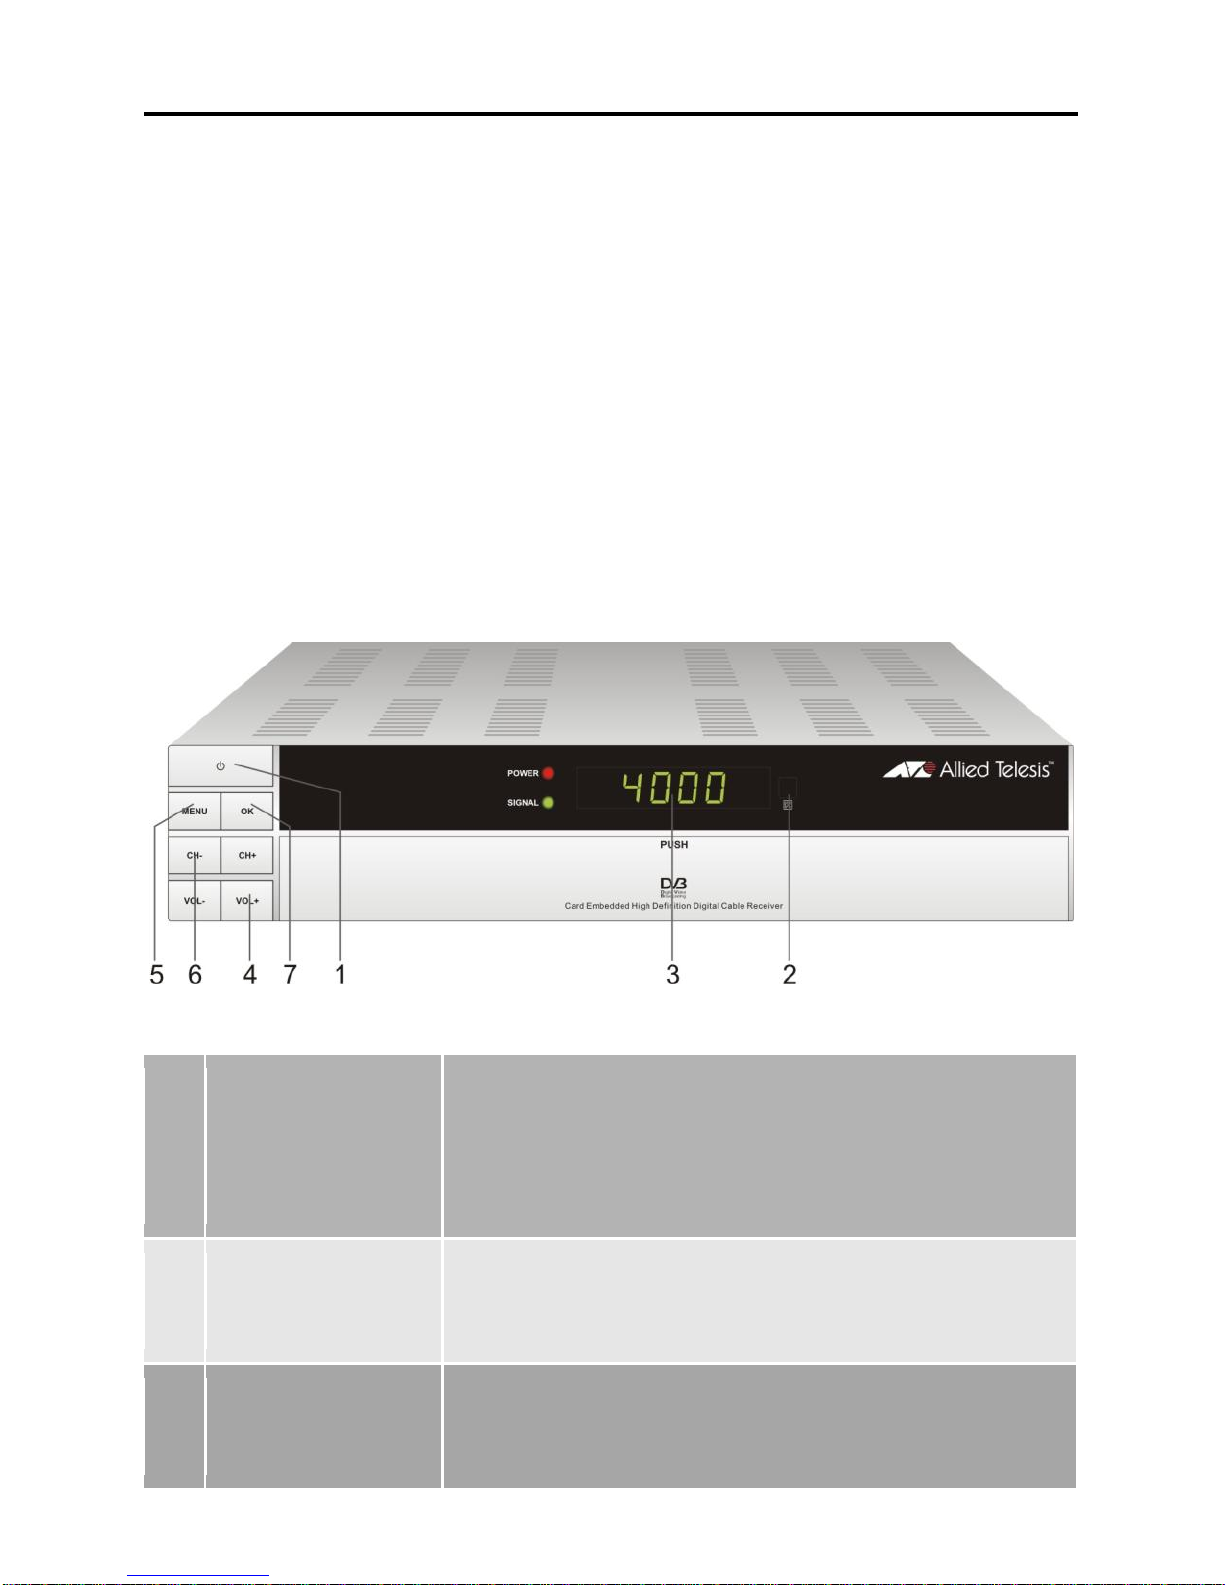
1.2 Front Panel Description....................................................................................... 3
1.3 Rear Panel Description....................................................................................... 4
1.4 Remote Control Description................................................................................ 6
2. Basic Operation......................................................................................................7
2.1 Switch „ON‟ the Settop........................................................................................ 7
2.2 Standby Mode..................................................................................................... 7
2.3 MUTE.................................................................................................................. 8
2.4 AUDIO................................................................................................................. 8
2.5 LAST................................................................................................................... 8
2.6 Channel Numbers............................................................................................... 8
2.7 PPV..................................................................................................................... 8
2.8 GUIDE................................................................................................................. 8
2.9 CH ▲/▼........................................................................................................... 10
2.10 VOL ◄/►........................................................................................................ 10
2.11 OK................................................................................................................... 10
2.12 MENU ............................................................................................................. 10
2.13 EXIT................................................................................................................ 10
2.14 PAUSE............................................................................................................ 10
2.15 ZOOM............................................................................................................. 11
2.16 INFO ............................................................................................................... 11
3. Channel..................................................................................................................12
3.1 TV Channel List................................................................................................. 12
3.1.1 Favorite ...................................................................................................... 13
3.1.2 Move........................................................................................................... 13
3.1.3 Sort............................................................................................................. 14
3.1.4 Edit............................................................................................................. 14
3.1.5 Find ............................................................................................................ 16
3.2 Radio Channel List............................................................................................ 16
3.3 Channel Setup .................................................................................................. 17
3.4 Favorite group list name.................................................................................... 18
3.5 Delete All........................................................................................................... 18
4. Installation .............................................................................................................19
4.1 Auto Scan ......................................................................................................... 19
4.2 Transponder scan............................................................................................. 20
5. System Setup........................................................................................................20
5.1 Language.......................................................................................................... 20
5.2 TV System ........................................................................................................ 21
5.3 Time & Timer Setting ........................................................................................ 22
5.4 OSD Setting...................................................................................................... 25
5.5 Parental Lock.................................................................................................... 25
5.6 Power setting.................................................................................................... 26
6. Tools.......................................................................................................................27
6.1 Information........................................................................................................ 27
6.2 Quick Setup ...................................................................................................... 27
6.3 Factory Default.................................................................................................. 28

Contents
2
6.4 Software Upgrade............................................................................................. 28
6.4.1 USB-STB Upgrade..................................................................................... 28
6.4.2 OTA Upgrade ............................................................................................. 29
6.5 CAS................................................................................................................... 29
7. Media Management...............................................................................................30
7.1 Media List.......................................................................................................... 30
7.1.1 All ............................................................................................................... 31
7.1.2 Music.......................................................................................................... 34
7.1.3 Picture........................................................................................................ 34
7.1.4 Video.......................................................................................................... 34
7.1.5 Music List.................................................................................................... 34
7.1.6 Picture List.................................................................................................. 35
7.1.7 Video list..................................................................................................... 35
7.1.8 Record list................................................................................................... 35
7.2 Media Control.................................................................................................... 37
7.3 Disk Information................................................................................................ 37
8. Technical Specification........................................................................................38

3
Remote Control & Panel Description
1. Settop Description & Remote Control
1.1 Settop Description
This Settop allows you to receive unencrypted (free) and encrypted (paid tier)
Digital Cable programs from your Cable TV Service Provider.
The Settop will search for additional new channels as soon as you launch the
automatic channel search. All Settop settings can be easily configured via the
user interface (Settop Menu).
1.2 Front Panel Description
1
POWER Button
Used to switch the Settop between the ON mode
and Standby mode (Make sure the rear panel
ON/OFF switch is set to ON).
2
Remote Sensor
Detects the infrared (IR) signals from the remote
control unit. Point your remote toward this area
when selecting channels, adjusting volume, etc.
3
Display (VFD)
When the Settop is on, this will display the Channel
Number you are watching.
When the Settop is in standby mode, this will

4
Remote Control & Panel Description
Cable In/
Loop out
YPbPr
HDMI
Output
Video, L/R
Audio Output
Power
Switch
Coaxial
display the current Time.
4
VOL+/-
Press these buttons to adjust the sound level. You
may also need to adjust your TV volume control to
achieve the desired sound level.
These will also serve as Cursor buttons, for
navigating and changing preferences in the Settop
Menu.
5
MENU
This button allows you to enter the Settop Menu,
making it possible to set the Settop features to your
preference without using the remote control.
This button will also allow you to exit all Menus.
6
CH+/-
Press these buttons to change the channel.
These will also serve as Cursor buttons, for
navigating and changing preferences in the Settop
Menu.
7
OK
Press this button to display the channel list.
This button will also serve as the OK button while in
the Settop Menu.
1.3 Rear Panel Description
1
CABLE IN
CABLE input of the tuner. Connect your Cable TV
signal to this jack.

5
Remote Control & Panel Description
2
LOOP OUT
CABLE output for connecting Cable TV signal to
another device. This jack will output the cable
signal at all times, whether the receiver is on or off.
3
VIDEO
Composite video output for connecting to your TV
video Input jack. This connection will support
NTSC/480i video.
4
AUDIO
AUDIO output for connecting to your TV Audio
Input jacks.
5
HDMI
High Definition Multimedia Interface connection.
This connection enables secure distribution of
uncompressed high-definition video and audio, in a
single cable. Because signals remain in digital
format, HDMI assures that the images retain the
highest video quality from your Settop to your TV.
6
Y Pb Pr
Component output for connecting high quality
Video to your TV.
7
AC IN
Main Power cord for your Settop.
8
POWER
ON/OFF
Allows user to completely switch off power to the
Settop, without having to unplug the Main Power
cord.

6
Remote Control & Panel Description
1.4 Remote Control Description

7
Menu Operations
2. Basic Operation
2.1 Switch „ON‟ the Settop
First, plug in your Settop. Next, set the Power ON/OFF switch on the rear
panel of the Settop to „ON‟. Then, press the [Power] button on the front panel
or remote control, to turn the Settop ON. When the Settop is first used, it will
start a „First Time Setup‟ walk-thru operation.
?Frequently Asked Question
Q: My Settop is powered on, but the TV screen shows nothing:
A: Make sure your TV is set to the correct video input. For example, if you
have connected the Settop to the HDMI1 input of your TV, then you need to
select the corresponding input of the TV.
Q: My Settop is powered on, but only a “No Signal” display is shown.
A: The channel you selected has no signal. This can be caused by
several reasons:
1. The channel you selected currently has no programming from your cable
provider. Select another channel.
2. The signal of the current TV channel is too weak. You can try changing to
another channel with a stronger signal. If the problem still exists, please
consult your local Cable TV Provider.
2.2 Standby Mode
1. Press the [Power] button on the front panel or remote control, to switch from
operational mode [ON] to standby mode [OFF].
2. In standby mode, press the [Power] button on the front panel or remote
control, to switch to operational mode [ON]. The last active channel will be
tuned and displayed.
3. To switch the Settop off completely, set the Power ON/OFF button on the
Rear Panel to [OFF]. Or, you may unplug the main power cord from the AC
wall outlet.

8
Menu Operations
2.3 MUTE
1. Press the [Mute] button to mute the sound. An icon will be displayed on the
screen to indicate the sound has been muted.
2. Press the [Mute] button again to restore the sound.
2.4 AUDIO
1. Press the [Audio] button to open the
Audio Mode window.
2. Select the desired audio program with
[CH▲/▼] and change the value with
[VOL◄/►].
2.5 LAST
Press the [LAST] button to toggle between
the current channel and the previously selected channel.
2.6 Channel Numbers
Enter the channel number directly with your remote control and confirm the
number with the [OK] button, to change to the desired channel.
2.7 PPV
<This section left blank intentionally>
2.8 GUIDE
The Settop has an Electronic Program Guide (EPG) to help you navigate
through all available channels. The EPG supplies information such as channel
listings, program descriptions, and starting/ending times for all programs.

9
Menu Operations
Press the [GUIDE] button to display the
Electronic Program Guide.
NOTE: When in this menu, use the color
buttons on your remote control to correspond to
the color coded function (for example, the
Green-Time feature is accessed by pressing the
Green-GUIDE button on your remote).
1. Press the RED button on the remote
control, which corresponds to the RED
(Time) command on the bottom of the
screen. You will then enter into the
following screen.
2. Use the [VOL◄/►] buttons to select the
chosen icon, then press the [OK] button to
set that action. Press the [EXIT] button to
return to the original EPG screen.
3. Press the GREEN button on the remote
control, which corresponds to the GREEN
(Timer) command on the bottom of the
screen. You will then enter into the
following screen.
To navigate, press the [CH, VOL◄►]
buttons and set related date, as well start
time and duration. Using this Timer menu, you may set the Settop to tune your
desired channel (or tune and record) at a preset time. Save your settings by
highlighting „Save‟ and pressing the [OK] button.

10
Menu Operations
2.9 CH ▲/▼
Press the [CH▲/▼] buttons to change the channel.
2.10 VOL ◄/►
Press the [VOL◄►] buttons to adjust the volume.
2.11 OK
1. Press the [OK] button to open the Channel List window. You can also select
your different “Favorites” groups by pressing [VOL◄/►].
2. Once you‟ve selected the desired Channel / Favorites list, you can select
the desired channel by pressing the [CH▲/▼] buttons to highlight the channel,
then confirm it by pressing the [OK] button.
3. Press the [EXIT] button to return to normal TV viewing.
You may also use the [OK] button to direct tune a channel.
First, enter the desired Channel number using the remote control number keys,
then press [OK] to tune that channel.
You also use this [OK] button while setting features in the Settop Menu system.
2.12 MENU
Press the [Menu] button to enter or exit the current menu.
2.13 EXIT
Press the [Exit] button to exit the current menu. You may press this button to
escape any on screen display or function, including: ZOOM, INFO, GUIDE,
Channel List, etc..
2.14 PAUSE
1. Press the [PAUSE] button and the picture will be paused, but the sound of
the channel will still continue.
2. Press the [PAUSE] button again to return to normal viewing.

11
Menu Operations
2.15 ZOOM
1. The [Zoom] button allows you to
magnify the video. You may use this
button during normal viewing, or you
may press [PAUSE] and zoom a still
picture.
2. Press the [Zoom] button the first time
and you will see „ZOOM x1‟ displayed
in the lower right corner of the TV
screen. Press [ZOOM] again and the
image will enlarge to „ZOOM x2‟. Press [Zoom] again, and repeat until
you reach the desired magnification (Zoom has the following possible
magnification settings: x1, x2, x4, x6, x8, x12, x16).
3. In “x2 ~ x16” Zoom mode, use the [CH▲/▼ / VOL◄/►] buttons to move
the image center area to the portion of the video you want to view.
4. Press the [Exit] button to close the “Zoom” window.
2.16 INFO
Press the [INFO] button to open the information screen. This window will show
the channel number being received, the channel ID, program description, and
the current date and time.

12
Menu Operations
3. Channel
Press [Menu] to enter the main menu.
1. Press [CH▲/▼] to select the channel
item.
2. Press [OK] to enter the selected item.
In the channel menu:
Press [CH▲/▼] to select the wanted menu
item among TV Channel List, Radio
Channel List, Channel setup, Favorite
group list name, and Delete All.
Press [OK] to enter the selected item.
3.1 TV Channel List
The TV Channel List menu allows you to
modify the channel list to your preference.
Note: When in this menu, use the color
buttons on your remote control to correspond to
the color coded function (for example, the
Green-Edit feature is accessed by pressing the
Green-GUIDE button on your remote).
1. You can move the highlighted channel
with [CH▲/▼] and press [OK] to preview the highlighted program in the
preview window.
2. Press [Vol◄/►] to switch type of the program group.
3. Press [Menu] or [Exit] buttons to enter TV playing mode.
4. The color buttons offer further functions to manage the channel list.

13
Menu Operations
3.1.1 Favorite
1. Press [FAV] to open the favorite
window.
2. You can select between 32 favorite
groups with [CH▲/▼]. Press [OK] to
assign the channel to a favorite group,
press [EXIT] to exit favorite group.
3. Press [OK] again to remove the
channel from the marked favorite
group.
4. Press [MENU] button you will be asked “Are you sure to save?”. Select
“Yes” to save the marked favorite group. Select “No” to cancel the operation.
5. To return to the TV channel list. The channels of favorite groups are
indicated with a favorite icon behind the name.
3.1.2Move
Pressing the [Red] button in the TV channel
list will open another window where you
can choose between move the actual
channel and swap the actual channel to the
desired position, press [OK] to confirm it.
a) Move
1. Press [Red] button to show a moving
icon behind the channel name.
2. Move the channel to the desired
position with [CH▲/▼]. Press [OK] to confirm the position.
b) Swap
1. Press [Green] button to show a moving icon behind the channel name.
2. Move the channel to the desired position with [CH▲/▼]. Press [OK], then
the selected channel will immediately exchange positions with the channel
currently occupying this position.

14
Menu Operations
3.1.3 Sort
Press [Green] to open the sort window.
Press [CH▲/▼] to select and [OK] to
confirm your choice.
The ways of sorting are:
Default: Sort channel factory default.
FTA/CAS: Sort channel by free and
scrambled sequence. Free channels
will be listed first and scrambled
channels behind in the channel list.
Lock: Unlocked channels are listed first end locked channels at the end.
Name (A-Z): Sorting in Alphabetical order.
Name (Z-A): Sorting in reverse Alphabetical order.
3.1.4 Edit
After pressing the [Yellow] button a window
for entering the password will open. The
default password is “0000”.
You can delete, skip, lock and edit the
channel.
Press [MENU] to leave the channel editing.
The system will ask you to confirm the
saving of the changes you made.
3.1.4.1 Delete
In channel edit menu press [Red] button will open another window where you
can choose between delete one channel OR delete all channels.
Del One
Press [Red] button to mark a channel for deleting. Marked channel will be
deleted after you confirm to save the changes when you leave this menu.
Del All
a) Press [Green] button to show a deleting icon behind all channel name.
b) Press [MENU] button you will be asked “Are you sure to save?”. Select
“OK” to delete all channels. Select “Cancel” to cancel the operation.

15
Menu Operations
3.1.4.2 Skip
In channel edit menu, press [Green] button to place a skip icon behind the name
of the highlighted channel. Marked channels will be skipped when you change
channels in TV mode after you confirm to save the changes when you leave this
menu.
3.1.4.3 Lock
In channel edit menu, press [Yellow] button to place a lock icon behind the name
of the highlighted channel. Marked channels will be locked and displayed only
after password has been entered if you confirm to save the changes when you
leave this menu.
3.1.4.4 Edit
Pressing the [Blue] button in the TV
channel list edit menu will open another
window where you can choose between
edit the actual channel and create a new
channel.
Edit
Press [Red] button to edit the channel.
1. Selecting the name item with [OK]
will display a button pad to show
you how to edit the channel
name.
2. On the “Video PID”, “Audio PID”
and “PCR PID” items you can
input numbers to modify the
item‟s value.
3. After modification select “Save”
and press [OK] button to save the
modified values and exit “Edit”
mode. Or select “Exit” and press [OK] to leave edit mode without
saving the modifications.
Create
Press [Green] button to open the create channel window.

16
Menu Operations
1. Press OK and Use [CH▲/▼] to
highlight the “Name” item and press
[OK] to display the button pad and edit
the new channel‟s name.
2. In “Video PID”, “Audio PID” and “PCR
PID” items you can enter the numbers
directly to set these parameters of the
new channel.
3. After modification, select “Save” and press [OK] to save the new channel
and leave the edit mode. Select “Exit” and press [OK] to exit the edit mode
without saving the new channel.
3.1.5 Find
1. Press [Blue] button to open the “Find”
window like showed beside. Press
[CH▲/▼] / [Vol◄/►] to select the
leading character of the channel name
and press [OK] to confirm it.
2. After entering the character(s)
highlight “OK” in the window and press
[OK] on the RCU.
3. Press [Exit] button to close the find
window and brings you back to the channel list.
3.2 Radio Channel List
Basically the operation of “Radio Channel List” is same as “TV Channel List”,
except that in the small channel window the radio Logo will be displayed.
Table of contents