ALLOMATIC APS1000-12 User manual

POWER INVERTER
APS1000-12 & APS2000-24

Table of Contents
Important Safety Information . . . . . . . . . . . . . . . . . . . . . . 1
General Safety Precautions. . . . . . . . . . . . . . . . . . . . . . 1
Precautions When Working With Batteries . . . . . . . . . . . . . . 1
General Informtion. . . . . . . . . . . . . . . . . . . . . . . . . . . . 2
Application . . . . . . . . . . . . . . . . . . . . . . . . . . . . . . . . 3
Features . . . . . . . . . . . . . . . . . . . . . . . . . . . . . . . . . 3
Basis System Architecture . . . . . . . . . . . . . . . . . . . . . . . 4
Product Overview . . . . . . . . . . . . . . . . . . . . . . . . . . . . 4
Installation . . . . . . . . . . . . . . . . . . . . . . . . . . . . . . . . 5
Unpacking and Inspection . . . . . . . . . . . . . . . . . . . . . . 5
Preparation . . . . . . . . . . . . . . . . . . . . . . . . . . . . . . 6
Mounting The Unit . . . . . . . . . . . . . . . . . . . . . . . . . . 6
Battery Connection . . . . . . . . . . . . . . . . . . . . . . . . . . 7
AC Input/Output Connection . . . . . . . . . . . . . . . . . . . . . 9
Electrical Performance . . . . . . . . . . . . . . . . . . . . . . . . . 11
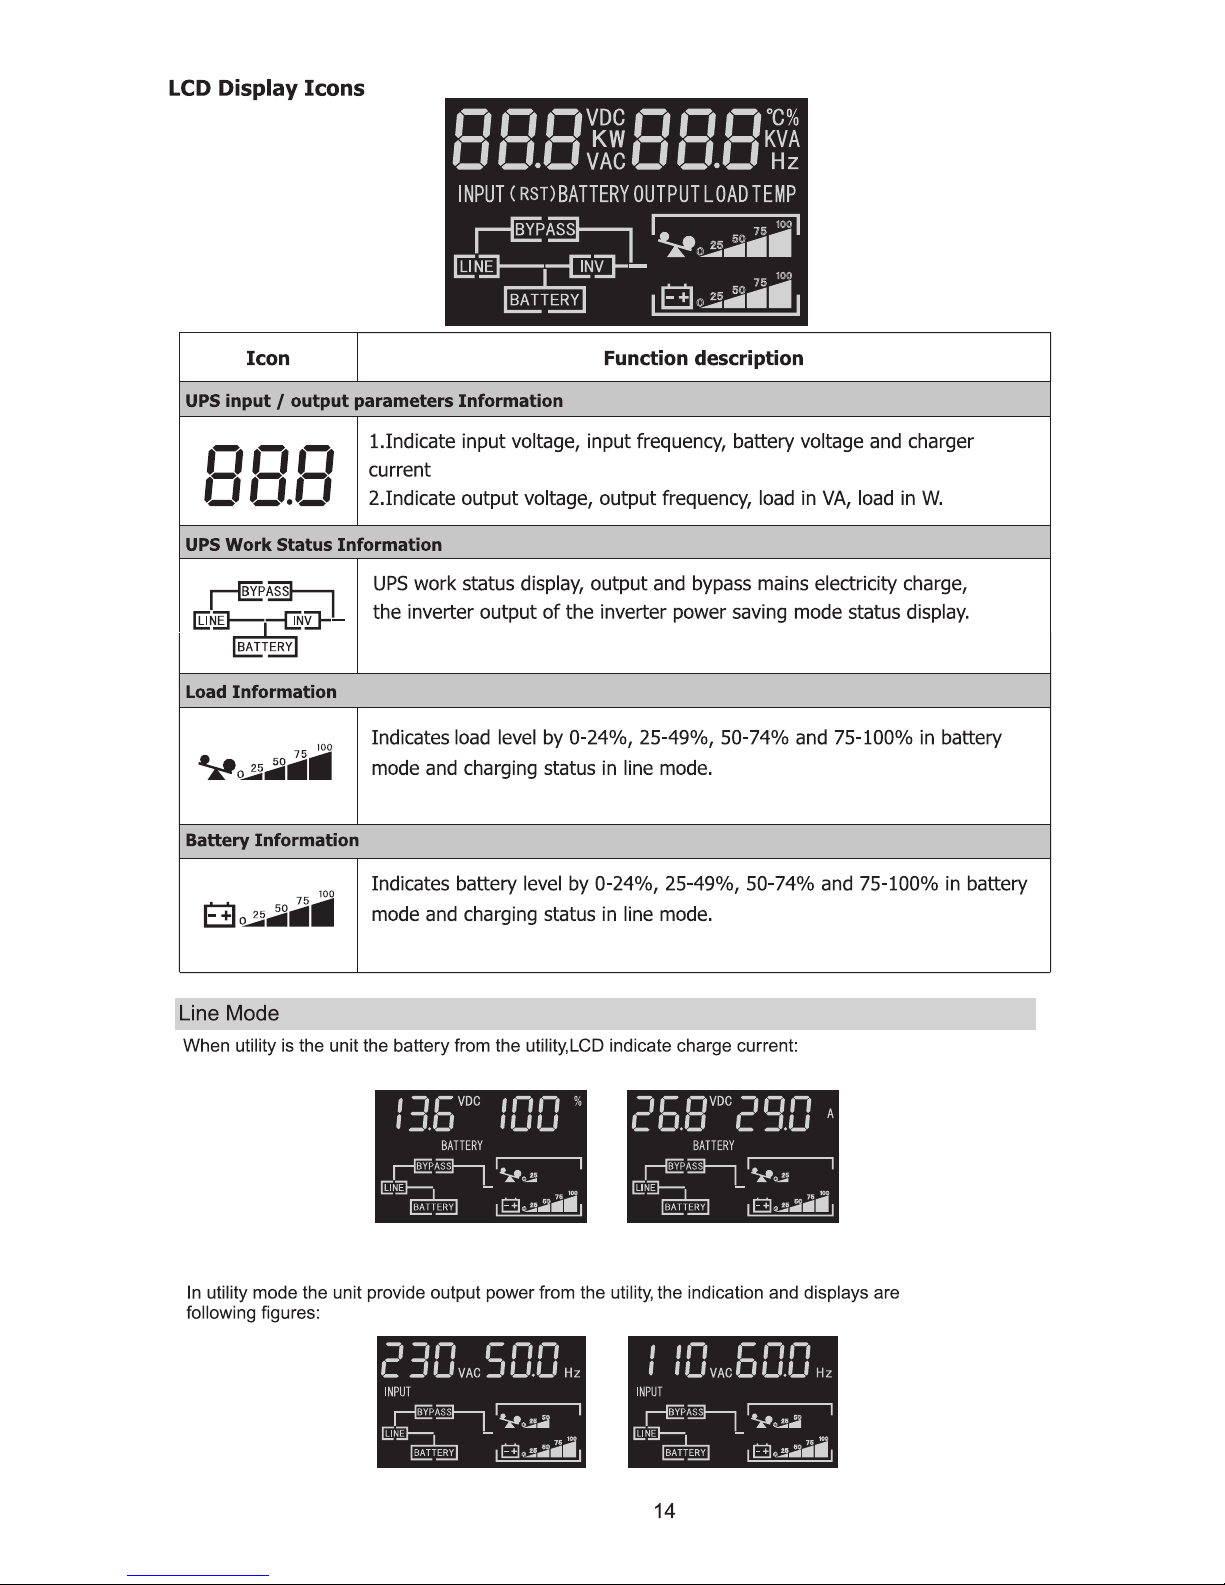
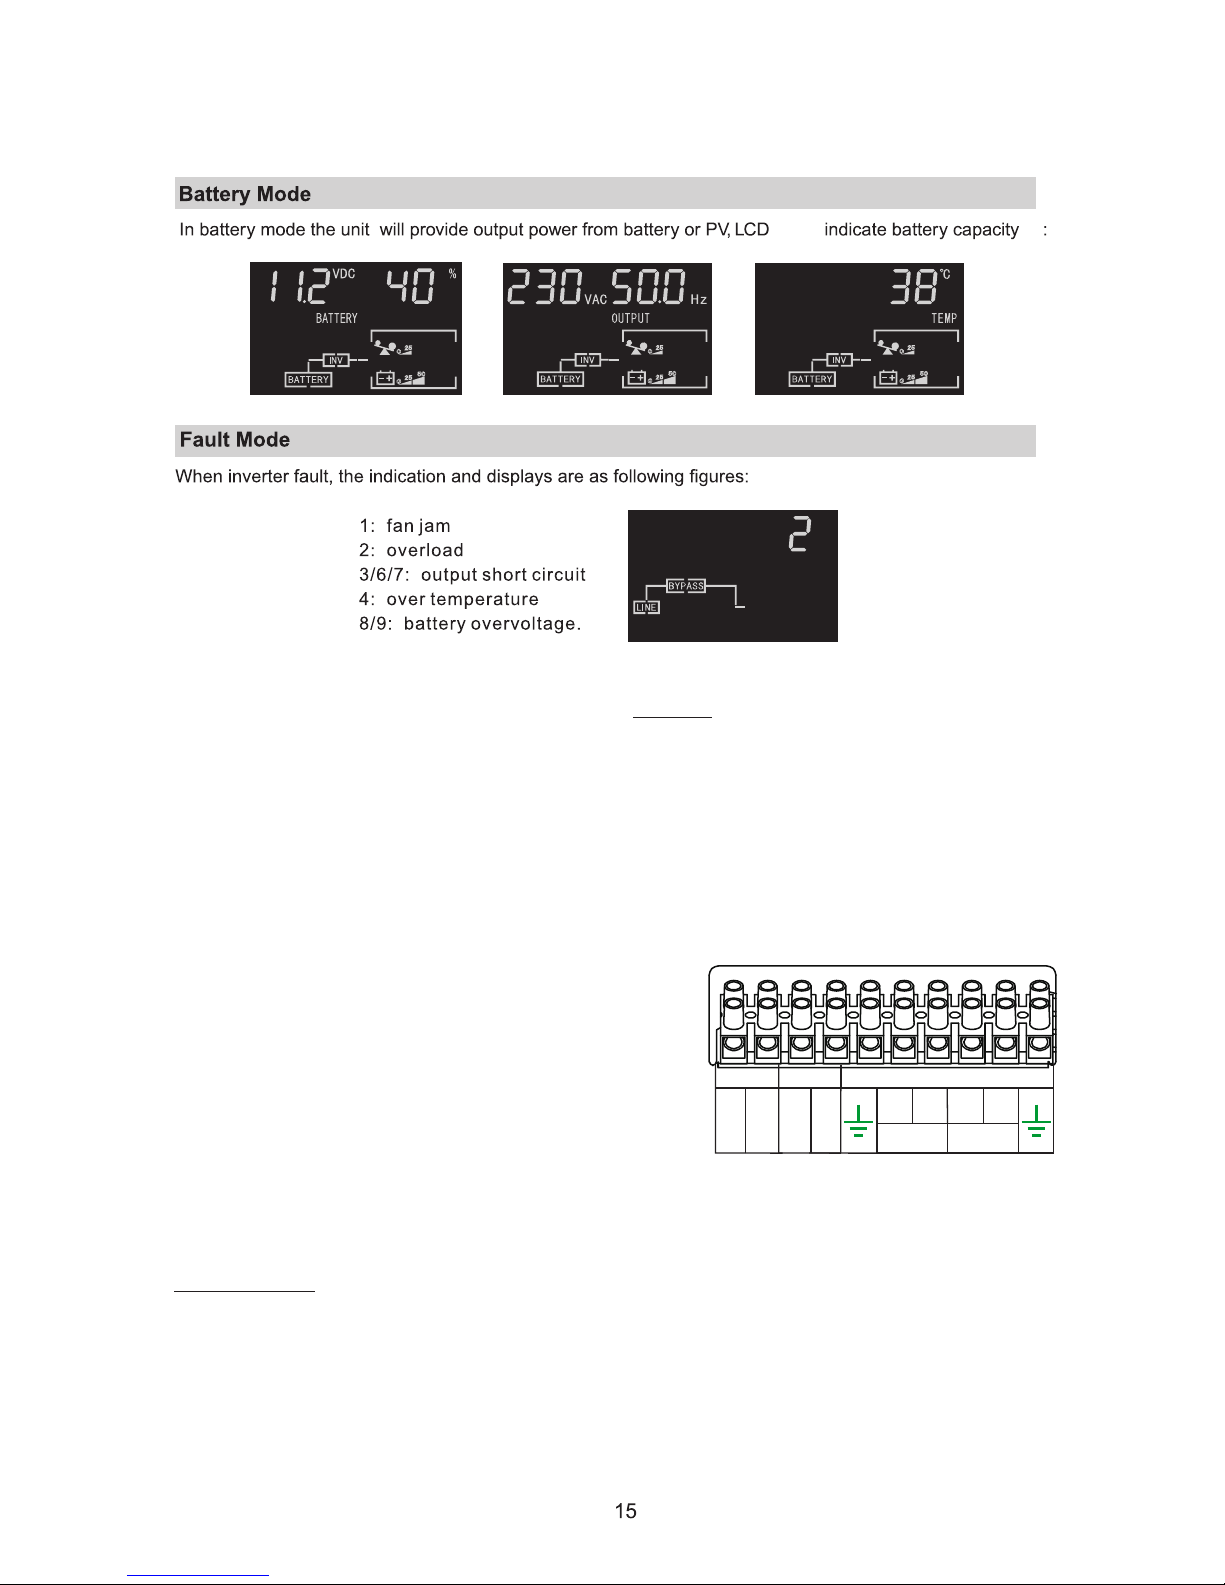
LCD Display Icons . . . . . . . . . . . . . . . . . . . . . . . . . . . . 14
Relay connections for gate operator auto open/close functions. . . 15
Operating Mode Description . . . . . . . . . . . . . . . . . . . . . . 16
Warning Code/Audible Alarm . . . . . . . . . . . . . . . . . . . . . . 19
Troubleshooting Guide . . . . . . . . . . . . . . . . . . . . . . . . . 20

Important Safety Information
í ! wb Lb Dﱡ
This manual contains important instructions for APS1000-12 & APS2000-24 models that
shall be followed during installation and maintenance of the inverters.
General Safety Precautions
1. Before installing and using the inverter/charger, read all instructions and
cautionary markings on the inverter/charger and all appropriate sections of this
guide. Be sure to read all instructions and cautionary markings for any equipment
attached to this unit.
2. Install this unit away from direct sun light and where is not exposed to water
sprinklers.
3. To reduce risk of fire hazard, do not cover or obstruct the ventilation openings.
Do not install the inverter/charger in a zero-clearance compartment. Otherwise
overheating may occur.\
4. Use only attachments recommended or sold by the manufacturer. Doing
otherwise may result in a risk of fire, electric shock, or injury to persons.
5. To avoid a risk of fire and electric shock, make sure that existing wiring is in good
condition and that wire is not undersized. Do not connect the inverter/charger
with damaged or substandard wiring.
6. Do not operate the inverter/charger if it has received a sharp blow, been
dropped, or otherwise damaged in any way. If the inverter/charger is damaged,
read the warranty section.
7. Do not disassemble the inverter/charger. It contains no user-serviceable parts.
See warranty for instructions on obtaining service. Attempting to service the
inverter/charger yourself may result in a risk of electrical shock or fire. Internal
capacitors remain charged after all power is disconnected.
8. The inverter contains more than one live circuit (batteries and AC line). Power
may be present at more than one source. To reduce the risk of electric shock,
disconnect both AC and DC power from inverter/charger before attempting any
maintenance or cleaning or working on any circuits connected to the
inverter/charger. Turning off controls will not reduce this risk.
9. Use insulated tools to reduce the chance of short-circuits when installing or
working with the inverter or the batteries.
Precautions When Working with Batteries
1. Make sure the batteries are well ventilated. Avoid blocking enclosure vents.
2. Never smoke or allow a spark or flame near the inverter or batteries.
3. Use caution to reduce the risk of dropping a metal tool on the batteries. It could
spark or short circuit the battery or other electrical parts and could cause an
explosion.
4. Remove all metal items, like rings, bracelets, and watches when working with
lead-acid batteries. Lead-acid batteries produce a short circuit current high
enough to weld metal to skin.
5. Make sure someone is close enough to aid should anything dangerous occur
when you’re working near a lead-acid battery.

6. Prepare enough fresh water and soap in case battery acid contacts skin, clothing or
eyes.
7. Wear complete eye protection and clothing protection. Avoid touching your eyes
while working near batteries.
8. If battery acid contacts skin or clothing, wash immediately with soap and water. If
acid enters your eyes, immediately flood in cold water and get medical attention
immediately.
9. If you need to remove a battery, always remove the ground terminal from the
battery first. Make sure all accessories are off so you don’t cause a spark.
10. Always use identical types of batteries.
11. Never install old or untested batteries. Check each battery’s date code label to
ensure age and type.
12. Batteries are temperature sensitive. For optimal performance, they should be
installed in a stable temperature environment.
13. Always recycle old batteries. Contact your local recycling center for proper
disposal information.
General Information
Thank you for purchasing the APS inverter series.
The inverter is a combination of an inverter, charger.
It is packed with unique features and it is one of the most advanced inverter/charger
in the market today.
The inverter features an AC bypass circuit, powering your gate operators and access
controls or any appliance from the utility power or generator power while charging the
battery. When utility power fails, the battery backup system keeps your equipment
powered until utility power is restored. Internal protection circuits prevent over-
discharging the batteries by shutting down inverter when a low battery condition
occurs. When utility or generator power is restored, the inverter transfer to the AC
source and recharges the batteries.
The series inverter can also serve as a central hub of renewable energy system. Set
the series inverter to battery priority mode to designate it to inverter-preferred UPS
configuration. In this configuration, the load power is normally provided by the inverter,
However, if the inverter output is interrupted, an internal transfer switch automatically
transfers the load from the inverter to commercial utility power. The transfer time
between inverter and line is short(6ms typically), and such transfers are normally not
detected by even highly sensitive loads. Upon restoration of battery capacity, the
inverter will transfer back to inverter power (battery).
In the line priority mode, when utility power cuts off (or drops below acceptable range),
the transfer relay is de-energized and the load is automatically transferred to inverter
output.
Once the qualified utility power is restored, the relay is energized and the load is
automatically reconnected to utility power.
It features power factor, sophisticated multi-stage charging and pure sine wave output
with unprecedentedly high surge capability to meet demanding power needs of
inductive loads without endangering the equipment.
The inverter is equipped with a powerful charger of up to 70Amp (depending on
mode). The overload capacity is 125~150% of continuous output for up to 20 seconds
to reliably support tools and equipment longer.
Another important feature is that the inverter can be easily customized to solar priority
by DIP switch, this helps to extract maximum power from solar in renewable energy
systems.
To get the most out of the power inverter, it must be installed, used and maintain
properly.
Please read the instructions in the manual before installing.
Gate operators, access control devices and accessories.
Power tools-circular saws, drills, grinders, sanders, buffers, weed and hedge trimmers, air compressors.
Office equipment such as computers, printers, monitors, facsimile machines, scanners. Household items,
vacuum cleaners, fans, fluorescent and incandescent lights, shavers, sewing machines.
Kitchen appliances-coffe makers, blenders, ice makers, toasters.
Industrial equipment-metal halide lamp, high-pressure sodium lamp.
Home entertainment electronics-television, VCRs, video gate consoles, stereos, musical instruments,
satellite equipment.
ŸPure sine wave output
ŸAC/Battery priority Via function DIP switch
ŸAuto generator start. For gate operators Auto open
relay.
ŸMax. AC charge current 35A
ŸBuilt-in pure copper transformer
ŸLow battery trip voltage 10.5V/11.0V setting
ŸAuto sense 50HZ/60HZ
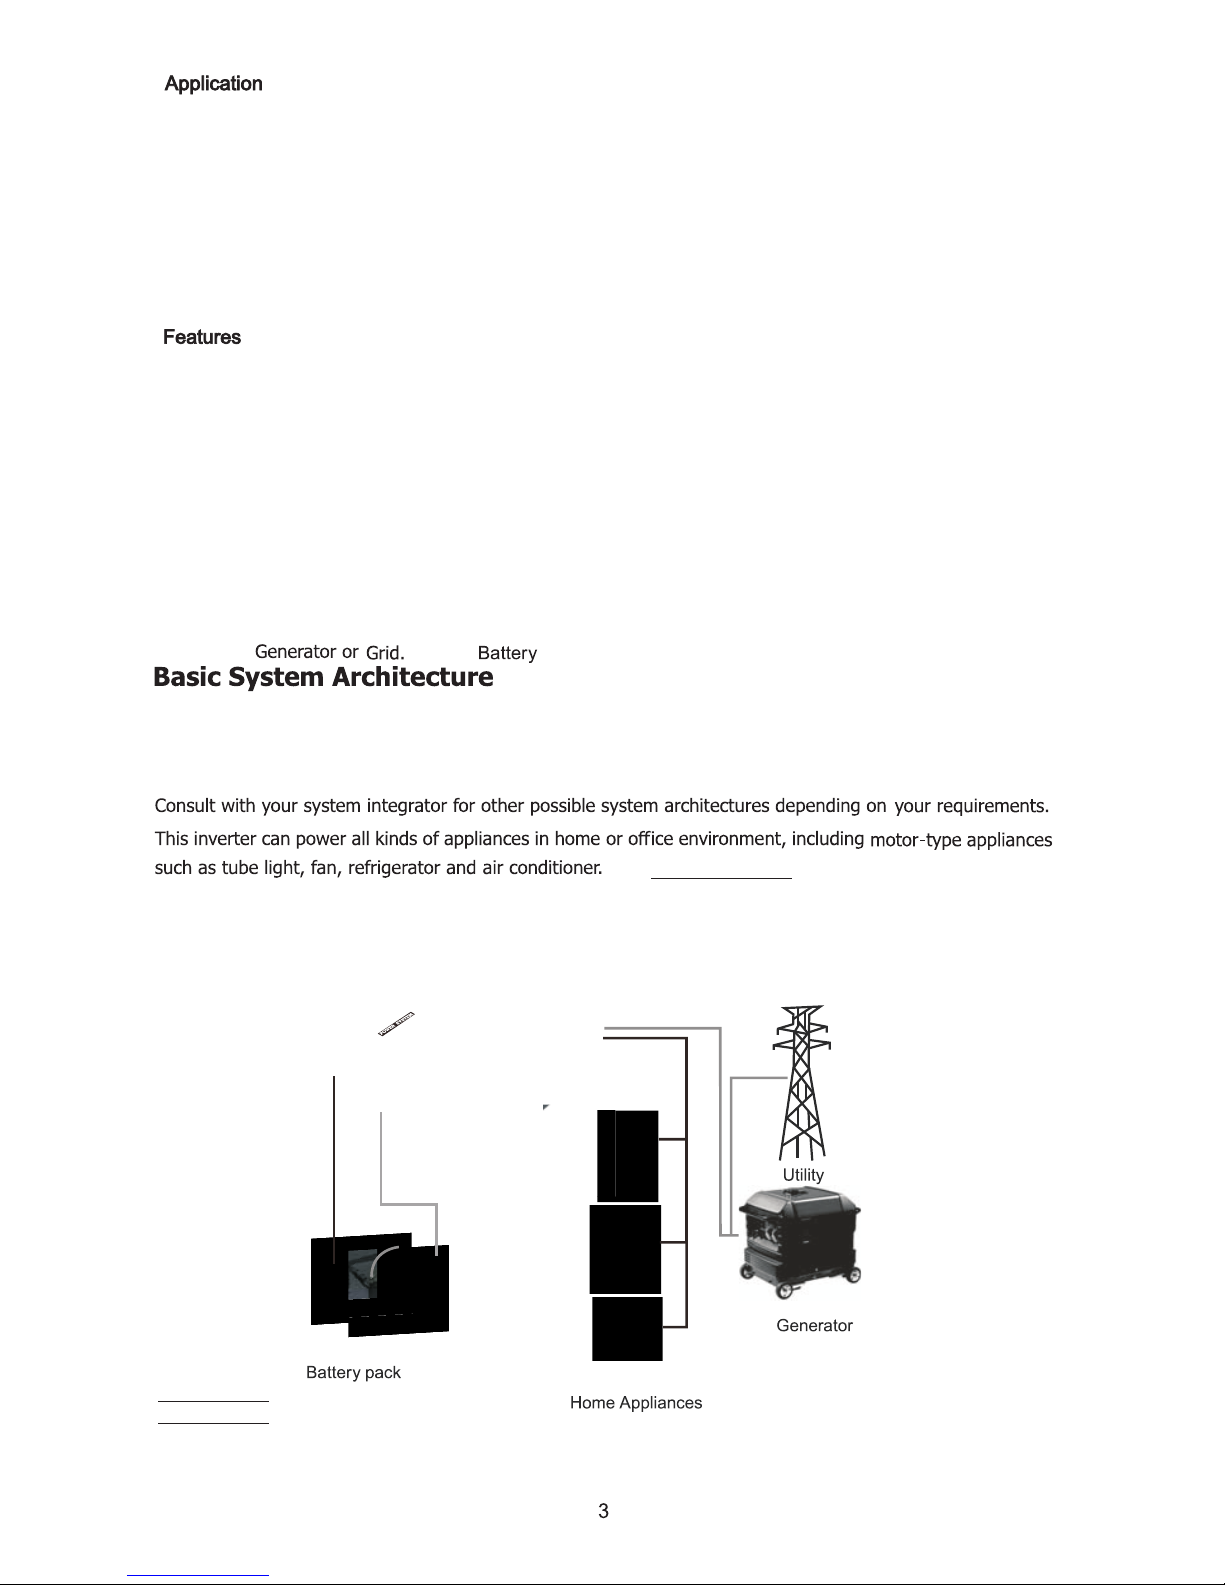
The following illustration shows basic application for this inverter. It also includes following devices to have
a complete running system:
Generator or Utility. Battery
Also Gate Operators and accessories.
APS1000-12 includes two 35Ahr batteries
APS2000-24 includes two 50Ahr batteries

Battery Type Selector
Charge Current Adjuster:25%,50%,75%,100%.

ON(Power Saver)
INVERTER OFF
ON
Connectors 8, 9 and
10 are extended to the
inverter front panel for
easy wiring.
IMPORTANT: When the inverter is
used to power Gate Operators,
switch must be in the ON position.
Not the ON (Power Saver) position.

Before installation, please inspect the unit. Be sure that nothing inside is damaged. You should see the
following items inside the main enclosure of the APS series inverters:
ŸMain inverter Unit
ŸTwo Batteries
35Ahr for APS1000-12
50Ahr for APS2000-24
ŸBattery breaker on the left side inside
enclosure
ŸAC Input/Output and relay connector on
inverter front panel
Mounting the unit
Consider the following before selecting where to install the unit:
ŸDo not install the inverter on flammable construction materials.
ŸMount on a solid surface.
ŸInstall the inverter at eye level in order to read the LCD display clearly.
ŸFor proper air circulation to dissipate heat, leave at least 3” gap above, below and
sides of the inverter enclosure.
ŸThe ambient temperature should be between 0ºF and 105ºF to ensure optimal
operation.
ŸThe recommended installation position is to be against the wall horizontally.
SUITABLE FOR MOUNTING ON CONCRETE OR OTHER NON-COMBUSTIBLE
SURFACE ONLY.
Mounting holes behind
packaging foam
Mounting holes
Install the unit using 4 screws on four mounting holes

Battery Connection
CAUTION: For safety and regulation compliance, it’s requested to install a separate DC
over-current protector between battery and inverter. DO NOT bypass the over-current
breaker that’s installed between inverter and batteries. Doing so, will increase the risk of
fire and possible harm to persons.
DC Wiring Recommendation
It is recommended the battery bank be kept as close as possible to the inverter. the
following is the recommended wiring options for 3 feet long cable.
APS series inverters use 4AWG cable that meet or exceed this requirement. If there is a
need to replace the battery cables, you must use the proper size to handle the power.
If Batteries need to be moved outside the inverter enclosure and need to extend the cable,
also increase the wire gauge thickness.
0-3 feet
1000W 2000W
0-3 feet
Two Batteries 4AWG BATTERY
CABLE
Over-Current
Breaker
One cable is always best, but cable is just copper and copper is what’s required, so it does
not matter if you use one cable or 10 cables as long as the square are adds up.
Performance of any product will be improved by thicker cable and shorter runs, so it is
recommended to keep the cables as short as possible.
Please follow steps below in case battery cables need to be replaced:
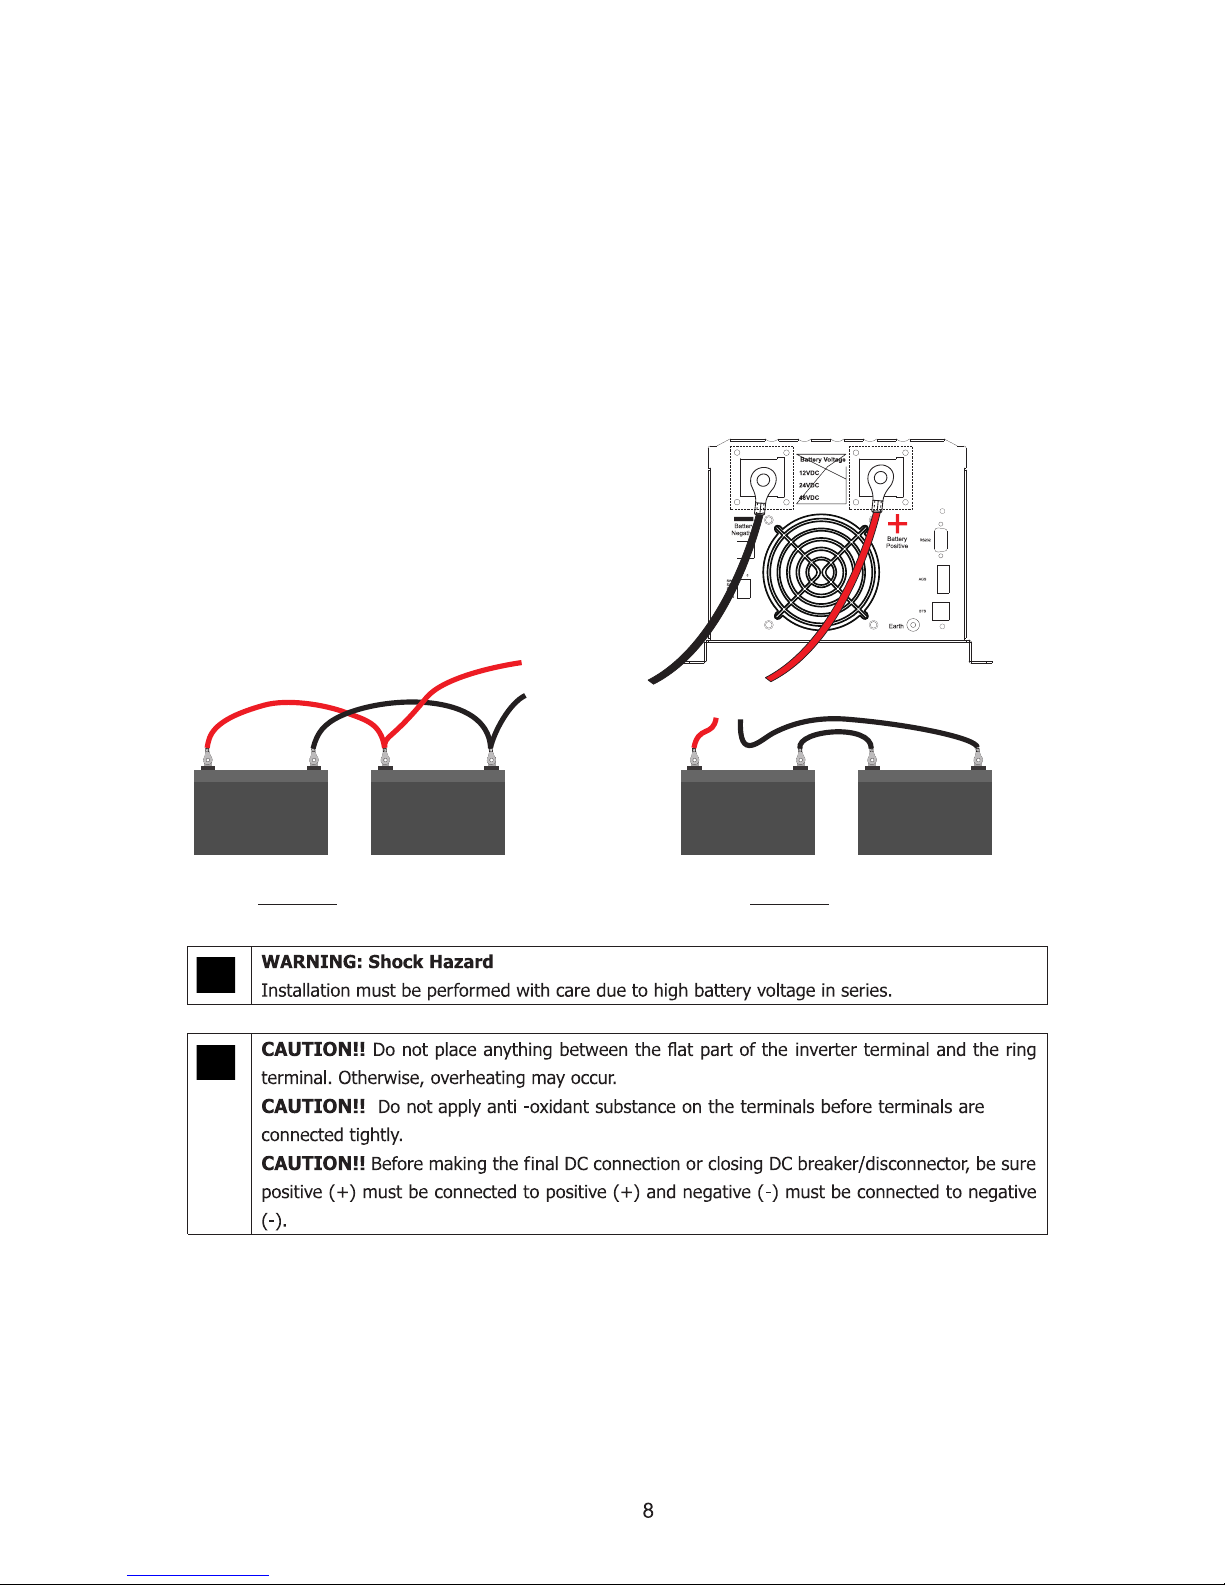
1. Install battery ring terminals on recommended cable and terminal size.
2. Connect battery pack as unit requires. APS1000-12 must have batteries connected in
parallel, and the APS2000-24 in series.
NOTE: Please only use Sealed Lead Acid or Sealed GEL/AGM Lead-Acid Batteries.
3. Connect ring terminals of battery cable into inverter battery connector and make sure
bolts are tightened. Make sure polarity is correct at both ends of the cable (battery
terminals and inverter connectors) and that ring terminals are tightly screwed to battery
terminals.
+
+
+
+
+
- -
--
-
APS1000-12 Main battery bank, 12VDC.
(35Ahr included) wired in parallel. APS2000-24 Main battery bank, 24VDC.
(50Ahr included) wired in series.
PARALLEL
SERIES
++
- -
12V
24V
12V
35Ahr
12V
35Ahr 12V
50Ahr
12V
50Ahr
APS1000-12
APS2000-24
AC Input/Output Connection
Caution!! Before connecting AC input power source, please install a separate AC breaker
between inverter and AC input power source. This will ensure the inverter can be safely
disconnected during maintenance and fully protected from over current of AC input. The
recommended AC breaker is 30A for both APS1000-12 and APS2000-24 models.
Caution!! Please don’t connect the output AC to “Grid” terminals nor connect the grid to the
“Load” terminals. Doing so will permanently damage inverter.
WARNING! All wiring must be performed by a qualify person.
WARNING! It’s very important for system safety and efficiency operation to use appropriate
cable for Grid connection. To reduce risk of injury, please use the recommended proper
cable size as below.
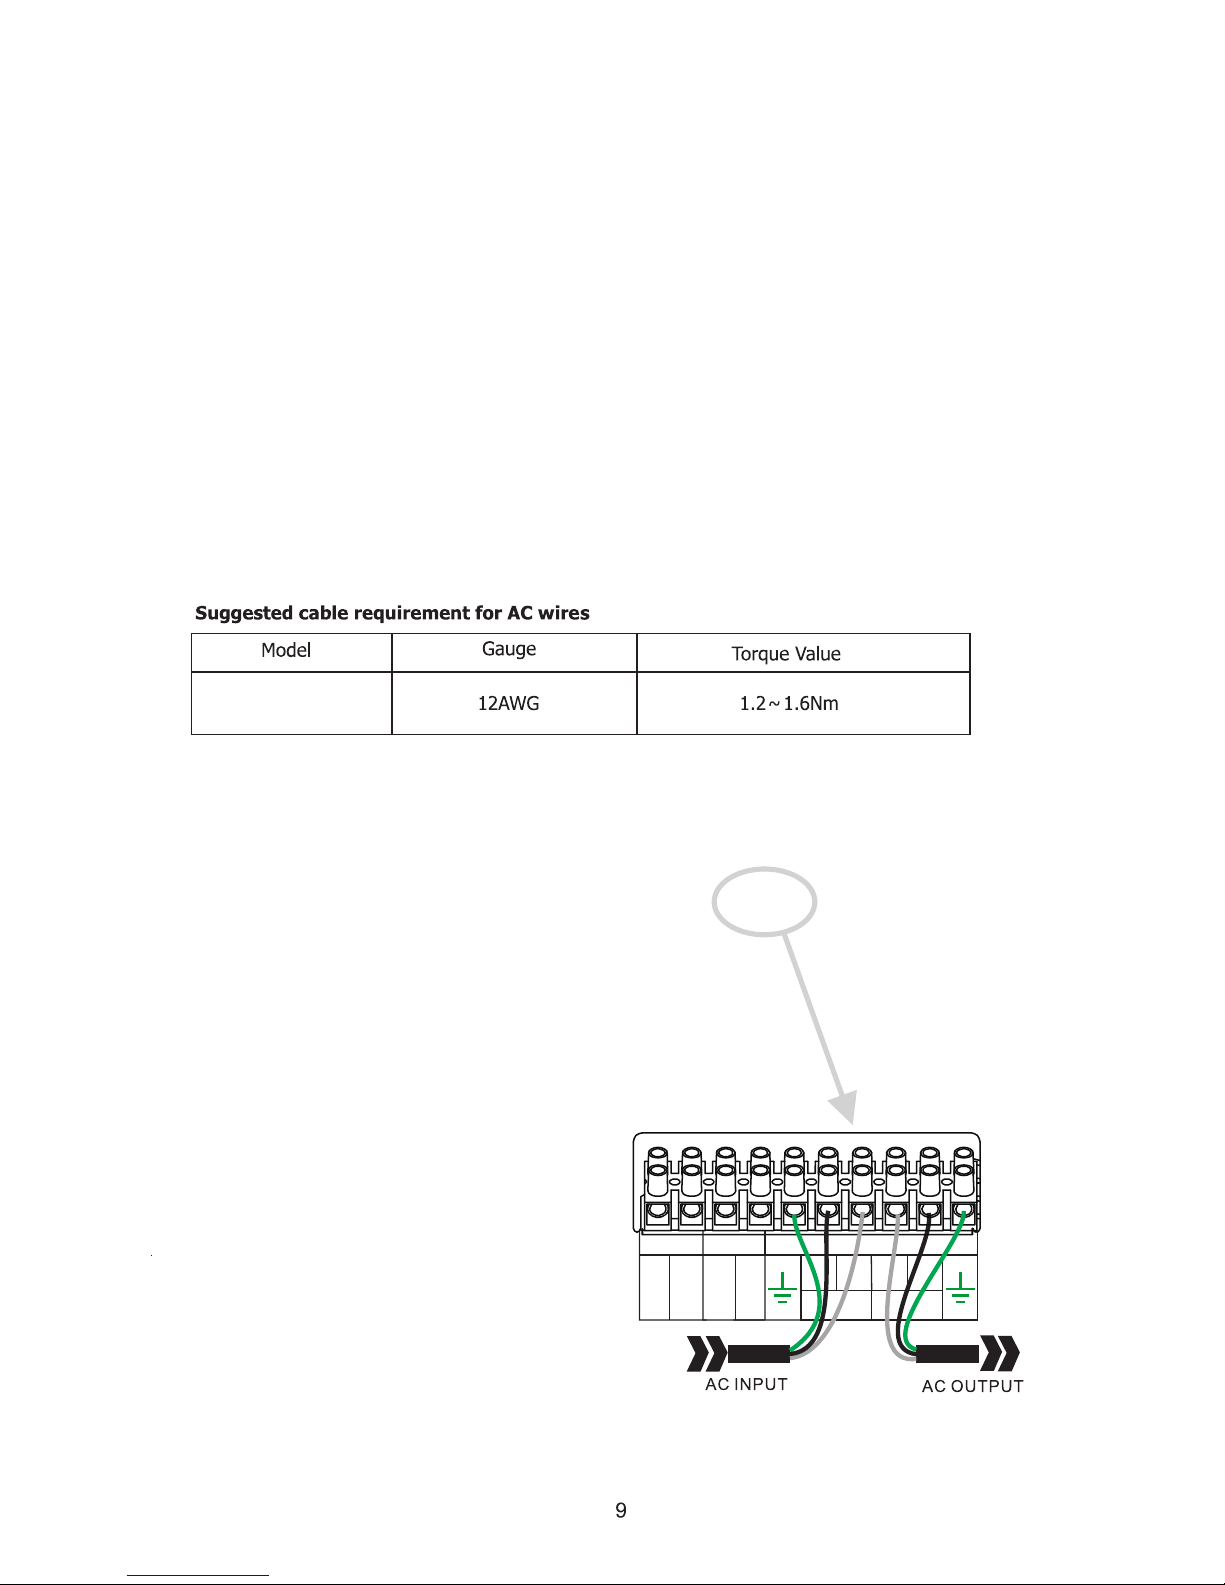
AC Wiring
We recommend using 12AWG wire to the AC terminal block. If the inverter is installed
farther than 70 feet from main power source, wire gauge must be sized properly to avoid
big voltage drops. Be sure all wiring is UL compliant, call our tech support if you are not
sure how to wire any part of the inverter.
WARNING! It’s very important to do the wiring correctly on battery terminals and high
voltage AC side.
120V AC 60Hz 1000W
L LN N
INPUT OUTPUT
RLY 1
COMMON
N.O.
RLY 2
COMMON
N.O.
AC Wiring (120VAC, Single phase, 60Hz)
Input: Groung +Hot line +Neutral (Main Source)
Output: Neutral +Hot line +Ground (Load)
120V AC 60Hz 1000W
L LN N
INPUT OUTPUT
RLY 1
COMMON
N.O.
RLY 2
COMMON
N.O.
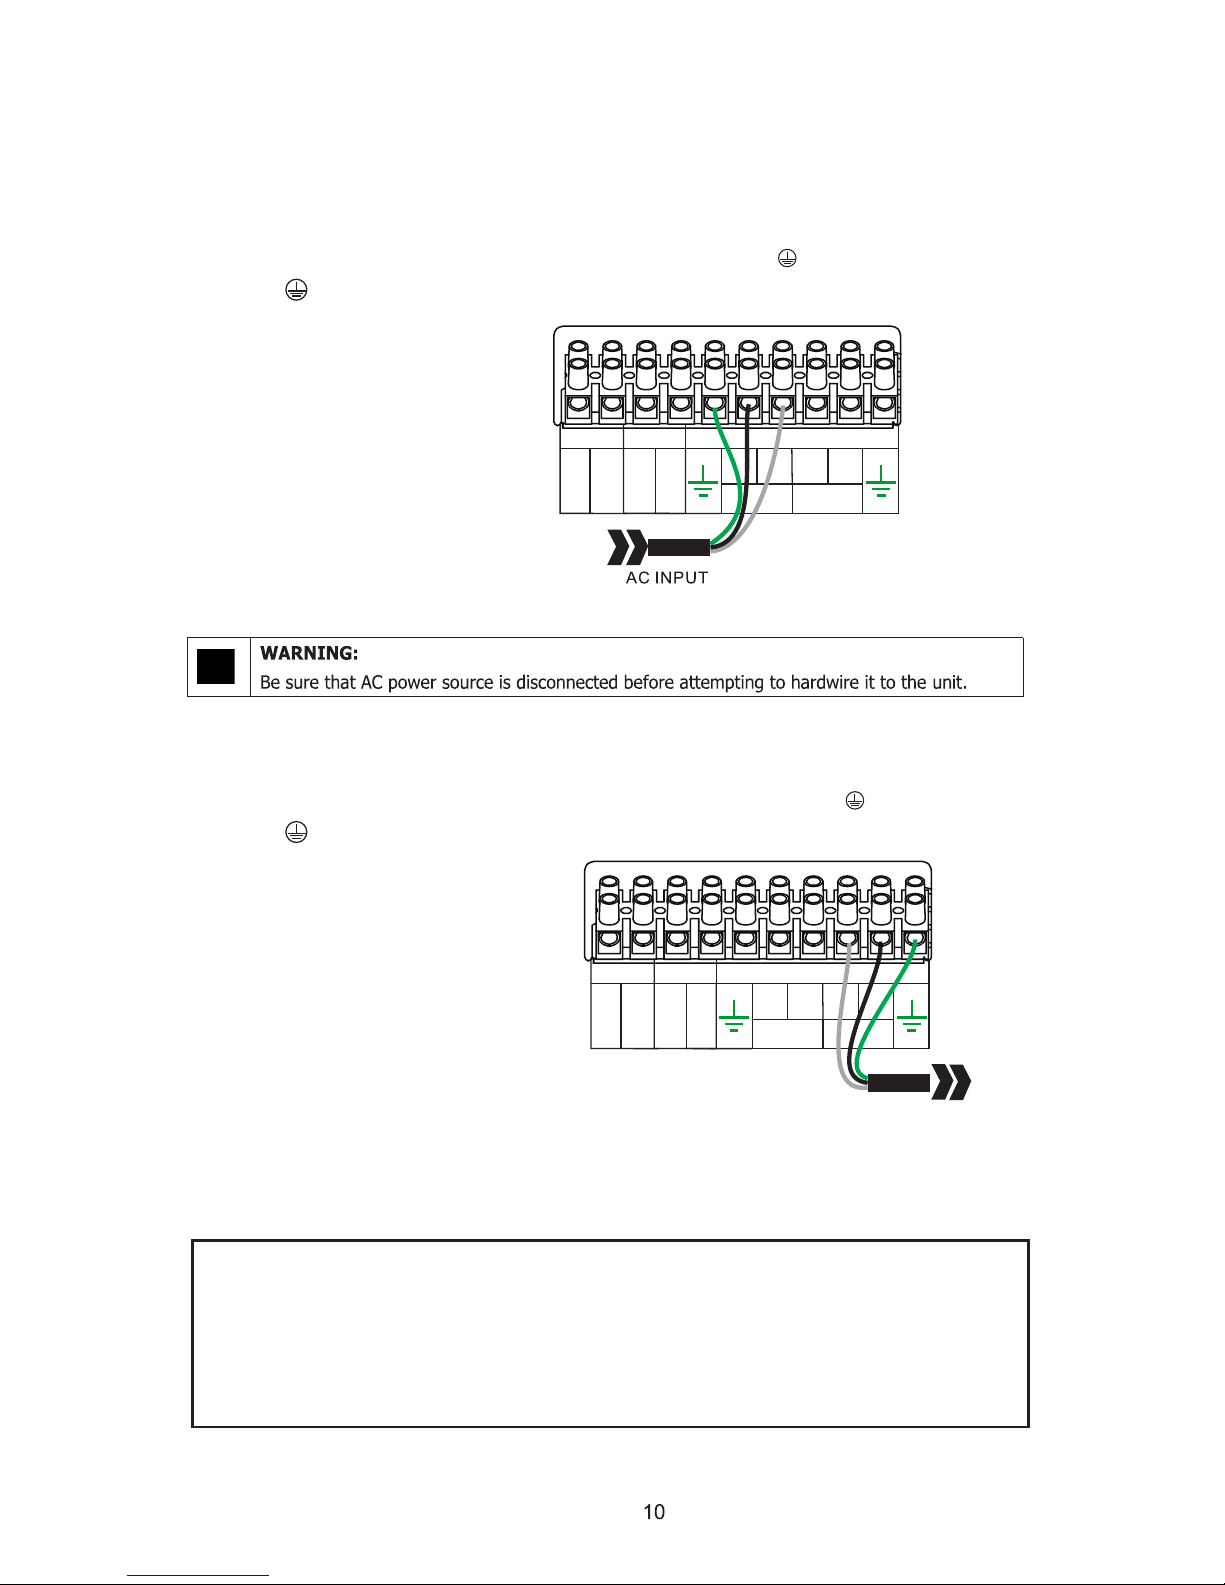
Please follow these steps to connect inverter to Load/Grid:
1. Before making Load/Grid connection, be sure to open DC protector/breaker first.
2. Strip each individual wire/conductor about 3/8”.
3. Connect grid wires according to polarity indicated on terminal block and tighten the
terminal screws. Be sure to connect protective earth conductor ( ) first.
-> Ground (green)
L-> LINE (black)
N-> Neutral (white)
4. Then, connect Load (output) wires according to polarity indicated on terminal block and
tighten terminal screws. Be sure to connect protective earth conductor ( ) first.
-> Ground (green)
L-> LINE (black)
N-> Neutral (white)
120V AC 60Hz 1000W
L LN N
INPUT OUTPUT
RLY 1
COMMON
N.O.
RLY 2
COMMON
N.O.
AC output
(load)
5. Make sure all wires are securely connected.
CAUTION: Appliances such as air conditioner require at least 2~3 minutes to restart
to have enough time to balance refrigerant gas inside of circuits. If a power outage
occurs and recovers in a short time, it will cause damage to your connected appliance.
To prevent this kind of damage, please check manufacturer of air conditioner if it’s
equipped with time-delay function before installation. Otherwise, this inverter will
trigger overload fault and cut off output to protect your appliance but it is still possible
it will cause internal damage to the air conditioner.
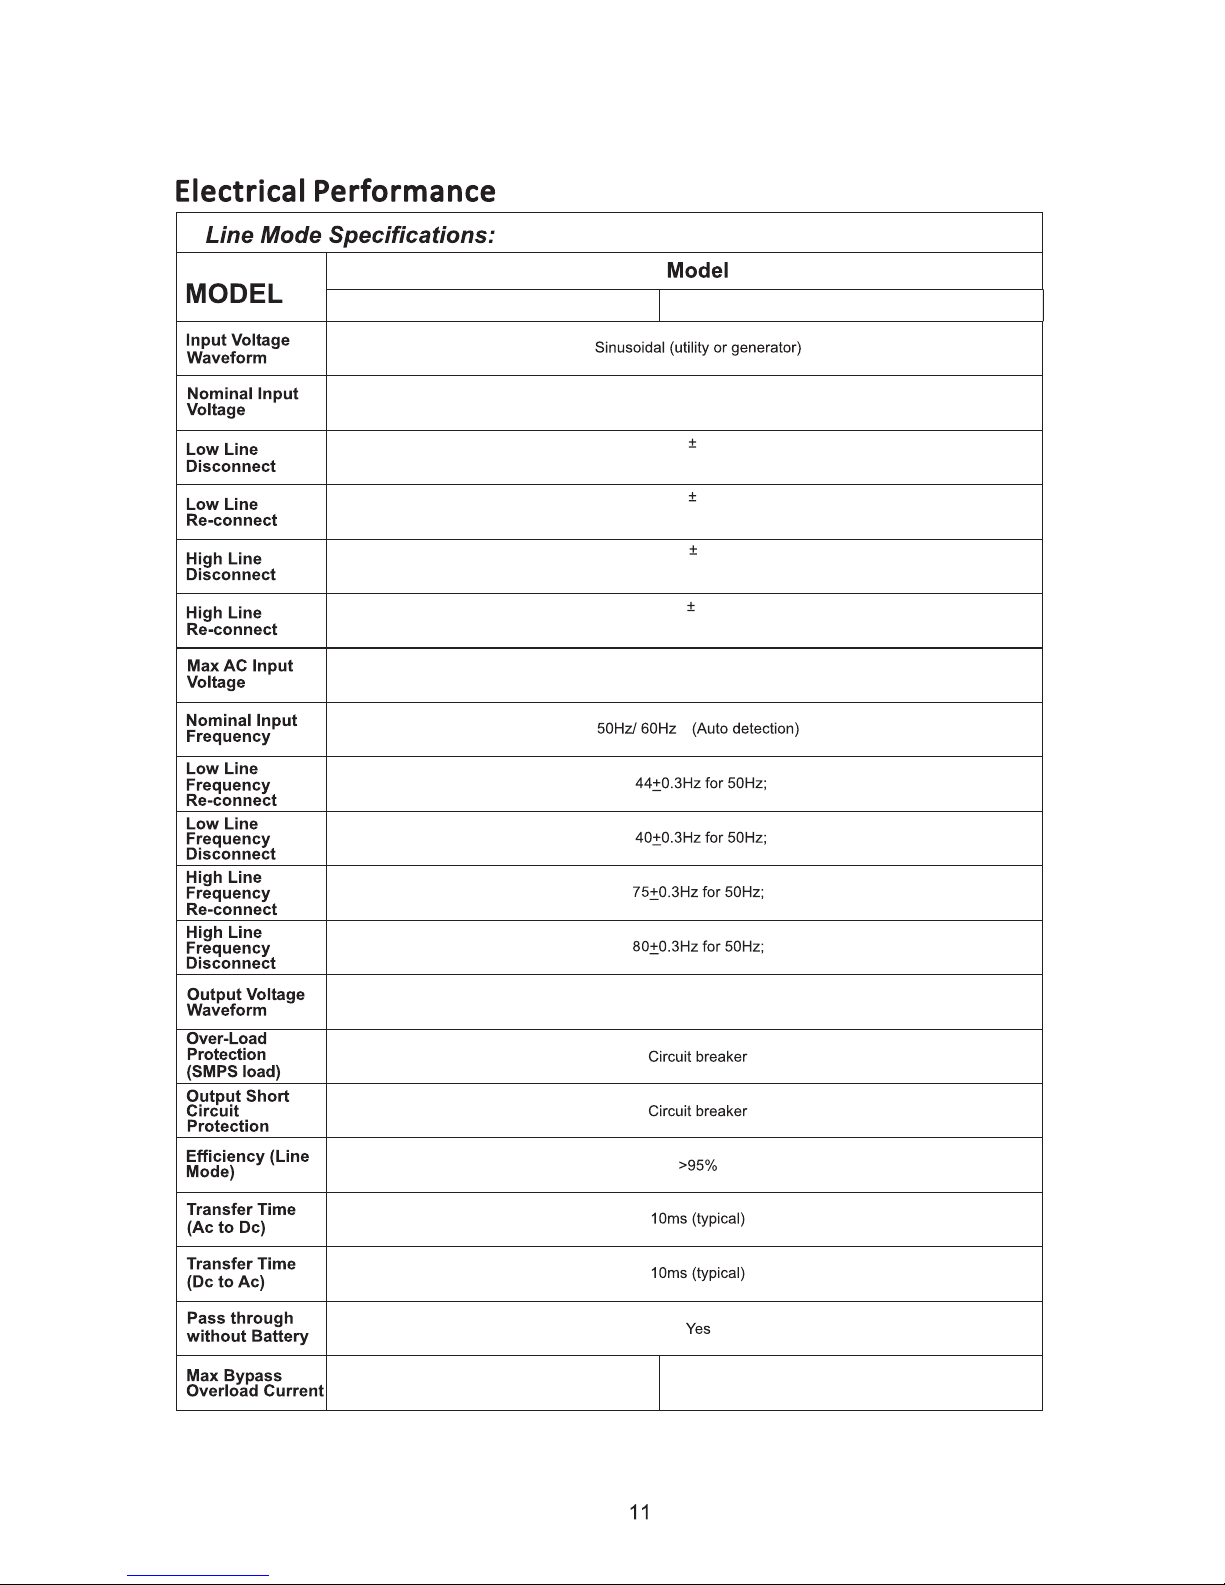
120Vac
75Vac 2%
80Vac 2%
140Vac
140Vrms
135Vac
2%
2%
30A 40A
APS1000-12 APS2000-24
Same as Input Waveform

120VAC
APS1000-12 APS2000-24
2,000VA 4,000VA
Instant Reverse Gate Motors
Two 1/2 HP or One 1HP Instant Reverse Gate Motors
Four 1/2 HP or Two 1HP
11Vdc ± 0.3Vdc
22V
11V
22Vdc ± 0.6Vdc
10.5Vdc ± 0.3Vdc 21Vdc ± 0.6Vdc
16Vdc ± 0.3Vdc 32Vdc ± 0.6Vdc
15.5Vdc ± 0.3Vdc 31Vdc ± 0.6Vdc
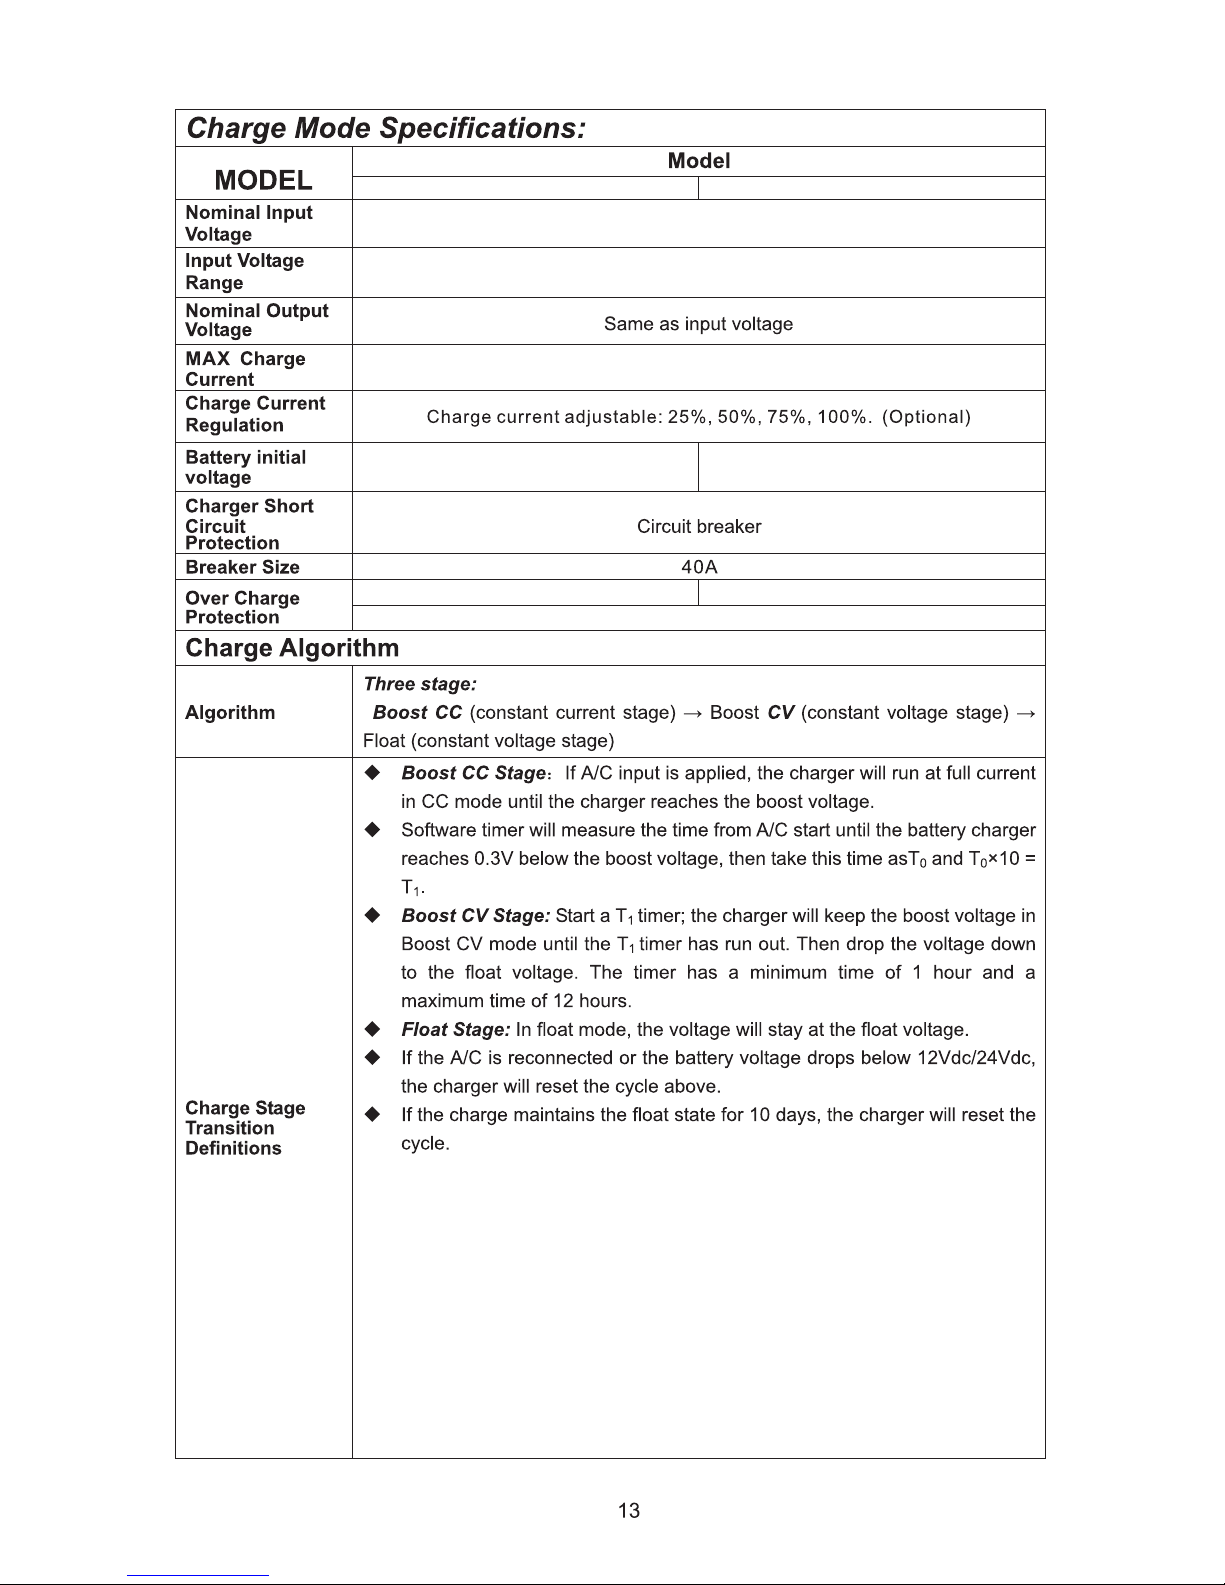
120Vac
75-140Vac
10.5-15.7Vdc
35A
APS1000-12 APS2000-24
21V-31.4Vdc
≥15.7Vdc
≥31.4Vdc
Alarm beeps 0.5s second & Fault after 60s
Auto generator start (AGS)
There is an extra connector in front of the inverter (Relay 2) used to start a generator or to
trigger a gate operator to open the gate before battery runs out of power. If the utility power is
abnormal and single battery discharges below 11VDC, the inverter will send out a signal to
either a generator start circuit or to a gate operator to trigger the gate to open. Once the battery
is charged to 13.5VDC or higher, the signal will deactivate and switch to normal operation.
Auto AC power off signal
Includes a relay N.O. contact used to trigger a gate operator to open the gate on AC utility
power failure. Once AC utility power fails, the relay will trigger the signal.
120V AC 60Hz 1000W
L LN N
INPUT OUTPUT
RLY 1
COMMON
N.O.
RLY 2
COMMON
N.O.
Relay Function for gate operators:
RELAY 1: Activates immediately after a power outage. I
can be to trigger a gate operator to open the gate. One
time open. It will stay active until power is restored.
RELAY 2: Activates after a power failure and battery
voltage has reached the low level threshold. It could be
used to trigger a gate operator to open before battery is
fully depleted.
Using this relay to trigger a gate to open, will allow a
gate operator to run on battery backup but will ensure
gate opens before battery fails.
For Failsafe connect to gate operator OPEN CMD
For Failsecure connect to gate operator CLOSE_CMD

120VAC 75-140VAC 95-140VAC
*2 for APS2000-24
SW3 Power saver auto setting check load every 5s
check load every 30s
SW5 Battery/AC priority setting Utility priority Battery priority
For APS1000-12, the low battery trip volt is set at 11.0VDC for sealed lead acid battery. It
can be changed to 10.5VDC using Sw1 for deep cycle lead acid battery, this is to prevent
batteries from over-discharging while there is only a small load applied on the inverter. (*2
for APS2000-24)
There are different acceptable AC voltage input ranges for different kinds of loads. For
some relatively sensitive electronic devices, a narrow input range of 95-140 VAC is
required to protect them.
While for some resistive loads which work in a wide voltage range, the input AC range can
be customized to 75-140VAC, this helps to power loads with the most AC input power
without switching to battery bank. For gate operators we use the setting 75-140VAC
By default the inverter is set to detect the load for 250ms every 5 seconds. This cycle can
be customized to 30 seconds through the Sw3 DIP switch. Note: Power saver mode should
not be used when using inverter for a gate operator.
Set the inverter frequency while in battery mode.
The inverter is designed with AC priority by default. This means, when AC input is present,
the battery will be charged first, and the inverter will transfer the input AC to power the load.
Only when AC input is stable for a continuous period of 15 days, the inverter will start a
battery inverting cycle to protect the battery. After 1 cycle normal charging and AC will be
restored and go back to bypass mode.
Low trip to AC model
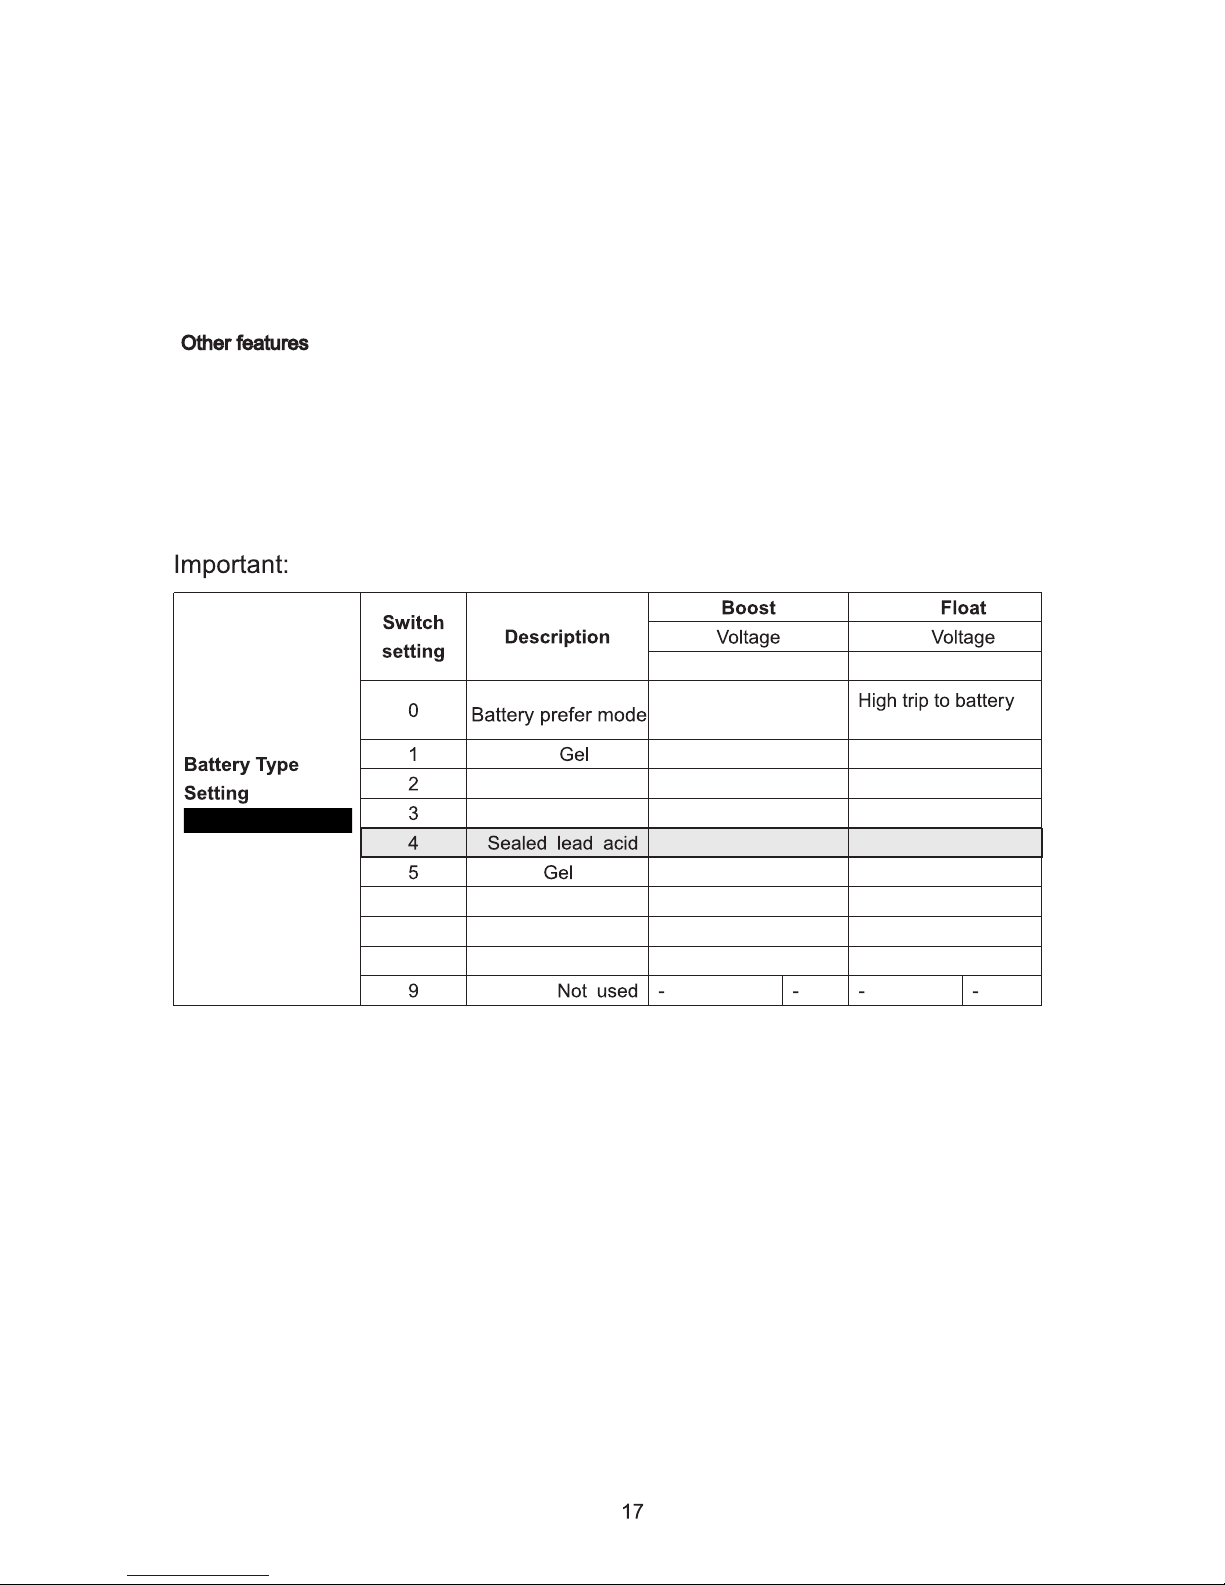
Note: APS series inverter include Sealed Lead Acid Batteries. If different chemistry batteries are used,
this setting must be adjusted to match the charging voltage appropriate for the type of battery.
The AC priority and battery priority switch is SW5. When switch is set to battery priority, the inverter
will run on battery power even if AC input is present. Only when the battery voltage reaches the low
voltage threshold (11.5V for 12V & 23V for 24V). The inverter transfers to AC input, charges battery,
and switches back to battery when it is fully charged. This function is mainly for wind/solar
applications and utility power is strictly backup. But it could also be useful in locations where a lot of
brow-outs happen.
Battery voltage restart
After low battery voltage shut off (10.5V for 12V model / 20V for 24V model), the inverter is able to
restore operation after the battery recovers to 13V for 12V model and 26V for 24V model (with power
switch still in the “ON” position). This function helps to save the users extra work reactivating the
inverter when the low battery voltage returns to an acceptable range in the renewable energy
systems. the built in battery charger will automatically reactivate as soon as utility/generator ac has
been stable for 15 seconds.
APS1000-12/APS2000-24 APS1000-12/APS2000-24
AGM 1
11.5V/23V
AGM 2
EURO
Open lead acid
De sulphation
7 Calcium
13.4V/27.4V
USA 14V/28V
14.1V/28.2V
14.6V/29.2V
14.4V/28.8V
14.4V/28.8V
14.8V/29.6V
15.1V/30.2V
15.5V/31V
13.4V/26.8V
13.7V/27.4V
13.6V/27.2V
13.3V/26.6V
13.8V/27.6V
13.6V/27.2V
4 hours then off
14V/28V
By restarting the inverter. Turn it OFF and back ON.
This manual suits for next models
1
Table of contents


