ALLSAT COME2ASCOS User manual

QUICK REFERENCE
COME2ASCOS UND COME2ASCOS BLUE
ALLSAT GmbH
Am Hohen Ufer 3A 30159 Hannover Germany
Telefon +49 (0)511 30 399 – 0 Telefax +49 (0)511 30 399 –
Internet: http://www.allsat.de
eMail: in[email protected]

QUICK REFERENCE COME2ASCOS AND COME2ASCOS BLUE
1
Last update: 18.12.2008

QUICK REFERENCE COME2ASCOS AND COME2ASCOS BLUE
2
TABLE OF CONTENTS
Overview come2ascos and come2ascos blue.......................................... 3
Installation ........................................................................................ 4
SIM card ........................................................................................5
Configuration in general...................................................................
Configuration Software ....................................................................7
Create configuration string manually ...............................................12
Configuration by SMS ....................................................................15
Configuration by HyperTerminal......................................................15
Configuration of the Bluetooth connection ........................................1
Assembly come2ascos ...................................................................18
Assembly come2ascos blue ............................................................19
Charging ......................................................................................... 19
Operation ........................................................................................ 20
Status informations .......................................................................... 22
Performance Optimization.................................................................. 23
Technical Data come2ascos ............................................................... 24
Technical Data come2ascos blue......................................................... 25
Connector........................................................................................ 25

QUICK REFERENCE COME2ASCOS AND COME2ASCOS BLUE
3
OVERVIEW COME2ASCOS AND COME2ASCOS BLUE
come2ascos is a fully automatic modem for correction data over GPRS and
GSM connections. An internal NTRIP client supports IP-based GPRS
connections as well as direct dial-in connections via GSM to different
reference services or an own reference station. The unit automatically logs
onto the reference station specified or the reference station within the
shortest distance to the GNSS rover. Information about different reference
stations (sources) is automatically updated through the Internet.
Status information about the come2ascos device can be requested either
by SMS or via serial interface.
The connection for correction data can be controlled by NMEA messages
from your GNSS receiver or by the function button.
come2ascos is manufacturer independent and can be used as a correction
data modem for different GNSS receivers.
You need a GSM card, if necessary an additional GPRS tariff, for operation.
As a supplier for correction data you can use reference services like ascos
in Germany or your own reference station. GSM net coverage must be
sufficient within the area you plan to measure.
come2ascos is designed for stationary use, use in a vehicle and as a
correction data module for mobile GNSS systems. For mobile applications
ALLSAT has developed a Bluetooth connection and an internal power
supply as an add-on under the label come2ascos blue, which make the
come2ascos blue the ideal partner in mobile applications.
This quick reference serves as a help for installation and provides
important hints to the handling. As come2ascos blue is an add-on to the
come2ascos the description of the come2ascos also fits to the come2ascos
blue. Product specific characteristics of the come2ascos blue are marked
explicitly.

QUICK REFERENCE COME2ASCOS AND COME2ASCOS BLUE
4
INSTALLATION
To configure the come2ascos once please follow the steps mentioned below
in the short overview. Each single step will be explained in detail later on.
-Change the PIN of your SIM card to 2204.
-Open the front of the enclosure carefully.
-Insert the SIM card into the GSM/GPRS modem.
-Mount the front panel again.
-Plug the come2ascos device to your Personal Computer using the
configuration cable.
-Supply the come2ascos device with stabilized power within a voltage
range from 8 to 13.5 Voltage.
-Start the configuration software and choose the serial interface at your
Personal Computer.
-Perform your individual settings and transmit the configuration.
-For come2ascos blue: Connect the additional module to your Personal
Computer using the configuration cable and switch it on.
-For come2ascos blue: Configure the Bluetooth connection if necessary.
-Integrate the come2ascos device into your system. Here for plug in
data and power supply cable.
-Switch on the come2ascos device and the GNSS receiver.
-Configure your GNSS receiver for NMEA output to the come2ascos
device.

QUICK REFERENCE COME2ASCOS AND COME2ASCOS BLUE
5
SIM CARD
You need a valid SIM card to register at GSM net. If you would like to use
internet based connections you need an additional activation of GPRS.
Please clarify the details with your provider. We suggest negotiating a
volume or flat tariff with your provider.
come2ascos requires 2204 as SIM card PIN. Please verify the PIN before
inserting the SIM card into the modem as otherwise you would have to
unlock the SIM with the PUK after three failed attempts before you can use
the SIM card again. You will find the function for changing the PIN in the
menu “settings” in many mobile phones.
Please note: All saved SMS drafts on your SIM card will be deleted. The
come2ascos device saves the configuration on the SIM card as an unsent
SMS.
To insert the SIM card please loosen the screws at the front of the
enclosure and dismount the front panel carefully. Please avoid tensile
stress at the cables between PCB and front panel.
Insert the SIM card according to figure 1 into the SIM card slot of the
modem and notice the position of the recessed corner. Afterwards mount
the front panel again. To remove the SIM card later, simply push it slightly
further into the modem and let it jump out by the spring mechanism.
figure 1

QUICK REFERENCE COME2ASCOS AND COME2ASCOS BLUE
CONFIGURATION IN GENERAL
GSM respectively GPRS connection settings will be saved persistently on
the SIM card as well as all parameters of the reference service. Once
configured the come2ascos doesn’t need to be reconfigured unless the SIM
card is used ulterior or you wish to change some settings.
In principle there are three different ways to configure the come2ascos
device:
- by come2ascos configuration software from ALLSAT
- by terminal program via serial interface
- by SMS
In the two last-mentioned cases the configuration string has to be created
manually. You will find detailed information in the chapter “Fehler!
Verweisquelle ko te icht gefu de werde .”.
In this quick reference guide the configuration by the user friendly
configuration software will be explained in the following.
Unless you haven’t received a CD with the come2ascos configuration
software, you can download a zipped package from this URL
http://www.allsat.de/download/Software/come2ascos/come2ascos.zip.
An installation is not required; instead you can use the Configuration
Software on Windows 2000 and XP platforms by simply copying the folder
into a local directory.

QUICK REFERENCE COME2ASCOS AND COME2ASCOS BLUE
7
CONFIGURATION SOFTWARE
Before you can start with the configuration the following requirements have
to be fulfilled:
-A valid SIM card is inserted into the modem according to the preceding
chapter.
-A GSM antenna is connected to the device.
-The come2ascos device is supplied by stabilized power between 8 and
13.5 Voltage.
-The come2ascos device is connected to a serial interface of your
Personal Computer by the configuration cable.
Then proceed with the following steps:
-Switch on the power supply. The come2ascos device will register at the
GSM net and indicate this state by a quickly flashing yellow LED.
Please wait until the flashing fades to a slower frequency after about
30 seconds.
-Push the function button for about two seconds until the green and
yellow LED flash quickly. The device is in pause mode now.
-Start the .exe file of the configuration software. A dialog shown in
figure 2 opens. Choose the serial port of your Personal Computer
which the come2ascos device is connected to. Click “Connect”.
figure 2

QUICK REFERENCE COME2ASCOS AND COME2ASCOS BLUE
8
figure 3

QUICK REFERENCE COME2ASCOS AND COME2ASCOS BLUE
9
The configuration dialog shown in figure 3 will appear. Here you can enter
your individual configuration settings. The meaning of the items will be
explained in detail below.
SERIAL INTERFACE
As long as it is not necessary to change the baud rate, leave it at 9 00
baud, which is approved and common for correction data transmission.
CONNECTION TYPE
By this radio button you make the general choice, if the connection is built
up modem-to-modem via GSM whether a GPRS internet connection is
used. Accordingly the dialog mask for both connection types differs.
GPRS SETTINGS (GPRS)
Provider dependant parameters for the internet access are specified in this
field. A pre-selection of the mostly used providers in Germany can be
accessed by the drop-down list instead of manual input. If your provider is
not listed it is explained below how you can add your individual entries to
the pre-defined settings.
CORRECTION DATA SETTINGS (GPRS)
In this field the login details of your reference service provider are set. You
will receive username and password from your reference service provider.
Some ascos services are already pre-defined. If you choose a pre-defined
setting also the optional parameters are included automatically.
OPTIONAL PARAMETERS (GPRS)
„Set static mount point“ allows to set the mount point manually.
„Disable source table download“ disables the source table download. The
come2ascos will not select a suitable mount point automatically, but go
directly to the manually specified one.
„Require GGA message“ activates control by GGA messages from your
GNSS receiver.
„Disable control by NMEA“ can be used for modem tests without a GNSS
receiver connected. The connection will be built up without receiving GGA –
just to see if dialling in works. Afterwards the reference service will cut the
connection because a GGA is normally needed.

QUICK REFERENCE COME2ASCOS AND COME2ASCOS BLUE
10
figure 4

QUICK REFERENCE COME2ASCOS AND COME2ASCOS BLUE
11
GSM SETTINGS (GSM)
For special applications you can select a certain type of modulation.
Standard setting is „Autobauding, non transparent“.
CORRECTION DATA SETTINGS (GSM)
GSM users are authenticated by their telephone number of the SIM card.
Thus, solely the target telephone number of the reference service is set
here. Pre-defined settings for ascos services can be used.
OPTIONAL PARAMETERS
Compared to GPRS connections two NTRIP specific settings are not needed
here. Only the settings for GGA control and test mode are needed here.
To transmit the configuration to the come2ascos device push the button
“Configure Device”. The writing process needs several seconds while the
come2ascos device should not be disconnected from power supply.
The button „Read Settings from Device“ displays the current configuration
of the come2ascos device.
You can create your individual configuration settings as pre-defined items
in the drop-down boxes by editing the text file Settings.txt in the directory
of your configuration software. To create a new entry, simply add a new
line. Notice the syntax: Values are separated by semicolons. The key words
PROVIDER, SERVICE_GPRS and SERVICE_GSM specify, in which drop-down
list the new entry will appear. The Syntax in detail:
PROVIDER;[provider name];[GPRS gateway];[username];[password];
SERVICE_GPRS;[identifier];[IP address];[port];[mount point];[disable
source table download];[require GGA];
SERVICE_GSM; [identifier];[tel. number];[require GGA];[test mode];

QUICK REFERENCE COME2ASCOS AND COME2ASCOS BLUE
12
CREATE CONFIGURATION STRING MANUALLY
First a configuration string has to be created before the come2ascos device
can be configured by SMS or via terminal program. A configuration string is
composed by different single parameters which will be described in the
following together with their range of values.
Syntax of a configuration string for GPRS connections:
[IDENTIFIER] CONFIG,NTRIP,[BAUD_RATE],[GPRS_GATEWAY],
[GPRS_USER],[GPRS_PASSWORD],[URL]:[PORT],[USER]:[PASSWORD],
[OPTIONAL_PARAM]
Syntax of a configuration string for GSM connections:
[IDENTIFIER] CONFIG,MODEM,[BAUD_RATE],MODUL:[MODULATION],
DIAL:[TEL_NUMMER],[OPTIONAL_PARAM]
Parameters’ semantics:
[IDENTIFIER]: An identifier can be set as an optional parameter
in order to distinguish between different
configuration strings stored in your mobile phone
easier. Choose a speaking name. Please note
that the maximum SMS length of 1 0 characters
is not exceeded. Blanks and special characters
cannot be used.
[BAUD_RATE]: 4K8, 9K , 19K2, 38K4 and 57K are possible
values for the baud rate at the serial interface.
Unless it is not urgently necessary leave the
baud rate at the common and approved setting
9K .
[GPRS_GATEWAY]: URL or simply IP address of the internet gateway
of the telephone provider.
[GPRS_USER], Username for internet access. username and
password are not personal, but public login

QUICK REFERENCE COME2ASCOS AND COME2ASCOS BLUE
13
combinations for GPRS access. The
authentication is realized by the SIM card. Some
providers use the empty username and
password; others don’t check this combination at
all.
[GPRS_PASSWORD]: Password for internet access. See [GPRS_USER].
[URL]: URL or simply IP address of the reference
service.
[PORT]: Port at the correction data server. The port is
separated from the URL by a colon.
[USER]: Username for identification of the user account
at the reference service. You will receive your
individual login combination by your reference
service.
[PASSWORD]: Password associated to the username. Username
and password are separated by colon.
[MODULATION]: Unless a certain modulation type is not
necessary for special applications use the
standard setting „autobauding“. For configuration
use the keyword MODUL and set the code
number for the modulation type behind it,
separated by a colon. The code numbers are
listed in the following table:
Code Modulation Verbindungselement
10 Autobauding Non transparent
14 V.22 Bis 2400 Non transparent
1 V.32 4800 Non transparent
17 V.32 9 00 Non transparent
114 V.32 14400 Non transparent
1 8 V.110/X.31 2400 Non transparent
170 V.110/X.31 4800 Non transparent
171 V.110/X.31 9 00 Non transparent
175 V.110/X.31 14400 Non transparent
04 V.22 Bis 2400 Transparent
0 V.32 4800 Transparent
07 V.32 9 00 Transparent
0 8 V.110/X.31 2400 Transparent
070 V.110/X.31 4800 Transparent

QUICK REFERENCE COME2ASCOS AND COME2ASCOS BLUE
14
071 V.110/X.31 9 00 Transparent
[TEL_NUMMER]: Telephone number to the modem access of a
reference service or an own reference station.
[OPTIONAL_PARAM]: Further parameters can be optionally set by
adding them to the configuration string,
separated by comma:
MOUNT:[MOUNTPOINT] allows to specify a
certain mount point manually. The keyword
MOUNT is followed by a colon and the name of
the source. This parameter is reserved for GPRS
connections.
SKIP-TABLE is a keyword that disables the
source table download. This setting makes sense
in combination with a manually specified mount
point as the source table download and an
automatic choice of a suitable reference station
is needless then. This parameter is reserved for
GPRS connections.
NEED-GGA is a keyword that must be set if the
reference service uses the VRS concept and
therefore requires receiving GGA messages in
certain time intervals. At the same time the
come2ascos is controlled by GGA messages: If
no GGA is received for 90 seconds the unit logs
off until it receives a GGA message again.
SKIP-NMEA allows disabling the GGA control for
test purpose. The device connects to the
reference service even without receiving GGA
messages. Thus, it is possible to test the
connection to the reference service without
connecting a GNSS receiver to the come2ascos
device. The reference service will neglect the
request if a GGA is needed. NEED-GGA and
SKIP-NMEA cannot be set at the same time as
they are opposed to each other.

QUICK REFERENCE COME2ASCOS AND COME2ASCOS BLUE
15
CONFIGURATION BY SMS
To perform a configuration by SMS, simply send the created configuration
string to the telephone number of the SIM card inserted in the come2ascos
device. The come2ascos device is supposed to be in pause mode.
An example for a configuration string
CONFIG,NTRIP,9K ,web.vodafone.de,,, 2.180.42.5 :2101,user:geheim,
MOUNT:01-ascos,SKIP-TABLE,NEED-GGA
for using a Vodafone D2 SIM card and the ascos PED service with GPS and
GLONASS.
CONFIGURATION BY HYPERTERMINAL
For configuration by HyperTerminal the come2ascos device is accessed via
serial interface. The configuration string is created like described in the
chapter “Create configuration string manually”. Additionally the string is
exceeded by the Prefix “$PSLL,” and ends with a line feed “<CR NL>”.
Connect the come2ascos device to the serial interface of your Personal
Computer using the configuratino cabel. Configure the interface with these
parameters:
9 00 baud, 8 data bits, 1 stop bit, no parity, no flow control.
In HyperTerminal navigate to the dialog File -> Properties -> Settings ->
ASCII Setup… and activate the check boxes in front of the entries „Send
line ends with line feeds“ and „Echo typed characters locally”.
An example for a configuration string
$PSLL,CONFIG,NTRIP,9K ,internet.t-d1.de,t-d1,gprs, 2.180.42.5 :2101,
user:geheim,MOUNT:02-ascos,SKIP-TABLE,NEED-GGA<CR NL>
for using a T-D1 SIM card and the ascos PED service with GPS.
QUICK REFERENCE COME2ASCOS AND COME2ASCOS BLUE
1
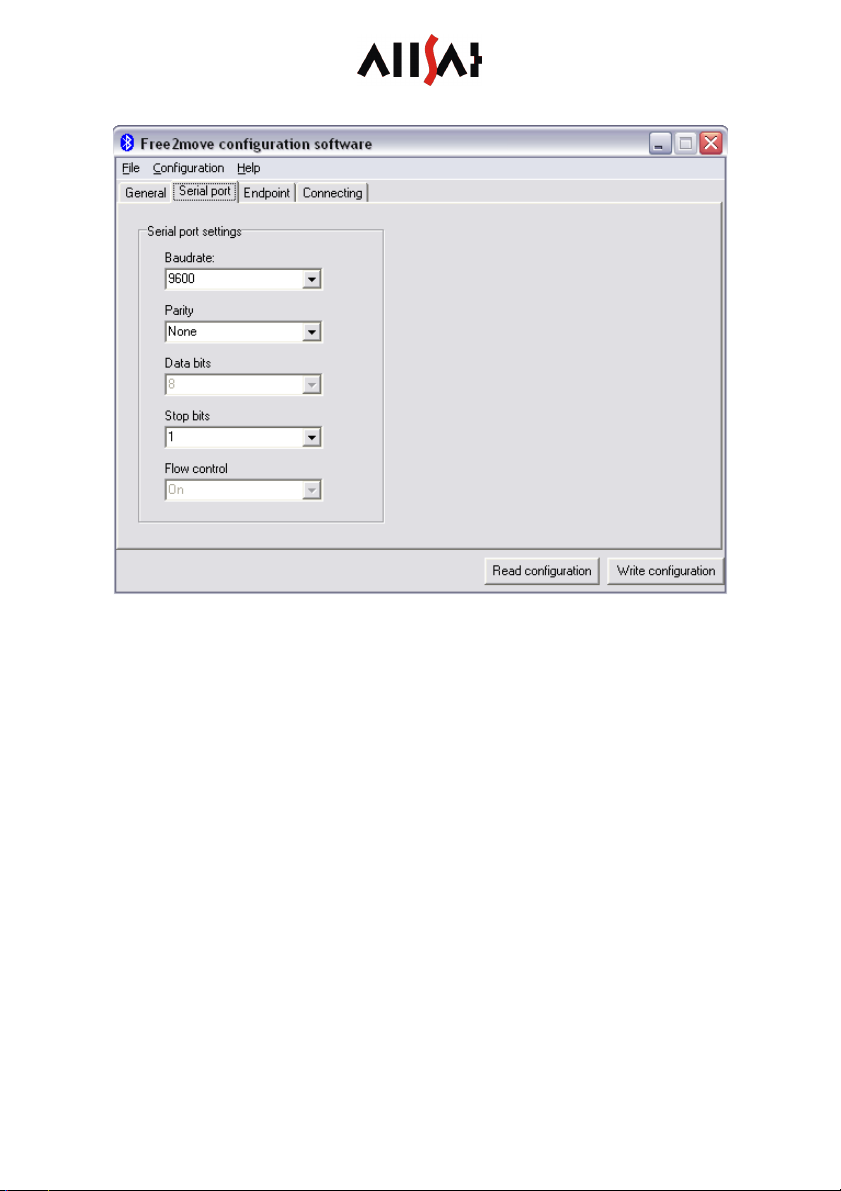
CONFIGURATION OF THE BLUETOOTH CONNECTION
The come2ascos blue will be delivered to you by ALLSAT in its standard
configuration unless you haven’t desired a special configuration. The
Bluetooth device is configured as a slave (passive communication partner).
The interface configuration is shown in figure . The device is visible and
receives calls. Thus, every other active communication partner can built up
a connection to the Bluetooth device.
For further setting options concerning the Bluetooth connection please take
a look into the Free2move user guide.
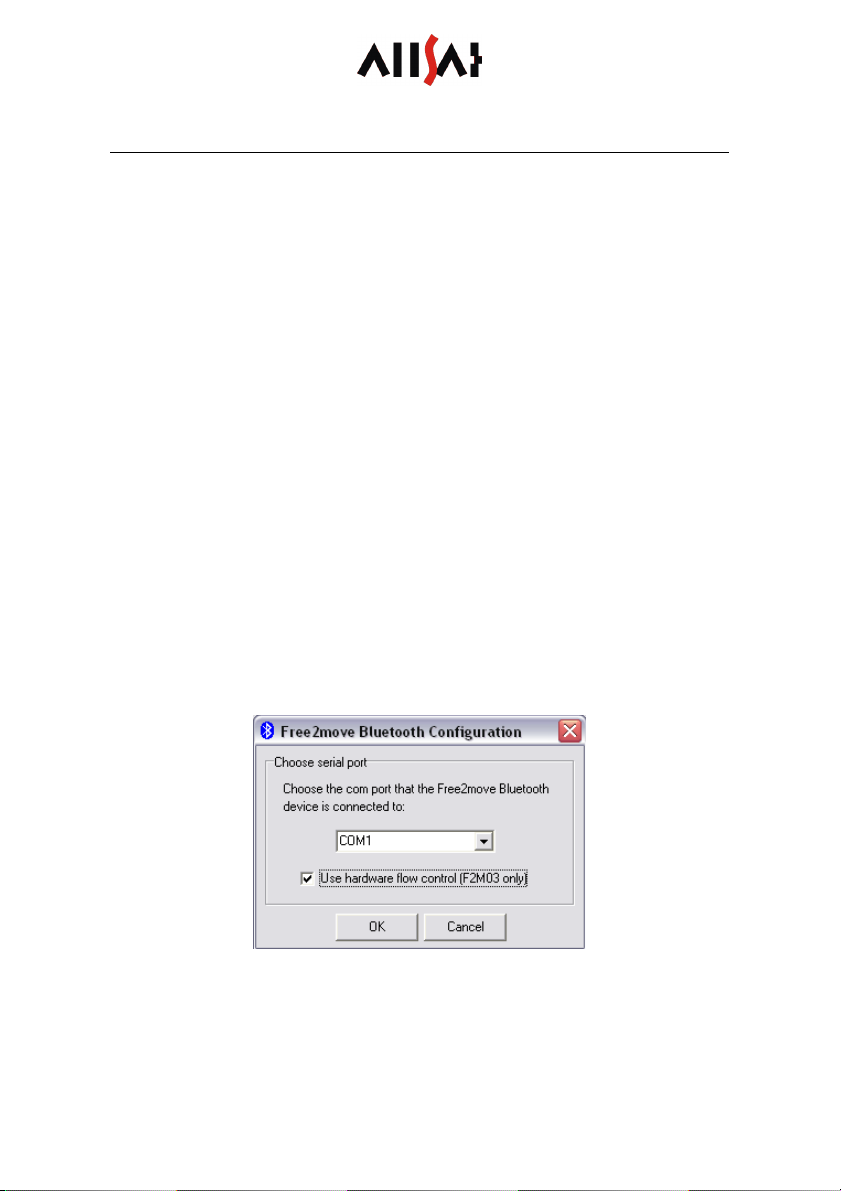
To perform a configuration
-connect the add-on module of the come2ascos blue to your Personal
Computer using the configuration cable,
-switch on the add-on module by the power switch,
-start the configuration software and
-choose the COM port at your Personal Computer which the device is
connected to as shown in figure 5,
-activate „Use hardware flow control“ and press “OK”.
figure 5
QUICK REFERENCE COME2ASCOS AND COME2ASCOS BLUE
17
figure
QUICK REFERENCE COME2ASCOS AND COME2ASCOS BLUE
18
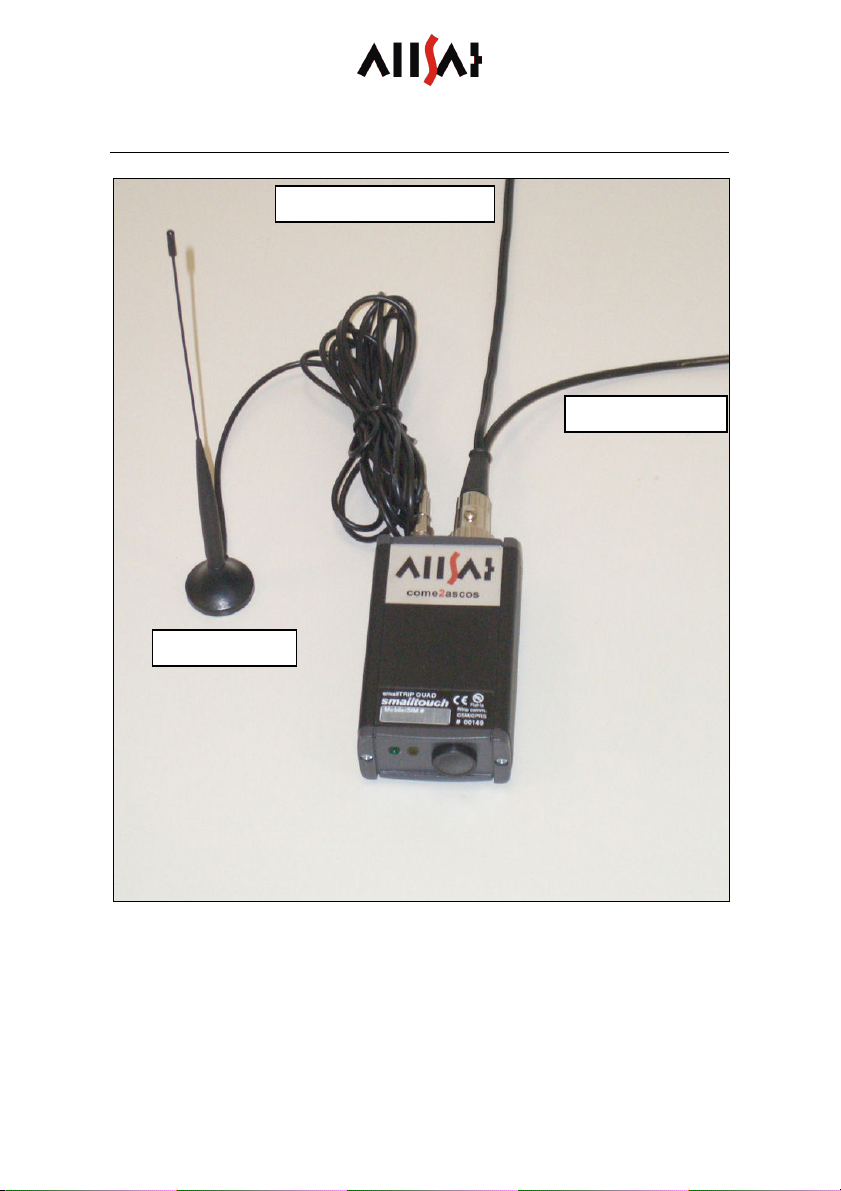
ASSEMBLY COME2ASCOS
figure 7
Connect your come2ascos device as shown in figure 7 to power supply and
your GNSS receiver by the split cable. Don’t forget connecting a GSM
antenna.
GSM antenna
power supply
GNSS receiver

QUICK REFERENCE COME2ASCOS AND COME2ASCOS BLUE
19
ASSEMBLY COME2ASCOS BLUE
Connect the come2ascos modem to the add-on module by plugging in the
connector cable into the MIDI connector of the come2ascos. The cable
includes data lines as well as power supply. Also connect a GSM antenna.
The come2ascos blue can be switched on by the power switch at the
add-on module.
CHARGING
Plug the connector of the battery charger into the charge socket beside the
power switch. Only use the battery charger delivered together with the
come2ascos blue. A full charge period can last up to three hours at 1000
mA charge current. The device can only be charged when switched off.
Urgently note: The battery charger must be set to 5 cells. The accu may be
charged with a current of 500 mA as well as 1000 mA. Please also note the
user guide of the battery charger, especially the safety instructions.
figure 8
charge socket power switch
This manual suits for next models
1
Table of contents


