AllSee Technologies FR8A User manual

Facial Recognition Thermometer Display
User Manual
Manual Version FRA1.0

Facial Recognition Thermometer Display User Manual
Page 1
Safety Instructions
Please keep the display away from any heat sources. Place the display in a
stable and well-ventilated place.
Please handle with care as product contains glass.
The holes or openings on the display are designed for ventilation. Do not
cover or block the ventilation holes or openings with any objects.
Remove protective covering from the screen before you use the display.
Shut off the power supply before cleaning. Use a soft lint-free cloth
instead of a tissue to wipe the screen.
You may use a glass cleaner to clean the product as required. However,
never spray the cleaner directly onto the display surface.
Do not attempt to repair this product yourself! Improper disassembly of
the product may invalidate the warranty and lead to possible danger
If you have a problem that cannot be solved using the "Troubleshooting"
guidelines, please contact your supplier.

Facial Recognition Thermometer Display User Manual
Page 2
Quick Reference Guide
Note: This is only for when the screen has already been set up by following the steps outlined in
Section 2. ‘Initial Setup’.
To control specific functions of the screen, such as the Fan, Mask Detection and Stranger
Detection:
1. Navigate to the “Device List” page under “Device Management”.
2. Click the first icon from the left under the “Operate” section on the right.
3. Click “Device Settings” at the top to open the devices settings.
4. From here, you can adjust everything about the screen in the different sections shown
below.

Facial Recognition Thermometer Display User Manual
Page 3
Contents
1. Introduction................................................................................................................................5
1.1 Box Contents ...................................................................................................................5
1.2 Product Overview............................................................................................................5
2. Initial Setup.................................................................................................................................6
2.1 Installing the Server ........................................................................................................6
2.2 Connecting the Screen to the Server ..............................................................................9
2.2.1 Hardware Overview –Connectivity Interface ........................................................12
3. Server Operation.......................................................................................................................13
3.1 Console..........................................................................................................................13
3.2 Device Management .....................................................................................................13
3.2.1 Device List ..............................................................................................................13
3.2.2 APK List...................................................................................................................14
3.3 Attendance Management .............................................................................................15
3.3.1 Attendance Rules ...................................................................................................15
3.3.2 Attendance Records ...............................................................................................15
3.3.3 Attendance Statistics..............................................................................................16
3.4 Personnel Management................................................................................................16
3.4.1 Employee List .........................................................................................................16
3.4.2 Visitor Management ..............................................................................................17
3.4.3 Blacklist Management............................................................................................17
3.5 Pass Management.........................................................................................................18
3.5.1 Pass Record ............................................................................................................18
3.5.2 Pass Permission......................................................................................................19
3.5.3 Blacklist Monitoring ...............................................................................................19
3.5.4 Permission Records ................................................................................................19

Facial Recognition Thermometer Display User Manual
Page 4
3.6 System Management ....................................................................................................20
3.6.1 Organisation Structure...........................................................................................20
3.6.2 Role Management..................................................................................................21
3.6.3 Business Management ...........................................................................................21
3.6.4 System Log .............................................................................................................21
3.6.5 System Settings ......................................................................................................22
3.7 Authorisation Management..........................................................................................23
4. FAQs ..........................................................................................................................................24
Table of Figures
Figure 1. Product Overview..................................................................................................................5
Figure 2. External Connectors............................................................................................................12

Facial Recognition Thermometer Display User Manual
Page 5
1. Introduction
Congratulations on your purchase of our product. Please read carefully and follow all instructions
in the manual before first use.
The product should not be exposed to liquids dripping or splashing and no objects filled with
liquids, such as vases, should be placed on the product.
For user convenience, a number of operations can be performed through the remote control.
Attention:
1. Do not change any default setting when it is unnecessary.
2. Keep the product far away from water during installation and use.
1.1 Box Contents
1x Thermal Facial Recognition Display (8”)
1x Power Supply
1x Table Mounting Pole
1.2 Product Overview
Figure 1. Product Overview

Facial Recognition Thermometer Display User Manual
Page 6
2. Initial Setup
2.1 Installing the Server
1. Download the necessary files from the following download link:
https://www.dropbox.com/s/2mri2ahuw0smzce/MIPS%20V2.3.0.rar?dl=0
2. When you have obtained the zipped folder containing the files you need, extract this onto
your desktop.
3. Open the extracted folder and move the smart pass setup file to your desktop.
4. A warning will appear when trying to open the setup file. Click “OK” to begin the setup.
Facial Recognition Thermometer Display User Manual
Page 7
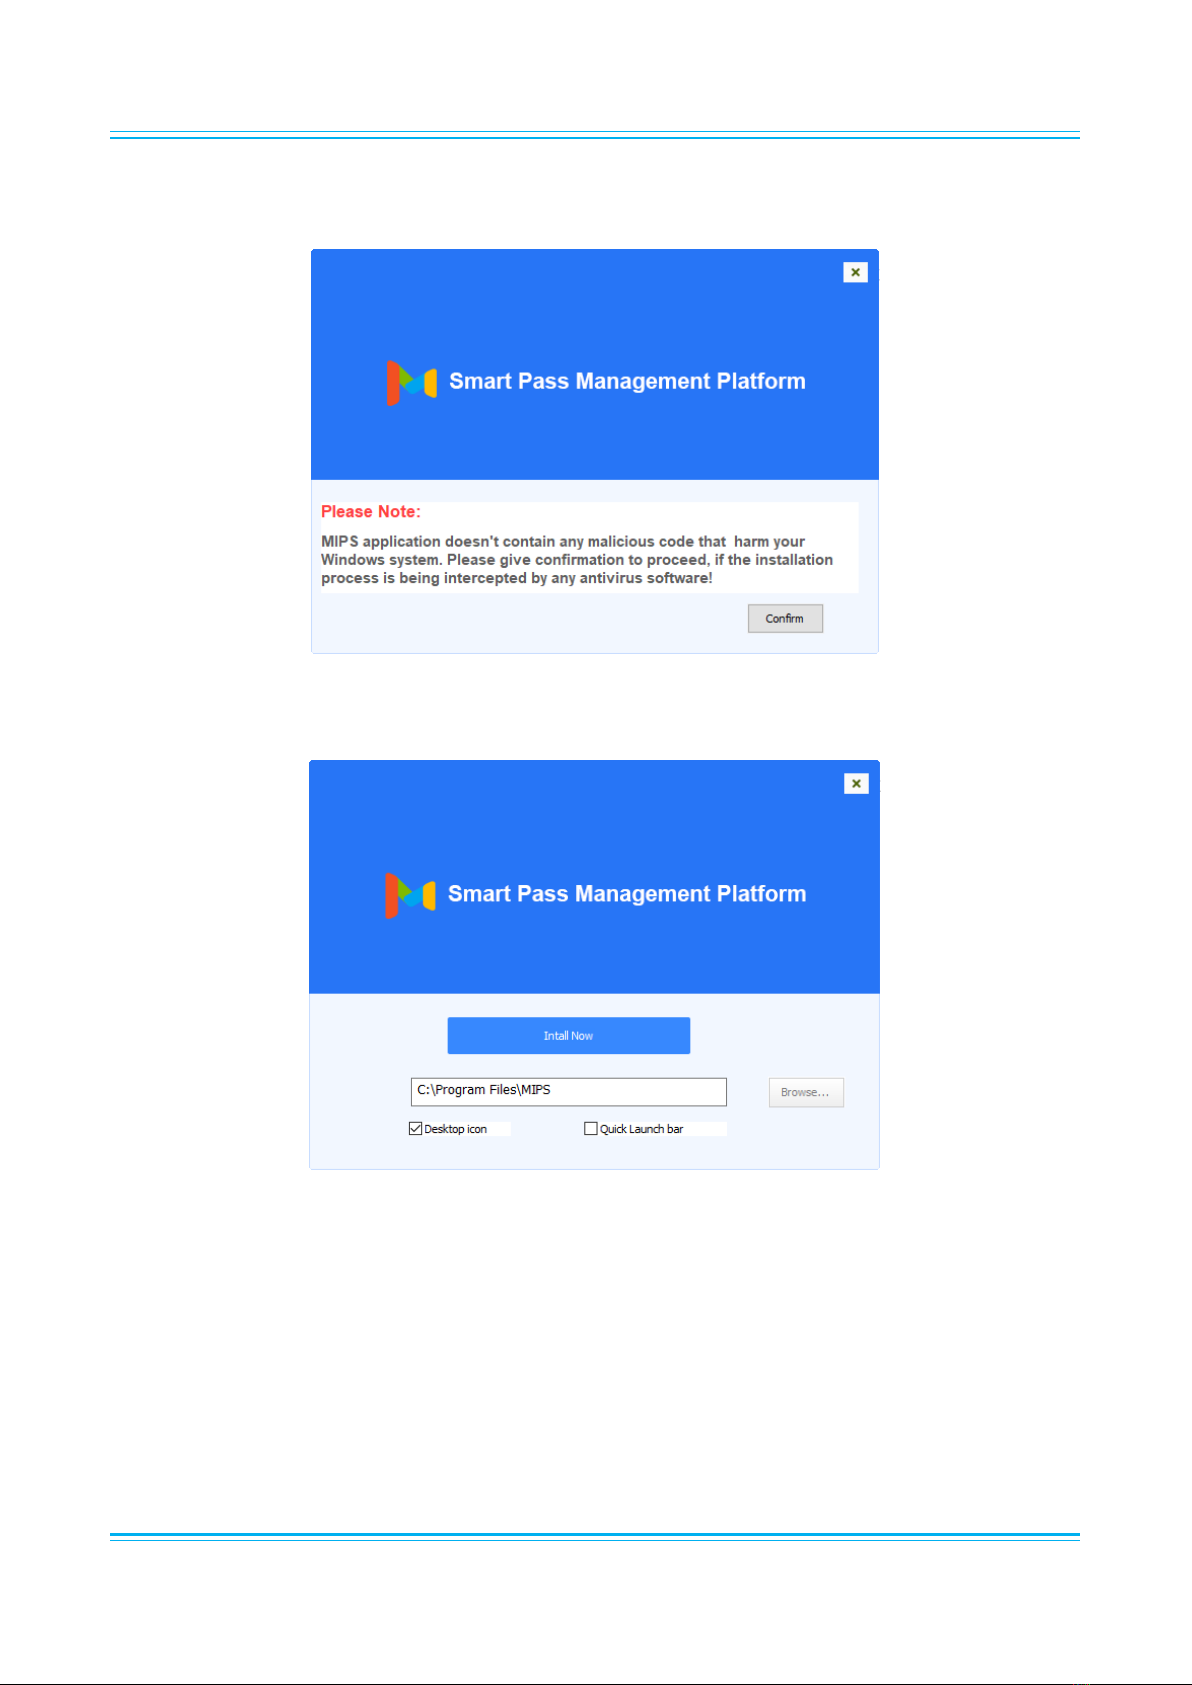
5. Double click the setup application, then click “Confirm” to begin the installation process.
6. Select the installation folder (it is recommended to leave this to the default location) and
click “Install Now”.

Facial Recognition Thermometer Display User Manual
Page 8
7. After this has finishing installing, the finished installation screen will appear.
8. If you created the desktop icon when installing, open the application shortcut it created. It
will ask you to confirm if you want to open it, and then give you a URL.
Note: We recommend setting a Static IP for the PC/Laptop that will be running this server.
9. Copy this URL into your Browser (Google Chrome is recommended for this). Keep this
window open, as this will be needed to set the screen up also.

Facial Recognition Thermometer Display User Manual
Page 9
2.2 Connecting the Screen to the Server
1. Insert a USB mouse into one of the screen’s USB ports and then click the middle mouse
button to attempt to access the setup menu. The default password for this is “123456”. You
can use the mouse to input this on the on-screen keyboard.
2. Once you have successfully accessed the setup menu, you need to click “Login
Management” to begin connecting.

Facial Recognition Thermometer Display User Manual
Page 10
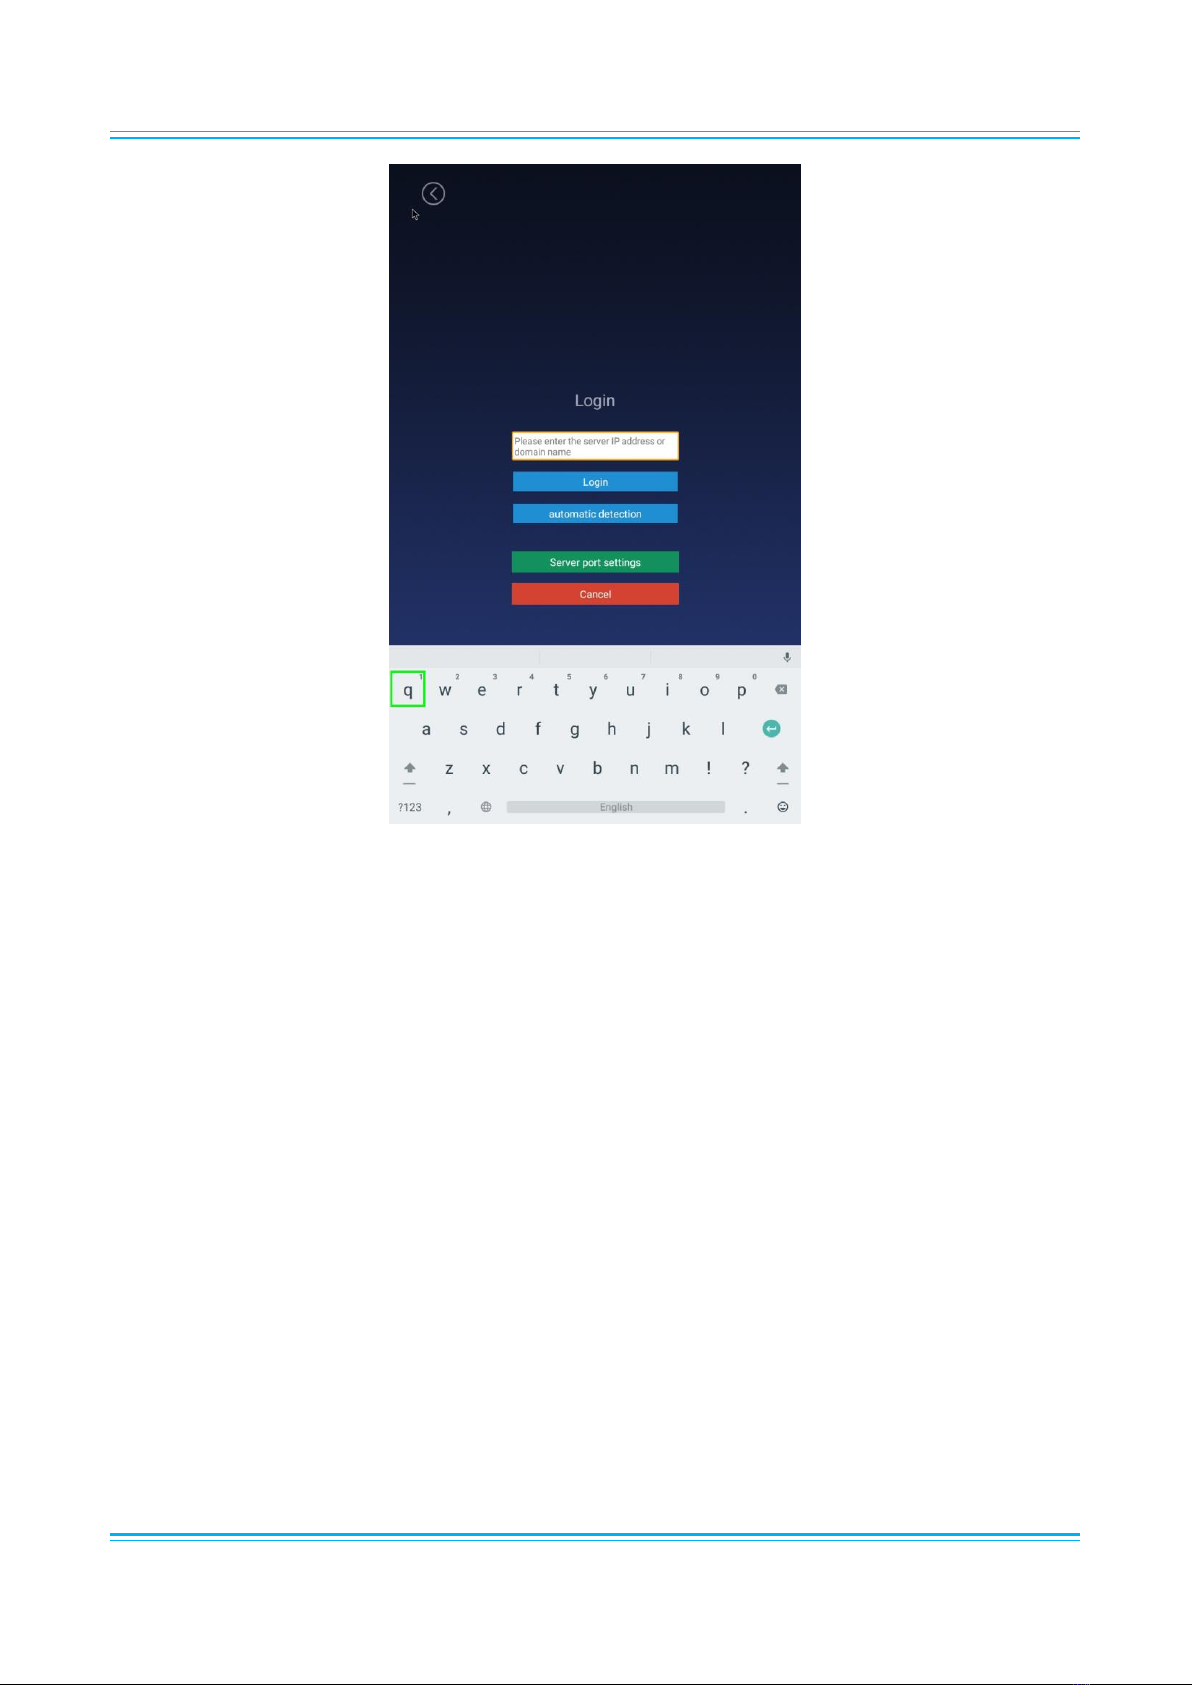
3. You can then insert the IP address that was given to you in the little window upon opening
the application. This will be in the format of “192.168.*.***”, without the part after the
colon.
Facial Recognition Thermometer Display User Manual
Page 11
4. After you get the message to say this is connected, you can now right click until back onto
the main page of the application that scans for faces. This will now be connected and set up
by using your PC/Laptop as the server and connecting the screen to that server via the
Local IP address.
Facial Recognition Thermometer Display User Manual
Page 12
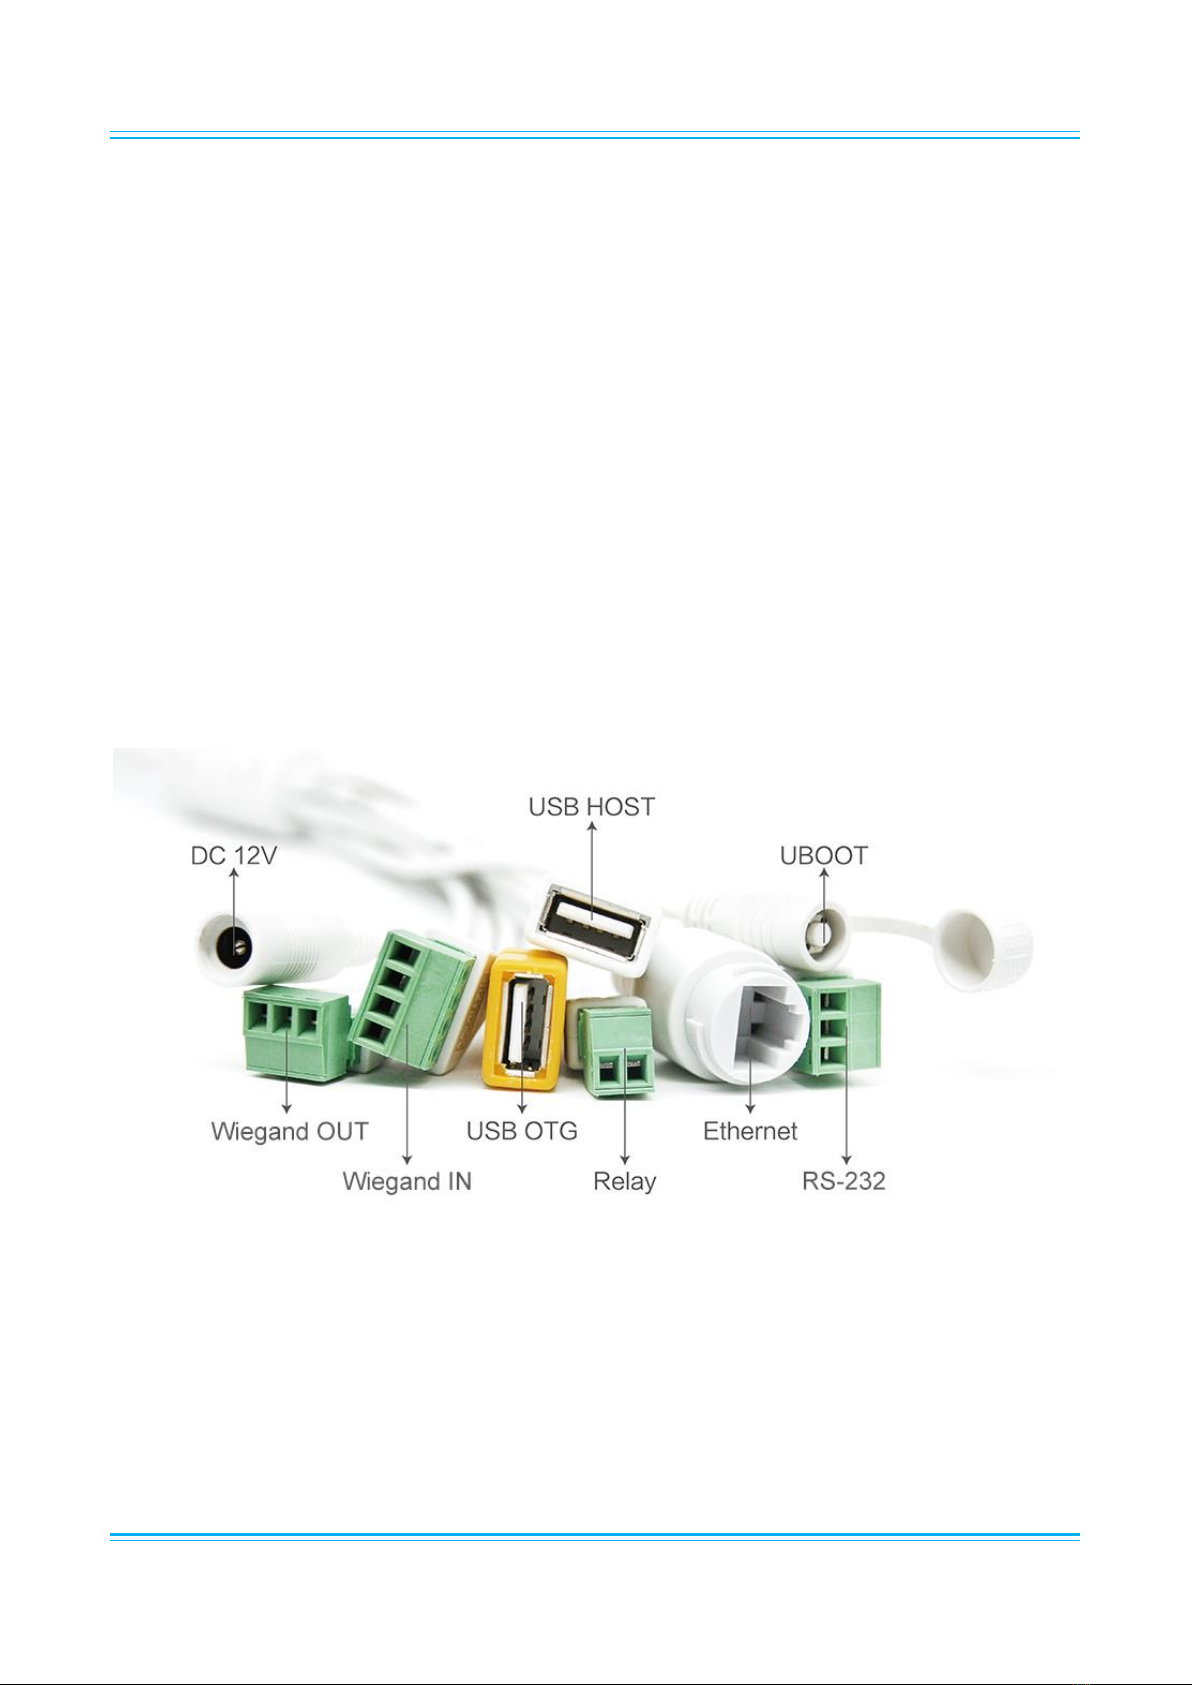
2.2.1 Hardware Overview –Connectivity Interface
The screen also features a set of extra connectors, including:
1x Wiegand In –For ticketing systems
1x Wiegand Out –For ticketing systems
1x Relay –For control over larger electrical functions, such as electric doors
1x RS232 –For controlling the display itself via RS232 commands
1x USB OTG –Both a standard USB and the one you will use for firmware upgrades
1x UBOOT –Used in the process of firmware upgrades
1x USB Host –For connecting standard USB devices
1x Ethernet –For connecting over LAN
1x DC 12v –To power the screen
Figure 2. External Connectors
Facial Recognition Thermometer Display User Manual
Page 13
3. Server Operation
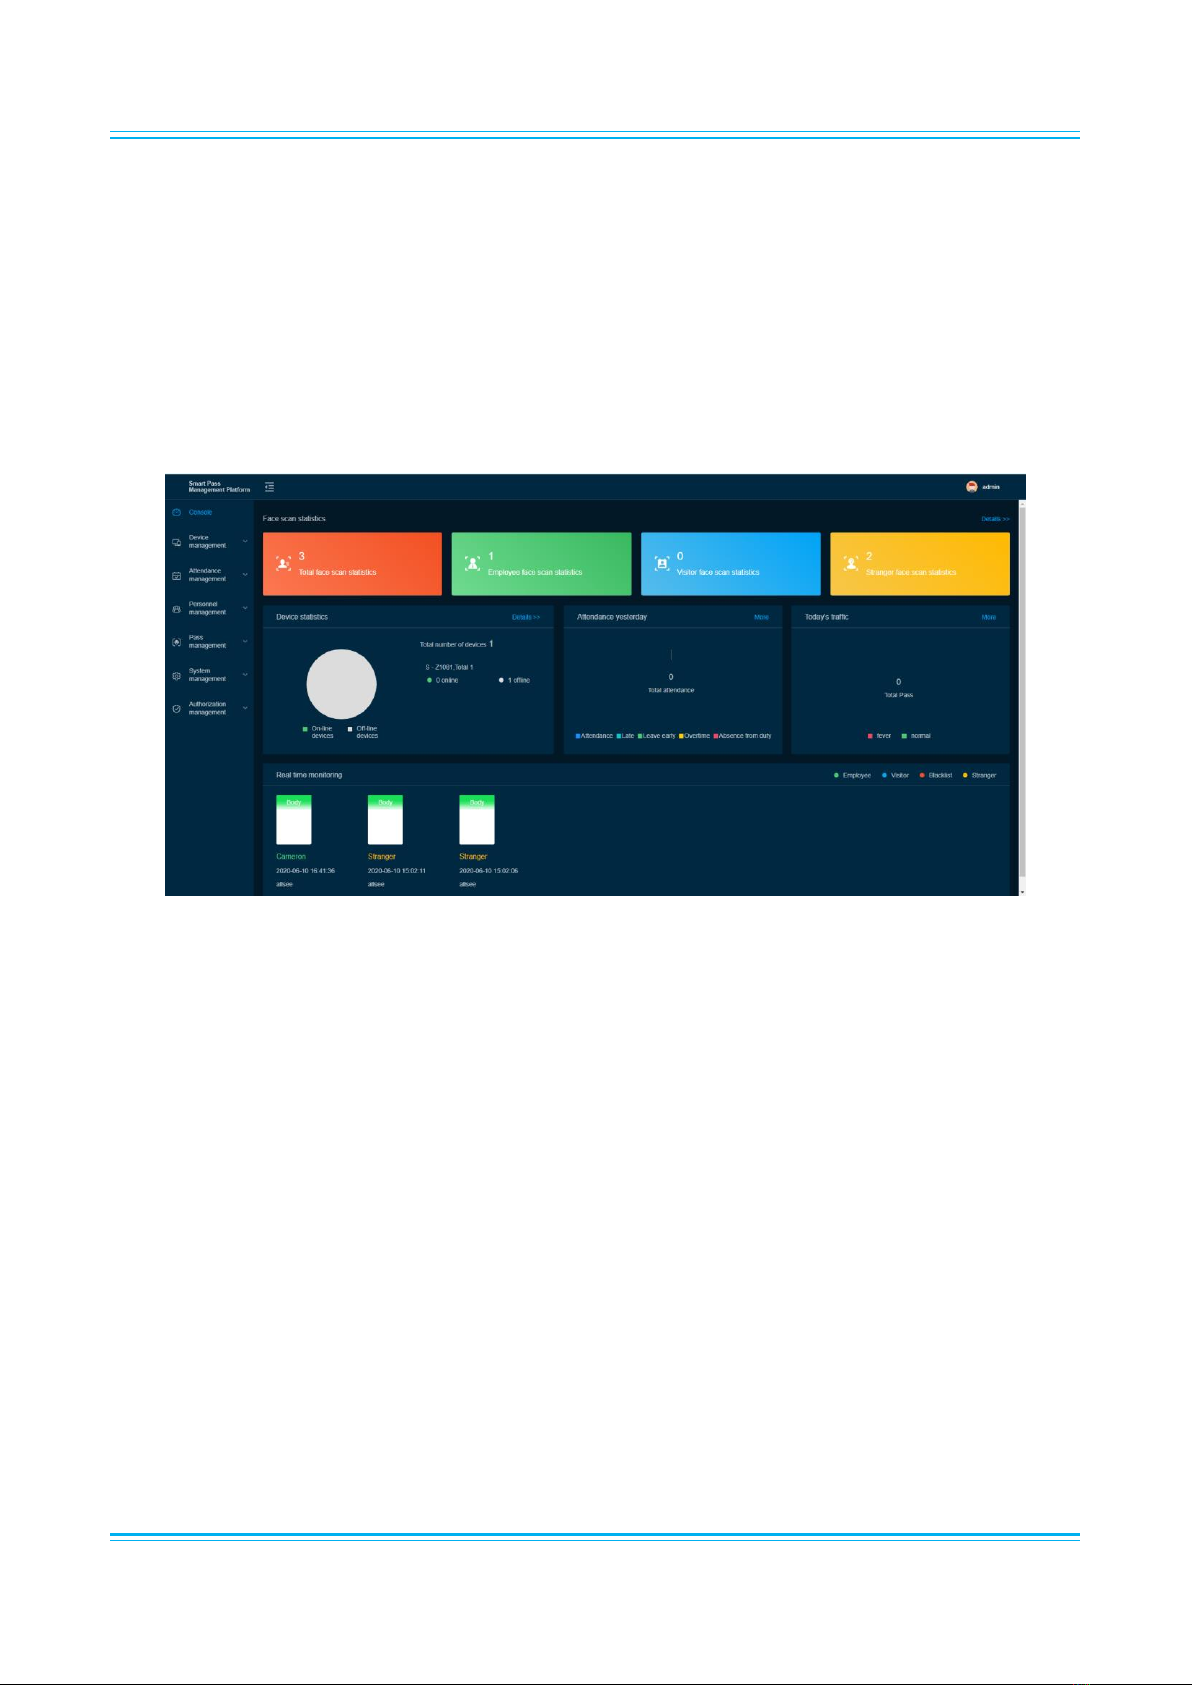
3.1 Console
The Console page defines the core statistics of the server, which are elaborated on in the other
pages of the server. This will show you the amount of passes from the screen, as well as the
temperature category, and previews of the passes below.
3.2 Device Management
The Device Management section allows monitoring and control of the screens that are currently
set to your server.
3.2.1 Device List
This section is to show all screens connected to your server and allow direct commands. This also
allows you to check the device information, change the device settings, and even view what the
camera can see directly and remotely.

Facial Recognition Thermometer Display User Manual
Page 14
3.2.2 APK List
The APK list is to allow for remote upgrade of the version of APK when upgrades are available. Click
“New APK” at the top right to add an APK; you can then push this to your online screens. The APK
will be given by the provider of your display.

Facial Recognition Thermometer Display User Manual
Page 15
3.3 Attendance Management
The Attendance Management section allows the monitoring of employee attendance based on
rules you create.
3.3.1 Attendance Rules
This allows you to set the rules for monitoring attendance of staff members, and other specific
times during the year. This includes shifts, personal holidays and public holidays.
3.3.2 Attendance Records
This allows you to keep track of attendance from registered people, such as staff and visitors.

Facial Recognition Thermometer Display User Manual
Page 16
3.3.3 Attendance Statistics
This section shows all attendance statistics from staff, visitors and strangers.
3.4 Personnel Management
The Personnel Management section allows the storage of staff and visitor information.
3.4.1 Employee List
This provides a list of all registered members of staff for attendance monitoring. This will allow you
to create a Staff Member listing, where you can give them a personal ID, input their name, gender,
whether their attendance is required, and assign a “Shift” from the “Attendance Rules” section.
You can also assign an ID Photo, which can be taken prior to the creation of the listing, or taken
using the screen camera when creating it.

Facial Recognition Thermometer Display User Manual
Page 17
3.4.2 Visitor Management
This allows visitors to be added to the server for attendance monitoring. The information that you
can input for this is similar to the Employee List, with the exception of the shift.
3.4.3 Blacklist Management
This section gives you the ability to blacklist certain people that are not allowed to enter. This also
works the same as the Employee List and Visitor Management.

Facial Recognition Thermometer Display User Manual
Page 18
3.5 Pass Management
The Pass Management section allows monitoring and control of who has access, and records who
has passed by the screen.
3.5.1 Pass Record
This section contains records of who has passed by the screen and their different statistics, such as
temperature, which device was used to scan them, and when the event occurred.

Facial Recognition Thermometer Display User Manual
Page 19
3.5.2 Pass Permission
This allows you to set staff access permissions for specific members of staff. This can be left as
default, which will allow them access, or you can revoke their permission to pass.
3.5.3 Blacklist Monitoring
This allows you to check if anyone on the blacklist has passed the screen recently.
3.5.4 Permission Records
This keeps a record of all authorisations for access.
Table of contents
Other AllSee Technologies Monitor manuals

AllSee Technologies
AllSee Technologies P2-B User manual

AllSee Technologies
AllSee Technologies 32" High Definition Digital Advertising... User manual

AllSee Technologies
AllSee Technologies PCAP Multi Touch Screen Display User manual

AllSee Technologies
AllSee Technologies DV-LED User manual

AllSee Technologies
AllSee Technologies PF46HD-B User manual

AllSee Technologies
AllSee Technologies Slimline User manual

AllSee Technologies
AllSee Technologies TL H7 Series User manual


