Allspace Wall Organization System User manual

THIS MANUAL CONTAINS IMPORTANT INFORMATION REGARDING SAFETY, OPERATION,
MAINTENANCE AND STORAGE OF THIS PRODUCT. BEFORE USE, READ CAREFULLY AND UNDERSTAND ALL
CAUTIONS, WARNINGS, INSTRUCTIONS AND PRODUCT LABELS. FAILURE TO DO SO COULD RESULT IN SERIOUS
PERSONAL INJURY AND/OR PROPERTY DAMAGE. IF YOU SHOULD HAVE ANY QUESTIONS OR EXPERIENCE A
PROBLEM WITH YOUR PRODUCT, DO NOT RETURN THIS PRODUCT TO THE STORE. PLEASE CALL OUR CUSTOMER
SERVICE DEPARTMENT AT 1-800-423-3598. BEFORE YOU CALL, HAVE THE FOLLOWING INFORMATION AVAILABLE:
MODEL No., DATE PURCHASED AND STORE LOCATION. AN ALLTRADE REPRESENTATIVE CAN RESOLVE YOUR
PROBLEM OVER THE PHONE. .
Wall Organization System
Assembly Instructions
Welcome to Allspace! You have just purchased one of the most flexible multi-configuration
systems in the world of organization. Before you start assembly, please note the many
configuration suggestions at the end of the manual.
SAVE THESE INSTRUCTIONS FOR FUTURE REFERENCE
2
SAFETY WARNINGS
WARNING: This product contains chemicals known to the State of California to cause cancer and birth
defects or other reproductive harm.
READ ALL INSTRUCTIONS BEFORE ASSEMBLY. Follow all warnings and safety precautions. If the
installation is not performed correctly, the unit could fall off the wall and cause serious injury or death.
Always use appropriate safety equipment when using power and hand tools. Always wear eye
protection. Protective equipment such as dust mask, non-skid safety shoes, hard hat, or hearing
protection used for appropriate conditions will reduce personal injuries. Failure to do so may cause
personal injury or product damage.
Use adequate manpower when assembling this unit. Failure to do so may cause personal injury or
product damage.
Take care when using ladders. Do not overreach. Keep proper footing and balance at all times. This
enables better control of the power tool in unexpected situations.
DO NOT alter this product in any manner.
Make sure that the wood screws are screwed at least 1-1/2 inches deep into solid wood or framing
material or into at least 5/8 inch thick wallboard using wall anchors. Failure to do so could result in
the wall unit falling off the wall.
Know the location of all utility lines before drilling. Serious injury or even death may occur if you
accidently drill into a utility connection (gas, water, electric). Make sure you shut off the power to
all electrical lines and outlets that you may come into contact with during installation by shutting
off the circuit breaker/fuse at the electrical panel. Use a circuit tester to make sure the power is off.
Keep work area clean and well lit. Cluttered or dark area invite accidents.
Do not operate power tools in explosive atmospheres, such as in the presence of flammable liquids,
gases or dust. Power tools create sparks which may ignite the dust or fumes.
Keep children and bystanders away while operating a power tool. Distractions can cause you to lose
control.
TOOLS NEEDED FOR ASSEMBLY
Drill Pencil
#3 Phillips Screwdriver Stud Finder
Tape Measure Ladder
Level 7 mm Combination Wrench

3
COMPONENTS
Remark:“
*
”This part compatible with the ✽elfa®pegboard system
*elfa®is a registered trademark of *elfa International AB
Note: “N/A**” Not Included in Set
Component
450048U
450048C
450048HF 450075HF 450076HF Component
450048U
450048C
450048HF 450075HF 450076HF
3321101036
22123322
6644111N/A
✽✽
N/A
✽✽
N/A
✽✽
N/A
✽✽
N/A
✽✽
N/A
✽✽
N/A
✽✽
N/A
✽✽
4423111
111
8846
332
151599
663322221612
66336644
76335533
673664N/A
✽✽
222337372521
22
N/A
✽✽
N/A
✽✽
N/A
✽✽
3
332
N/A
✽✽
N/A
✽✽
N/A
✽✽
4
✽450036-08
4 in. x 12 in. Metal Tray
450036-09
Accessory Hook
✽450036-10
Utility Circle Hook
✽450036-13
Utility Long Hook
✽450036-15
Utility Short Hook
✽450036-16
Small Utility Box
450036-01
24 in. Utility Track
450036-02
26 in. Top Track
450036-03
18.75 in.
Vertical Standard
450036-04
15 in. x 23-1/2 in. Pegboard
450036-12
Basic Hook
✽450036-17
Larger Utility Box
450036-18
Tool Holder
450036-19
3 in. Metal Peg Hook
450036-21
Standard Bar Connector
450036-23
Bike/Ladder Hook
450036-24
Hose Hook
450036-25
Plastic Pegboard Locking Pin
450036-30
1.5 in. Wall Anchors for
Top Track Mount
450036-31
2.25 in. Wall Anchors for
Vertical Standard Mount
450036-32
Through Screws
450036-33
Top Track Connector
450036-35
Utility Track Locking Pin
450036-36
Plastic Anchors for 1.5 in.
and 2.25 in. Wood Screws
✽450036-37
24 in. x 12 in. Wire Shelf
✽450036-38
12 in. Wire Shelf Bracket

4
INSTALLATION
The Allspace Wall Organization System was created to give you the amount of organization you need in whatever size space
you have. Change that bare wall in the garage into rows of easily found tools. Store household items in that space above the
washer. Keep office supplies handy by hanging a single square of pegboard in your home office. Allspace can fit in almost
any space to serve almost any need.
The sturdy steel construction is strong enough to hang bicycles and ladders, but the plastic hooks and baskets allow you to
hang up the smallest tools or fasteners. Each pegboard panel, properly assembled, has a capacity of 75 lbs.
This system is designed for both stud mount or 5/8 in. or thicker wallboard anchor
mount. DO NOT USE wallboard anchors on wallboard that is 1/2 in. or less.
UNPACKING
Remove all materials from the box. Make sure all the parts needed for assembly are included. Check that there are no sharp
edges or burrs that could injure you during assembly. Set all the plastic hanging hooks and baskets aside. You will not need
them until after the wall has been assembled.
PREPARING THE LOCATION
Know the location of all utility lines before drilling. Serious injury or even death
may occur if you accidently drill into a utility connection.
Now you need to decide where you want your pegboard to go. Make
sure the space you have chosen is a flat wall that is clean and free of
obstacles or obstructions.
Using a stud finder, locate the studs in your chosen wall. Studs are
vertical pieces of wood that are usually about 16 inches apart. Once
you have found the first one, move 16 inches horizontally to find the
next one. Mark the stud locations on the wall with pencil. Use a level to
make sure the pencil marks are in a straight line.
Hold one of the top tracks up against the wall, making sure that the
first hole in the track lines up with the first pencil mark. Note where
the second pencil mark falls. (Sometimes the holes in the metal tracks
will not line up with the studs. In those cases, you will have to use
wallboard anchor screws.)
Continue across the wall, marking all the hole locations. For wall mounts requiring 4 peg panels horizontally, you will need
to add utility tracks (450036-01) on each side of two top tracks (450036-02). Both top tracks should be mounted first, then
mount the utility tracks. The top track is slightly longer than the utility track and the drilling locations will need to be adjusted
accordingly. Drill holes in the wall at all the marked locations. If the location does not line up with a stud, you will have to
insert a wallboard anchor into the drill hole. (For stud mount, drill 1/8 in. holes, for wallboard mount, drill 5/16 in. holes.)
This will prevent the screw from pulling out of the wall when you attach the track.
16in
407mm
To prevent injury and/or property damage, DO NOT USE if any part is
missing or damaged.

5
MOUNTING THE TOP TRACKS
Now you are ready to mount the top tracks (450036-02). Remember that the insert slots in the tracks must be facing up toward the
ceiling. Do not mount the track upside-down. For non-stud-direct wallboard mount, use minimum of three wall anchors (450036-
30/450036-36) per 26 inch top track. Your wallboard must be 5/8 in. or thicker for wallboard mount.
If you are using more than one track, we recommend that
you fasten them together before you mount them on the
wall. Each track has a tab with a hole on either end. Line
up the tabs and insert a top track connector (450036-33)
through the hole. Fasten with the nut. Make sure the
insert slots on both top tracks are facing up.
Starting at the far left corner, hold the top track in place with the first hole in the track over the first drill hole in the wall.
Insert a wood screw. Carefully tighten the screw, making sure to keep the top track level. Find the second drill hole and
insert a wood screw or a wallboard screw, depending on the location.
Step 2
Step 1
Step 3
450036-02
450036-30
450036-30
When installing into wallboard, slip the plastic wall anchor
sheath (450036-36) onto the 1.5 in. wall screws (450036-30).
INSERT SLOTS
450036-33
450036-30

6
Each track must have at least two stud screws or three wallboard screws securing it to the wall. Use a level to check each
track as it is mounted.
FASTENING VERTICAL STANDARDS TOGETHER
Now it is time to attach the vertical standards. These are
the tracks that will run on either side of each piece of
pegboard. If your configuration is going to be one panel
deep, you will only need one vertical standard on each
side, but if your configuration is two panels deep, you
will have to fasten two vertical standards together.
Take two vertical standards (450036-03) and set them
on a workbench with the peg holes facing up. Make
sure that the keyholes in both tracks are facing the same
direction. The round part of the keyhole should be toward
the top. Move the two tracks a few inches apart. Set the standard bar connector (450036-21) into the space
between them, sliding it into the top of one of the tracks. Line up the holes in the adapter with the holes in
the peg track and slide a through screw (450036-32) through the holes. Fasten.
Slip the other track onto the other end of the adapter. Line up the holes and fasten.
Step 4
Step 5 Make sure that
the keyholes
in both bars
are facing the
same direction.
The round part
of the keyhole
should be
toward the top.
Step 5A
450036-03
450036-21
450036-32

7
MOUNTING VERTICAL STANDARDS TO TOP TRACKS
Find the insert slots located on the top of the tracks (450036-02). Make sure the notch on the end of
the standard (450036-03) is facing up. Line up the arms of the standard with the insert slots and care-
ful push in and down. The standard should drop into the opening in the track with the notch hanging
on the track lip. If needed, the standards have screw or wallboard mount holes for extra fastening
support.
MOUNTING VERTICAL STANDARDS TO WALL
Step 6
450036-03
450036-02
Step 7
Step 7A
(optional)
When installing into
wallboard, slip the
plastic wall anchor
sheath (450036-
36) onto the 2.25
in. wall screws
(450036-31).

8
MOUNTING PEGBOARD PANELS
If you want the panels to fit tightly together in double vertical panel configurations (one
panel on top of the other), you must insert the bottom pegboard panels first. Otherwise,
mount pegboard panels as needed.
Each pegboard panel (450036-04) has mounting hooks along either side. These hooks correspond to
the mounting slots in the vertical standards (450036-03). To mount a panel, simply line up the pegboard
hooks with the mounting slots and push them into place. Once all the hooks are inserted, pull down on
the pegboard to lock it. (If you are having trouble mounting the pegboard, make sure that the round part
of the keyholes are facing up. The hooks will not lock if the pegboard is upside-down.)
Insert a pegboard locking pin (450036-25) through holes in both the pegboard panel and the mounting
track, then twist left or right to lock the panel into place. This will keep the panel from moving up or down
while in use. To remove panels, reverse the process.
Step 8
Make sure that the keyholes in both
bars are facing the same direction.
The round part of the keyhole should
be toward the top.
LOCK
450036-04
INSERT
450036-25
Step 9

9
MOUNTING THE UTILITY TRACK
This set includes four utility track bars. These utility track (450036-01) can be used for hanging bikes, lad-
ders, hoses and larger tools. You can mount these tracks wherever they are needed. They can be mounted
between the upper and lower pegboards or they can be mounted at the bottom below the pegboards. They
can even be mounted on the pegboards themselves or directly to the wall without using vertical standards.
In this case, it is preferred that you use wood screw-stud mount with at least two 1-1/2 in. wood screws
(450036-30) per section. Mount them at the height and location that is convenient for you.
Once you have chosen the location for your utility track, line up the hole in the utility track with one of the
keyholes on the vertical standard. Push a utility track locking pin (450036-35) through the hole, mak-
ing sure that the flat part of the pin is aligned with the side of the hole. Slide pin and track
downward. Turn the mounting pin to tighten. Repeat process to lock the other side. Reverse this process to
remove or relocate utility track.
Step 10 450036-01 450036-35
Use this hole
to connect to
pegboard.
Use this hole
to connect to
standards.
450036-01

10
MOUNTING HOOKS, UTILITY TRAYS AND BASKETS
Now you are ready to attach the various hanging accessories. The plastic hooks have a keyhole-shaped
lock on the back. To hang them, simply line the lock up with one of the keyholes in the pegboard and
insert. Gently pull the hook down to lock into place. To remove, just reverse the procedure.
To hang a utility tray (450036-16/450036-17), line up both hooks
with the keyholes on the pegboard. Insert into keyholes and pull
down to lock. (See Figure 1.)
To attach the bike/ladder hook (450036-23), the tool holder
(450036-18) and the accessory hook (450036-09) onto the utility
track (450036-01), tilt the bike hook toward the utility track and
slip the upper lip into the upper channel of the utility track. The
bottom channel of the utility track should snap in into the notch
on the back of the bike hook. (See Figure 2.) Make sure the bike
hook is securely seated before trying to hang heavy objects.
These pegboards can also
use standard 1 inch metal
peg hooks from your local
hardware store. Just insert
them into the keyholes
where required.
Step 11
450036-18
Slip the upper lip into
the upper channel of
the utility track.
Figure 1
Figure 2

11
PREPARING AND MOUNTING BIKE/LADDER/HOSE HOOK
Before you use the bike/ladder hook (450036-23),
it is necessary to release the bike hook from its
packing position. To do this, turn bike hook around
so you can see the springs inside. Push up on one
of the arms until you are able to swing it to the side.
Release and the spring will pop back into the locked
position. Repeat for the other side. (See Figure 3.)
Once the bike/ladder hook is open, you can
attach the spacer/storage basket. If you are going
to mount the bike/ladder hook on a utility track
mounted directly to the wall, you will place the
spacer/storage basket on the front of the bike hook
just above the hooks. (See Figure 4).
The bike/ladder/hose hook (450036-23/450036-
24) can also be mounted directly to the wall.
Place the spacer/storage basket on the front of
the bike hook just above the hooks. Fasten into a
stud with the supplied wood screws.
If using hook for bike mounting, it’s advisable to use direct wall stud mount.
Depress springs and
swing out to release
bike hook arms.
Figure 3
Spacer/storage
basket faces
to the front
on utility track
with direct wall
mount
450036-23
Figure 4
450036-24
450036-23
Figure 5
SUPPLIED WOOD
SCREWS
12
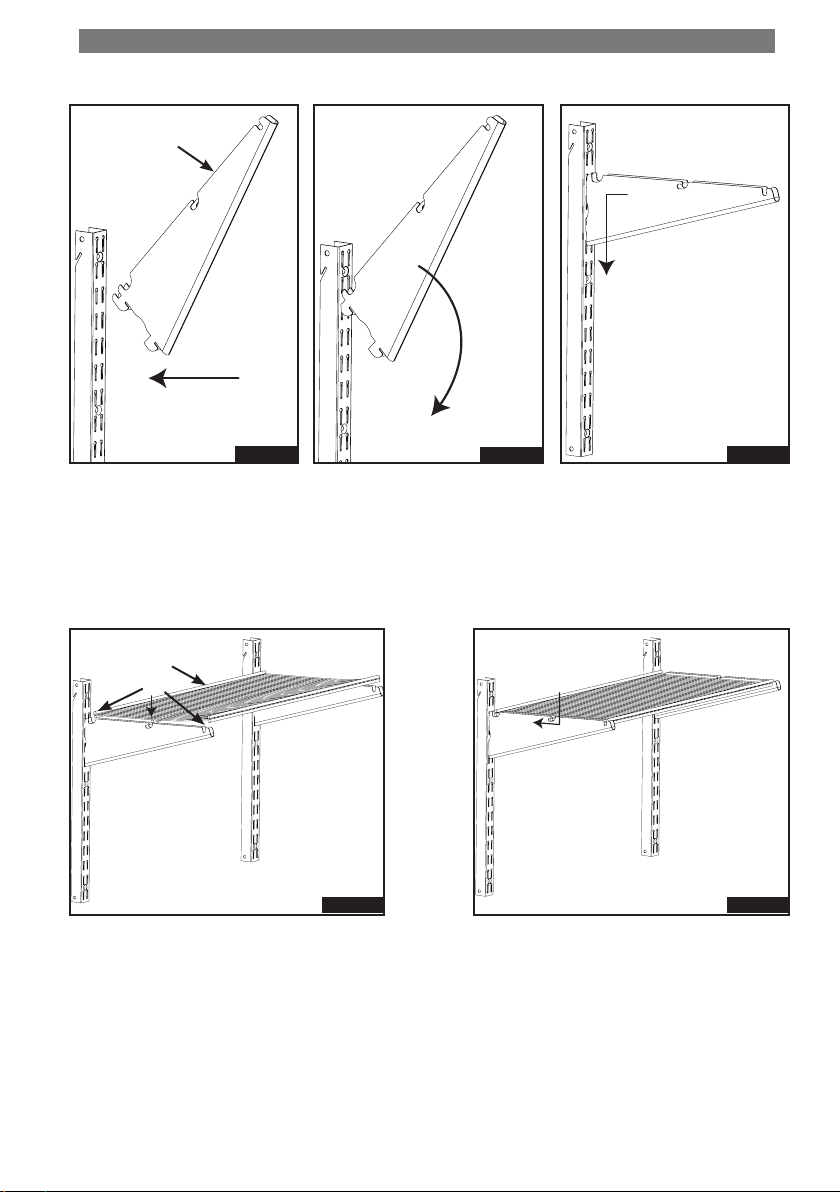
PREPARING AND MOUNTING WIRE SHELF AND BRACKET
450036-38
Figure 1
Note: Instructions only apply for model no. 450076HF
Figure 4 Figure 5
Figure 2 Figure 3
450036-37
Insert top hook of shelf bracket (450036-38) into mounting slot of vertical standard (450036-03) at desired
height. The bracket should be inserted at an oblique angle (See Figure 1) Rotate shelf bracket clockwise until
bottom hooks slide into mounting slot of vertical standard (See Figure 2). Press down shelf bracket (See Figure 3)
securing shelf bracket to vertical standards. Repeat on opposite vertical standard making sure that shelf brackets
are at same height
Place wire shelf (450036-37) onto top of shelf bracket. Insert wire shelf ends into slotsIn the middle and ends of
shelf bracket (See Figure 4). Push wire rack rearward to lock onto shelf bracket (See Figure 5)

FOR CUSTOMER SERVICE
1-800-423-3598
Printed in China
ALLTRADE TOOLS LLC
1431 VIA PLATA
LONG BEACH, CA 90810-1462
www.alltradetools.com
©COPYRIGHT 2015 , ALLTRADE TOOLS LLC REV.1
VERSATILITY
Remember that your pegboard system can be adjusted to fit any space you have. Use one panel or all four,
it’s up to you.
52 in.
37-7/8 in.
25 in.
37-7/8 in.
25 in.
74 in.
25 in.
37-7/8 in.
26 in.
76 in.
18-15/16 in.
25 in.
100 in.
18-15/16 in.
49 in.
100 in.
18-15/16 in.
25 in.
25 in.
52 in.
18-15/16 in.
49 in.
100 in.
37-7/8 in.
49 in.
China Patents No. ZL 2014 2 0623701.6
US and International patents pending
Table of contents
Other Allspace Storage manuals


