Alpha I AL905-SE User manual

Alpha I AL905-SE
Smoke Exempted Free-standing
Multi Fuel Non-Boiler Stove
Instruction Manual
Published July 2012
Please note This appliance has been
independently tested and approved
by Defra as an ‘exempted appliance’
to allow the burning of wood in
designated UK Smoke Control Areas
(see page 14). It must, at all times,
be operated in accordance with the
instructions to minimise the amount
of smoke produced.
Ref: AL905-SE / UK-NI-ROI / V4.29-03-16
You will need to refer to the serial
number of your stove shown above
should you ever need to make a claim
under the Hi-Flame Warranty. You will
also find the serial number, beginning
with AL, on the CE plate at the rear of
the stove as well as on the lid of the
outer packaging.
This appliance has
been approved by Hetas
This appliance has been approved
by Hetas Limited specifically as an
intermittent operating appliance for
burning both wood and approved
smokeless fuels only. Please note that
Hetas Limited Appliance Approval only
covers the use of wood and approved
smokeless fuels in this appliance. Hetas
Limited Approval does not cover the use
of other fuels, either alone or mixed with
wood, nor does it cover instructions for
the use of other fuels.
ALPHA
Collection
The


USER WARNING NOTE
Properly installed, operated and
maintained this stove will not emit
fumes into the dwelling.
Occasional fumes from removing
ash and refuelling may occur.
However, persistent fume emission
is potentially dangerous and must
not be tolerated.
If fume emission does persist, then
the following immediate action
should be taken:
• Open doors and windows to ventilate
the room and then leave the premises
• Let the fire go out
• Check for flue or chimney blockage
and clean if required
• Do not attempt to relight the fire until
the cause of the fume emission has been
identified and corrected. If necessary
seek expert advice
The most common cause of fume
emission is flueway or chimney
blockage. For your own safety these
must be kept clean at all times see
page 36.
If the CO alarm (which should be
fitted at the time of installation)
sounds, please follow the advice
above.
Please note: From 1 September 2014
a CO alarm will now be a mandatory
requirement for all stove installations in
the Republic of Ireland.
WATCH OUT
!
CARBON MONOXIDE KILLS
CONTENTS
Page
4
4
5
6
7
8
9
10
11
13
14
15
16
17
17
18
18
22
22
23
25
26
27
30
31
35
36
37
38
40
41
42
Back Cover
Introduction
Packing List
Installer Safety First
Standard Features
General Dimensions
Technical Data / CPR
Important Safety Advice
Assembling the Stove
Flue Options
Installation Regulations
Smoke Control Areas
Recommended Fuels
Prohibited Fuels
Important: First Fires
Understanding Different Fuels
Burning Wood Logs
Lighting a Wood Fire
Adding Mineral Fuels
Burning Mineral Fuels
Some Simple Tips
Removing Ash
Installation Check-list
Installation General Guidelines
Commissioning
Trouble-shooting
Routine Checks
Standing Down
Routine Maintenance
Hi-Flame Warranty
Annual Service
Spares Service
Service Record
External Air Kit
3

PACKING LIST
As soon as you receive your new stove
please check that you have a full set of
components as set out in the list below.
In the unlikely event of a shortage,
please report this immediately to the
dealer you bought the stove from.
Never attempt to operate the stove
with missing or damaged components.
Product Information
1 Instruction Booklet
1 Warranty Card
Stove Components
1 Stove Lid
1 Handle Cover
1 Handle Cover Securing Bolt
1 Log Retaining Bar
Equipment
1 Ashpan
1 Operating Tool
Tool Bag
1 Safety Mitten
2 Spare Glass Retaining Clips
2 Spare Glass Retaining Clip Screws
1 Spare Rope Seal (for door)
1 Allen key (for door hinges)
4
INTRODUCTION
Thank-you for purchasing the
Alpha I stove. We are confident that
with its state-of-the-art combustion
and convection technology it will
warm your home even on the cold-
est winter days and provide you
with many years of pleasurable
heat.
Before you install or operate your
stove however, please read this
booklet which contains important
safety advice as well as instructions
which will help you make the most
of your new stove.
All users of this stove should be
aware of the contents of this
handbook. If other people are going
to operate the stove then please
keep this booklet handy so that it
can always be quickly referred to.
Never let anyone use the stove who
is unfamiliar with its correct
operation.
PLEASE NOTE
This instruction manual is also used
for a number of other free-standing
stove models in the Hi-Flame product
range and therefore some of the stove
photographs and diagrams used, which
are used for guidance purposes only,
may differ slightly from your new
Alpha stove. However, the principles
illustrated here remain the same.
Hi-Flame Fireplace (UK) Limited

INSTALLER SAFETY FIRST
BS 8303 Code of Practice
Please refer to the current issue of
British Standard BS 8303, Code of
Practice for installation of domestic
heating appliances burning solid
mineral fuel. Make reference to Building
Regulations, Local Authority Byelaws
and other specifications / regulations
as they affect the installation of this
appliance. See page 13.
Health and Safety
During the installation of this stove
and any related building works you
must comply with any current Health &
Safety at Work regulations. When the
stove is fired up always wear protective
gloves and use the tool supplied when
adjusting the stove’s air controls.
Asbestos
This stove does not contain Asbestos.
However, check that there is no
possibility of disturbing any asbestos
based materials during its installation.
You may intend removing an older
appliance prior to installing your new
stove, and you should be aware that
the old appliance or installation could
incorporate heat protective asbestos
sheet. Use appropriate protective
equipment and seek specialist guidance
at www.hse.gov.uk/asbestos – do not
underestimate the potential dangers
of Asbestos.
Fire Cement
Some types of fire cement are caustic
and should not be allowed to come into
contact with the skin. Protective gloves
and glasses should be worn when
applying fire cement. In case of contact
wash immediately with plenty of water.
Always read and follow the fire cement
manufacturer’s instructions.
Care should also be taken to avoid
unnecessary contact between the
stove’s surfaces and the fire cement as
this could damage the paintwork. Any
excess fire cement should be quickly
removed before it hardens.
Handling
The Alpha I stove is extremely
heavy (79kg / 12st 6lb) and therefore
adequate facilities must be available
for its safe loading, unloading and site
handling.
Metal Parts
When installing or servicing this stove
care should be taken to avoid the
possibility of personal injury from the
stove’s metal parts. Particular care
should be taken to avoid sharp edges
when handling or attaching the flue
liner.
5

1
3
5
IMPORTANT
In the interests of safety please
read these instructions carefully
before installing or operating
your new stove. Even if you have
installed or operated stoves before,
manufacturers’ requirements can
vary and can also change with
updates to building regulations.
If installed in a UK Smoke Control
Area this stove must be operated
in accordance with the instructions
to minimise the amount of smoke
produced.
STANDARD FEATURES
1 Primary Air Control Air which enters
under the grate for burning multi fuels,
(other than wood). Also used at the
beginning of wood fires
2 Pre-heated Secondary Air
Control Air enters at the base of the
stove is pre-heated to ensure the fire-
chamber is not cooled down by new
colder air. This ensures a higher fire-
chamber temperature and therefore a
cleaner, more efficient burn. Controls
the air supply when burning wood
3 Pre-heated Tertiary Air
System Pre-heated
air enters the stove
through jets in the
special cast iron heat
sink at the rear of
the firechamber. This
ensures a much
longer,cleaner burn
from the Alpha I
even in the latter
stages of fire cycle
4 Airwash System
Part of the secondary
air control system
which diverts pre-
heated air down
along the front of
the glass to burn off
unwanted dry sooty
particulates and
help keep it clean
5 Top or Rear
Flue Option Simple
to switch depending
on the type of
installation
5
4
2
6

7
DIMENSIONS All dimensions are in mm

8
Construction Products Regulation
Declaration of Performance (DoP)
Hi-Flame Fireplace (UK) Limited declare
that the test stove submitted for type
testing of the AL905-SE model represented
the full production model specifications
in all critical technical parameters
needed to fulfil the requirements of the
testing standard BS EN 13240:2001 +
Amd 2:2004. No modifications were
required to the items tested in order to
meet the requirements of the standard.
All applicable criteria on the type test
have been passed in respect of the
materials, design and construction as
well as the instructions and marking.
Data derived from Kiwa GasTec BS EN
13240:2001 tests during September
2010 (report number 6650).
General Specification
Model Name Alpha I
Model Number AL905-SE
Overall Height 605 mm
Overall Width 445 mm
Overall Depth 425 mm
Net Weight 79 kg
Gross Weight (packed) 90 kg
Data from CE Test EN13240
Burning Wood Logs:
Nominal Heat Output 4.9 kW
Refuelling Interval 51 minutes
Efficiency (net) 84.3%
Mean CO Emission (at 13%) 0.38
Mean Flue Gas Temperature 208ºC
Flue Gas Mass Flow 3.3 g/s
Burning Smokeless Fuel (Ancit):
Nominal Heat Output 4.9 kW
Refuelling Interval 60 minutes
Efficiency (net) 71.4%
Mean CO Emission (at 13%) 0.13
Mean Flue Gas Temperature 311ºC
Flue Gas Mass Flow 3.7 g/s
Minimum Distance to Combustibles
Rear 900 mm
Sides 700 mm
We do not recommend the use of
mantels made from combustible
materials such as wood
Non-combustible Hearths
At a nominal output of 4.9kW and
when operated in accordance with
these instructions this stove is suitable
for use with a 12mm non-combustible
hearth – subject to current Building
Regulations.
Tested hearth temp (Ancit) 63.2ºC
Fuel Requirements
Wood Logs:
Moisture content <20%
Maximum Log Length 300 mm
Maximum Fuel Load 1.5 kg
Mineral Fuel:
Hetas Approved Manufactured
Smokeless Fuels See www.hetas.co.uk
Maximum Fuel Load 1.5 kg
Flue Requirements
Flue configuration top or rear
Flue pipe diameter 125 mm
Height to centre of rear flue 429 mm
From centre of top flue to back 142 mm
Minimum flue height from
base of stove 4500 mm
Minimum flue pressure 12Pa
TECHNICAL DATA / CPR DECLARATION OF PERFORMANCE

9
IMPORTANT SAFETY ADVICE
• Ensure that an approved carbon
monoxide detector (BS EN50291:2001)
is fitted in the same room as the stove. It
should be powered by a battery
designed for the working life of the
alarm. Please note that since October
2010 this is now a requirement under UK
Building Regulations.
• External surfaces including the fire-
chamber door and operating handles,
windows, flue pipes and stove
bodywork will become extremely hot.
Always use the tool provided and avoid
touching these parts of the stove without
proper protection, such as heat resistant
gloves or other protective aids.
• Potentially combustible material or ob-
jects such as soft furnishings should never
be left on or near any of the stove’s hot
surfaces. Ensure that wood supplies and
log baskets are kept at a safe distance
from the stove.
• Never leave children unattended in
the room where your stove is being
operated. Ensure that children are aware
of the potential danger and make sure
that they keep clear of the stove when it
is in operation. Where children, the eld-
erly or the infirm are present, to prevent
accidental contact with the stove, always
use a safety fireguard manufactured in
accordance with BS8423:2002, Fire-
guards for use with solid fuel appliances.
• This stove should not be fitted in a
room with an extractor fan (eg kitchen)
without the appropriate worst-case
scenario spillage safety tests being
undertaken and an approved air vent and
/or external air supply installed to rectify
any potential air supply issues which
could affect the safe operation of the
stove. Under no circumstances should
the stove be operated until these tests
have been satisfactorily completed.
• To ensure your safety make sure that
your stove’s installation complies with
all local building regulations’ ventilation
requirements. Low energy houses have
their own particular requirements and
should be strictly adhered to.
• Do not use flammable liquids to ignite
the fire. In the confined space of the
firechamber there is a real potential to
cause a life-threatening flash flame or
explosion.
• Never over-fire the stove. If any
external parts of your stove glow red
during operation then immediate action
should be taken to reduce the supply
of air to the firechamber through the
Primary and Secondary air controls
which should quickly limit the intensity
of the fire.
• This stove is CE approved and tested
to EU EN13240 standards in the UK by
Kiwa GasTec. Alterations to its
construction could be potentially
dangerous and will render your
product warranty void.
• Do not use aerosol products in the
vicinity of the stove when it is in use.
• Check and clean the stove’s flue way
and the top of baffle plate regularly
to help avoid potential blockages (see
page 36).
• Clean your chimney regularly (see
page 36).

ASSEMBLING THE STOVE
Your new Alpha stove is extremely
heavy. Always handle with care and
make sure that you have additional
strong help when you move it.
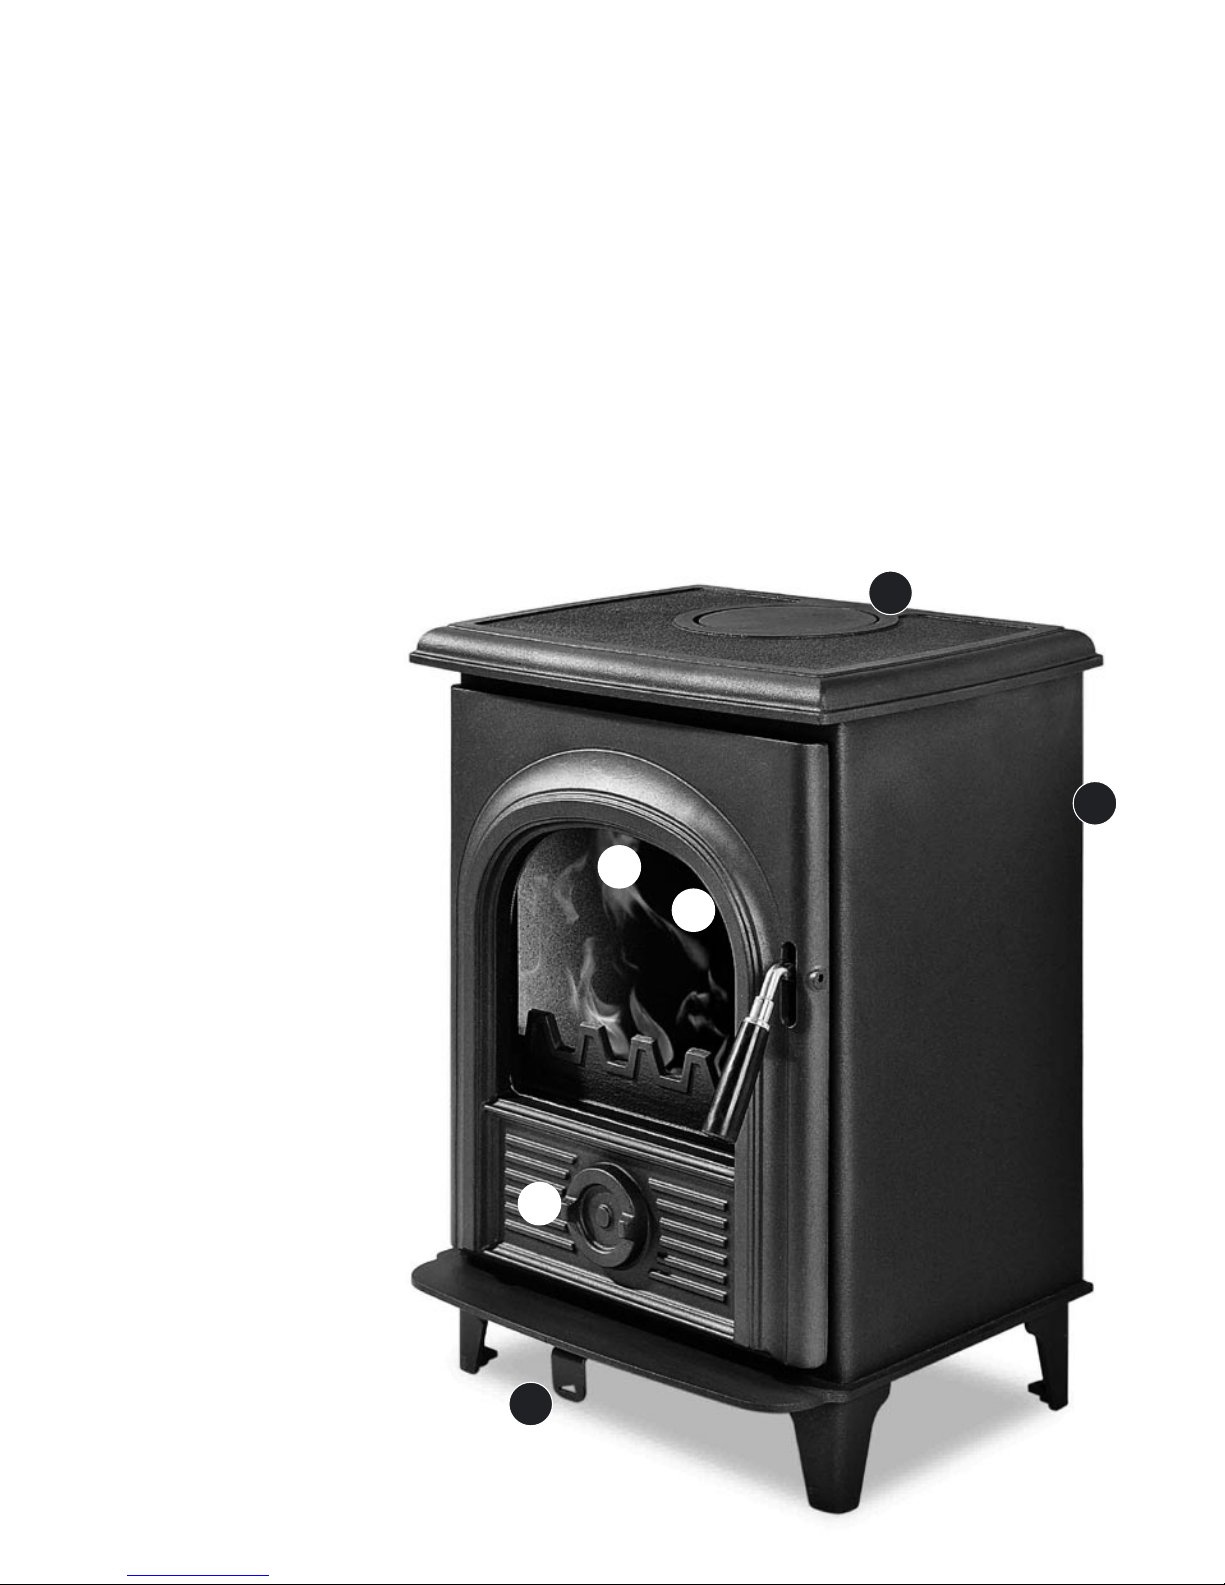
The ash lip on the Alpha I is factory fit-
ted and, along with the door and door
handle, should not be used to grip the
stove as they could be damaged from
supporting the stove’s weight. Items,
such as the lid and fuel retaining bar,
can be removed to help reduce the
weight. Under no circumstances should
the door be removed as this will
invalidate your Hi-Flame Warranty.
• Unpack Remove your new stove from
its recyclable packaging. Retain this
until the stove is installed and is fully
operational. Unfasten retaining wires
and remove any components, including
those inside the ash pan, from inside
the stove
• Inspect Please inspect the stove to
check that it has not been damaged in
transit – never attempt to install a stove
which has been damaged. If damage is
suspected then report this immediately
to your stove dealer
• Check List Study the component
packing list on page 4 and make sure
that you have all of the components
listed before proceeding. Some compo-
nents are contained within the ash pan
• Baffle Plate Check the position of
the baffle plate (sometimes known as
the throat plate) inside the ‘roof’ of the
stove to ensure that it has not moved
during transit. This is a heavy metal
plate which directs flames and helps
10
retain heat inside the stove. The base of
this plate should sit securely on a small
ledge at the back of the firechamber,
towards the top. The rest of the plate
is sits on top of the side firebricks to
maintain it at the correct angle and in
line with the top of these side firebricks.
It is best to fully familiarise yourself
with the baffle plate’s correct location
by practising removing it and re-fitting
it prior to the stove’s installation as you
will need to regularly check the top of
this plate and the access to the flue way
to avoid potential soot build up and
blockages. Once you know how to do
this it is a very easy operation.
See page 36
• Handle Assembly Thread the split
washer along the handle bolt. Feed the
bolt and washer through the handle
grip. Use a Phillips crosshead
screwdriver to attach the assembled
grip to the door handle clamp
mechanism on the door, being careful
not to over-tighten.
Your stove is now ready for installation.
• Moving Do not drag the stove.
Always lift the stove to finally position
it. Alternatively it may be possible to
place the stove on heavy duty plastic
sheeting or thick floor covering to slide
the stove into position, being careful
not to damage any finished floor
surfaces with trapped grit or building
debris.
• Flue Options The AL905-SE stove is
delivered already configured for a top
fitted 125mm (5”) flue pipe but can
easily be switched to the rear fitting flue
option. To do this see page 11.

11
FLUE OPTIONS
The AL905-SE stove can be configured
for a 125mm (5”) top or rear flue
outlet. Under no circumstances should
the flue pipe diameter be reduced from
125mm (5”) as this could be extremely
dangerous.
Remember a top flue outlet will always
be the most efficient choice if it can be
undertaken safely.
Top Flue Outlet
For a top flue outlet the aperture should
already be open on the top of the fire-
chamber bodywork and the flue collar
fitted at the factory.
On some models the flue collar may be
contained in the ash pan, in which case,
remove the loose fitting stove lid by
pulling it forward and lifting it upwards.
Attach the collar using the two bolts
supplied. Ensure that a good seal is
made between the firechamber surface
and the gasket on the flue collar – use
fire cement if necessary.
Re-attach the lid, ensuring it is pushed
towards the back of the stove and
‘locks’ securely against its locating lugs.
When the lid is properly located the
flue collar should be perfectly central in
the lid aperture. The flue pipe can then
be fitted through the lid into the collar.
Again, neatly apply a seal of fire cement
and / or fire rope to ensure an air-tight
connection.
Avoid getting fire cement on the
paintwork by masking the immediate
working area. Any excess fire cement
should be removed immediately.
Your Alpha stove should already be factory
configured to take a top flue outlet with the flue
collar fixed in position as shown above. However,
if using the rear flue option then the rear heat
shield should be removed to expose the rear flue
outlet blanking plate
The flue and blanking plate are then swapped over.
Be careful to ensure good air-tight seals are main-
tained on the new attachments – use fire cement
if necessary

12
Rear Flue Outlet
For a rear fitted flue, remove the heat
shield to gain access to the rear flue
outlet and remove the rear outlet
sealing plate.
Use the correct sized allen key or
‘hex-head’ screwdriver to avoid dam-
aging the bolts which will be re-used.
Once the two bolts are undone on the
blanking plate you may have to prise
this away very gently to avoid
damaging the gasket.
Remove the loose fitted stove lid by
pulling it forward slightly and lifting it
upwards to clear the top-fitted flue
collar. Undo the two bolts on the flue
collar and re-attach this to the rear flue
outlet ensuring that there is a good air-
tight seal between the flue collar gasket
and the bodywork. Use fire cement if
necessary. Now re-fit the rear blanking
plate to seal off the top flue outlet. Do
not use the decorative lid blanking plate
for this. Make sure you maintain a good
air-tight seal.
The decorative lid blanking plate
supplied with your new Alpha stove
will be contained in the ash pan. This
should be attached to the lid using the
bolts supplied. This makes a discreet
flush fitting closure of the lid aperture
and does not need sealing with fire
cement. Re-attach the lid, ensuring it is
pushed towards the back of the stove
and ‘locks’ securely against its locating
lugs. When the lid is properly located it
should sit squarely on top of the stove
and only be able to be moved forward.
Next remove the pre-cut flue outlet
shape on the rear heat shield.
The cut out can be easily removed by
using a junior hacksaw blade to cut
through the 4 small retaining links.
Re-attach the heat shield to the rear of
the stovel.
IMPORTANT
When using the rear flue option never
light or operate the stove without its
loose fitting lid securely located in the
correct position.
Your stove is now ready for installation.

INSTALLATION
REGULATIONS
You must ensure that your stove is
installed by a recognised competent
person who is appropriately qualified
in the installation of stoves and that
the installation complies with all local,
national and European building
regulations.
In the UK we strongly recommend using
a Hetas registered installer (www.hetas.
co.uk) and in Ireland a registered
installer from INFO – the Irish
Nationwide Fireplace Organisation
(www.fireplace.ie). Your authorised
Hi-Flame dealer will also be able
to help and advise you.
For further information on local
Building Regulations please consult:
England & Wales
Building Regulations Document J
(revised October 2010) – Combustion
Appliances and Fuel Storage Systems
www.planningportal.gov.uk
Scotland
Building Standards (2001) Domestic
www.sbsa.gov.uk
Northern Ireland
The Building Regulations (Northern
Ireland) 2000 / Amendment 2006 /
Amendment No 2 2006
www.buildingcontrol-ni.com
Isle of Man
Building Regulations (2007) – Isle of
Man
www.gov.im
13
Republic of Ireland
Approved Document J – Heat Producing
Appliances (Revised September 2014)
www.environ.ie
Other Information Points
For additional useful information and
links to the government websites
above, including informative down-
loads, visit The Solid Fuel Technology
Institute website www.soliftec.com.
The Solid Fuel Association website is
also a very good source of practical
information and downloads
www.solidfuel.co.uk.
The British Flue and Chimney
Manufacturers Association website,
www.bfcma.co.uk produces an authori-
tative and informative download guide
to solid fuel flues and chimneys.
Buildings Insurance
It is a requirement by some building
insurance companies to inform them of
the installation of a new fixed heating
appliance and a relevant certificate of
compliance produced.
Health & Safety
During the installation of this stove and
any related building works you must
comply with any current Health
& Safety at Work regulations.

14
The Clean Air Act 1993
and Smoke Control Areas
Under the Clean Air Act local
authorities may declare the whole or
part of the district of the authority to be
a Smoke Control Area.
It is an offence to emit smoke from a
chimney of a building, from a furnace
or from any fixed boiler if located in
a designated Smoke Control Area.
It is also an offence to acquire an
‘unauthorised fuel’ for use within a
Smoke Control Area unless it is used in
an ‘exempt’ appliance (‘exempted’ from
the controls which generally apply in
the Smoke Control Area).
The Secretary of State for Environment,
Food and Rural Affairs has powers
under the Act to authorise smokeless
fuels or exempt appliances for use
in Smoke Control Areas in England.
In Scotland and Wales this power
rests with Ministers in the devolved
administrations for those countries.
Separate legislation, the Clean Air
(Northern Ireland) Order 1981, applies
in Northern Ireland. Therefore it is
a requirement that fuels burnt or
obtained for use in smoke control areas
have been ‘authorised’ in Regulations
and that appliances used to burn
solid fuel in those areas (other than
‘authorised’ fuels) have been exempted
by an Order made and signed by the
Secretary of State or Minister in the
devolved administrations.
Further information on the
requirements of the Clean Air Act can
be found at the following website:
www.smokecontrol.defra.gov.uk.
Your local authority is responsible for
implementing the Clean Air Act 1993
including designation and supervision
of Smoke Control Areas and you can
contact them for details of Clean Air
Act requirements.
The Alpha I AL905-SE has a factory-
fitted modified control damper to
prevent closure of the main air control
beyond the 50% open position and has
been recommended as suitable for use
in Smoke Control Areas when burning
wood logs. In addition, the appliance
can burn Authorised Solid Smokeless
Fuels in Smoke Control Areas.
YOUR LEGAL OBLIGATIONS
IF YOU LIVE IN A UK SMOKE
CONTROL AREA

15
RECOMMENDED FUELS
• Hetas Approval Please note that
Hetas Limited Appliance Approval only
covers the use of wood and approved
smokeless fuels in this appliance. Hetas
Limited Approval does not cover the
use of other fuels, either alone or mixed
with wood, nor does it cover
instructions for the use of other fuels.
• Defra Smoke Exemption The
Alpha I AL905-SE stove is approved by
Defra as an ‘exempted appliance’ to
allow the burning of wood in designated
UK Smoke Control Areas. It must, at all
times, be operated in accordance with
the instructions to minimise the amount
of smoke produced.
The following fuels are approved by
Hi-Flame for use in the AL905-SE:
• Wood Logs Only ever use dried, fully
seasoned chopped wood logs with a
moisture content of less than 20%.
Wood which is well seasoned makes
a distinctive ‘clack’ rather than a dull
‘thud’ when knocked together. It will
also feel much lighter than an
unseasoned log. Other indicators
include bark peeling away and cracking
and splitting around the outside.
Ideally wood should be seasoned
outdoors for between 18 to 24 months
– the harder the wood then the longer
the seasoning. It should be stacked off
the ground with plenty of space
between the logs to allow air
movement and with the top covered
to keep rain and snow out. Seasoned
wood will give you approximately 50%
more heat output than the equivalent
unseasoned log.
Most types of hardwood, for instance
Ash (generally regarded as the best),
Birch, Beech, Oak and Elm can be used.
However, avoid woods with a high
resin content. As a rule of thumb, the
heavier the wood, then the greater the
heat output and the longer burn time
– the time between refills. All of this is
providing it is fully seasoned wood.
Never use wet or unseasoned (green)
wood as this will cause nuisance smoke
and a very disappointing fire.
It could quickly result in the build up of
soot and creosote which, because of
the higher temperatures of stove flue
gases, could easily cause a flue or
chimney fire. In addition, burning wet
wood creates other environmental
problems, a less efficient fuel economy
and can eventually clog your flue
system and cowl. It will also reduce the
effectiveness of the stove’s Airwash
system thus causing staining and
blackening of the glass.
Wet or unseasoned would produces the
following poor performance:
• Hard to light fires
• Fires that are difficult to keep going
or to keep burning well
• Smoky fires with fewer flames which
are also of a dull orange colour
• Increased dense grey / blue smoke
from the chimney
• Shorter burn times
• Low heat output
• Dirty glass and firebricks
• Excessive and rapid creosote build-up
in the flue system and chimney
• Unpleasant smoky smells both inside
and sometimes outside the house

16
Manufactured or finished wood
products, such as plywood and
chipboard, must also be strictly avoided
because of the high chemical adhesive
content used in their production which
will also leave harmful residue inside the
stove and flue system.
For more information about wood fuel
visit the Defra funded National Energy
Foundation website Logpile at
www.nef.org.uk/logpile.
• Peat or Turf Do not use in a Smoke
Control Area. Peat is an excellent
cost-effective fuel alternative and
provides a similar calorific heat output
to wood but has a higher ash content
so that you will be required to empty
the ash pan more often. It’s also clean
and easy to handle with low
atmospheric emissions.
• Multi Fuels (Other than wood or
peat). Only burn Approved Smokeless
Fuels in a Smoke Control Area. Use solid
fuels which are recommended and
approved for use in stoves.
If you cannot burn wood then we
always recommend burning a smokeless
alternative as this is better for the stove
and flue system as well as the environ-
ment. There are many different brands
of high quality smokeless coal nuggets
available in the UK and your local fuel
merchant, preferably a member of the
Approved Coal Merchants Scheme, will
be able to advise you on those suitable
for multi fuel stoves. You can also find
out more about the various fuel types
by visiting www.hetas.co.uk and
www.solidfuel.co.uk.
PROHIBITED FUELS
Never use your stove like an incinerator.
Burning prohibited ‘fuels’ is an offence
in a Smoke Control Area and could
create nuisance smoke which is also an
offence in non-Smoke Control Areas.
Burning the following ‘illegal’ materials
could also damage your stove and flue
system, as well as render the product
warranties on the stove and flue system
components void.
• Petroleum Coke Never burn
petroleum coke as this burns at a very
high temperature and its continued use
will almost certainly cause irreparable
damage to components such as the
grate, baffle plate and fire bars.
• Bituminous House Coal is not
recommended because it produces
excessive soot deposits, which is not
good for the environment, and also
considerably increases the need for
cleaning the stove and flue system.
• Household Rubbish Printed matter
(excluding very small amounts of
newspaper for starting the fire),
plastic, rubber, lacquered or
impregnated wood, plywood,
chipboard and household rubbish, such
as milk cartons, should also be avoided.
During combustion some of these
materials may develop substances
which could be hazardous to your
health and be harmful to the
environment.
• Flammable Liquids Never use
methylated spirits, petrol or other highly
inflammable liquids for lighting the fire
as these could cause an explosion in the
confined spaces of the firechamber.

17
IMPORTANT: FIRST FIRES
Use smaller and shorter ‘gentle’ fires
the first five or six times that you fire up
the stove, making these progressively
bigger, as this will avoid any potential
thermal shock and allow the cast iron
components to ‘acclimatise’ with each
other. Allow the stove to fully cool
down between these fires.
When first using the stove it is normal
to experience paint fumes or see light
smoke rising from some of the stove’s
painted surfaces. During this stage
ensure that the room has additional
ventilation by opening doors and
windows to minimise any adverse
effects.
The hotter you burn the stove the more
intense these fumes will be, which is
one of the reasons that we advise that
you use smaller fires to start with. Every
time the stove reaches a new higher
temperature it may still be possible to
smell these fumes or see some
gentle smoke until the paint work is
fully cured.
If smoke and fumes persist do not use
the stove and immediately consult your
installer, as this may indicate that there
could be a possible problem with the
installation.
UNDERSTANDING HOW
DIFFERENT FUELS BURN
Wood and solid fuels (multi fuels) burn
in different ways and you will need to
understand these differences if you
want to get the best out of operating
your stove.
Basically solid fuels need a flow of
combustion air through the bottom
grate whereas wood does not require
this as its combustion air can be taken
from above the grate. Wood always
burns best on a bed of its own embers
and shouldn’t need to be riddled. On
the other hand, solid fuel requires
riddling to maintain an adequate air
flow from underneath the grate.
Your new stove can burn very well, or
very poorly, depending on how you
light the fire, how you refuel the fire,
and, of course, the type and quality of
the fuel that you are burning. A flue
temperature gauge and log moisture
meter are both cost-effective invest-
ments and are highly recommended if
you want to maximise the efficiency of
your stove and fuel.
Wear protective gloves when loading a
burning stove and place logs and other
fuels precisely where you want them by
using heat-resistant tongs. Always open
the stove door gently to avoid
unnecessary air turbulence which could
cause ash or small lighted embers to
be drawn from the fire chamber and
beyond the protective hearth. Never
operate the stove without the fire fence
(or log guard) in position.
The stove is not designed to be
operated with the door open.

18
BURNING WOOD LOGS
As previously stated wood burns best
on a bed of its own embers which also
forms a barrier that reflects heat and
protects the fire grate from being
damaged. You can therefore leave a
bed of ash in place to create a layer of
approximately 25mm (1”), only
occasionally removing the surplus ash.
The end grain of the wood produces
more of the remaining moisture and
gases so whenever possible point the
log ends away from the glass to help
keep the glass clean.
Fuel Load Ideally the logs should be
approximately 225 – 250mm (9” – 10”)
long and a typical fuel load should
weigh 1.0 – 1.5kg (2.2lb – 3.3lb).
To get the best out of your stove,
ideally you will need three different
thicknesses of wood log as you build
the fire through each lighting phase:
A Kindling This is generally finely
chopped wood, approximately 5 to
10mm thick (1/4” to 1/2”) from your
supply of logs. Alternatively use dried
The recommended maximum fuel load: Photo
shows a typical loosely stacked fuel load of
approximately 1.5kg of fully seasoned wood logs
approx 250mm (9”) long by 75 – 100mm thick
AB
C
twigs or small branches which have also
been fully seasoned
B Lighting Logs These are slightly
bigger diameter logs, approximately 25
to 50mm (1” to 2”)
C Refuelling Logs These should be
approximately 75 to 100mm thick (3”
to 4”). Bigger logs should be split down
to this size
Lighting a wood fire
The main difference between smoke
and flame is temperature, so when
lighting a fire you need to get the
temperature in the firechamber as high
as possible as quickly as possible. This
is also critical in creating a good ‘draw’
within the flue system, especially when
it is particularly cold outside.
When flue gas temperatures are below
120°C, creosote tars form within the
gases and the fire will be smoky and

19
burn with a dull orange flame. Burning
the stove like this for a sustained period
will create unnecessary smoke and not
be good for the chimney or flue system.
1 The Lighting Phase
For best results:
Primary Air – fully open
Secondary Air – fully open
Door – slightly ajar (optional)
Avoid trying to light the fire with
excessive amounts of paper as this
has a very high ash content which can
‘smother’ the ash bed. If you have good
dry kindling or sticks then paper should
not be needed at all.
The size of the logs used at each stage
is also important. If the kindling wood is
too large this will not light well and will
be slow to get started. Two handfuls of
smaller pieces of kindling (equivalent
to the weight of typical log) layered in
a criss-cross or ‘wig-wam’ and a small
firelighter will get the fire well
established and up to operating
temperature quickly.
If you feel you have a weak chimney
draught, then keeping the stove door
slightly ajar for the first 10 – 15
minutes will assist, after which it should
be closed. This will also help prevent the
build-up of condensation on the door
glass until the glass warms up,
especially if you have not used the stove
for a few days.
During the lighting phase the Primary
and Secondary air settings on the stove
should be fully open.
2 The First Refuel Phase
For best results:
After 10 minutes
Primary Air – close completely
Secondary Air – fully open
Door – closed
Once the embers are starting to glow
and the flames start to calm down the
first refuelling can take place. For this
stage use slightly larger pieces of wood
than the lighting wood – but smaller
than the main refuelling wood in the
next phase. The reason for this is that
the embers from the kindling wood are
small and will not hold a high
temperature for too long.
If unnecessarily large pieces of wood
are placed on the embers at this stage
and do not ignite well there is a risk
that the firebox will cool down and the
wood start to smoke. When the first
refuelling wood is burning well (say,
after about 10 minutes from the start)
the Primary air can be completely shut
off.
Maximum height of wood fuel load
Maximum fuel load: This should never be higher
than the lowest part of the logo circle in the
tertiary air plate at the back of the firechamber as
shown.

20
Use the tool provided to adjust the Secondary air
/ Airwash control A at the base of the stove –
moving it to the left hand side will reduce the air
supply and ‘slow’ the fire down. B is Primary air
B
A
3 The Main Firing Phase
For best results:
After 17 or 18 minutes –
Secondary Air – adjust to suit
Primary Air – remains closed
Door – remains closed
Once the embers of the first refuel
phase are glowing then these can be
evenly spread with a poker or
companion tool and the main
refuelling wood can be quickly set.
Wood burns best if the flames have
other wood to ‘play off’. For example a
single dense piece of wood or log will
not burn as well as 2 or 3 smaller logs
of equivalent mass. The more contact
the wood has with each other piece,
the hotter the embers will be. 3 or 4
logs tightly packed to each other will
burn longer but at a lower temperature
than loosely criss-crossed logs.
Approximately 1.0 to 1.5kg of wood
logs can be added at this stage. Be
careful not to add too many logs as
they may ‘smother’ the fire.
Try to avoid setting the ends of the logs
pointing towards the glass as this can
cause staining which the Airwash may
find difficult to remove.
Only reduce the Secondary air control
when the wood has ‘carbonised’ and
the fire is burning at a high
temperature. This is when the ash on
the burning wood looks light grey and
virtually covers all of the wood. A flue
temperature gauge will be invaluable.
You will be able to tell when the stove
is at this stage by studying the colour of
the burning surfaces – the ‘lighter’ they
are the better the wood is burning.
If the log surface is predominately
black and / or the flames are a dull
orange then there is still some time to
go before the fire is operating at full
temperature.
Never leave the stove unattended after
refuelling until the flames are well
established on the new logs. Always
load onto a bed of hot embers.
Once the fire is established the flame
pattern can then be adjusted to your
requirements with the Secondary air
(Airwash) control.
Getting the balance right between a
gently burning stove and one that is
burning too slow, creating smoke and
causing the Airwash to fail and
consequently the glass to stain is very
much a matter of trial and error. If you
are burning well-seasoned wood then
a quick ‘blast’ of the stove operating at
‘full throttle’, with Secondary and
Primary air fully open, should quickly
Other manuals for I AL905-SE
1
Table of contents
Other Alpha Stove manuals
Popular Stove manuals by other brands

Golden Eagle
Golden Eagle THE LINCOLN Operating & installation manual

Regency
Regency Ultimate U39 Owners & installation manual

Premier
Premier EF-0578E instruction manual

Morso
Morso 6140 instruction manual

Harvia
Harvia M3 SL Additional instructions

Continental Refrigerator
Continental Refrigerator CEFS22H-LOWC Installation and operation manual

Lofty
Lofty SJ15SFB owner's manual

United States Stove Company
United States Stove Company KP60 Owner's operation and instruction manual

Yeoman
Yeoman PM302 Fittings guide

Heta
Heta Icon-line Moderna Series Operating and installation instructions

Coleman
Coleman 5469-700 Instructions for use

Regency
Regency C33-LP2 Owners & installation manual