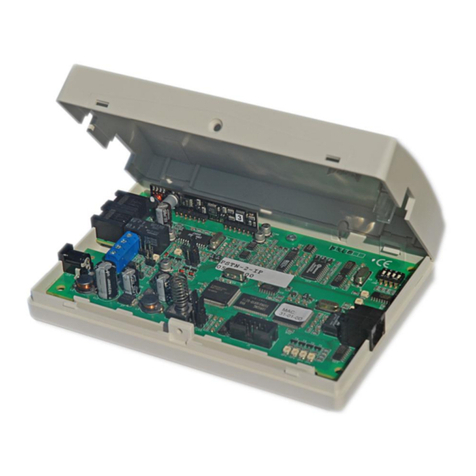
alphatronics PSTN-2-IP GPRS User manual

Alphatronics bv * Watergoorweg 71* 3861MA Nijkerk * Tel.: 033-2459944 * Fax.: 033-2453149 [email protected]
www.alphatronics.nl
Quick reference guide
PSTN-2-IP (GPRS)

PSTN-2-IP & PSTN-2-IP GPRS Quick reference Rev.1.0 01-11-2012 Page 2

PSTN-2-IP & PSTN-2-IP GPRS Quick reference Rev.1.0 01-11-2012 Page 3
Table of contents
TABLE OF CONTENTS......................................................................................................... 3
INTRODUCTION.................................................................................................................. 4
PREPARATIONS................................................................................................................. 5
MOUNTING........................................................................................................................ 5
ALPHATRONICS DEVICE DISCOVERY................................................................................... 6
LOGIN............................................................................................................................... 6
CONFIGURATION WIZARD ................................................................................................... 7
PRIMARY CONNECTION ...................................................................................................... 7
BACKUP CONNECTION........................................................................................................ 8
CONTROL ......................................................................................................................... 8
CLOSE WIZARD.................................................................................................................. 9
MEANING OF THE TRANSCEIVER LEDS:........................................................................ 10
MEANING OF THE INDICATION LEDS:............................................................................. 10
MEANING OF THE STATUS LEDS: ................................................................................... 10
DIPSWITCH SETTINGS ON THE ALPHACOM PSTN-2-IP (GPRS) ...................................... 11

PSTN-2-IP & PSTN-2-IP GPRS Quick reference Rev.1.0 01-11-2012 Page 4
Introduction
The Installer manual for the PSTN-2-IP (GPRS), given the size of this manual, is not included
in the product package. This manual is available on request from the sales department or can
be downloaded as a pdf version from the website. Go to Security Installers and then to Service
& Support. You will need to login (see screen below)
User: your customer number (format: 1XXXXXX)
Password: the province in which your company is situated (starting with a capitol letter)
Then you can download the file under Digital Manuals, IP solutions:
Installer manual PSTN-2-IP & PSTN-2-IP GPRS transceiver.
Should you prefer to receive a paper copy, please contact the sales dept.
We will then send a copy.

PSTN-2-IP & PSTN-2-IP GPRS Quick reference Rev.1.0 01-11-2012 Page 5
Preparations
Before installing make sure the following components are present:
Security alarm system with analog dialer or Alphatronics control panel with RS-485 bus
12VDC power supply in the control panel (only applicable if the transceiver is powered
from the control panel)
Otherwise a net adapter can be used (art. code. 200079)
Router or switch with a free LAN connection
Working internet connection
Computer / laptop with Internet Explorer 6 or higher#,Mozilla FireFox, Google Chrome
or compatible browser.
Network cable and optional cross-over network cable for programming
# Note: Internet Explorer 5.0 (or lower) is not supported!
Before installing make sure the following information is known:
The protocol that the analog dialer of the control panel transmits (only applicable if the
analog dialer is connected via the PSTN interface)
The IP address and registration port of the RC-4001 IP or RX-5000/8000 receiver in
the central station including the subscriber number.
The IP address, subnet mask and (local) Gateway that must be programmed into the
PSTN-2-IP (GPRS) when not using DHCP configuration in the Ethernet settings
Mounting
1. It is advisable to install the PSTN-2-IP (GPRS) in the enclosure of the control panel. If
this is a metal cabinet than it should be equipped with a proper grounding.
2. When the analog (PSTN) dialer of the control panel is still connected to the telephone
(or VoIP) line, remove the cable from the phone line.
3. If connection to the IP transceiver is done through the PSTN interface, connect the
cable from the analog dialer to the dialer terminal (CMK) of the PSTN 2 IP (GPRS)
transceiver. Note: the cable of the analog dialer must be shorter than 30 meters.
4. Then connect a network cable between the PSTN 2 IP (GPRS) and the router, the
transceiver can now be accessed via the internal network. Use the free Device
Discovery Tool (see www.alphatronics.nl) to detect Alphatronics IP devices on the
network.
5. It is also possible to connect directly to the PSTN-2-IP (GPRS) using a Cross-over
network cable (art. code. 003620) between the LAN port of the laptop and the PSTN-2-
IP (GPRS). Ensure that the laptop has a fixed IP address in the same range
(192.168.0.xx) as the PSTN-2-IP (GPRS). Set dipswitches 2 * and 3 ** to ON.
6. Finally connect the power supply to the PSTN-2-IP (GPRS).
*dipswitch 2 to ON ensures that it is always possible be log-in to the web server with Username "admin" and no
Password needs to be entered. Also, the IP address of the PSTN 2 IP (GPRS) is temporarily set to
192.168.0.48 (http port 80). Dipswitch 2 can remain OFF if the Username, Password and the IP address of the
PSTN 2 IP (GPRS) is known.
** dipswitch 3 to ON (default) ensures that the programming can be accessed / modified.
If dipswitch 3 is set to OFF then the webpage of the PSTN-2-IP (GPRS) is completely blocked and it is not
possible to get into the programming.

PSTN-2-IP & PSTN-2-IP GPRS Quick reference Rev.1.0 01-11-2012 Page 6
Alphatronics Device Discovery
All Alphatronics IP devices (including the PSTN 2 IP (GPRS)) can always be easily found on
an internal network by using the 'Alphatronics Device Discovery tool. This tool is present in the
AlphaTool software but is also available as a single tool which can be freely downloaded from
the website www.alphatronics.nl (installer, service & support). Start the tool and then double-
click the desired device. The default browser on your PC/laptop will open automatically the
webserver of the selected device.
Login
Once your browser has been opened, the login screen of the selected IP device is shown. For
the PSTN 2 IP (GPRS) transceiver it is the following screen:
When dipswitch 2 is set to ON you can login using the user "admin". The Password field
should be left empty. The temporary IP address is now 192.168.0.48. When dipswitch 2 is set
to OFF, then the correct username and password must be entered.
If too often an incorrect user / password combination is entered then access to the web server
is temporarily blocked and optionally an alarm message is generated.

PSTN-2-IP & PSTN-2-IP GPRS Quick reference Rev.1.0 01-11-2012 Page 7
Configuration wizard
From firmware version 2.00 a configuration wizard has been introduced to the AlphaCom
PSTN-2-IP (GPRS) to be able to program the transceiver in 5 simple steps. Read the welcome
screen carefully and make sure that all required information is present before you start
programming. You can always return to the standard programming screens by clicking the
'Advanced Settings' button. If you have all required information present press Next:
Primary connection
Central station protocol
(SIA-HS or Sec IP)
IP-address, Registration
port and Account number.
Grade-3 reporting
Polling 300 (No) or 90 sec. (Yes).
GPRS back-up
GSM module present (Yes or No)

PSTN-2-IP & PSTN-2-IP GPRS Quick reference Rev.1.0 01-11-2012 Page 8
Backup connection
Control
Central Station protocol
(SIA-HS or Sec IP)
IP-address, Registration
port and Account number.
Pin code simcard
APN name
Username
Password
Interface connection
PSTN or RS-485 bus
PSTN protocol
Own power –Yes/No
Username
Password

PSTN-2-IP & PSTN-2-IP GPRS Quick reference Rev.1.0 01-11-2012 Page 9
Close wizard
Press Finish to save all settings, the AlphaCom PSTN-2-IP (GPRS) will restart. Verify that the
PSTN-2-IP (GPRS) functions correctly. Via 'Advanced Settings', the System Status screen can
be shown with a summary of the status of the device.

PSTN-2-IP & PSTN-2-IP GPRS Quick reference Rev.1.0 01-11-2012 Page 10
Meaning of the TRANSCEIVER LEDs:
LED number
Colour
Description
LED OP2
green
Flashes slowly when the firmware in the transceiver functions correctly.
LED OP3
red
Illuminates when a message is in the buffer or when no dialers have
been programmed.
LED OP4
green
Status of the 2nd transceiver with corresponding backup path.
LED OP5
green
Status van de 1st transceiver with corresponding backup path.
Meaning of the INDICATION LEDs:
LED number
Colour
Description
LED OP8
green
Power supply present
LED OP6
green
LAN activity
LED OP7
green
LAN link
Meaning of the STATUS LEDs:
LED number
Colour
Description
LED OP1
green
Watchdog LED. Should be constantly illuminated to indicate that the
hardware functions correctly. Is turned off during flashing.
LED OP9
red
Is illuminated when the priority relay is activated. The incoming PSTN
line (CMK) is connected to the outgoing PSTN telephone line (TEL). As
long as this led is illuminated the AlphaCom PSTN-2-IP (GPRS) will not
transmit alarm messages received via the PSTN line (CMK).

PSTN-2-IP & PSTN-2-IP GPRS Quick reference Rev.1.0 01-11-2012 Page 11
DIPSWITCH settings on the AlphaCom PSTN-2-IP (GPRS)
Dipswitch
number
Setting
Description
1
OFF
‘Normal’ position
ON
When dipswitch 1 is set to ON and the AlphaCom PSTN-2-IP (GPRS) is
powered up, the default settings will be programmed.
2
OFF
‘Normal’ position. The programmed web server- and Ethernet settings
will be used.
For access to the programming the programmed ‘Username’ and
corresponding ‘Password’ must be entered.
ON
Default web server and Ethernet settings are used instead of the
programmed settings.
The AlphaCom PSTN-2-IP (GPRS) can now be reached via IP address
192.168.0.48 and web server port 80. The programmed settings are not
erased!
For access to the web server the standard Username (admin) must be
entered and no Password instead of the programmed Username and
Password.
Note: the default gateway in this mode is set to 0.0.0.0
The PSTN-2-IP (GPRS) is temporarily not accessible from the outside
world!
Use this mode only to program the Ethernet and Username / Password
settings. Restart the AlphaCom PSTN-2-IP (GPRS) and set dipswitch 2
to OFF.
Note: when the PSTN-2-IP (GPRS) is set to DHCP and dipswitch 2 is set
to ON, the PSTN-2-IP (GPRS) temporarily works with a fixed IP address
192.168.0.48 and web server port 80!
3
OFF
Access to the programming is blocked entirely. When trying to access
the webpage a page will be displayed with a message that access to the
transceiver is not possible. This is the most secure mode.
ON
Access to the programming is possible using the programmed Username
and Password.
4
OFF
Dipswitch 4 should always be set to OFF. The helpdesk personnel of
Alphatronics may ask you temporarily (!) to set to ON.
WEEE-declaration
This Alphatronics product is manufactured with the most modern technology
and consists of high quality components. Most of the components used can
be recycled.
The symbol means that this product should be recycled separately and not
put in the normal waste bin together with normal household waste.
This product can be handed over to your local city council disposal point,
shop or supplier
© Alphatronics –2012

Alphatronics bv * Watergoorweg 71* 3861MA Nijkerk * Tel.: 033-2459944 * Fax.: 033-2453149 [email protected]
www.alphatronics.nl
Other manuals for PSTN-2-IP GPRS
1
Table of contents
Other alphatronics Transceiver manuals
Popular Transceiver manuals by other brands

Standard Horizon
Standard Horizon HX40 Owner's manual and user's guide

Intek
Intek MT-3030 owner's manual

Kenwood
Kenwood TK-3312 Service manual

General Radiotelephone Company
General Radiotelephone Company Super MC-IIA Operation guide

Yaesu
Yaesu FTM-3200DE Advance manual

Em-Trak
Em-Trak B900 Series user manual