Alti-2 ALTIMASTER NEPTUNE User manual

- 2-
Introduction
Congratulations on buying an Altimaster Neptune!
Neptune information is constantly being updated. Please refer to our website,
www.alti-2.com, for the latest information.
All altitude measurements are referred to in feet in this manual.
Software Upgrades
The Neptune has an Infrared interface which allows you to update the built-in
software as new versions become available. Software updates are available free of
charge from our website: www.alti-2.com.
Customer Support
The Neptune has a considerable number of options and facilities covering alarm
settings, log book, manual mode, DZ offset, contrast, flip, backlight, etc., etc. There
are hundreds of combinations of settings, and it is impossible to cover each one in
detail. We have attempted to cover the basics of all functions, however:
If you have ANY problems or question, please call or e-mail us. We will do our best
to help you get the most out of your Neptune.
386-943-9333
We may have Altimaster Field Support at your drop zone. Check our online
Altimaster Field Support locator: http://www.alti-2.com/field_support_locator.htm.
WARNING
PARACHUTING IS A HAZARDOUS ACTIVITY THAT CAN RESULT IN INJURY OR DEATH.
An altimeter is a device subject to malfunction, even when properly designed, built, assembled, maintained and used. Do not
rely upon an altimeter for your safety. Your altimeter must only be considered as an aid when checking your altitude.
A visual cross reference with the ground should be used in combination with any altimeter.

Table of Contents
INTRODUCTION.................................................................................................................................................................... 2
SOFTWARE UPGRADES.....................................................................................................................................................2
CUSTOMER SUPPORT.........................................................................................................................................................2
TABLE OF CONTENTS.........................................................................................................................................................3
BASIC OPERATION .............................................................................................................................................................4
BASIC SETUP PROCEDURE.............................................................................................................................................4
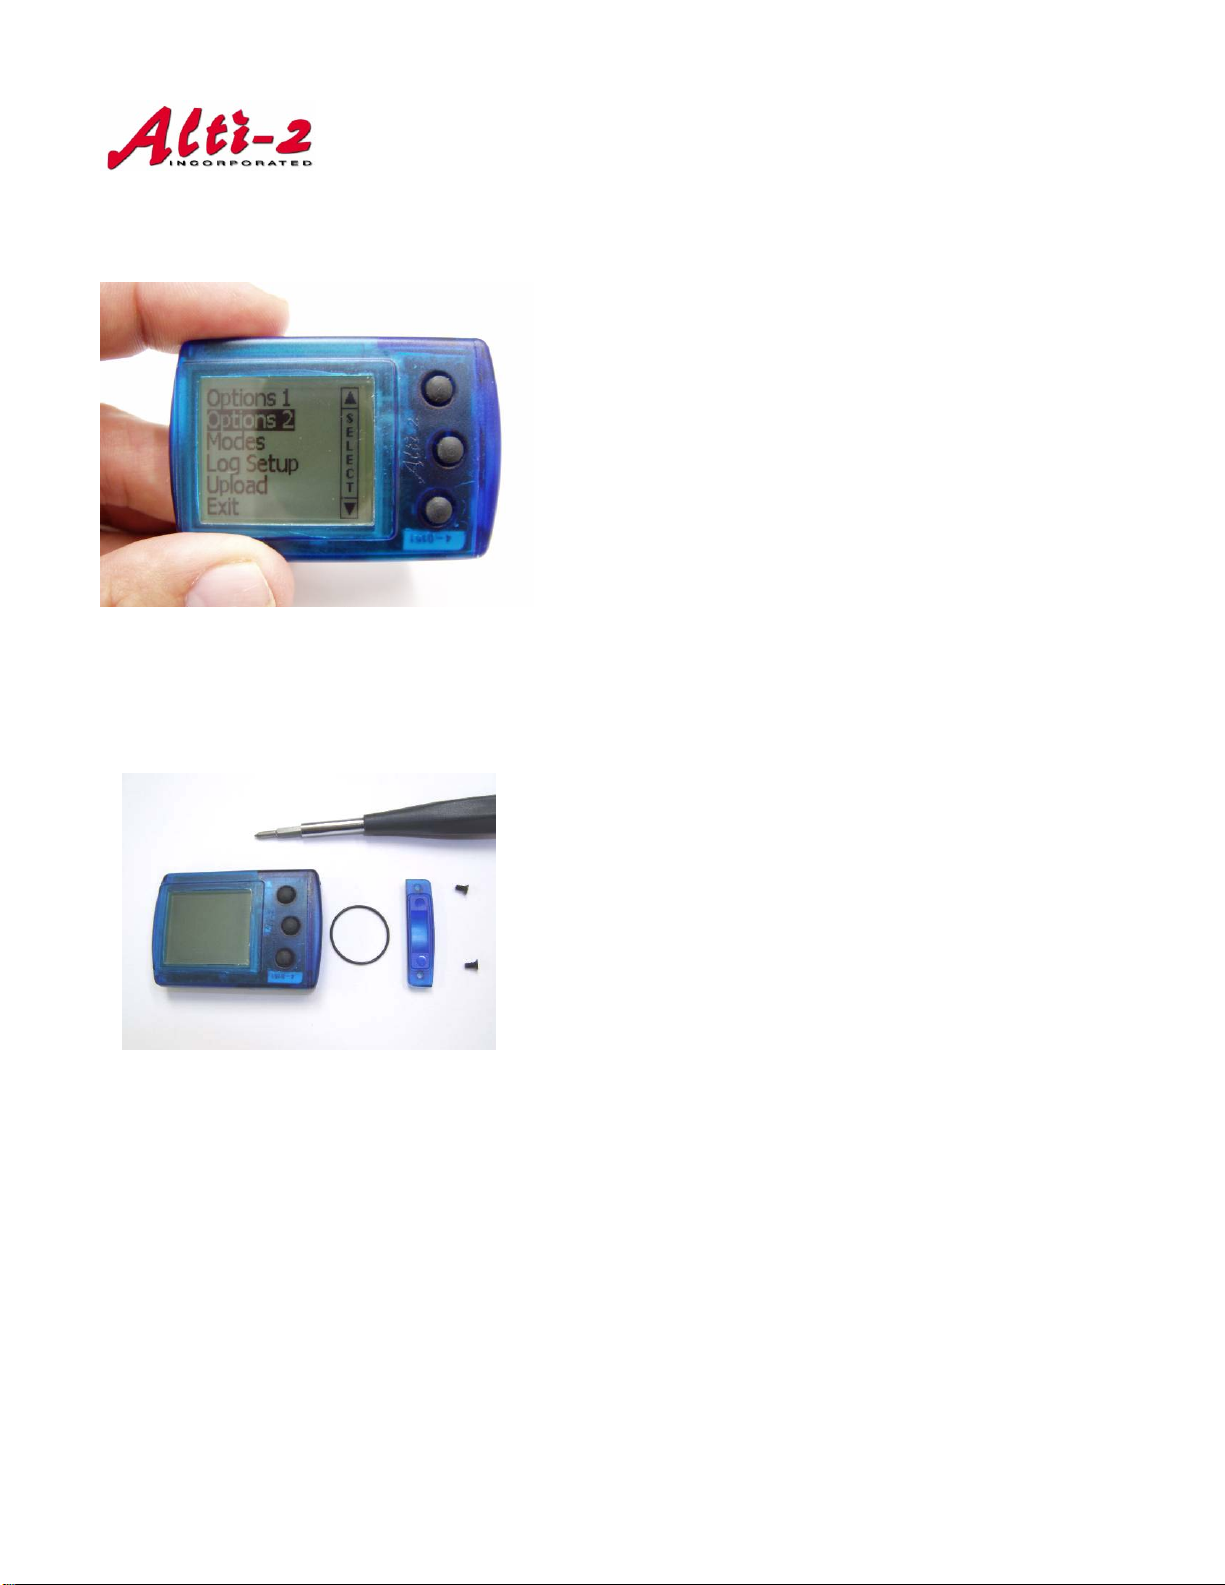
INSERT BATTERY...........................................................................................................................................................................4
FITTING THE HELMET CLIP...........................................................................................................................................................6
HAND MOUNT................................................................................................................................................................................7
TIME AND DATE.............................................................................................................................................................................8
LOGBOOK SETUP...........................................................................................................................................................................9
ALARMS..........................................................................................................................................................................................9
IR DOWNLOADS.................................................................................................................................................................10
DISPLAY SCREENS / MODES.......................................................................................................................................11
GROUND.......................................................................................................................................................................................11
ALTITUDE..................................................................................................................................................................................... 12
CLIMB...........................................................................................................................................................................................12
FREEFALL .....................................................................................................................................................................................13
CANOPY........................................................................................................................................................................................14
ALARMS...................................................................................................................................................................................14
GENERAL...................................................................................................................................................................................... 14
FREEFALL ALARMS.......................................................................................................................................................................16
CANOPY ALARMS......................................................................................................................................................................... 18
LOG BOOK..............................................................................................................................................................................20
DZ SETUP................................................................................................................................................................................24
FLIP ...........................................................................................................................................................................................25
BACKLIGHT............................................................................................................................................................................25
AUTO/ECON..........................................................................................................................................................................26
MODES......................................................................................................................................................................................26
DEMO MODE................................................................................................................................................................................ 26
DEMO ALARMS ............................................................................................................................................................................26
TRAINING MODE................................................................................................................................................................27
SPECIFICATIONS...............................................................................................................................................................28
DISASSEMBLY......................................................................................................................................................................28
GENERAL CLEANING........................................................................................................................................................28
MAINTENANCE AFTER SUBMERSION IN SALT WATER................................................................................29
SERVICING............................................................................................................................................................................30

- 4-
Basic Operation
All menus have the same basic
operation; the top and bottom
buttons move the cursor and the
center button selects the highlighted
choice.
Basic Setup Procedure
Insert Battery
Remove the two screws securing the battery
cover using a Phillips screwdriver.
Be careful not to lose the O ring.
WARNING
PARACHUTING IS A HAZARDOUS ACTIVITY THAT CAN RESULT IN INJURY OR DEATH.
An altimeter is a device subject to malfunction, even when properly designed, built, assembled, maintained and used. Do not
rely upon an altimeter for your safety. Your altimeter must only be considered as an aid when checking your altitude.
A visual cross reference with the ground should be used in combination with any altimeter.

- 5-
Insert one type Duracell DL2450 (or
equivalent) battery.
2 batteries are provided; 1 is a spare.
The battery should only be inserted with the
“+” side up, i.e. toward the buttons.
Do not let metal of any kind to come in
contact with the battery, and do not allow
two batteries to touch each other.
The Neptune will only be waterproof if you fit
the o-ring into the groove in the battery
cover.
This can be an awkward task and you may
wish to use silicon grease or petroleum jelly
to help hold the o-ring in the grove.
If you never jump near water you can leave
the o-ring out.
Replace the two screws, but DO NOT
OVERTIGHTEN! This can crack the battery
cover and cause the unit to lose water
resistance.
You can press the battery cover down to seal
the o-ring to the body of the unit for
maximum water resistance.
WARNING
PARACHUTING IS A HAZARDOUS ACTIVITY THAT CAN RESULT IN INJURY OR DEATH.
An altimeter is a device subject to malfunction, even when properly designed, built, assembled, maintained and used. Do not
rely upon an altimeter for your safety. Your altimeter must only be considered as an aid when checking your altitude.
A visual cross reference with the ground should be used in combination with any altimeter.

- 6-
Fitting the Helmet Clip
If you wish to use Neptune as an external
audible altimeter, use the helmet clip and tie
wraps provided.
Align the Neptune’s speaker with the speaker
hole in the helmet clip. Failure to do so may
result in inaudible alarms.
Using the “Flip” function, the Neptune can be
fitted with the buttons in either direction, on
either side of your helmet. Use the tie wraps
to attach the clip to your helmet in desired
position, keeping the speaker hole and
speaker aligned.
The Neptune is snapped into the clip.
The clip is designed to fit in a recess as
shown. If mounted on a non-recessed
helmet, we suggest that a rubber band be
fitted around the clip to prevent the Neptune
from sliding out.
WARNING
PARACHUTING IS A HAZARDOUS ACTIVITY THAT CAN RESULT IN INJURY OR DEATH.
An altimeter is a device subject to malfunction, even when properly designed, built, assembled, maintained and used. Do not
rely upon an altimeter for your safety. Your altimeter must only be considered as an aid when checking your altitude.
A visual cross reference with the ground should be used in combination with any altimeter.

- 7-
Hand Mount
If you wish to use Neptune as a visual
altimeter we suggest you use the hand mount
provided.
Lay the hand mount across the back of the
Neptune. Line up the four (4) holes with the
threaded inserts in the back of the Neptune
and insert the screws provided, with the
washers between the fabric and the screws.
You may use Loctite to hold the screws
securely in place.
If you wish to wear the Neptune on your
wrist, like a watch, use the wrist mount
provided.
The fabric wrist mount is attached to the back
of the Neptune in the same way as the hand
mount. The narrow wrist strap is then fed
through the channel in the wrist mount.
Metal backplates were previously issued with
Neptunes. Do NOT use one of these
backplates alone with the narrow wrist strap;
this setup will crack the display!
WARNING
PARACHUTING IS A HAZARDOUS ACTIVITY THAT CAN RESULT IN INJURY OR DEATH.
An altimeter is a device subject to malfunction, even when properly designed, built, assembled, maintained and used. Do not
rely upon an altimeter for your safety. Your altimeter must only be considered as an aid when checking your altitude.
A visual cross reference with the ground should be used in combination with any altimeter.

- 8-
Time and Date
Setting the time and date is typical of many Neptune setup menus. This
adjustment is explained in detail to familiarize you with the menu system.
The system starts up in the ground screen. It
displays time, date and temperature.
Icons indicate:
•the battery state
•alarms enabled or disabled
•logbook enabled or disabled
•backlight enabled (no icon for disabled)
Start by pushing the center “Menu” button on
the ground screen. The Main Menu will be
displayed.
Move the cursor (top or bottom button) to
“System” and press “Select” (center button).
In the “System” menu, most of the basic
setup options are under “Options 1” or
“Options 2”.
Move the cursor (top or bottom button to
“Options 2” and press “Select” (center
button)
You will now see the “Time/Date” setting
option, as well as many others.
(Neptune pictured with optional Armor and Screen
Protector)
WARNING
PARACHUTING IS A HAZARDOUS ACTIVITY THAT CAN RESULT IN INJURY OR DEATH.
An altimeter is a device subject to malfunction, even when properly designed, built, assembled, maintained and used. Do not
rely upon an altimeter for your safety. Your altimeter must only be considered as an aid when checking your altitude.
A visual cross reference with the ground should be used in combination with any altimeter.

- 9-
The cursor will already be on the “Hours”
setting.
Use the top and bottom buttons to increase
or decrease the number, then press “Select”
and the cursor will move to the next item.
When all entries have been adjusted the
system will automatically exit from this
screen.
Logbook Setup
From the “System” menu, select “Log Setup”
The Logbook setup menu allows you to set
the starting number of jumps and starting
Freefall (FF) time.
If necessary it also allows you to delete the
entire logbook.
Alarms
From the Main Menu, move the cursor down to
“Alarms” and press “Select”
WARNING
PARACHUTING IS A HAZARDOUS ACTIVITY THAT CAN RESULT IN INJURY OR DEATH.
An altimeter is a device subject to malfunction, even when properly designed, built, assembled, maintained and used. Do not
rely upon an altimeter for your safety. Your altimeter must only be considered as an aid when checking your altitude.
A visual cross reference with the ground should be used in combination with any altimeter.

- 10 -
Neptune will display the current alarm group
and altitude settings.
If the settings are correct, select “OK”. If you
want to change them, select “Edit/Select”
Alarm setup is described in detail under the
'Alarms’ section of this manual.
IR Downloads
The Neptune has a build in IrDA
compliant infrared port which provides
a wireless link to your PC.
The IR port allows:
•Neptune software to be updated
•The log book to be downloaded to Paralog.
For Neptune software updates, go to www.alti-2.com. Full download instructions are
included with the program software.
Instructions on downloading jumps to Paralog can be found in the Log Book section
of this manual. Paralog can be purchased online at www.paralog.net.
If you have any questions or problems updating your Neptune, please go to our
online Altimaster Field Support locator to see if we have Field Support at your drop
zone. If there is none, please call or e-mail Alti-2.
www.alti-2.com/field_support_locator.htm
386-943-9333
WARNING
PARACHUTING IS A HAZARDOUS ACTIVITY THAT CAN RESULT IN INJURY OR DEATH.
An altimeter is a device subject to malfunction, even when properly designed, built, assembled, maintained and used. Do not
rely upon an altimeter for your safety. Your altimeter must only be considered as an aid when checking your altitude.
A visual cross reference with the ground should be used in combination with any altimeter.

- 11 -
Display Screens / Modes
Ground
The ground display shows time, date and temperature, and also shows status icons
for backlight, logbook, alarms, and battery.
The Neptune has a power saving mode which switches the display off after 30
minutes. The Neptune will continue to function as normal; the display can be
reactivated by pushing any button. It will also reactivate automatically if the unit
switches to Climb Mode, or senses a change in the atmospheric pressure. It is not
unusual for your Neptune display to switch on even if you are not jumping.
There is no on/off switch on the Neptune. The two holes on the back of the unit are
for the speaker and filter; touching either one could irreparably damage your
Neptune.
WARNING
PARACHUTING IS A HAZARDOUS ACTIVITY THAT CAN RESULT IN INJURY OR DEATH.
An altimeter is a device subject to malfunction, even when properly designed, built, assembled, maintained and used. Do not
rely upon an altimeter for your safety. Your altimeter must only be considered as an aid when checking your altitude.
A visual cross reference with the ground should be used in combination with any altimeter.

- 12 -
Altitude
When “Alt” is showed in the bottom right of the screen (in Ground Mode and Climb
Mode), push the bottom button to go to the “Altitude” screen. This shows altitude
AGL (above ground level) and altitude MSL (Mean Sea Level).
THE MSL value is actually QNE, or Pressure Altitude, which means that the value
will change with barometric pressure. It is normal for the MSL reading to vary as
much as +/- 300’.
Climb
The Climb screen shows:
•Time to target altitude (not shown on the picture above).
oTarget altitude is the exit altitude from your previous jump.
•Current time
WARNING
PARACHUTING IS A HAZARDOUS ACTIVITY THAT CAN RESULT IN INJURY OR DEATH.
An altimeter is a device subject to malfunction, even when properly designed, built, assembled, maintained and used. Do not
rely upon an altimeter for your safety. Your altimeter must only be considered as an aid when checking your altitude.
A visual cross reference with the ground should be used in combination with any altimeter.

- 13 -
•Current altitude
•Climb Rate
•Temperature
•Status icons
oIn the screen above, the backlight, logbook, & freefall alarms are
enabled, and the battery is full. Canopy alarms are disabled.
In Climb Mode, you can adjust any setting, look at your logbook, and turn functions
on and off, right up until you exit the plane.
You do not have to return to the main screen when you are ready to skydive, or go
to the altitude screen. The Neptune will switch to Freefall Mode, no matter what
screen is displayed when you exit.
Freefall
When the Neptune detects you are in freefall, it will switch to Freefall Mode,
regardless of which screen you may be in at that time. The freefall display shows
altitude in thousands of feet (or hundreds of meters).
There is also an analog display called the “fun meter”. The “fun meter” is a black
bar across the bottom of the screen which starts to fill in at 3,000 feet and is a
complete solid bar at 12,000 feet. The purpose is to give you a quick indication of
where you are between 12,000 feet and 3,000 feet.
WARNING
PARACHUTING IS A HAZARDOUS ACTIVITY THAT CAN RESULT IN INJURY OR DEATH.
An altimeter is a device subject to malfunction, even when properly designed, built, assembled, maintained and used. Do not
rely upon an altimeter for your safety. Your altimeter must only be considered as an aid when checking your altitude.
A visual cross reference with the ground should be used in combination with any altimeter.

- 14 -
NOTE: If the analog bar (fun meter” is empty it does NOT mean you are at 3,000
feet, it means you are BELOW 3,000’ – check the numbers!!
Canopy
The canopy display shows altitude in feet to a resolution of 10 feet. It also shows
rate of descent in feet per second.
The canopy display may be disabled (Menu > System > Options 1 > Canopy
Display). If you disable the canopy display you will see the freefall display while
under canopy.
CAUTION
Do not allow the canopy descent rate information to distract you from safely flying
and landing your canopy.
Alarms
General
The Neptune has 4 groups of programmable alarms, each with 3 individually
selectable alarm altitudes.
There are two types of alarms from which to choose: freefall and canopy. You may
have up to one freefall alarm group and one canopy alarm group enabled at the
same time. Each is discussed in greater detail in the next sections.
WARNING
PARACHUTING IS A HAZARDOUS ACTIVITY THAT CAN RESULT IN INJURY OR DEATH.
An altimeter is a device subject to malfunction, even when properly designed, built, assembled, maintained and used. Do not
rely upon an altimeter for your safety. Your altimeter must only be considered as an aid when checking your altitude.
A visual cross reference with the ground should be used in combination with any altimeter.

- 15 -
In the Ground screen, the underlined alarm
icon indicates that freefall and canopy alarms
are both activated.
We recommend that alarms are disabled
(Menu > System > Options 1 > Audible >
Disable) if you are using Neptune as a visual
altimeter. The alarm icon will change on the
ground screen to show that the alarms have
been disabled.
The underlined alarm icon indicates that
freefall and canopy alarms are both activated.
The alarm icon without underline indicates
that only freefall alarms are activated. Canopy
alarms will not sound.
If you attempt to check the alarms settings (Menu > Alarms) while they are
disabled you will see the following screen:
Select “enable” to activate the alarms, or exit if you wish to leave them disabled.
If alarms are enabled, Menu > Alarms will display the following screen showing
the current active group and the alarm altitudes.
WARNING
PARACHUTING IS A HAZARDOUS ACTIVITY THAT CAN RESULT IN INJURY OR DEATH.
An altimeter is a device subject to malfunction, even when properly designed, built, assembled, maintained and used. Do not
rely upon an altimeter for your safety. Your altimeter must only be considered as an aid when checking your altitude.
A visual cross reference with the ground should be used in combination with any altimeter.

- 16 -
To exit without making changes select “OK” or
to change the setting select “Edit/Select”.
Freefall Alarms
The following procedure shows how to edit and select another freefall alarm group:
When you select “Edit/Select,” you will see the
screen shown on the left. Group 1 in this case
is the active group.
To set up another group for freefall
alarms, highlight the group to be edited, in
this case group 2, and press “Select”.
You will see the current settings for Group 2.
The first item is the name; if you wish to
change the name, press “Select”.
WARNING
PARACHUTING IS A HAZARDOUS ACTIVITY THAT CAN RESULT IN INJURY OR DEATH.
An altimeter is a device subject to malfunction, even when properly designed, built, assembled, maintained and used. Do not
rely upon an altimeter for your safety. Your altimeter must only be considered as an aid when checking your altitude.
A visual cross reference with the ground should be used in combination with any altimeter.

- 17 -
Scroll through the list to change the group
name. In this case “4-way” has been selected.
Press “Select” to confirm the new name.
The same method is used to select and change
the 3 alarm altitudes.
When the alarm name and altitudes are correct,
highlight “Activate Group,” then “Select”.
The menu text “GRP ACTIVE” will confirm that
this group is now active.
Now highlight and select “Exit”
The process is now complete. Group 2 has been
set for 4-way, and the arrows confirm that it is
the active group.
Freefall alarms have 16 possible names: Group 1, Group 2, Group 3, Group 4,
Group 5, AFF, Birdman, Student, Camera, Tandem, Big Way, Freefly, 16-way, 10-
WARNING
PARACHUTING IS A HAZARDOUS ACTIVITY THAT CAN RESULT IN INJURY OR DEATH.
An altimeter is a device subject to malfunction, even when properly designed, built, assembled, maintained and used. Do not
rely upon an altimeter for your safety. Your altimeter must only be considered as an aid when checking your altitude.
A visual cross reference with the ground should be used in combination with any altimeter.

- 18 -
way, 8-way, or 4-way. This group name will be written to the log of that particular
jump, whether alarms are enabled or not.
Freefall alarms will sound only if freefall speeds are reached at the preset altitudes.
If, for example, your Group 1 alarms are set at 4500’, 3000’, and 1500’, the third
alarm will only go off if you are still in freefall at 1500’.
The first two alarms will sound for 3 seconds and then stop, however the third (flat-
line) alarm is designed to activate if you exceed a preset vertical velocity below the
third alarm altitude. So, if you perform a radical canopy maneuver below your third
alarm altitude you should expect to hear the flat-line warning. (Note: Activating a
swoop alarm will prevent the “flat-line” sounding when under canopy).
Canopy Alarms
Version 2.2.0 (and later versions) incorporates a new ‘Swoop Mode’ with canopy
alarms in addition to the standard freefall alarms.
CAUTION
With canopy alarms enabled, the Neptune will not go back into Freefall Mode after it
has transitioned to Canopy Mode. This means that you will not hear the third flat-
line freefall alarm when performing aggressive canopy maneuvers, or if you
cutaway from a slow-speed malfunction.
Swoop alarms are three programmable ‘chirps’ that operate similar to the freefall
alarms, but can be set in 10’ increments, instead of 100’. These chirps are in
addition to your regular freefall alarms.
To activate swoop alarms, select “Swoop 1”.
WARNING
PARACHUTING IS A HAZARDOUS ACTIVITY THAT CAN RESULT IN INJURY OR DEATH.
An altimeter is a device subject to malfunction, even when properly designed, built, assembled, maintained and used. Do not
rely upon an altimeter for your safety. Your altimeter must only be considered as an aid when checking your altitude.
A visual cross reference with the ground should be used in combination with any altimeter.

- 19 -
Default settings are 1500’, 1000’ and 600’.
Change swoop alarm altitudes as you would
change freefall alarms. Select the item you
wish to change.
The top button will increase the altitude in
increments of 10’; the bottom button will
decrease.
Once you have set your alarm altitudes, select
“Activate Grp” to turn canopy alarms on.
“GRP ACTIVE” indicates that this alarm group,
“Swoop 1”, is enabled.
WARNING
PARACHUTING IS A HAZARDOUS ACTIVITY THAT CAN RESULT IN INJURY OR DEATH.
An altimeter is a device subject to malfunction, even when properly designed, built, assembled, maintained and used. Do not
rely upon an altimeter for your safety. Your altimeter must only be considered as an aid when checking your altitude.
A visual cross reference with the ground should be used in combination with any altimeter.

- 20 -
The two sets of double arrows indicate that
freefall group “4-way” and canopy group
“Swoop 1” are both enabled.
The Ground screen alarm icon will also be
underlined.
To turn off canopy alarms, select that group.
Select “GRP ACTIVE”.
The option to activate this alarm group will be
displayed. Exit without selecting to keep this
group disabled.
The single set of double arrows indicates that
only freefall group “4-way” is enabled.
The Ground screen alarm icon will not be
underlined.
You can choose not to have any canopy alarm groups; simply set all 4 groups to
freefall names and altitudes.
Log Book
To use the logbook function, make sure it is enabled (Menu > Log Book >
Enable/Disable). The log book icon on the ground mode screen will confirm that
logging is enabled.
WARNING
PARACHUTING IS A HAZARDOUS ACTIVITY THAT CAN RESULT IN INJURY OR DEATH.
An altimeter is a device subject to malfunction, even when properly designed, built, assembled, maintained and used. Do not
rely upon an altimeter for your safety. Your altimeter must only be considered as an aid when checking your altitude.
A visual cross reference with the ground should be used in combination with any altimeter.
Other manuals for ALTIMASTER NEPTUNE
1
Table of contents
Other Alti-2 Measuring Instrument manuals