Altura Photo AP-UNV1 User manual

AP-UNV1 FLASH
USER'S MANUAL

For video tutorials about your product(s), customer
support, updated user manuals, and all other
Altura Photo news please visit:
www.AlturaPhoto.com

FOR YOUR SAFETY
Before using your product, please read the following safety notice to ensure safe
and correct operation. This will prevent damage to your product or injury to
yourself and others.
• Do not use the flash in the presence of flammable or explosive gas. If used in
this environment it could cause a fire or an explosion.
• Do not attempt to disassemble or repair the flash unit. This may cause electric
shock and will void the warranty.
• Do not cover the light emitting area of the flash while it is being used and do
not touch that area after the flash has been used. Doing this could burn your
skin.
• Do not fire the flash unit directly at the driver of a moving car as this could

temporarily impair the driver’s vision and cause an accident.
• Do not fire the flash unit directly into the eyes of someone that is at close range
as it could damage their retina. Blindness in children can occur if the flash is fired
within 1 meter.
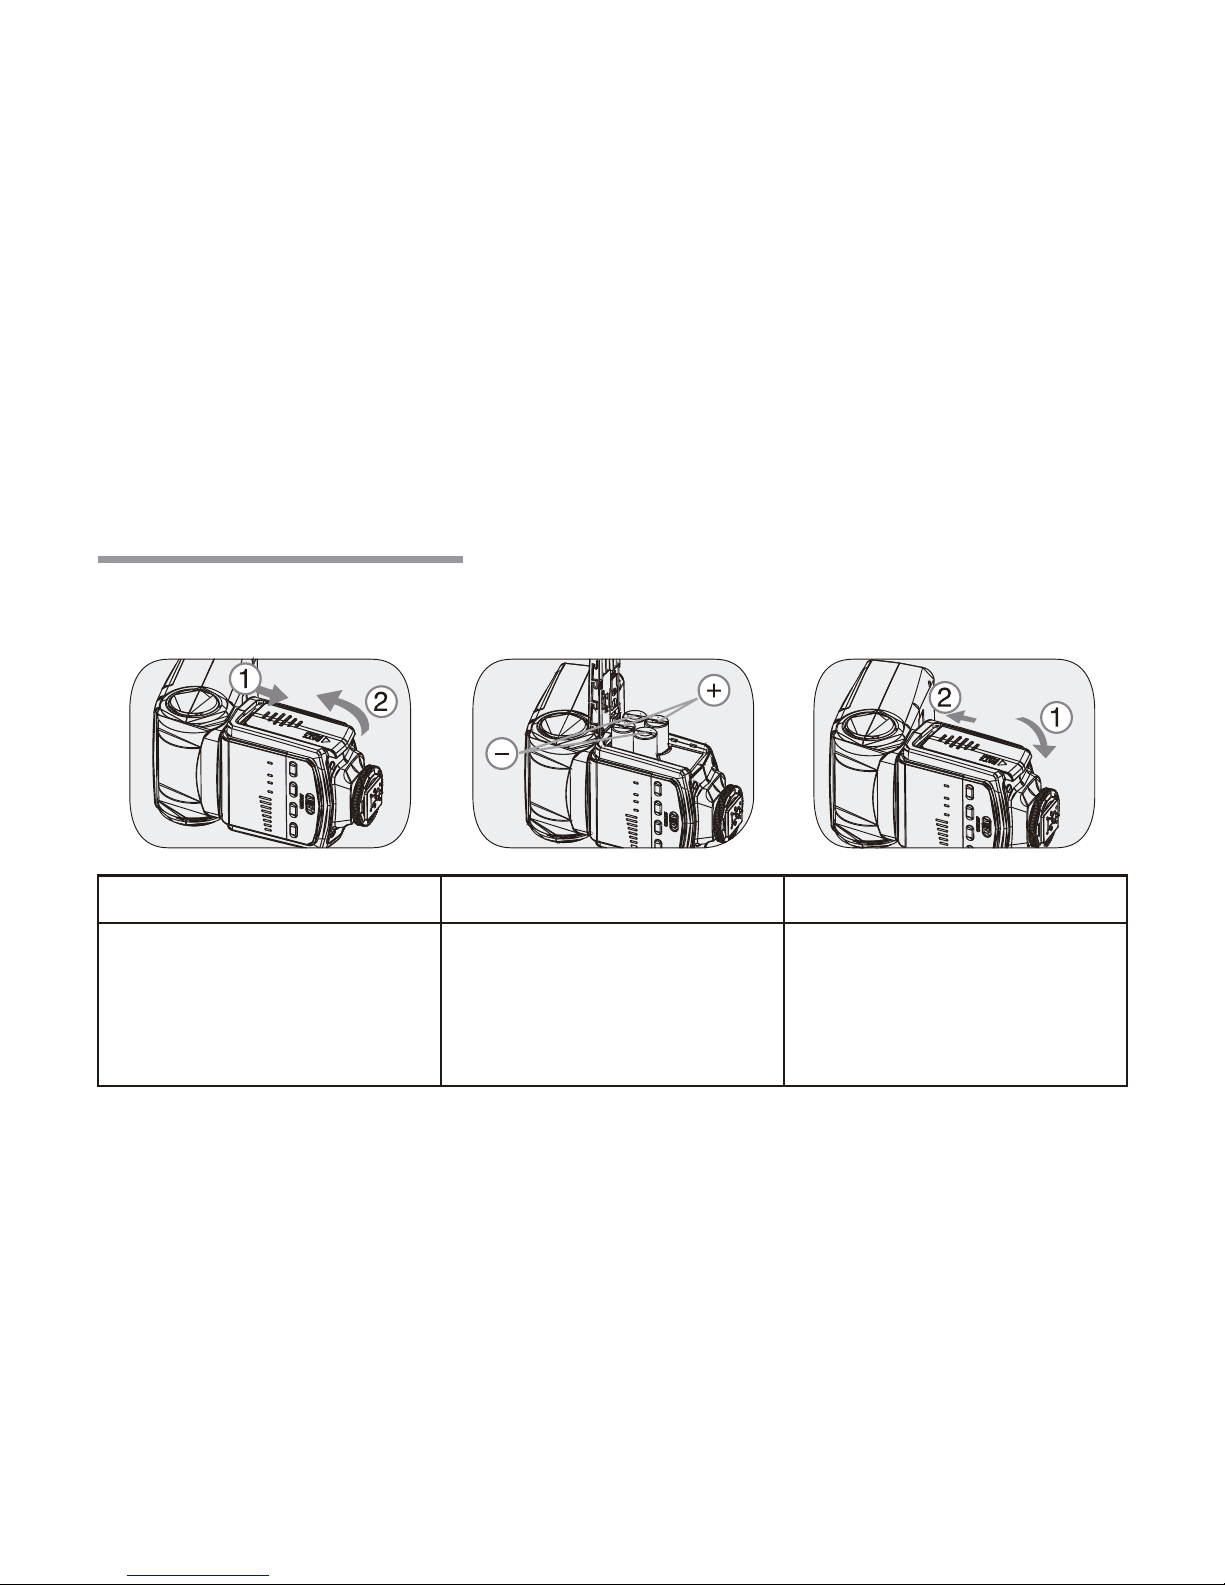
• Be sure to only use the batteries that are specified in the instruction manual.
• Do not mix different types, brands or old and new batteries. The batteries
could leak corrosive liquids, explode or catch on fire.
• If you notice smoke, peculiar smell or abnormal noise please stop using
immediately. Remove the batteries carefully to not get burned and contact the
dealer or repair facility.
• Do not use with wet hands or allow the flash to get wet. This could cause
electric shock.

FEATURES
• Universal flash with wireless slave capabilities
• 8 levels of flash output power
• Guide No. 38m ISO 100
• 90 degree bounce
• 270 degree swivel
• Metal mounting foot
• Automatic standby mode to save batteries
• 3 second recycle time
• External power source socket
• PC terminal

COMPATIBLE WITH
• Canon EOS and PowerShot series digital camera
• Nikon DSLR
• Ricoh DSLR
• Olympus Four Thirds digital camera
• Olympus Micro Four Thirds digital camera
• Nikon Coolpix series digital camera with hot shoe
• Fujifilm DSLR
• Pentax DSLR
• Samsung DSLR
• Panasonic Four Thirds digital camera
• Panasonic Micro Four Thirds digital camera

FLASH PARTS
1. Built in bounce card
and wide panel
2. Flash head
3. Wireless Sensor
4. Socket cover
5. PC socket
6. Lock ring
7. Mounting foot

8. Mode Select Indicator (S1, S2)
9. Battery COver
10. Power Switch
11. Test Button
12. Mode select button
13. Output level
14. Flash power level button <_>
15. Flash power level button <+>
16. Charging indicator
17. Flash Stand

INSTALLATION
1. Installing the batteries
Open the battery cover Install the batteries Close the battery cover
Make sure the + & - battery
contacts are inserted
correctly as shown in the
battery partment.
Close the battery
compartment and slide the
cover up until it clicks
Slide the cover to the
bottom of the flash and
then pull up.

• Only use AA/LR6 Alkaline batteries or if you prefer rechargeable batteries you
can use AA Rechargeable Ni-MH.
• When replacing batteries use a brand new set from the same manufacturer.
NOTE

2. Attaching the flash
Attach the flash Secure the flash Remove the flash
Turn the locking ring to
secure the flash on the
camera.
Turn the locking ring in the
opposite direction and pull
the flash from the camera.
Slip the mounting foot all
the way into the hot shoe
of the camera.
NOTE
• Remove the batteries when the flash is not being used.

FLASH OPERATION
1. Turning on the power
• Set the power switch to the ON
position. All lights will come on.
• To test the flash press the TEST
button.
• Start taking pictures when the
power light is red.
• Turn the power off when done and
only remove batteries while in the off
position.

2. Flash Intensity Control
• There are 8 settings to control the output of the flash.
• They range from 1/128 1/64 1/32 1/16 1/8 1/4 1/2 and 1/1 (full power output).
• Select the desired level of output by pressing the + or – button.
3. M Mode
• This is your shooting mode when the flash is mounted on the camera. To
select the M mode press the Mode button until M is illuminated.
• Your flash is synched to your camera and will fire when you take a picture.
4. S1 Mode
• This is the shooting mode to take pictures using this flash as a slave.
• Use this mode when your built in camera flash or master flash is set to Manual
mode.

5. S2 Mode
• This is the second mode to use when you want to take pictures using this flash
as a slave.
• Use this mode when your built in camera flash or master flash is set to TTL
mode.
6. Automatic Save Function
• The last flash settings that you had before turning off the flash will be
automatically saved. The settings will be saved even if you change the batteries.
7. PC Synchronous Port Output
• By connecting to this port you can remove the flash from the hotshoe. When
the flash sync is triggered, a signal is sent from the camera along the wire to the
flash telling it to fire.

8. External Power Supply Box
• Flash has a standard Canon external power socket. By using an external
power supply you will extend the capacity of your flash.
9. Power Saving Function
• Flash has an auto sleep function to help conserve battery life when flash is not
in use for 5 minutes and only when the flash is in the M mode.
• All lights will turn off on the flash except for the power indicator light. It will turn
green and flash while on the power saving mode.
• To take the flash out of the Power Saving Function simply press the test button.
10. Protection Function
• To prevent the flash from overheating use the chart in the following page as a
guide to let the flash cool down for 10 minutes.

CONTINUOUS FLASHING MAXIMUN TIMES
POWER LEVEL
1/1 , 1/2
1/4 , 1/8
1/16 , 1/32
1/64 , 1/128
NUMBER
20
40
80
160
NOTE
• With continuous flash shooting, the batteries may get hot. If you need to
change the batteries be careful to not get burned.
• The flash will stop recharging once the batteries take more than 30 seconds.
The power light will alternate red and green indicating that it is time to install a
new set of batteries.

ADVANCED APPLICATION
1. Bounce Flash
• To soften shadows behind your subject aim the flash head toward a ceiling or
wall. By bouncing the flash off the surface you will capture a more natural
looking photograph.
• If the photograph is not bright enough, then the ceiling or wall might be too
far away. If this happens try using a larger aperture opening ( smaller number ).
• If the wall or ceiling are not plain white then you will get a color cast on your
photograph.
2. Bounce Card
• The bounce card allows you to reflect light in a person’s eyes and create a
more vivid expression.

• Mount the flash and adjust the bounce of the flash to 90 degrees. Do not rotate
the flash and keep your subject within 4 feet.
3. Wide Panel
• The wide panel works well when photographing a subject at a very close
range. If your subject is too far away then you might under expose and have to
adjust your exposure in your camera’s manual mode.

TROUBLESHOOTING
1. Flash will not turn on: Make sure that the batteries are installed in the right
position and the flash is turned to the on position.
2. After taking a picture the flash takes a long time to be ready again: It is time
to replace the batteries in the flash.
3. Flash does not fire while on the camera: Turn off the flash, remove from the
camera, clean the contact on the camera hot shoe and on the flash, install the
flash on the camera and tighten the lock ring.
4. Flash does not fire as a slave: Make sure that the flash is turned on and set
to either S1 or S2 mode.

SPECIFICATIONS
Guide No.
Power
Lighting Time
Recycle Time
Flash Mode
Vertical Rotation Angle
Horizontal Rotation Angle
Light Quantity Output Control
38 ISO 100
4 x AA size batteries
(Alkaline or Ni-MH are usable)
100 - 1500 time (AA Alkaline battery used)
Approx 0.1 - 5s (AA Alkaline battery used)
Manual, S1, S2
0 - 90 Degrees
0 - 270 Degrees
With 1/8 strop increment
Table of contents
Other Altura Photo Camera Flash manuals