alzaTools AT-CVC20V User manual

Cordless Vacuum Cleaner
AT-CVC20V
User Manual


ENGLISH 6
DEUTSCH 15
ČESKY 25
SLOVENSKY 34
MAGYAR 43

4
A B
C1 C2
D E1

5
E2 F1
F2 F3
F4

6ENGLISH
Translation of the original user manual
Read these operating instructions carefully before use. Familiarize yourself with the controls and
proper use. Keep the instructions in a safe place for future reference.
The machine is designed for personal use in gardens, backyards or other parts of the property. It is
not intended for commercial or other use.
EXPLANATION OF SYMBOLS ON THE PRODUCT PACKAGING/TYPE LABEL
Read the instructions for use carefully.
• This appliance is intended for use by children
8 years of age and older and persons with re-
duced physical, sensory or mental capabilities,
or lack of experience and knowledge, provided
they have been given supervision or instruction
concerning the use of the appliance in a safe
manner and understand the potential hazards.
• Children must not play with the device.
• Cleaning and user maintenance must not be
performed by children without supervision.
• The appliance must only be used with the pow-
er cord included with the appliance.
• Do not expose the appliance to rain. Store it
inside a building.
• Take extra care when using the appliance near
children.
• This appliance is intended for vacuuming dust
and dirt in households, home workshops, etc.
Use it in accordance with the instructions in this
user manual. Do not use it in an industrial envi-
ronment or for commercial use.
• Only use the accessories included with the ap-
pliance or recommended by the manufacturer.
• Do not use the appliance with a damaged bat-
tery. If the appliance does not work properly,
has been dropped, damaged, left outside or
dropped into water, contact an authorized ser-
vice center.
• Do not touch the appliance with wet or damp
hands.
• Do not insert any foreign objects into the open-
ings in the appliance. Do not use the appliance
if the ventilation holes are blocked. Keep the
ventilation holes clean, free of dust, lint and
hair etc., which can reduce the suction power.
• Keep hair, hands, fingers, loose clothing, etc.
away from the suction opening and moving
parts. Do not place the appliance against any
part of the body.
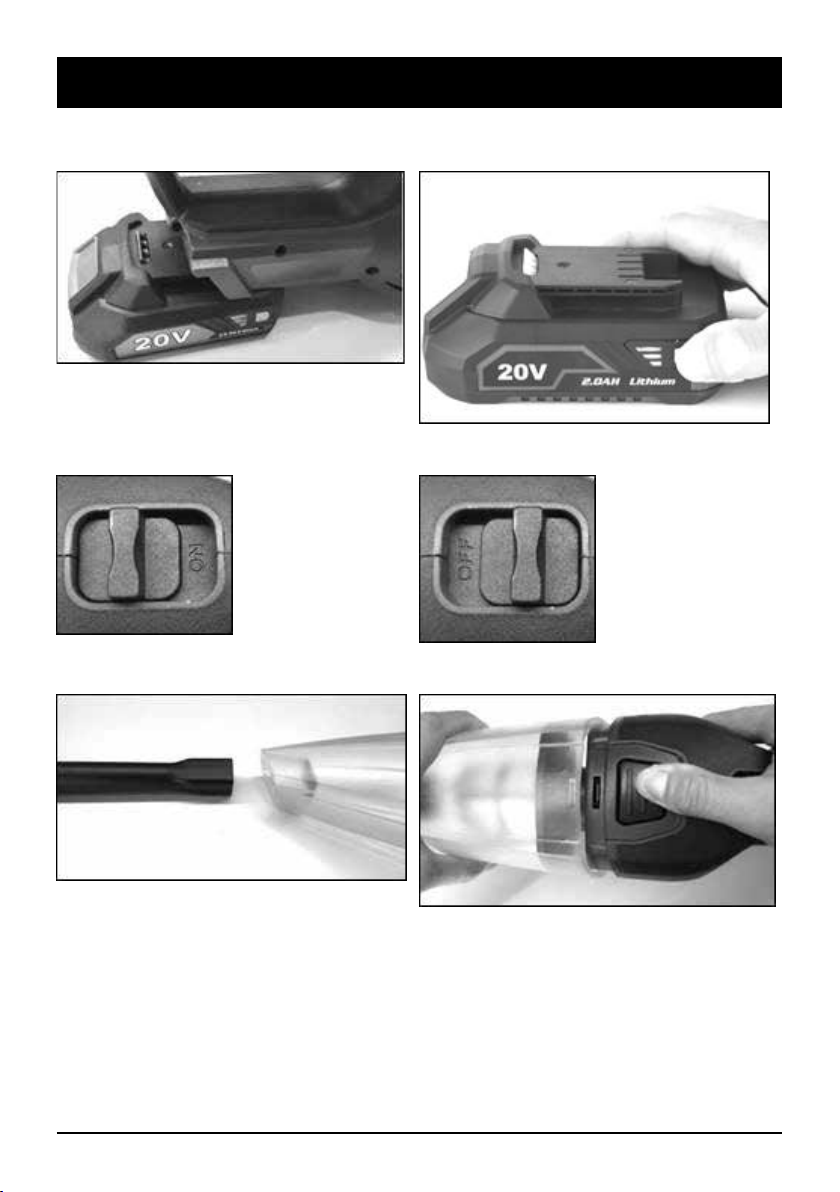
• Make sure the appliance is switched off before
removing the battery.
• Do not use the appliance for vacuuming:
– flammable or explosive substances, such as
petrol, or use the appliance in places where
such substances are used or stored;
– burning or smouldering objects such as cig-
arettes, matches or hot ashes;
– explosives such as nitro-glycerine;
– flammable materials such as aluminium, zinc,
magnesium, titanium, phosphorus or cellu-
loid;
– wet dirt, water, oil, etc .;
– solid objects with sharp edges, such as saw-
dust, metal, stones, shards, nails, screws,
blades, etc. .;
– dust substances such as cement or toner;
– conductive metal or carbon dust;
– very fine dust, e.g. concrete. Otherwise, there
is a risk of serious damage to the appliance.
• Do not use the appliance without the correctly
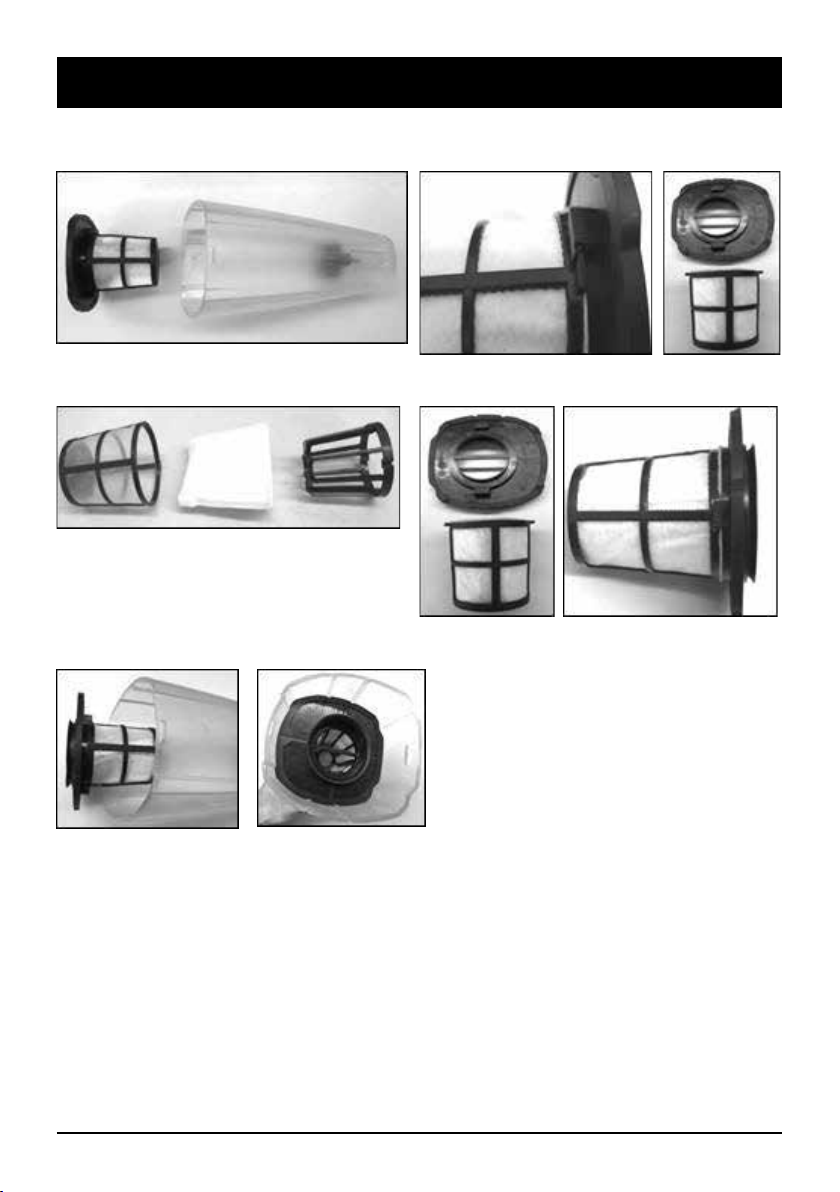
installed dust filter and dust container.
• Do not charge the battery outdoors.
• When not in use, keep the battery away from
metal objects such as paper clips, coins, keys,
nails, screws, and other small metal objects that
could connect one terminal to another.
• Under unsuitable conditions, the electrolyte
may leak from the battery. Avoid contact with
the electrolyte. However, if this does happen,
rinse the affected area under clean water.
• Do not place the appliance near open flames
or other heat sources. Do not expose to direct
sunlight.
SAFETY INSTRUCTIONS

7ENGLISH
• Do not use the appliance near containers filled
with water, such as bathtubs, washbasins or
swimming pools.
• Switch off the appliance when left unattended,
after use and before cleaning.
• Do not repair or modify the appliance yourself.
Have all repairs carried out by an authorized
service center.
SAFETY INSTRUCTIONS

8ENGLISH
TECHNICAL DATA
Cordless hand vacuum cleaner
Parameter Value
Battery voltage 20 V DC
Water tank capacity 0.5 l
Suction power Maximum 3.8 kPa
Continuous operation time ≥ 14 minutes
Dimensions (without battery) 535 x 140 x 85 mm
Weight (without battery) 1.2 kg
Operating temperature 0–45 °C
Protection class III

9ENGLISH
1 Dust container
2 Filtration unit (external filter, dust filter, holder)
3 Dust container release safety device
4 On/Off switch
5 Handle
6 Rechargeable battery (not included)
7 Motor unit
8 Suction opening
9 Extension nozzle
10 Floor nozzle
11 Slotted nozzle
12 Brush nozzle
13 Short nozzle
DESCRIPTION
1
6
11
9
10
2
3
4 5
7
8
12
13

10 ENGLISH
CHARGING BATTERY
Warning: Only use the battery specified by the manufacturer as suitable or recommended for the
type of blower. Using another battery can result in loss of warranty, damage to the product, damage
to property, or a serious risk of injury or death.
Recommended types of batteries and chargers
The battery and charger are not included. Only use these recommended types of batteries and
chargers.
Battery:
• AlzaTools 20LBP20V (model AT-20LBP20V)
• AlzaTools 40LBP20V (model AT-40LBP20V)
Charger:
• AlzaTools 35FCH20V (model AT-35FCH20V)
• AlzaTools 24FCH20V (model AT-24FCH20V)
• AlzaTools DCH20V (model AT-DCH20V)
Inserting and removing the battery
Follow the instructions, directions and warnings in the relevant operating instructions when handling
the battery.
Before inserting or removing the battery, make sure that:
1. the device is off;
2. the battery is fully charged.
Align the grooves in the battery compartment at the back of the vacuum cleaner with the notches on
the battery and slide it into the vacuum cleaner until you hear a click (Fig. A).
To remove the battery, press the button on the battery and pull it out of the vacuum cleaner (Fig. A).
When inserting and removing the battery from the vacuum cleaner, hold it firmly to prevent damage
from improper handling (e.g. falling).
Do not insert or remove the battery by force. If it cannot be easily removed, it is likely that it has not
been inserted correctly. Contact an authorized service center.
Charge status check
The battery is fitted with a charge status indicator (3 LEDs). To check the charge status, press the but-
ton on the side (Fig. C). If all LEDs are lit, the charge level is high. When two LEDs are lit, the battery is
partially discharged. If only one LED is lit, the battery is discharged and must be recharged.
OPERATION
Intended use
This vacuum cleaner is intended for use in the home, home workshop or garden to vacuum dust and
dirt.
Turning On/Off
Before switching on the vacuum cleaner, make sure that:
• It is correctly assembled;
• The battery is inserted correctly;
• The battery is fully charged.
Slide the switch forward to switch on the vacuum cleaner (Fig. C1), and slide the switch backwards to
switch off the vacuum cleaner (Fig. C2). You may hear a click inside the vacuum cleaner as you move
USE

11ENGLISH
the switch. This is a normal occurrence.
Note: If you use the vacuum cleaner until the battery is discharged, let the vacuum cleaner cool down
for at least 15 minutes before using it again with a second battery.
Attachments and use
The vacuum cleaner comes with a set of attachments that make it easier to clean various surfaces,
floor coverings or objects.
Warning: Before attaching or removing the attachments, make sure that the vacuum cleaner is
switched off and the battery is removed.
1. Extension nozzle – insert the nozzle with the square end into the suction hole (Fig. D) until you feel
it resisting. When removing, carefully pull the nozzle out of the suction opening. The extension
nozzle is suitable for vacuuming dust and dirt in narrow spaces, corners, etc. It is also used as
a connecting element when using a floor, slot or brush nozzle.
2. Short nozzle – insert the nozzle with the square end into the suction hole until you feel it resisting.
When removing, carefully pull the nozzle out of the suction opening. The short nozzle is used as
a connecting element when using a floor, slot or brush nozzle.
3. Floor nozzle – place the floor nozzle on the extension nozzle until you feel resistance. When re-
moving, carefully pull out the floor nozzle. The floor nozzle is suitable for vacuuming dust and dirt
from a larger floor area while standing.
4. Slotted nozzle – place the slotted nozzle on the extension nozzle until you feel it resisting. When
removing, carefully pull out the nozzle through the slot. The slotted nozzle is suitable for vacuum-
ing dust and dirt from narrow spaces, corners and hard-to-reach places on the floor or at height.
5. Brush nozzle – place the brush nozzle on the extension nozzle until you feel it resisting. When
removing, carefully pull out the brush nozzle.The brush nozzle is suitable for vacuuming dust and
dirt from upholstery and padding or scratch-sensitive surfaces.
Use
Assemble the vacuum cleaner with the required attachment and switch it on. Slowly move the vacu-
um cleaner back and forth or from side to side.
Warning: Do not cover the ventilation holes. There is a risk of the motor unit overheating and irre-
versible damage.
Note: Do not rest the folded vacuum cleaner against a wall when operation is interrupted. It could fall
and be damaged. Place it on the floor in a horizontal position.
Overload protection
If using the vacuum cleaner or battery in a way that uses an abnormally high current, the vacuum
cleaner will stop automatically stop without any indication. If this happens, slide the switch backwards
to switch off the vacuum cleaner and stop the operation that caused the overload. Then turn on the
vacuum cleaner again.
Overheating protection
If the vacuum cleaner or the battery overheats, the vacuum cleaner will automatically stop. If this
happens, slide the switch backwards to switch off the vacuum cleaner and let the battery cool down.
Then turn on the vacuum cleaner again.
Protection against excessive discharge
If the charge level drops excessively, the vacuum cleaner will automatically stop. If this happens, slide
the switch backwards to switch off the vacuum cleaner. Remove the battery and charge it.
Note: Overload, overheating and over-discharge protection are the vacuum and battery safety sys-
tems that protect them against damage. Do not attempt to bypass or modify these security features.
There is a risk of serious injury or death.
USE

12 ENGLISH
MAINTENANCE AND STORAGE
Warning: Before any maintenance or cleaning of the vacuum cleaner, always make sure that it is
switched off and the battery is removed.
The user must only carry out the maintenance and cleaning described in this manual. In the case of
further maintenance, cleaning or adjustment, contact an authorized service center.
Clean the vacuum cleaner after each use. This will ensure its long life.
Wipe the motor unit with a clean, slightly damp cloth.
Warning: Do not immerse any part of the vacuum cleaner in water or other liquids. Do not use a hose
or pressure washer to clean the vacuum cleaner. Do not expose the vacuum cleaner to dripping or
splashing water.
Remove any dirt from the ventilation holes. Use a dry cloth. Do not allow water to enter the ventilation
holes. There is a risk of damage to the motor unit.
Warning: Do not use petrol, thinner, alcohol or other similar substances for cleaning. There is a risk
of surface damage, deformation or cracking.
Emptying the dust container
Empty the dust container after each use or, if necessary, during use. A container that is too full can
reduce the suction power of the vacuum cleaner.
1. Make sure the vacuum cleaner is switched off and the battery is removed.
2. Press the catch and carefully remove the dust container (Fig. E1).
3. Carefully remove the filter unit (Fig. E2) and pour the contents of the container into a waste bin.
4. If necessary, rinse the dust container with clean water and wipe dry.
5. Then put the filter unit back in the container and place it on the motor unit until you hear a click.
Recommendation: Empty the dust container outside the living area.
Cleaning the filter unit
1. Empty the dust container – perform steps 1 to 3 in the "Emptying the dust container" section.
2. Turn the outer filter clockwise to release the entire filter unit from the plastic cover (Fig. F1).
3. Carefully remove the holder and the dust filter from the external filter (Fig. F2: 1. External filter;
2. Dust filter. 3. Holder).
4. Tap the dirt out of the dust filter. For hygienic reasons, we recommend tapping the dust filter out-
side of the living area. If the dust filter is too dirty, replace it with a new one. Contact an authorized
service center or your dealer.
5. If necessary, wash the outer filter and holder in lukewarm water and wipe dry.
6. Always make sure that the dust filter, outer filter and holder are completely dry before assembling
the filter unit.
7. Carefully fit the dust filter onto the holder and then insert it together into the outer filter. Align
the dust filter so that there are no folds or creases. If the dust filter is not properly inserted into
the external filter, dust particles will enter the motor unit, which could cause irreversible damage.
8. Place the assembled filter unit on the plastic cover and turn it counterclockwise until you feel it
resisting (Fig. F3).
9. Place the filter unit in a dust container (Fig. F4).
Warning: Before using the vacuum cleaner, always check that the filter unit is correctly assembled
and inserted and that the dust filter is correctly fitted. Otherwise, dust could enter the motor unit and
cause irreversible damage.
USE

13ENGLISH
Dust filter replacement
Change the dust filter regularly. Depending on the frequency of use, at least once every six months.
Contact an authorized service center to purchase a new filter.
Outer surface
Wipe the outer surface with a slightly damp sponge. Wipe dry with a clean cloth.
Storage
Before storing, make sure that the vacuum cleaner is switched off and the battery is removed from the
motor unit. Make sure that the dust container is empty, and the filter unit is clean.
Keep the vacuum cleaner in a dry, well-ventilated area out of the reach of children, pets and people
who have not been instructed in the safe use of this product. Only store the vacuum cleaner indoors.
Fully charge the battery and store it in a dry and well-ventilated place where the temperature will not
fall below freezing for a long period of time. When stored for a long time, recharge the battery every
three months to extend its life.
TROUBLESHOOTING
Problem Cause Solution
Poor suction power. The dust container is full. Empty the dust container.
The dust filter is clogged. Clean the filter or wash it.
Low charge. Charge the battery. Replace if
necessary.
The vacuum cleaner does not
switch on.
Low charge. Charge the battery. Replace if
necessary.
If the problem is not listed in the table above or the problem has not been solved, switch off the vac-
uum cleaner, remove the battery and contact an authorized service center.
USE

14 ENGLISH
Identification of the manufacturer/importer's authorised representative:
Manufacturer: Alza.cz, a. s.
Registered office: Jankovcova 1522/53, Holešovice, 170 00 Prague 7
Company ID: 27082440
Subject of the declaration:
Name: Cordless hand vacuum cleaner
Model/Type: AT-CVC20V
The above product has been tested in accordance with the standard (s) used to demonstrate
compliance with the essential requirements set out in the Directive (s):
Electromagnetic compatibility (EMC) directive 2014/30/EU
ROHS directives 2011/65/EU and (EU) 2015/863
Directive LVD 2014/35/EU
Reference to harmonised standards:
EN 60335-2-2:2010/A1:2013
EN 60335-1:2012/A2:2019
EN 62233:2008
EN 55014-1:2017/A11:2020
EN 55014-2:2015
EN IEC 55014-1:2021
EN IEC 55014-2:2021
EC type-testing was carried out on:
No. 0123 TÜV SÜD Product Service GmbH, Certification Body, Ridlerstraße 65, 80339 Munich, Ger-
many
Certificate number: N5A 063263 0275
Technical documentation is stored at:
Alza.cz, a. s.
Jankovcova 1522/53, Holešovice, 170 00 Prague 7
The year of manufacture of the machine and the serial number are indicated on the machine.
Ing. Jan Melena
Business Development Manager
Sales and Purchasing; Private Labels
In Prague, 16.5.2022
EC DECLARATION OF CONFORMITY

15DEUTSCH
Übersetzung des originellen Benutzerhand- buchs
Lesen Sie vor dem Gebrauch sorgfältig diese Bedienungsanleitung durch. Machen Sie sich mit den
Bedienelementen und der richtigen Handhabung vertraut. Bewahren Sie die Bedienungsanleitung
an einem sicheren Ort zum späteren Nachschlagen auf.
Das Gerät ist für die persönliche Verwendung in Gärten, in den Höfen von Häusern oder anderen
Abschnitten des Grundstücks bestimmt. Es ist nicht für kommerzielle oder andere Zwecke bestimmt.
ERLÄUTERUNG DER SYMBOLE AUF DER PRODUKTVERPACKUNG/DEM TYPENSCHILD
Lesen Sie sorgfältig die Bedienungsan-
leitung durch.
• Dieses Gerät kann von Kindern ab 8 Jahren und
von Personen mit verminderten physischen,
sensorischen und mentalen Fähigkeiten oder
mangelnden Erfahrungen und Kenntnissen be-
nutzt werden, sofern sie beaufsichtigt werden
oder über die Anwendung des Verbrauchers
auf eine sichere Weise belehrt wurden und
eventuelle Gefahren verstehen.
• Kinder dürfen nicht mit dem Gerät spielen.
• Kinder dürfen keine Reinigungs- und War-
tungsarbeiten vornehmen, falls diese nicht be-
aufsichtigt sind.
• Das Gerät darf nur mit dem mitgelieferten
Netzgerät betrieben werden.
• Setzen Sie das Gerät nicht Regen aus. Lagern
Sie es innerhalb von Gebäuden.
• Seien Sie besonders vorsichtig, wenn Sie das
Gerät in der Nähe von Kindern verwenden.
• Dieses Gerät ist für das Saugen von Staub und
Schmutz in der Wohnung, in der Werkstatt usw.
vorgesehen. Verwenden Sie es gemäß den An-
weisungen in diesem Handbuch. Verwenden
Sie es nicht in einer industriellen Umgebung
oder für den gewerblichen Gebrauch.
• Verwenden Sie nur das mit dem Gerät geliefer-
te oder vom Hersteller empfohlene Zubehör.
• Verwenden Sie das Gerät nicht mit einem be-
schädigten Akku. Wenn das Gerät nicht richtig
funktioniert, gestürzt oder beschädigt ist, im
Freien gelassen wurde oder ins Wasser ge-
fallen ist, wenden Sie sich an eine autorisierte
Kundendienststelle.
• Berühren Sie das Gerät nicht mit nassen oder
feuchten Händen.
• Stecken Sie keine Fremdkörper in die Öff-
nungen des Geräts. Verwenden Sie das Gerät
nicht mit blockierten Öffnungen. Halten Sie die
Lüftungsöffnungen sauber und frei von Staub,
Fusseln, Haaren usw., die die Saugleistung be-
einträchtigen könnten.
• Halten Sie Haare, Hände, Finger, lose Klei-
dungsstücke usw. von der Saugöffnung und
den beweglichen Teilen fern. Legen Sie das
Gerät an keinen Körperteil.
• Bevor Sie den Akku herausnehmen, vergewis-
sern Sie sich, dass das Gerät ausgeschaltet ist.
• Verwenden Sie das Gerät nicht zum Saugen
von:
– entflammbaren oder explosiven Stoffen, wie
z.B. Benzin, auch sollten Sie das Gerät nicht
an Orten verwenden, an denen solche Stoffe
benutzt oder gelagert werden;
– brennenden oder schwelenden Gegenstän-
de wie Zigaretten, Streichhölzer oder heiße
Asche;
– explosiven Stoffen wie Nitroglyzerin;
– brennbaren Materialien wie Aluminium, Zink,
Magnesium, Titan, Phosphor oder Zelluloid;
– feuchten Schmutz, Wasser, Öl, usw.;
– harten Gegenständen mit scharfen Kanten,
wie Sägespäne, Metall, kleine Steine, Scher-
ben, Nägel, Schrauben, Klingen usw.;
– staubigen Substanzen wie Zement oder To-
ner;
– leitfähigen Metall oder Kohlestaub;
– sehr feinem Staub, z.B. von Beton. Andern-
falls besteht die Gefahr einer schweren Be-
schädigung des Geräts.
• Verwenden Sie das Gerät nicht ohne einen
ordnungsgemäß installierten Staubfilter und
Staubbehälter.
• Laden Sie den Akku nicht im Freien auf.
• Wenn Sie den Akku nicht benutzen, halten Sie
SICHERHEITSHINWEISE

16 DEUTSCH
ihn von Metallgegenständen wie Büroklam-
mern, Münzen, Schlüsseln, Nägeln, Schrauben
und anderen kleinen Metallgegenständen fern,
die ein Endstück mit dem anderen verbinden
könnten.
• Bei nicht geeigneten Bedingungen kann Elek-
trolyt aus dem Akku heraustreten. Vermeiden
Sie den Kontakt mit dem Elektrolyt. Sollte dies
dennoch geschehen, spülen Sie die Stelle un-
ter einem Strahl sauberen Wassers ab.
• Stellen Sie das Gerät nicht in der Nähe von Feu-
er oder anderen Wärmequellen auf. Setzen Sie
das Gerät nicht der direkten Sonneneinstrah-
lung aus.
• Verwenden Sie das Gerät nicht in der Nähe von
mit Wasser gefüllten Behältern wie Badewan-
nen, Waschbecken oder Schwimmbecken.
• Schalten Sie das Gerät aus, wenn es unbeauf-
sichtigt ist, nach der Verwendung und vor der
Reinigung.
• Reparieren oder modifizieren Sie das Gerät
nicht selbst. Überlassen Sie alle Reparaturen
einer autorisierten Kundendienststelle.
SICHERHEITSHINWEISE

17DEUTSCH
TECHNISCHE DATEN
Akku-Handstaubsauger
Parameter Wert
Akku-Spannung 20 V DC
Volumen des Staubbehälters 0,5 l
Saugleistung Max. 3,8 kPa
Ununterbrochener Betrieb ≥ 14 Minuten
Abmessungen (ohne Akku) 535 x 140 x 85 mm
Gewicht (ohne Akku) 1,2 kg
Betriebstemperatur 0–45 °C
Schutzklasse III

18 DEUTSCH
1 Staubbehälter
2 Filtereinheit (Außenfilter, Staubfilter, Halter)
3 Sicherung zur Freigabe des Staubbehälters
4 Ein/Aus-Schalter
5 Griff
6 Wiederaufladbarer Akku (nicht im Lieferumfang enthalten)
7 Motoreinheit
8 Saugöffnung
9 Verlängerungsdüse
10 Bodendüse
11 Fugendüse
12 Bürstendüse
13 Kurze Düse
BESCHREIBUNG
1
6
11
9
10
2
3
4 5
7
8
12
13

19DEUTSCH
WIEDERAUFLADBARER AKKU
Warnung: Verwenden Sie nur so einen Akku, der nach Angaben des Herstellers für den Gebläsetyp
geeignet oder empfohlen ist. Die Verwendung eines anderen Akkus kann zum Verlust der Garantie,
der Beschädigung des Produkts, der Beschädigung von Eigentum oder einer erhöhten Gefahr von
Verletzungen oder Tod führen.
Empfohlene Akku- oder Ladegerättypen
Akku oder Ladegerät sind nicht im Lieferumfang enthalten. Verwenden Sie nur die empfohlenen
Akku- oder Ladegerättypen.
Akku:
• AlzaTools 20LBP20V (Modell AT-20LBP20V)
• AlzaTools 40LBP20V (Modell AT-40LBP20V)
Ladegerät:
• AlzaTools 35FCH20V (Modell AT-35FCH20V)
• AlzaTools 24FCH20V (Modell AT-24FCH20V)
• AlzaTools DCH20V (Modell AT-DCH20V)
Einlegen und Heraunshemen des Akkus
Befolgen Sie während der Manipulation mit dem Akku die in der jeweiligen Bedienungsanleitung
angeführten Anweisungen, Hinweise und Warnungen.
Bevor Sie den Akku einlegen und herausnehmen, vergewissern Sie sich, dass:
1. das Gerät ausgeschaltet ist;
2. der Akku vollständig geladen ist.
Richten Sie die Rillen im Akkubereich an der Rückseite des Staubsaugers mit den Aussparungen am
Akku aus und schieben Sie ihn in das Gerät ein, bis Sie ein Klickton hören (Abb. A).
Wenn Sie den Akku herausnehmen möchten, drücken Sie die Taste am Akku und ziehen Sie ihn aus
dem Staubsauger (Abb. A)
Halten Sie den Staubsauger und den Akku beim Einlegen und Herausnehmen fest, um Schäden
durch unsachgemäße Manipulation (z.B. durch einen Sturz) zu vermeiden.
Üben Sie beim Einlegen oder Herausnehmen des Akkus keine Gewalt an. Wenn er sich nicht leicht
herauszunehmen ist, ist er wahrscheinlich nicht richtig eingesetzt worden. Wenden Sie sich an eine
autorisierte Kundendienststelle.
Kontrolle des Ladezustands
Der Akku ist mit einer Ladestandsanzeige (3 LED-Anzeigen) ausgestattet. Um den Ladezustand zu
überprüfen, drücken Sie die Taste an der Seite (Abb. C). Wenn alle LED-Anzeigen leuchten, ist der
Ladezustand des Akkus hoch. Wenn zwei LED-Anzeigen leuchten, ist der Akku teilweise entladen.
Wenn nur eine LED-Anzeige leuchtet, ist der Akku schwach und muss aufgeladen werden.
BETRIEB
Verwendungszweck
Dieser Staubsauger ist für den Gebrauch im Haushalt, in der Werkstatt oder im Garten zum Saugen
von Staub und Schmutz vorgesehen.
Einschalten/Ausschalten
Bevor Sie den Staubsauger einschalten, vergewissern Sie sich, dass:
• es richtig zusammengebaut ist;
• Der Akku richtig eingelegt ist;
VERWENDUNG

20 DEUTSCH
• Der Akku vollständig geladen ist.
Schieben Sie den Schalter nach vorne, um den Staubsauger einzuschalten (Abb. C1), schieben Sie
den Schalter nach hinten, um den Staubsauger auszuschalten (Abb. C2). Wenn Sie den Schalter be-
wegen, hören Sie einen Klickton innerhalb des Staubsaugers. Es handelt sich um eine normale Er-
scheinung.
Bemerkung: Wenn Sie den Staubsauger so lange benutzen, dass der Akku leer ist, lassen Sie den
Staubsauger mindestens 15 Minuten abkühlen, bevor Sie es mit einem zweiten Akku wieder benut-
zen.
Aufsätze und deren Verwendung
Der Staubsauger wird mit einer Reihe von Aufsätzen geliefert, die das Reinigen verschiedener Ober-
flächen, Bodenbeläge oder Gegenstände erleichtern.
Warnung: Vergewissern Sie sich, dass der Staubsauger ausgeschaltet und der Akku herausgenom-
men ist, bevor Sie mit den Vorbereitungen für den Gebrauch beginnen.
1. Verlängerungsdüse – legen Sie die Düse mit dem kantenförmigen Ende in die Ansaugöffnung
ein (Abb. D), bis Sie einen Widerstand spüren. Ziehen Sie beim Abnehmen die Düse vorsichtig
aus der Saugöffnung heraus. Die Verlängerungsdüse eignet sich zum Saugen von Staub und
Schmutz in engen Räumen, Ecken usw. Sie dient auch als Verbindungsstück bei der Verwendung
einer Boden-, Fugen- oder Bürstendüse.
2. Kurze Düse – legen Sie die Düse mit dem kantenförmigen Ende in die Saugöffnung ein, bis Sie
einen Widerstand spüren. Ziehen Sie beim Abnehmen die Düse vorsichtig aus der Saugöffnung
heraus. Die Kurze Düse dient als Verbindungsstück bei Verwendung einer Boden-, Fugen- oder
Bürstendüse.
3. Bodendüse – Stecken Sie die Bodendüse auf die Verlängerungsdüse, bis Sie einen Widerstand
spüren. Ziehen Sie die Bodendüse beim Herausnehmen vorsichtig heraus. Die Bodendüse eig-
net sich zum Saugen von Staub und Schmutz auf einer größeren Fläche im Stehen.
4. Fugendüse – setzen Sie die Fugendüse auf die Verlängerungsdüse auf, bis Sie einen Widerstand
spüren. Ziehen Sie Fugendüse beim Herausnehmen die vorsichtig heraus. Die Fugendüse eignet
sich zum Saugen von Staub und Schmutz in engen Räumen, Ecken und schwer zugänglichen
Stellen am Boden oder in der Höhe.
5. Bürstendüse – Setzen Sie die Bürstendüse auf der Verlängerungsdüse auf, bis Sie einen Wider-
stand spüren. Ziehen Sie die Bürstendüse beim Herausnehmen vorsichtig heraus. Die Bürsten-
düse eignet sich zum Saugen von Staub und Schmutz auf Polstern und Polstermöbeln sowie auf
kratzempfindlichen Oberflächen.
Verwendung
Legen Sie den Staubsauger mit einem der Aufsätze nach Bedarf zusammen und schalten Sie ihn ein.
Bewegen Sie mit dem Staubsauger vorsichtig nach vorne und nach hinten oder von der Seite zur
Seite.
Warnung: Decken Sie die Lüftungsöffnungen nicht ab. Es besteht die Gefahr einer Überhitzung und
einer irreversiblen Schädigung der Motoreinheit.
Bemerkung: Lehnen Sie den zusammengeklappten Staubsauger nicht an die Wand, wenn der Be-
trieb unterbrochen wird. Er könnte stürzen und sich beschädigen. Legen Sie in auf den Boden in
horizontaler Position.
Überlastungsschutz
Wenn den Staubsauger oder der Akku in einer Weise betrieben wird, die zu einer ungewöhnlich
hohen Stromaufnahme führt, schaltet sich der Staubsauger automatisch ab, ohne dass eine Anzeige
erfolgt. Lassen Sie in diesem Fall den Schalter los, um den Staubsauger auszuschalten und die Tätig-
keit zu stoppen, die zur Überlastung führte. Schalten Sie ihn dann erneut ein.
VERWENDUNG
Table of contents
Languages: