Amana Front Loading Washers User manual

InstallationAnd
Operating Instructions
For Front Loading
Washers
Keep these instructions for future reference. Be sure this manual stays
withwasher.
Pararecibir un manualen español gratis,envíe por correoo por faxsu
nombre,dirección, y númerode modelo a:
AmanaAppliances
ConsumerCommunications/SpanishManual
2800220thTrail
Amana,Iowa52204-0001
USA
Númerodefax1-319-522-8158
Attention Installer
Wait until washer is within 4 feet of installation area to
remove shipping brace and shock sleeve.
Shipping brace and shock sleeve must be removed
prior to operating machine.

2
Service
Keep a copy of sales receipt for future reference or in
case warranty service is required. Any questions or to
locateanauthorizedservicer, call 1-800-NAT-LSVC
(1-800-628-5782)insideU.S.A.319-622-5511outside
U.S.A.Warranty service must be performed by an
authorizedservicer. Amana Appliances, alsorecommends
contactinganauthorized servicer if serviceisrequired
afterwarrantyexpires.
Asure™ Extended Service
Plan
AmanaAppliancesofferslong-termservice protection for
this new washer. Asure™ Extended Service Plan is
speciallydesigned to supplementa strong warranty. This
plancoversfunctional parts, labor,andtravel charges. Call
1-800-528-2682forinformation.
Parts and Accessories
Purchasereplacement parts and additionalaccessories
overthephone. To orderaccessoriesfor your Amana
product,call1-800-843-0304 inside U.S.A. or
319-622-5511 outside U.S.A.
For more information on this and other
Amana products, visit our web site:
www.amana.com
Important Safety Instructions
!
WARNING
For your safety and to reduce the risk of fire or an
explosion, do not store or use gasoline or other
flammablevapors and liquidsin the vicinity of thisor
anyotherappliance.
Contents
Service ........................................................................ 2
Asure™ExtendedServicePlan .................................. 2
Parts and Accessories................................................ 2
ImportantSafetyInstructions....................................... 2
ModelIdentification ..................................................... 4
Electrical..................................................................... 4
Tools ........................................................................... 4
ElectricalRequirements .............................................. 5
GroundingInstructions ................................................ 5
Installing Washer
WaterSupplyRequirements .................................... 5
WaterTemperature .................................................. 6
WaterPressure........................................................ 6
Risers ...................................................................... 6
InstallationProcedure .............................................. 6
RoughinDimensions ............................................. 10
Operating Washer
HelpfulHints .......................................................... 11
Pauses ............................................................... 11
BoostedHotWashTemperature ......................... 11
LockingDoor ...................................................... 11
AddingClothes During WashCycle .................... 11
Detergents.......................................................... 11
Spin Cycle.......................................................... 11
OperatingInstructions ............................................ 12
DetermineProperCycle...................................... 12
Wash Cycles...................................................... 13
OperatingProcedures ......................................... 14
Timer .................................................................. 16
“DoorLocked”Light ............................................ 16
“HeaterOn”Light ................................................ 16
Outof Balance Load ........................................... 16
End of Cycle Signal ............................................ 16
DispenserDrawer................................................... 16
ChildLock .......................................................... 16
DetergentCompartment...................................... 16
LiquidBleachCompartment................................ 17
FabricSoftenerCompartment ............................. 17
ToCleantheDispenser....................................... 17
CareandCleaning ..................................................... 18
ColdWeatherCare ................................................ 18
Care OfYour Washer ............................................. 18
Vacations and Extended Non-Use.......................... 18
ReinstallationofShipping Materials........................ 18
BeforeCallingService ............................................ 19
CommonWasherSounds ...................................... 20
Warranty ................................................................... 21
InstallerChecklist...................................................... 22

3
!
WARNING
To reduce the risk of fire, electric shock, serious injury
ordeath to persons whenusing your washer,follow
these basic precautions:
1. Readall instructions before usingthe washer.
2. Referto the Grounding Instructionsin the Installa-
tionManualforthe proper grounding of thewasher.
3. Donotwash articles that havebeen previously
cleaned in, washed in, soaked in, or spotted with
gasoline,dry-cleaningsolvents,or other flammable
orexplosivesubstancesas they give off vapors
that could ignite or explode.
4. Donot add gasoline, dry-cleaningsolvents, or
otherflammable or explosive substancesto the
washwater. These substances give offvapors that
couldignite or explode.
5. Undercertain conditions, hydrogengas may be
produced in a hot water system that has not been
used for two weeks or more. Hydrogen gas is
explosive. If the hot water system has not been
usedfor such a period,before using awashing
machineorcombination washer-dryer, turnon all
hotwater faucets andlet the water flow fromeach
forseveral minutes. This willrelease any accumu-
lated hydrogen gas. The gas is flammable, do not
smoke or use an open flame during this time.
6. Do not allow children to play on or in the washer.
Closesupervisionof children is necessarywhen
the washer is used near children. This is a safety
rulefor all appliances.
7. Beforethewasherisremovedfromservice or
discarded,remove the door tothe washing com-
partment.
8. Do not reach into the washer if the wash tub is
moving.
9. Do not install or store the washer where it will be
exposedtowaterand/or weather.
10. Do not tamper with the controls.
11. Donot repair or replace anypart of the washer, or
attemptany servicing unless specifically recom-
mendedin the User-Maintenance instructionsor in
publisheduser-repairinstructions that you under-
stand and have the skills to carry out.
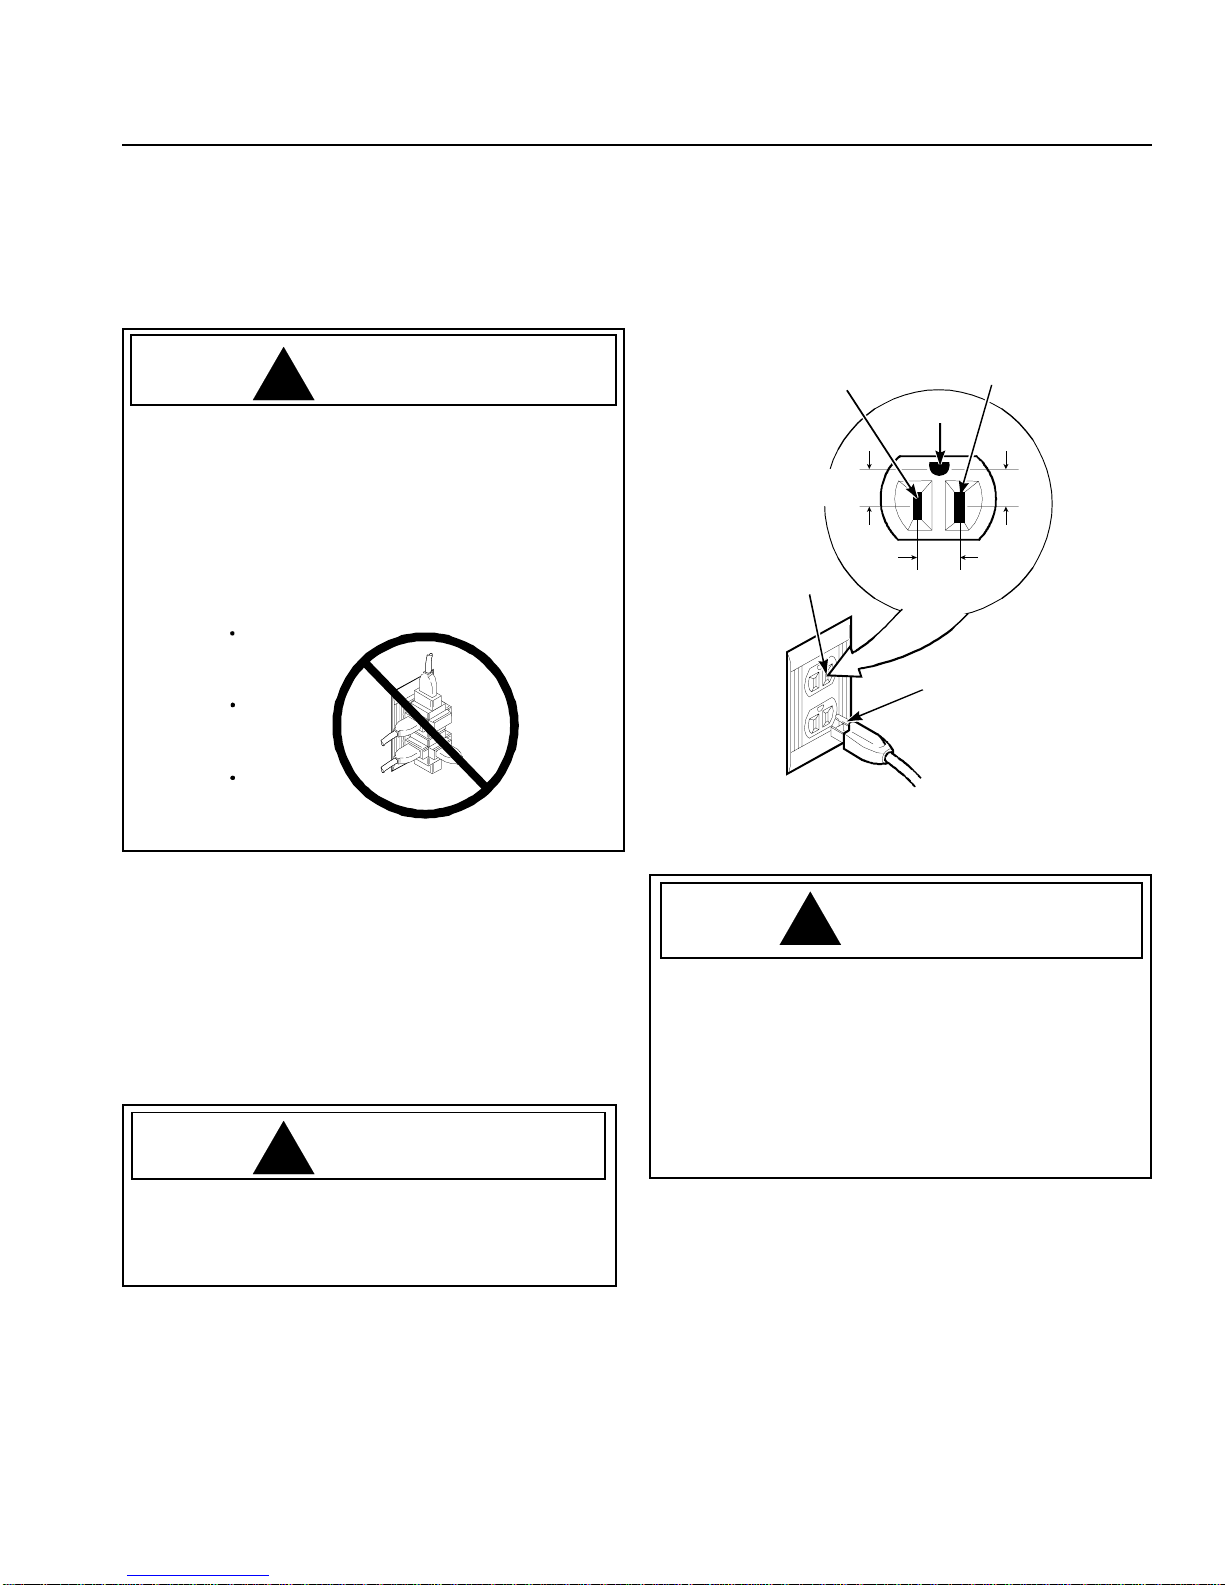
12. To reduce the risk of an electric shock or fire, do
not use an extension cord or an adapter to con-
nect the washer to the electrical power source.
13. Use yourwasher only forits intended purpose,
washingclothes.
14. Always disconnect the washer from electrical
supplybefore attempting any service.Disconnect
the power cord by grasping the plug, not the cord.
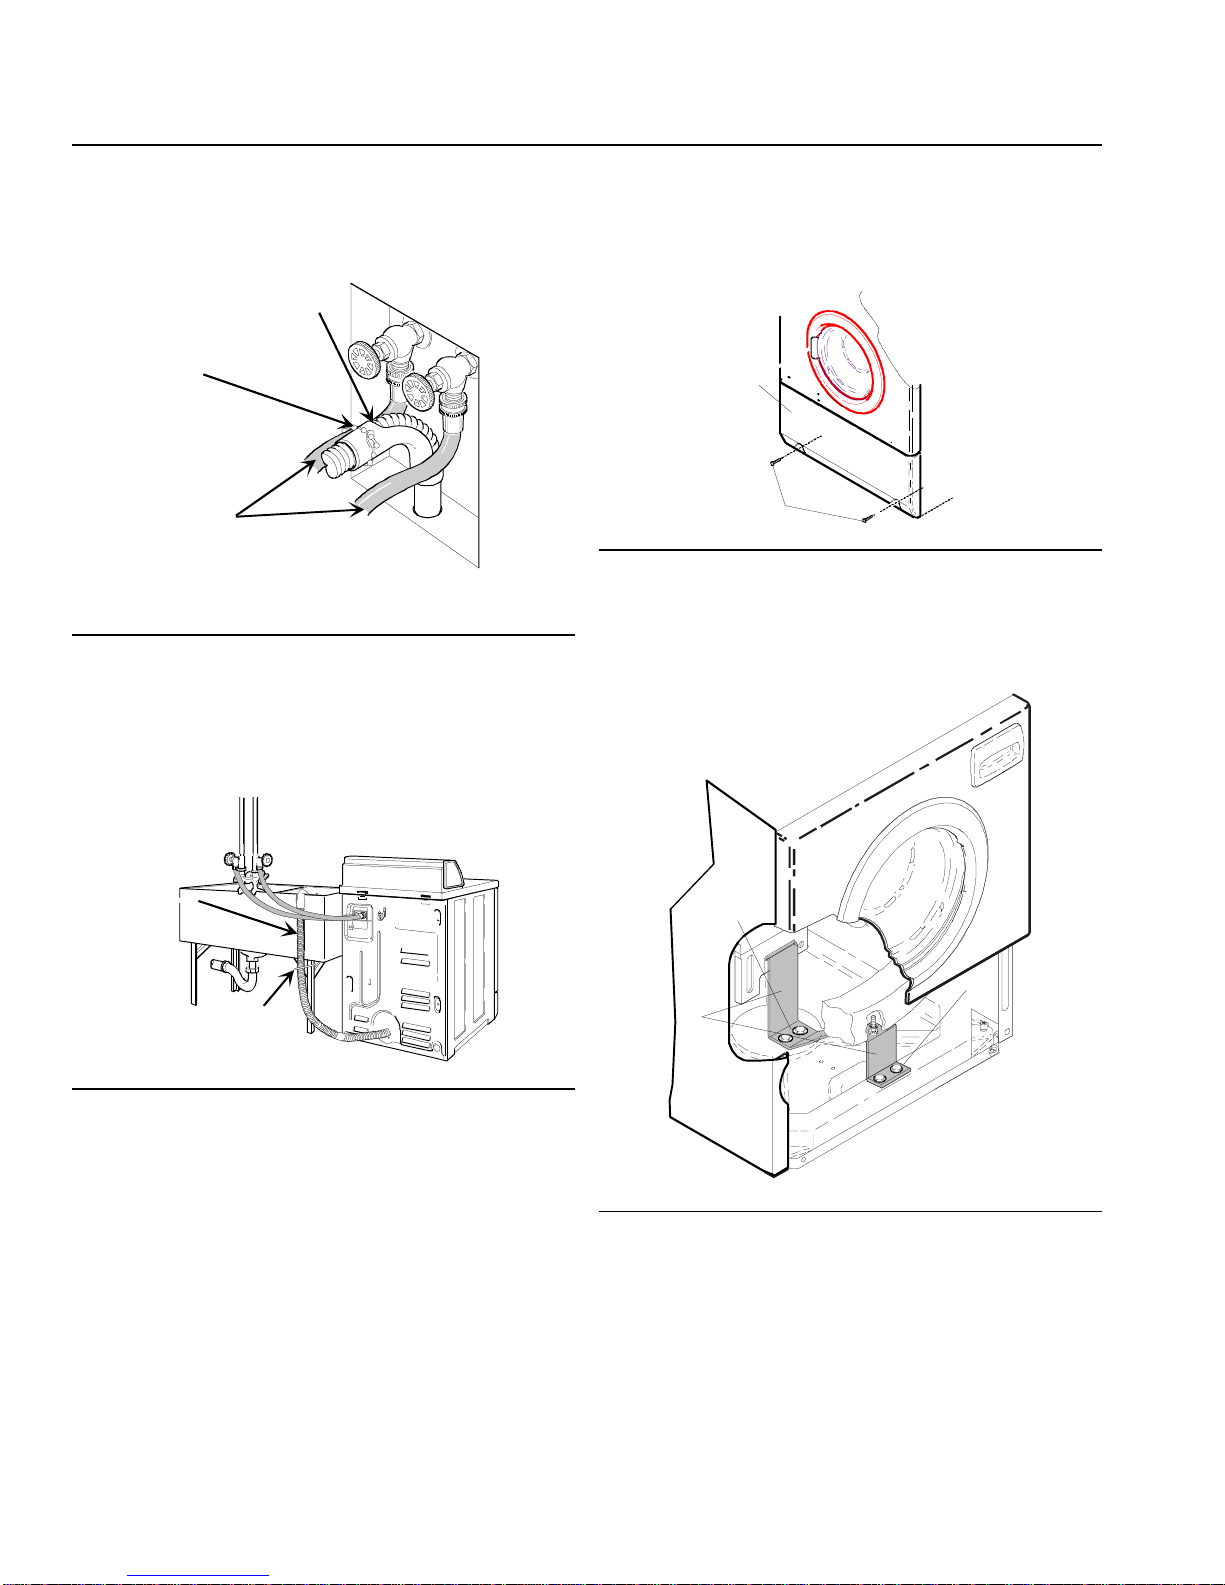
15. Install thewasher according tothe Installation
Instructions.All connections forwater, drain,
electricalpower and grounding mustcomply with
local codes and be made by licensed personnel
when required. Do not do it yourself unless you
knowhow!
16. Toreduce the riskof fire, clothes which have
traces of any flammable substances such as
vegetableoil, cooking oil, machineoil, flammable
chemicals, thinner, etc. or anything containing wax
or chemicals such as in mops and cleaning cloths,
must not be put into the washer. These flammable
substances may cause the fabric to catch on fire
by itself.
17. Do not use fabric softeners or products to elimi-
natestatic unlessrecommended bythe manufac-
turerof the fabric softeneror product.
18. Keep yourwasher in good condition.Bumping or
droppingthewasher can damage safetyfeatures.If
this occurs, have your washer checked by a
qualifiedserviceperson.
19. Replacewornpowercords and/or loose plugs.
20. Besurewaterconnectionshaveashut-offvalve
and that fill hose connections are tight. Close the
shut-offvalves atthe end of eachwash day.
21. Loading door must be closed any time the washer
is to fill, tumble or spin. Do not attempt to bypass
the loading door switch by permitting the washer to
operatewiththe loading door open.
22. Always readand follow manufacturer’s instructions
onpackages of laundryand cleaning aids. Heed all
warningsor precautions. To reduce therisk of
poisoning or chemical burns, keep them out of the
reach of children at all times (preferably in a locked
cabinet).
23. Always followthe fabric care instructions supplied
bythegarmentmanufacturer.
24. Neveroperatethewasher with any guards and/or
panelsremoved.
25. Do notoperate the washer with missingor broken
parts.
26. Do not bypass any safety devices.
27. Failure to install, maintain, and/or operate this
washeraccordingto the manufacturer’s instruc-
tions may result in conditions which can produce
bodilyinjuryand/or property damage.
Note:TheWarning and Important SafetyInstructions
appearingin this manualare not meant to coverall
possible conditions and situations that may occur.
Common sense, caution and care must be exercised
wheninstalling,maintaining, or operating thewasher.
Alwayscontact your dealer, distributor,service agent or
themanufacturer about any problemsor conditions you
donotunderstand.

4
Accessories Bag
An accessory bag has been shipped inside your washer.
It includes:
• Two inlethoses with washers
• Fourrubberfeet
• BeadedTie-DownStrap
• Installationand Operating Instructions
• WashingGuide
• Bagfor storing shipping materials
• Video
Retain accessories bag to store shipping brace and
shocksleeveforfutureusewhenmoving washer.
Tools
Toolsrequired:
9/16" wrench oradjustablewrench
Screwdriver,Phillipsand blade
Level
Pliers
9/16" socket wrenches, and 5/16" socket wrench
DeepSocket 9/16"socket wrenches forrear leveling legs
Screwdriver
Pliers
Wrench
9
/
1
6
"
Socket
wrench
9
/
1
6
"
Deep
socket
wrench
Level
Model Identification
Thankyou for purchasing thiswasher.Please read these
InstallationInstructionsthoroughly. This manualprovides
propermaintenance information. Any questions,call the
ConsumerAffairsDepartmentat1-800-843-0304inside
U.S.A.and 1-319-622-5511 outsidethe U.S.A.
Completeregistrationcard and promptly return.If
registration card is missing, call the Consumer Affairs
Department.Appliancecan also be registeredthrough
outwebsitewww.aman.com.
WhencontactingAmana Appliances, provide product
information.Product information ison the serialplate.
Recordthefollowinginformation.
Serial Plate
ModelNumber: _________________________
ManufacturingNumber: _________________________
S/Nor Serial Number: _________________________
DateofPurchase: _________________________
Dealer'snameandaddress:______________________
________________________________________________
Note: Translationmay sometimes cause variations in
meaning.In all cases where meaning varies, the
most accurate meaning will be the English
versionof this document.
Electrical
Referto serial platefor specific electricalrequirements.
Formore detailed information referto section onelectrical
requirements.Serial plateis locatedin area shown.
Water
Washerneeds two standard 3/4"(19.05)mm) water
supplyfaucets with a pressurebetween 20 –120pounds
persquare inch (138 to 827 kPa). For more detailed
informationrefer to sectionon Water Supply
Requirements.

5
Electrical Requirements
Washerrequires 120 volt, 60hertz and a 3-prong
groundingplug.
NOTE: Wiring diagram is located in the control hood.
!
WARNING
To reduce the risk of fire, electrical shock or personal
injury, all wiring must conform with the latest edition of
the National Electrical Code, ANSI/NFPA 70, and such
local regulations as might apply. It is the customer’s
responsibility to have the wiring, fuses and circuit
breakers checked by a qualified electrician to make
sureyour home hasadequate electrical powerto
operatethewasher.
DO NOT
OVERLOAD
CIRCUITS
DO NOT
USE AN
ADAPTER
DO NOT
USE AN
EXTENSION
CORD
Grounding Instructions
Washermust be grounded. Inthe event of malfunctionor
breakdown,grounding will reduce therisk of electric
shock by providing a path of least resistance for electric
current.Thewasher is equipped witha cord having an
equipment-groundingconductoranda 3-prong grounding
plug.The plug must beplugged into anappropriate outlet
thatis properly installedand grounded inaccordance with
all local codes and ordinances.
!
WARNING
Improperconnectionofthe equipment-grounding
conductor can result in a risk of electric shock. Check
witha qualified electricianor serviceman ifyou are in
doubtas to whether thewasher is properlygrounded.
Do not modify the plug provided with the washer – if it will
not fit the outlet, have a proper outlet installed by a
qualifiedelectrician.
NOTE: Havea qualified electrician check the polarity of
thewall receptacle.If avoltage reading is
measuredother thanthat illustrated,the qualified
electricianshould correctthe problem.
STANDARD 120 VOLT,
60 HERTZ, 3-WIRE
EFFECTIVELY GROUNDED CIRCUIT
NEUTRAL
ROUND
GROUNDING
PRONG
GROUND
NEUTRAL
SIDE
L1
0
V.A.C.
120 ± 12
V.A.C.
120 ± 12
V.A.C.
Water Supply Requirements
!
WARNING
Undercertain conditions, hydrogengas may be
produced in a hot water system that has not been
usedfor two weeksor more. HYDROGEN GAS IS
EXPLOSIVE. If the hot water system has not been
usedfor such a periodand before usingthe washer,
turn on all hot water faucets and let the water flow from
eachfor several minutes. Thiswill release any
accumulatedhydrogen gas. Thegas is flammable,do
not smoke or use an open flame during this time.
NOTE: Water supply faucets must fit standard 3/4"
(19.05 mm)female gardenhose couplings. Do
not use slip-on or clamp-on connections.
Installing Washer

6
NOTE: Water supply faucets should be readily
accessible to permit turning them off when
washer is not being used.
NOTE: Longerinlet hoses areavailable (optional atextra
cost) if hoses supplied with the washer are not
long enough for the installation. Order hoses as
follows:
No. 20617 Inlet Hose, 8 feet (2.44 m)
No.20618 InletHose, 10feet (3.05 m)
B
D
C
A
E
or
A. Water supplyfaucets B. Coldwaterconnection
C. Hotwaterconnection D. Watermixingvalve
E. Water inlet hoses
Water hookup
Water Temperature
Cold:
Recommendedcold water temperature is60° to 80°
Fahrenheit,10° to 24°Celsius.
Hot:
Recommendedhotwater temperature is 120°to 140°
Fahrenheit,60° to 66°Celsius.
Warm:
Mixture of hot and cold water. (Warm water temperature is
dependentuponthewatertemperature and the pressure
of both the hot and cold water supply lines).
IMPORTANT: Turnoff water supply faucetsaftercheckout
anddemonstration.Owner should turn offwatersupply
whenevertherewillbeanextendedperiod of non-use.
Water Pressure
Pressure must be a minimum of 20 to a maximum of 120
pounds per square inch (138 to 827 kPa) static pressure
measuredat the faucet.
NOTE: Waterpressure under 20pounds per square inch
(138 kPa) will cause an extended fill time in the
washer and may not properly flush out the
detergentdispenser.
Risers
Risers (or air cushions) may have to be installed if the
pipesknock or pound when flowof water stops. The risers
are more efficient when installed as close as possible to
the water supply faucets.
A
B
A. Risers (air cushions) B. Watersupplyfaucets
Risers
Installation Procedure
1. Position washer near installation area.
Position washer so it is within 4 feet of desired area
ofinstallation.
!
CAUTION
Toavoiddamagetowasher,nevermovewashermore
then 4 feet without installing shipping brace and shock
sleeves.
2. Connect Water Inlet Hoses.
Removetwo plain rubber washersfrom accessories
bag. Install according to illustration below.
A
B
A
A. Rubber washer B. Inlet hose
Water supply hoses
Turnon watersupply faucetsand flush lines for
approximatelytwo minutes toremove any foreign
materials that could clog filter screens in water
mixingvalve.
NOTE: When installing in newly constructed or
renovatedbuilding, it is very important to flush
thelines since build-up may have occurred
duringconstruction.
Installing Washer

7
IMPORTANT: Thread hose couplings ontovalve
connectionsfinger-tight, then approximately1/4
turn with pliers. DO NOT cross thread or
overtightencouplings.
Turn water on and check for leaks. If leaks are found,
retightenthe hose couplings. Continue tighteningand
rechecking until no leaks are found.
3. Connect Drain Hose to Drain Receptacle
Removedrain hose from its shipping position on the
rear of the washer by unhooking the hose from the
retainerclamp.
A
B
A. Retainerclamp B. Drain hose
Preparing drain hose for installation
Findthe instructionsthat areappropriate for your
type of drain receptacle (standpipe, sink, wall, or
laundry tub). Follow these instructions to properly
install the drain hose.
IMPORTANT: Drainreceptacle must be capable of
handling a minimum of 1 1/4" (32 cm) outside
diameterdrain hose.
Standpipe Installation:
Place the drain hose into the standpipe. Remove the
beadedtie-down strap from accessories bagand
placearound standpipe and drain hoseand tighten
strap to hold hose to standpipe. This will prevent the
drainhose from dislodgingfrom drain receptacle
duringuse.
IMPORTANT: To prevent siphoning, do not place any
ribbed portion of the drain hose into the
standpipe.
A
B
C
DE
A. Ribbed portion or drain hose
B. Drain hose sleeve
C. 24" to 36" (91.44 cm) recommended height, it is not
recommendedtoinstalldrainpipeoutsidetherecommended
heightrange.
D. Standpipe 2" (5.08 cm) or 11/2" (4 cm)
E. Beaded tie-down strap
Standpipe installation
Sink Installation
For this type of installation, use the beaded tie-down
strap (supplied in accessories bag), or use a large
wiretie (available fromyour local hardwarestore) and
secure the drain hose to the cabinet top hinge (see
illustration).This will prevent the drainhose from
dislodging.
A
B
C
A. Drain hose B. Tie-down strap or wire tie
C. 24" to 36" (91.44 cm) recommended height, it is not
recommendedtoinstalldrainpipeoutsidetherecommended
heightrange.
Sink installation
In The Wall Installation
For installation of this type, the drain hose MUST be
secured to one of the inlet hoses using the beaded
tie-downstrap from accessories bag.
Installing Washer

8
NOTE: End of drain hose must be 24" to 36" above the
floor. Without 24" to 36" high elevation, water
mayrun outof washerprematurely.
A
B
C
A. Drain hose
B. Tie-down strap (tape if necessary)
C. Inlet hoses
In wall water hook up
Laundry Tub Installation
For this type of installation, the drain hose must be
securedto the stationarytub to prevent hose from
dislodgingduringuse. Use the beadedtie-down strap
(supplied in accessories bag) to secure hose.
A
B
A. Drain hose B. Tie-downstrap
Laundry tub installation
4. Remove Shock Sleeves and Shipping
Brace
Remove2front access panel screwsto remove
access panel. Save screws.
A
B
A. Front access panel B. Access panel screws
Access panel removal
Removefivebolts and five washersfromyellow
marked shipping brace with a 9/16" socket wrench and
removebrace. Remove label fromoutside access
panel and place on inside of access panel.
A
B
B
A. Shippingbrace B. Bolts and washers
Removing shipping brace
Installing Washer

9
Removeboth front shocksleeves and bothrear
shock sleeves by pulling on the yellow rope.
A
B
A. Shock sleeve
B. Pull on cord to remove 4 shock sleeves
Shock sleeve removal
NOTE:5 Bolts, shipping brace, 5 washers and shock
sleeves should be saved and must be
reinstalled whenever the washer is moved
more than four feet. Do not lift or transport
washerfrom frontor sidesor without shipping
materialsinstalled.
Store shipping materials in Accessories Bag. Save
materialsfor use whenever thewasher is moved.
Referto
ShippingBrace Removaland Installation
section for instructions on installation.
5. Position and Level Washer
Positionwasher ona clean,firm, and level floor.
Removerubber feet fromaccessories bag. Place
rubberfeet on all fourleveling legs.
Installing washer on any type of carpeting or soft
vinylflooring is notrecommended. These surfaces
contributeto vibration and a tendencyfor the washer
to move during the spin cycle.
NOTE: Do not slide washer across floor if leveling legs
havebeenextendedorrubber feet have been
installed, legs and base could become damaged.
NOTE: Useof the dispenser drawer, door or control
panel as a handle in moving of washer may
cause damage to these parts.
Installing Washer
Loosen inside locknuts using a 9/16" deep socket.
Adjust level legs with a 1/4" socket on top of leg.
Adjust legs until machine is level front to back, side
to side and does not rock. Tighten locknuts using the
9/16" deep socket. If locknuts are not tight, washer will
moveoutofpositionduring operation.
• On front legs an open or box end wrench can be
used in place of deep socket. Hold leg still with 1/4"
socket on top of leg. use 9/16" wrench to tighten
locknut.
NOTE: Level must rest on raised portion of top panel.
See illustration.
A
B
C
D
E
F
A. Level, washer should be level front to back and side to side
B. 1/4" hex, top of leveling leg
C. Locknut
D. Levelingleg
E. Rubber foot
F. Washer base
Leveling washer
Reinstall front access panel.
6. Electrical Connection
Refer to section on
ElectricalRequirements
, and plug
inwasher.
Plug in washer

10
28" (71.1 cm)
26.9" (68.3 cm)
14.6"
(37.1 cm)
36.6" (93 cm)
43.6" (110.7 cm)
30.9" (78.5 cm)
28" (71.1 cm)
16.8"
(42.7 cm)
2"
(5.1 cm)
Installing Washer
7. Check Installation
Refer to Installer Check on back cover of this manual
and make sure that washer is installed correctly.
8. Verify Washer Operation
Push timer knob in and turn to RINSE & SPIN cycle
to ensure washer is operating correctly. Close door
and pull knob out to start the washer. Verify that
water enters the wash tub, the wash tub rotates,
water is drained out and the wash tub spins dry.
Verify washer operation
Rough in Dimensions

11
Helpful Hints
Thereis no agitator on thiswasher. Instead,clothing
gently tumbles through water. Wash action consists of a
periodof tumbling in one direction, a brief pause, thena
reversetumble in opposite direction.Pauses are partof
tumble action and add to the unique soaking and cleaning
action of the washer. Do not attempt to turn timer through
these pauses. Pauses are part of the wash cycles.
Pauses
This washer has pauses in its operation that are part of its
normal operation. Pauses occur at the following times:
• During washing and rinsing tumble action there is a 8
to 10 second pause while the tumbling action reverses.
• Washer is heating water during the
Boosted Hot
setting. Washer will heat for approximately 55 seconds
performa 5second tumbleand then repeat until water
iscorrect temperature.
• Between wash and rinse cycles for 15 to 30 seconds.
Boosted Hot Wash Temperature
• When Boosted Hot setting is selected, the built-in
heating element will boost the water temperature in the
wash tub to 140°. When the heating element is
operating the
“HEATER ON”
light will come on
.
The
timerwill notadvance untilthe water temperature
reaches 140°. (See setting
WASH/RINSE
temperature
instructionsfor temperature selection)
• Time needed to reach 140° depends on the load size
andthe temperatureof theincoming water. This can
vary from 30 to 60 minutes.
• Boosted Hot setting can be turned off by rotating the
WASH/RINSE TEMPERATURE selector to any other
setting (rotating the cycle will cause a pause in the
cycle of approximately one minute.)
Locking Door
• Door locking mechanism is a safety feature that keeps
thedoor securelyshut duringoperation. Door can not
beopened while washer is inoperation.
• The “Door Locked” light must be on for the unit to
operate.
• If power to washer is interrupted or there is a power
outageduring operation,there willbe a minimum of 45
seconddelay before door canbe opened evenif DOOR
LOCKEDlight goes off.
Adding Clothes During Wash Cycle
To avoid delays to wash cycle make sure all items are
placed in washer before starting washer. If it is necessary
to add or remove items from the washer while it is
operating,performthefollowing steps:
1. Push timer knob in to stop the wash cycle.
2. Waituntil “Door Locked”light goesoff (“Door Locked”
light will take a minimum of 45 seconds to shut off
when the wash cycle has been interrupted.)
3. Opendoor. Add or removeitems, closedoor.
• Water level will be below the level of the door so
overflowout of doorwill not occur.
4. Adjust timer knob (if needed) and pull timer knob out
to restart cycle.
Detergents
See
DispenserDrawer
instructionsforaddingdetergents.
• Lowsudsing detergents arerecommended for use with
highefficiencyorfront loading washing. To identify
thesedetergents look for High Efficiency (HE) graphic
onthe detergent package.
• Ifusing detergents made fortopload washers, avoid
oversudsingby using 1/3the recommended detergent
amount.Cleaningperformance may be affectedwhen
using the lesser amount.
NOTE: Theglass door allowsviewing of sudslevel. The
normallevel ofsuds shouldbe below the center
of the door. If suds level is too high, the amount
ofdetergent used should be reducedduring next
cycle. Extra Rinse cycle may also be selected.
Spin Cycle
When washer goes into its spin cycle, there will be a
noticeableincreasing and decreasing ofthe spin speedof
the washer wash tub. The washer will slowly tumble the
clothing items between rapid spins. During the final spin,
there will be a noticeable increase in the spin speed
beforethewasher goes into afinal fluff.
Loading Washer
Thisfrontload washer operates bestwhen fully loaded.
Maintainingabalanced load is importantfor proper
operation. A single item or very small load can not be
evenlybalanced. Make sureseveral items arein the wash
tub when starting cycle.
Operating Washer

12
Operating Instructions
!
WARNING
To reduce the risk of fire, electrical shock, serious
injuryor death topersons, read the IMPORTANT
SAFETYINSTRUCTIONSonpages3and4before
operatingyourwasher.
Determine Proper Cycle
Regular Cycle
Use for sturdy items, play or work clothes, towels,
T-shirts, etc. Wash time selection will depend on type of
fabricand amount of soil.When cleaning heavilysoiled
items, use prewash setting and a longer wash time (15
minutes maximum). Lightly soiled items require less
wash time.
RegularCyclecontainsfour settings—Prewash, Heavy,
Normaland Light. Prewashsetting is for heavily soiledor
stainedclothing. Number shown nextto Heavy, Normal,
and Light settings is the length of tumbling in minutes.
(For example: Setting timer on Heavy will be a 15 minute
tumble,including pauses.)
NOTE: Detergentwill notbe dispensed during the
Prewash setting. Use a spot remover directly on
stains when using this setting. To add detergent
during a Prewash cycle, add powder into the
washtub, addliquid detergentinto the detergent
dispenser. If liquid detergent is used, you will
need to add detergent to the dispenser during the
wash portion of the cycle also.
Permanent Press/Knit Cycle
Use for permanent press items and synthetics. Wash
timeselection will depend upon typeof fabric and amount
of soil. There are two settings in the PERMANENT
PRESS/KNITScycle—NormalandLight. Number shown
next to these settings is length of tumbling in minutes.
(For example: Setting timer on Normal will be a nine
minutetumble, including pauses.)
Delicate Cycle
Wash delicate items that typically get washed by hand, in
this cycle. There are two settings in the DELICATE
cycle—Normaland Light.Number shownnext to these
settings is length of tumbling in minutes. (For example:
Setting timer on Normal will be a seven minute tumble,
includingpauses.)
Rinse and Spin Cycle
Use for items that only need to be rinsed. This cycle is
also useful in ridding your washer of suds when too much
detergenthasbeen used.
NOTE: Rinse and Spin setting can be used to help
completely remove excess soap from any wash
setting.
Operating Washer

13
Wash Cycles
Each wash cycle includes several different settings. The following chart lists what can be expected during the cycles
selected.
Operating Washer
Regular Cycle
Activity Water Temperature
Prewash (Optional) Fill, Tumble, Rinse & Drain Boosted Hot, Hot, Warm or Cold
Heavy, Normal, Light Fill & Tumble Boosted Hot, Hot, Warm or Cold
Spin Pulse Spin
Rinse 1 Fill & Tumble Cold
Spin Pulse Spin
Rinse 2 Fill & Tumble Warm or Cold*
Final Spin* Medium & Fast Spin
Extra Rinse (Optional) Fill & Tumble Warm or Cold
Spin Medium & Fast Spin
Fluff Tumble
48 minute total cycle time, cycle time will vary with fill rate.
Rinse and Spin
Rinse Fill & Tumble Warm or Cold
Spin Medium & Fast Spin, Tumble
17 minute total cycle time. Permanent Press/Knits Cycle
Normal, Light Fill & Tumble Boosted Hot, Hot, Warm or Cold
Spin Pulse Spin
Rinse 1 Fill & Tumble Cold
Spin Pulse Spin
Rinse 2 Fill & Tumble Warm or Cold*
Final Spin* Slow & Medium Spin
Extra Rinse (Optional) Fill & Tumble Warm or Cold
Spin Medium Spin
Fluff Tumble
38 minute total cycle time, cycle time will vary with fill rate.
Delicate Cycle
Normal, Light Fill & Slow Tumble Boosted Hot, Hot, Warm or Cold
Spin Pulse Spin
Rinse 1 Fill & Slow Tumble Cold
Spin Pulse Spin
Rinse 2 Fill & SlowTumble Warm or Cold*
Spin Slow Spin
Extra Rinse (Optional) Fill & Slow Tumble Warm & Cold
Spin Slow Spin
Fluff Slow Tumble
33 minute total cycle time, cycle time will vary with fill rate.
* If extra rinse is selected the final spin will be medium speed only.
* Rinse 2 will give a cold rinse when the optional Extra Rinse is selected. Extra Rinse adds
approximately 15 minutes to the cycle time.

14
Operating Procedures
!
Caution
Topreventpropertydamageordamagingwasherverify
thefollowingbeforeusing the washer:
• Washer cord is plugged into a 120 volt electrical
outletthat hasthe propergrounding and polarity.
• Washer hoses are connected to the hot and cold
water faucets and faucets are turned on.
• Drain hose is not kinked and is inserted into a drain.
SeeInstallation section of thismanual for properwasher
installation.
IMPORTANT: Prior to first wash, use an all-purpose
cleaner, or a detergent and water solution with a
damp cloth to remove shipping dust from inside
washtub.
1. Prepare clothes for washing. Sort items into separate
loads, empty pockets and cuffs, pretreat stains and
heavilysoiled areas. See
WashingGuide
provided in
literaturepacket for wash preparation instructions.
2. Measureand add high efficiency (HE) detergent,
fabricsoftener, and bleach tothe dispenser drawer.
See
DispenserDrawer
instructions for dispenser
usage.
3. Load clothes into wash tub.
• Washer has automatic water level adjustment.
Water level will be adjusted to the size of
each load.
•When loading washer, clothes should fill the wash
tub but should not be packed.
•Wash loads can be too small. Wash load should
be large enough so that clothes can be evenly
distributedaround the drum during spin.
4. Close loading door tightly. Washer will not operate
withthe door open.
!
WARNING
To reduce risk of serious injury, do not attempt to
bypassloading door switchpermitting washer to
tumbleor spin withthe loading door open.
5. SetWASH/RINSE temperature.
Water temperature dial
Therearefive WASH/RINSE temperaturesavailable—
Boosted Hot Wash/Cold Rinse, Hot Wash/Cold
Rinse, Warm Wash/ Cold Rinse, Warm Wash/Warm
Rinse,and Cold Wash/ColdRinse.
Seechart below fortemperatures that workbest for
yourgarments.
!
WARNING
To prevent personalinjury do nottouch door glass
when Boosted Hot and Hot wash cycles are selected.
Windows may be hot.
NOTE: Alwaysfollow Manufacturer’s Care Labels.
NOTE: Energy Saver settings, marked with a dot (•),
show which temperature settings will use the
leastenergy.
Operating Washer

15
Boosted Hot
Approximately 140° F •Sturdy whites and
colorfast items
•Work Clothes
•Heavily soiled items
•Diapers
Hot
Approximately 120° F
(Or as determined by home
hot water supply)
•Sturdy whites and
colorfast items
•Work clothes
•Soiled items
•Diapers
Warm
Approximately 100° F •Light and moderately
soiled items
•Non-colorfast or dark
colors.
•Permanent press
•Silks, woolens, nylon,
acrylic
•Rinsing of some items
Cold
Approximately 65° F •Non-colorfast items
•Extra delicate clothing
•Rinsing of most items
Boosted Hot Wash
Boosted Hot Wash will boost water temperature in
tubto 140° Fand is usefulfor improved cleaningof
some loads. “Heater On” light will be on when the
heatingelement is on.Timer will notadvance until
140°Fhas been reached. Timeneeded to reachthis
temperaturemay add anadditional 30 to 60 minutes
to the cycle time. Hot water is the most effective for
cleaning but it is not recommended for all fabric types
(readlabels).
NOTE: Boosted Hot Wash can be turned off by rotating
theWASH/RINSE temperature toanother
setting. (The washer may pause for a short time
when this change is made.)
NOTE: Therewill be extended pauses with tumbling
action when BOOSTED HOT WASH is selected
becausewater isbeing heated.
6. Select“EXTRA RINSE” if desired.
ExtraRinse control isuseful for people with detergent
sensitive skin. By pressing the “Extra Rinse” to “ON”,
theRegular, Permanent Press/Knits, or Delicate
cycleswill eachprovide anadditional rinse. When
extra rinse is not wanted, “OFF” should be selected.
Extra Rinse will add approximately 10 to 15 minutes
to the total cycle time.
• ExtraRinse is usefulfor removing detergent for
sensitive skin.
Extra rinse button
7. Select cycle according to type of fabric being
washed. Push timer knob in and turn clockwise to
desired cycle and wash time. Use indicator dot on
knob as a guide.
Cycle knob
8. Pull timer knob out to start washer. “DOOR
LOCKED” light will come on after a short delay, water
fill will begin, and wash tub will begin tumbling.
NOTE: Washer door MUST be closed tightly to start
washer.
Adding Items during wash cycle
Ifadding items after a cyclehas already started perform
thefollowing steps:
• Push timer knob in. There will be approximately a
minute delay as “Door Locked” light goes out.
• Opendoor and addor remove items.
• Adjust timer knob (if desired) and pull timer knob back
out to restart cycle.
Operating Washer

16
Dispenser Drawer
Child Lock
Dispenser drawer has a child lock. Slide the latch
(located inside the handle) to the right to lock the drawer,
if desired. Slide latch to the left to unlock door.
A
A. ChildLock
Child lock location
Detergent Compartment
Detergent compartment is located on the right side of the
dispenserdrawer.
HighEfficiency(HE)powdered or liquid detergents are
recommendedforusewith front loading washers.
Powderedbleach can alsobe used in the dispenseralong
withthe detergent.
Compartmentsfordetergent,fabricsoftener and bleach
arelarger than what isneeded per load tohelp avoid
spills.Do not overfill dispenserwith detergent. Filling
dispenser cavity completely with detergent will result in
oversudsingand a decreasein cleanability. Use only
amountofdetergentrecommendedbydetergent
manufacturer.
NOTE: Ifusing detergents madefor topload washers,
avoidoversudsing by using1/3ofthe
recommendedamount.Cleaningperformance
may be affected when using lesser amounts.
Use care when adding detergent so as not to spill into the
othercompartments.Detergent mixed with fabricsoftener
can make the softner gummy.
NOTE: Thenormal level of suds shouldbe below center
ofthe door.
Timer
Although wash cycles are automatic, the timer may be
reset to lengthen, shorten or repeat a portion of a cycle.
To set or reset the timer, push timer knob in to stop the
washer. Hold timer knob in firmly while slowly turning it
clockwise to the setting desired. Pull timer knob out to
startwasher.
“Door Locked” Light
When washer is started the “Door Locked” light will come
on after a short delay. Light will turn off when the cycle is
complete.
“Heater On” Light
This light comes on during the Boosted Hot setting only.
While the washer is heating the “Heater On” light will turn
on. The light will go off when the washer tumbles and will
come back on when the heater is on.
Out of Balance Load
If at the end of the cycle, the load is noticably wet,
washer has limited the spin speed. Limiting the spin
speedwill prevent damageto the washer if thereis a
severelyunbalancedload.
If this condition occurs, redistribute the load manually and
repeat the cycle beginning at the last rinse.
If the condition persists, consider steps discussed in the
Washing Tips
section of Washing Guide.
Wash loads can be too small. Wash load should be
largeenoughso that clothes areevenly distributed around
the drum during spin. If load is too small, add clothes to
washtub.
End of Cycle Signal
End of cycle signal
Volume of the signal tone may be set on OFF, LOUD or
betweenthe two selections. If a volume level is selected,
the signal tone will buzz on and off when the cycle is
completed. Signal will stop when the door is opened or
whenthe timer has advanced to an OFF position.
Operating Washer

17
A
A. Detergentcompartment
Detergent dispenser location
Liquid Bleach Compartment
Bleach compartment is located in the left front corner of
thedispenserdrawer. It hasbeen designed to preventthe
dispensingof undiluted bleachonto the clothes load.
A
A. Bleachcompartment
Bleach dispenser
Useliquid bleach inthe dispenser. Powdered bleach must
not be used in this compartment. Powdered bleach can
be used in the detergent compartment only and can be
addedalongwith the detergent.
DONOT use more thanthe maximum levelindicated for
thebleach compartment. Addingmore than the maximum
amount could result in early dispensing of the product and
possibledamage to fabrics.
Carefullypourrecommendedamount of bleach into the
compartmentbeforestartingwash load.
Be careful not to spill undiluted bleach. It is a strong
chemical and can damage some fabrics if it is not
properlydiluted.Followbleach manufacturer’s label for
properuse.
Carefullyclose dispenser door.Do not allowbleach to
spill into other compartments.
Operating Washer
Fabric Softener Compartment
Thefabric softener compartmentis located inthe left rear
cornerofthedispenserdrawer.
A
A. Fabric softner dispenser
Fabric softner dispenser location
Useno more thanthe maximum level indicated forthe
fabricsoftenercompartment. Adding more thanthe
maximum amount could result in early dispensing of the
productand possible stainingof fabrics.
Addfabricsoftenertocompartment before beginning
washload.Thefabric softener will bedispensedduringthe
last rinse cycle.
Carefullyclose dispenser door.Do not allow softenerto
spill into other compartments.
To Clean the Dispenser
Removethedispenserdrawer from the washer byfirmly
pulling the drawer straight out, past the stop position.
Rinse dispenser drawer in hot water. A small brush may
be used to thoroughly clean out any residue. After
cleaning,reinstallthe dispenser drawer.
Small amounts of water may be discovered in the
dispenser drawer. This condition is normal. Water
may be removed by removing the dispenser drawer
and pouring the water out.

18
Care and Cleaning
Cold Weather Care
Ifthe washer is deliveredon a cold day(below freezing),
or is stored in an unheated room or area during the cold
months, do not attempt to operate it until the washer has
had a chance to warm up to room temperature.
Care Of Your Washer
• Use only a damp or sudsy cloth for cleaning the control
panel. Some cleaning product sprays may harm the
finish on the control panel or damage the interior of the
hood.
• Wipethe washercabinet as needed. If detergent,
bleach or other washing products are spilled on the
cabinet, wipe immediately. Some products will cause
permanent damage if spilled on the cabinet.
• Do not use scouring pads or abrasive cleansers.
• Do not lay sharp or rough objects on or against the
washer. The finishcould be damaged.
• Thewash tub and window willneed no particular care
althoughthey mayneed rinsingor wiping after an
unusualload hasbeen washed.Outside of window can
becleaned with household windowcleaner.
• Leavethe loading door open to allow the inside ofthe
washer to dry out after use. This helps prevent musty
odorsfromdeveloping.
• Do not allow small children to play on or around the
washer.
•Do not move washer without reinstalling shipping
brace. See instructions below for shipping brace
installation.
Vacations and Extended Non-Use
Important:Toavoid possible property damagedueto
flooding,turnoff the water supplytothewasher whenever
therewillbe an extended periodofnon-use.Leave door
openso that moistureinside machine canevaporate
preventingmoldormildewfromgrowing.
Reinstallation of Shipping Materials
1. Removefront access panelby removing two screws.
A
B
A. Front access panel B. Access panel screws
Access panel removal
2. Place the shock sleeves on all four shock absorbers.
(Seeillustration)
A
B
A. Shocksleeve B. Shock absorber
Reinstalling shock sleeves
3. Inserthooked end ofshipping brace into the open
slot of the motor mount. Attach with bolts and
washers to anchor bracket to machine. (See
illustration)
A
B
B
A
B
C
A. Shippingbrace B. Bolts and washers
C. Cut-away view of washer cabinet to illustrate location of
shippingbrace
Reinstalling shipping brace
4. Reinstall front access panel.
RefertotheInstallation Instructions for proper procedures
wheneverthewasheris moved.

19
Before Calling Service
You may save time and money by checking the
items listed below. If you have a question not
explained below contact Amana Consumer
Information at 1/800-843-0304.
Washer will not fill.
• Close the door tightly.
• Check the house circuit breaker to make sure the
breakerdoes not needreplacement.
• Make sure washer is plugged into a live electrical
outlet.
• Verify that inlet hoses arenot pinched preventing water
fromenteringwasher.
• Make sure both hot and cold faucets are turned on
completely.
• Cleanthe filter screens in valveopenings. Owner is
responsiblefor service callsregarding cleaning of the
screens.
Washer will not start.
• Be sure power cord is plugged all the way into the
electrical outlet.
• Close the loading door tightly.
• Check the house circuit breaker to make sure the
breakerdoes not needreplacement.
• Pull timer knob out to start the washer. Check to make
sure timer is not set at an OFF position.
Washer will not tumble
• Close door tightly.
• Check the house circuit breaker to make sure the
breakerdoes not needreplacement.
• Are controls properly set. See Operating Instructions
for setting controls.
• Drive belt may be broken. Call Amana technician.
Washer will not spin
• Close door tightly.
• Wash load may be out of balance, stop load and
redistribute clothing, or add clothing if load is too small.
• Check the house circuit breaker to make sure the
breakerdoes not needreplacement.
• Are controls properly set. See Operating Instructions
for setting controls.
• Drive belt may be broken. Call Amana technician.
Washer will not drain
• Make sure drain hose is not twisted or kinked.
• Make sure drain hose is installed within recommended
height range. See
Installation Instructions
for
recommendedheightrange.
Door will not open or close.
• Make sure control knob is all the way pushed in when
stoppingwasher.
• Wait. It will take at least 45 seconds for the door lock
mechanismto disengage.
• Weight of wet clothes may be pushing on inside of
door. Push in slightly on door and then try to open.
Washerstops.
• This may be a pause in the cycle, a soak period, or
washer may be heating water. Wait and it may start.
• Check the house circuit breaker to make sure the
breakerdoes not needreplacement.
• Make sure electrical cord is plugged all the way into
electrical outlet.
Washer leaks water.
• Make sure hose connections are tight.
• Make sure end of drain hose is correctly inserted and
secured to drain facility.
• Makesure washer was not overloaded, or too much
detergentwas put in dispenser.
• If washer drains to a standpipe, make sure standpipe is
notoverflowing during drain portionof cycle.
Washer is excessively noisy.
• See
Common Operating Sound
s section in this
manual.
• Clangingheard during tumbling can be caused by loose
change or buckles. Check for loose change in wash tub
and remove. Make sure all clothing has zippers zipped
up, clothing with buckles must be turned inside out.
• Makesure shipping brace and shocksleeves have
beenremoved.
• Make sure washer is level. See “Installation
Instructions”forleveling.
• Floor may not be strong enough for washer. See
InstallationInstructions for recommended type offloor.
• If noise persists in successive loads, or a loud banging
develops,contact an authorized Amana technician.
Washer fills with the wrong temperature water.
• Make sure both faucets are turned on fully.
• Make sure temperature control knob is turned to
desiredsetting.
• Make sure water inlet hoses are connected to correct
faucets and inlet connections.
• Check water heater setting. Water heater should be set
to a minimum of 120°.
Care and Cleaning

20
Washer signal comes on and remains on
• Unplugwasher wait approximately 5 seconds and plug
washer back in.
• Washer may not be getting enough water. Make sure
faucets are turned on fully. This situation should be
accompaniedwith a signal warning.
• Make sure water inlet hoses are connected to correct
faucets and inlet connections.
• Make sure something in washload is not tangled
preventingwashload from tumbling.
• After checking these items and washer signal is still
on, unplug washer, shut off water and contact a service
person.
Clothes are still wet after cycle is complete
• Washload may have been out of balance. Redistribute
clothes and put clothes through an extra spin cycle. If
washer has not completed its cycle, EXTRA RINSE
cycle can be selected.
• Ifa power outage occurred during cycle, may not have
been able to go through complete spin. Extra spin
shouldbe selected to remove moisture.
• Mayhave been toomuch detergent. Reducedetergent
amount for next cycle.
If power is disconnected from washer
• When power is disconnected from the washer, door can
not be opened immediately. There will be a minimum of
a 45 second delay before door will unlock.
• Clothes may still be wet when removing from washer. A
disconnection from power will often not allow washer to
go through a complete spin cycle. Extra spin should be
selected or push in control knob and turn control knob
back to spin setting.
Washer is Vibrating excessively
• Make sure washer is level. See
Installing Washer
for
levelinginformation.
• Check wash load. If wash load is not evenly distributed
rearrangewash load for amore even clothing
distribution.
• May not be enough clothing in the washer. Wash loads
can be too small. It may be neccesary to add clothing
items to the wash load. There should be enough
clothesin thewasher toevenly distribute around wash
tubwhen spinning.
• Floor may not be strong enough for washer. See
InstallingWasher
for type of floor recommended.
• Makesure shipping brace and shocksleeves have
beenremoved before using washer. See
Installing
Washer
forshipping brace andshock sleeves removal.
• Make sure locknut is tightened on leveling leg.
• Makesurerubber feet are placedunderneath leveling
legs.
Care and Cleaning
Ifafter reviewing this informationyou are still unableto
solveproblemcontact an authorized servicer.If you are
unableto locate an authorizedservice center orare
unsatisfiedwiththeservice performed on your washer,
contact:
AmanaAppliances
2800220thTrail
Amana,Iowa 52204-0001
Phone: 1-800-843-0304
Fax: (319)622-2977
!
WARNING
To reduce the risk of serious injury or death, do not
repair or replace any part of the washer or attempt any
servicingunless specifically recommended inthe user-
maintenanceinstructionsor in published user-repair
instructions that you understand and have the skills to
carry out.
Table of contents
Other Amana Washer manuals

Amana
Amana NAH6800AWW User manual

Amana
Amana NFW5800DW User manual

Amana
Amana W11156981B User manual

Amana
Amana NTW4500VQ0 User manual

Amana
Amana LWA50AL User manual

Amana
Amana LW8463W User manual

Amana
Amana NAV-1 User manual

Amana
Amana ALW430RAW User manual

Amana
Amana Top-Loading Washer User manual

Amana
Amana 2201045 User manual

Amana
Amana NTW4800VQ1 User manual

Amana
Amana ATW4676BQ1 User manual

Amana
Amana NAV8805EWW User manual

Amana
Amana TANDEM W10252719A User manual

Amana
Amana NAH6800AWW User manual

Amana
Amana NFW5700B Series User manual

Amana
Amana NFW7200TW User manual

Amana
Amana LW7563W2 User manual

Amana
Amana LWA50AL User manual

Amana
Amana LW8263L2 User manual