GENERAL INFORMATION
Amana Compact Washer n
1-5
Using the Dispensers
Using the Dispensers
Add Laundry Products
If using liquid laundry detergent, single-dose laundry packets,
color-safe bleach, Oxi-type boosters, or fabric soener crystals,
add to the wash basket prior to adding laundry.
NOTE: Always follow manufacturer’s instrucons.
UsingYour Washer
4PSUBOEQSFQBSFZPVSMBVOESZ
■Empty pockets. Loose change, buttons, or any small
object can pass under the washplate and become
trapped, causing unexpected sounds.
■Sort items by recommended cycle, water temperature,
and colorfastness.
■Separate heavily soiled items from lightly soiled.
■Separate delicate items from sturdy fabrics.
■Do not dry items if stains remain after washing; heat
can set stains into fabric.
■Treat stains promptly.
■Close zippers, fasten hooks, tie strings and sashes.
Remove non-washable trim and ornaments.
■Mend rips and tears to avoid further damage to items
during washing.
Helpful Tips:
■For best performance, use HE liquid detergent when washing
bulky items.
■Use mesh bags to help avoid tangling when washing
delicate or small items.
■Turn knits inside out to avoid pilling. Separate lint-takers
from lint-givers. Synthetics, knits, and corduroy fabrics will
pick up lint from towels, rugs, and chenille fabrics.
/05& Always read and follow fabric care labels instructions
to avoid damage to your items.
"EEMBVOESZQSPEVDUT
IMPORTANT: If you are using the Compact Dryer Stack Stand
(Part Number 49971), pull the washer forward before lifting
the washer lid.
If you are using liquid laundry detergent, single-dose laundry
packets, color-safe bleach, Oxi-type boosters, or fabric softener
crystals, add to the wash basket prior to adding laundry.
NOTE: Always follow manufacturer’s instructions.
-PBEMBVOESZJOUPXBTIFS
Max
load
level
For best performance, load items
in loose heaps evenly around the
washplate. Try mixing different
sized items to reduce tangling.
*.1035"/5 Items need to move
freely for best cleaning and to reduce wrinkling and tangling.
Figure 1
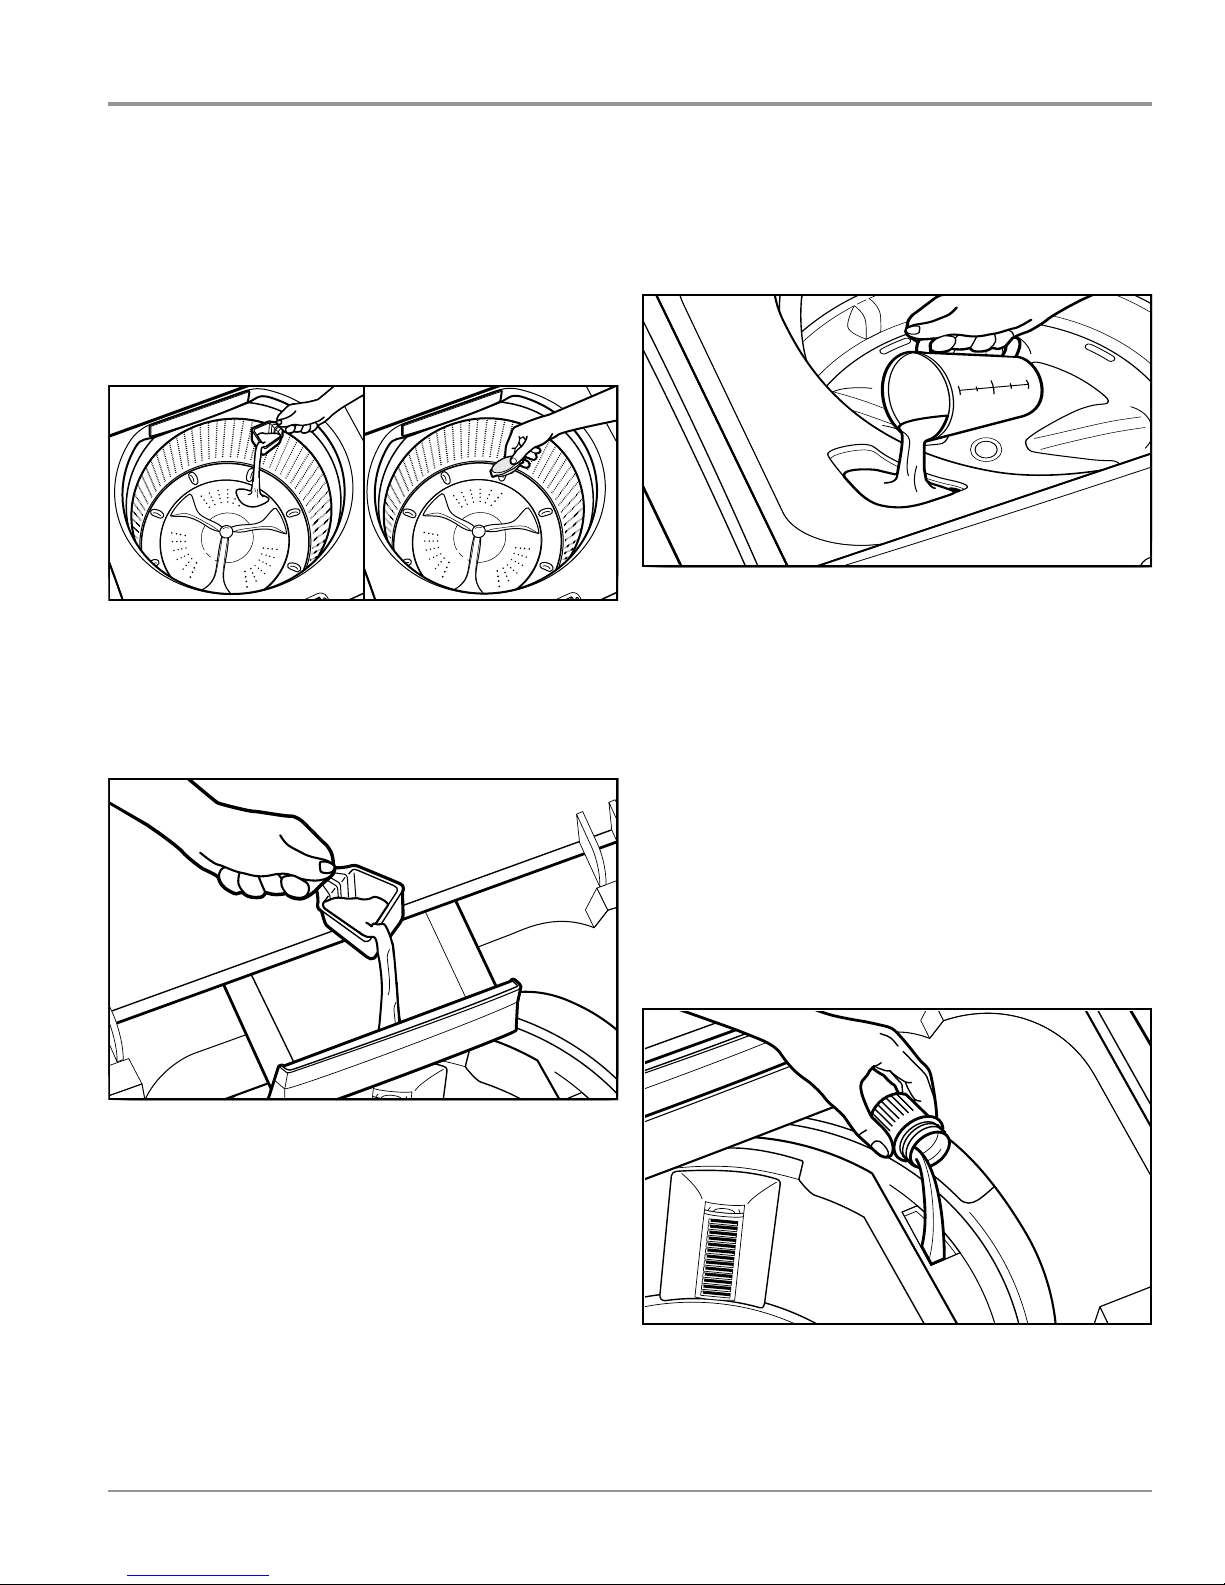
Add Powdered HE Detergent
NOTE: Do not add liquid laundry detergent, single-dose
laundry packets, color-safe bleach, Oxi-type boosters, or
fabric soener crystals to dispensers. They will not dispense
correctly. Add to the basket prior to adding laundry.
Using Laundry Product Dispensers
NOTE: Do not add liquid laundry detergent, single-dose
laundry packets, color-safe bleach, Oxi-type boosters, or
fabric softener crystals to dispensers. They will not dispense
correctly. Add to the basket prior to adding laundry.
"EEQPXEFSFE)&EFUFSHFOU
*.1035"/5 Use only High Efficiency detergents. The
package will be marked “HE” or “High Efficiency.” Low-water
washing creates excessive sudsing with a regular non-HE
detergent. Using regular detergent will likely result in longer
cycle times and reduced rinsing performance. It may also
result in component failures and noticeable mold or mildew.
HE detergents are made to produce the right amount of
suds for the best performance. Follow the manufacturer’s
instructions to determine the amount of detergent to use.
/05&4
■Use only powdered HE detergent in the detergent
dispenser. Add liquid HE detergent or single-dose packets
to the basket prior to adding laundry.
■See “Washer Maintenance” for information
on recommended method of cleaning washer dispensers.
"EEMJRVJEDIMPSJOFCMFBDI
UPEJTQFOTFS
Bleach will be dispensed automatically during the wash part
of the cycle. Do not overfill, dilute, or use more than 1 cup
(250 mL). Do not use color-safe bleach or Oxi products in
the same cycle with liquid chlorine bleach.
"EEMJRVJEGBCSJDTPGUFOFS
Pour a measured amount of liquid fabric softener into
dispenser; always follow manufacturer’s directions for correct
amount of fabric softener based on your load size. Fabric
Softener is added during rinse.
*.1035"/5 Do not overfill or dilute. Overfilling dispenser will
cause fabric softener to immediately dispense into washer.
It is normal for a small amount of water to remain in the
dispenser at the end of a cycle.
NOTE: The fabric softener dispenser rotates around the wash
basket and may not be in the same spot each time.
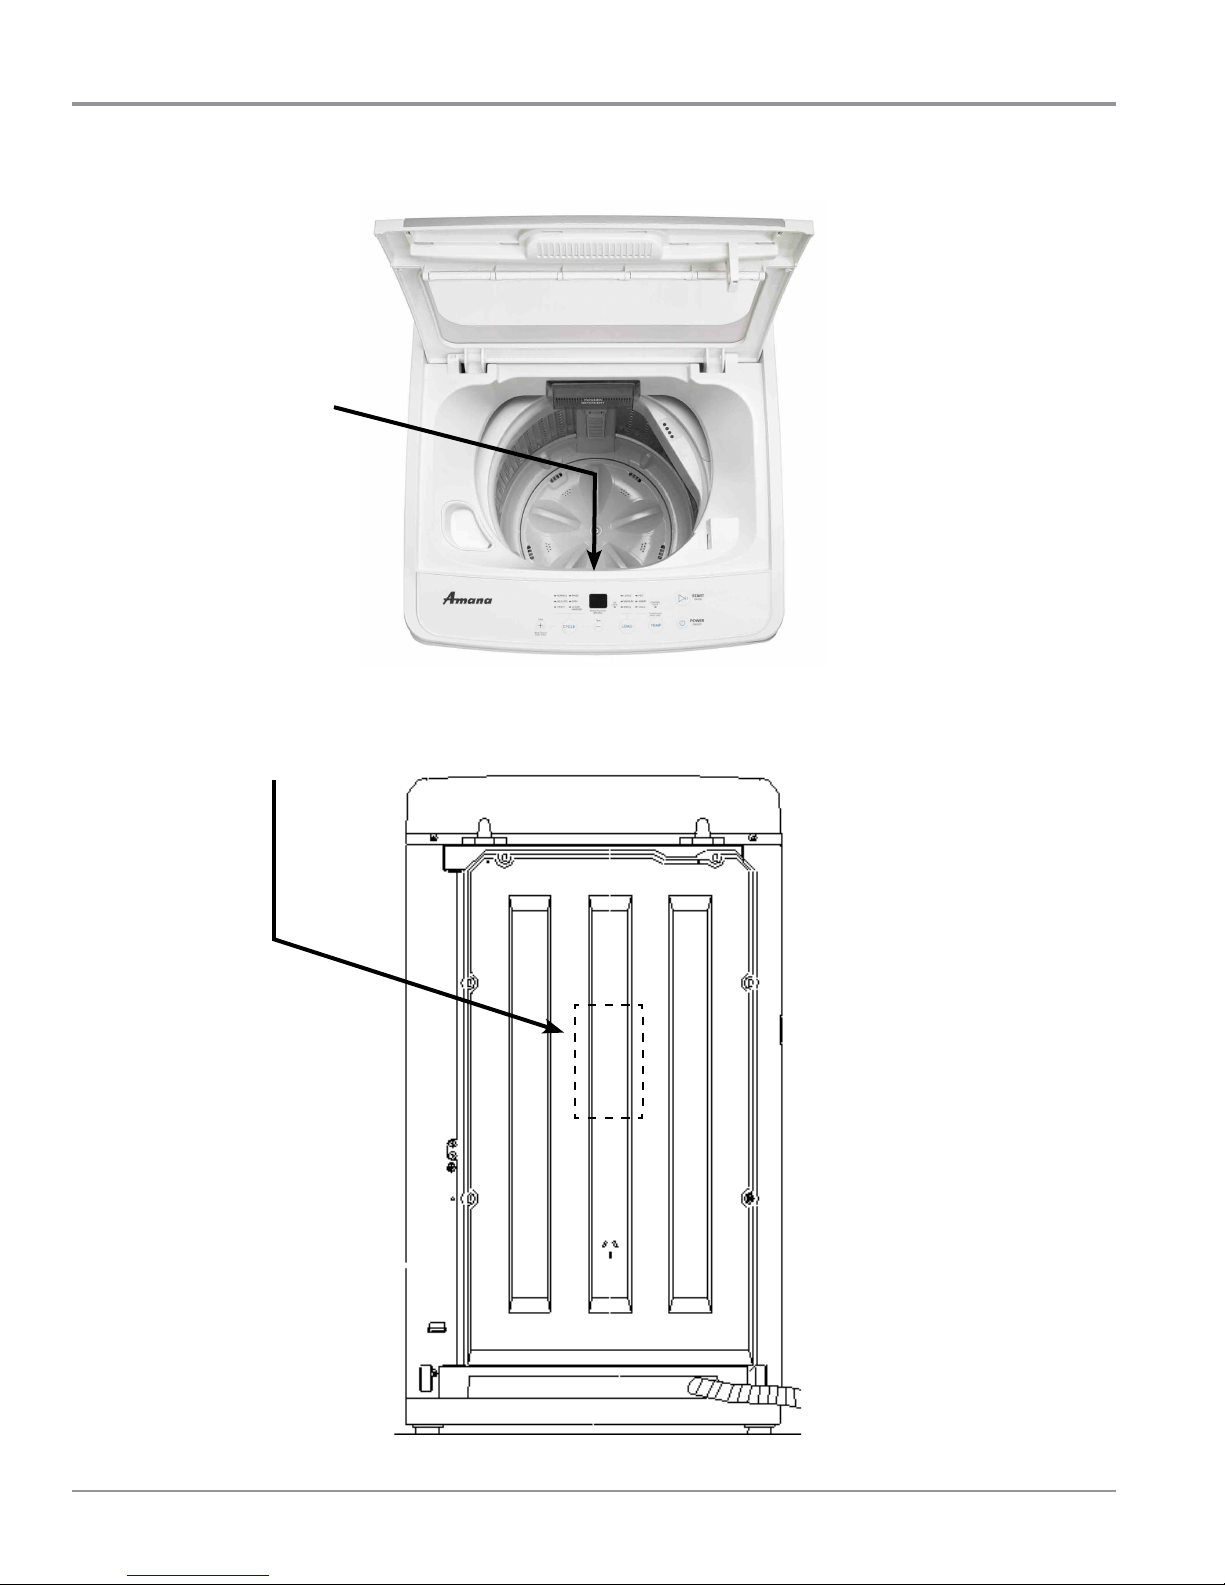
5PVDI108&3UPUVSOPOXBTIFS
Close the washer lid. Washer will not fill, agitate or spin
with the lid open. Make sure the dispenser drawer is closed
completely, then touch POWER to turn on the washer.
4FMFDU-0"%TJ[F
Press the LOAD button to select the correct setting for
your wash load and the type of fabric being washed.
Choose a water level that allows the load to move freely
for best fabric care.
Figure 2
IMPORTANT: Use only High Eciency detergents. The package
will be marked “HE” or “High Eciency.” Low-water washing
creates excessive sudsing with a regular non-HE detergent.
Using regular detergent will likely result in longer cycle
mes and reduced rinsing performance. It may also result
in component failures and noceable mold or mildew. HE
detergents are made to produce the right amount of suds for
the best performance. Follow the manufacturer’s instrucons
to determine the amount of detergent to use.
NOTES:
nUse only powdered HE detergent in the detergent
dispenser. Add liquid HE detergent or single-dose packets
to the basket prior to adding laundry.
Add Liquid Chlorine Bleach to Dispenser
Using Laundry Product Dispensers
NOTE: Do not add liquid laundry detergent, single-dose
laundry packets, color-safe bleach, Oxi-type boosters, or
fabric softener crystals to dispensers. They will not dispense
correctly. Add to the basket prior to adding laundry.
"EEQPXEFSFE)&EFUFSHFOU
*.1035"/5 Use only High Efficiency detergents. The
package will be marked “HE” or “High Efficiency.” Low-water
washing creates excessive sudsing with a regular non-HE
detergent. Using regular detergent will likely result in longer
cycle times and reduced rinsing performance. It may also
result in component failures and noticeable mold or mildew.
HE detergents are made to produce the right amount of
suds for the best performance. Follow the manufacturer’s
instructions to determine the amount of detergent to use.
/05&4
■Use only powdered HE detergent in the detergent
dispenser. Add liquid HE detergent or single-dose packets
to the basket prior to adding laundry.
■See “Washer Maintenance” for information
on recommended method of cleaning washer dispensers.
"EEMJRVJEDIMPSJOFCMFBDI
UPEJTQFOTFS
Bleach will be dispensed automatically during the wash part
of the cycle. Do not overfill, dilute, or use more than 1 cup
(250 mL). Do not use color-safe bleach or Oxi products in
the same cycle with liquid chlorine bleach.
"EEMJRVJEGBCSJDTPGUFOFS
Pour a measured amount of liquid fabric softener into
dispenser; always follow manufacturer’s directions for correct
amount of fabric softener based on your load size. Fabric
Softener is added during rinse.
*.1035"/5 Do not overfill or dilute. Overfilling dispenser will
cause fabric softener to immediately dispense into washer.
It is normal for a small amount of water to remain in the
dispenser at the end of a cycle.
NOTE: The fabric softener dispenser rotates around the wash
basket and may not be in the same spot each time.
5PVDI108&3UPUVSOPOXBTIFS
Close the washer lid. Washer will not fill, agitate or spin
with the lid open. Make sure the dispenser drawer is closed
completely, then touch POWER to turn on the washer.
4FMFDU-0"%TJ[F
Press the LOAD button to select the correct setting for
your wash load and the type of fabric being washed.
Choose a water level that allows the load to move freely
for best fabric care.
Figure 3
Bleach will be dispensed automacally during the wash part of
the cycle. Do not overll, dilute, or use more than 1 cup (250
mL). Do not use color-safe bleach or Oxi products in the same
cycle with liquid chlorine bleach.
Add Liquid Fabric Softener
Pour a measured amount of liquid fabric soener into
dispenser; always follow manufacturer’s direcons for correct
mount of fabric soener based on your load size. Fabric
Soener is added during rinse.
IMPORTANT: Do not overll or dilute. Overlling dispenser will
cause fabric soener to immediately dispense into washer.
It is normal for a small amount of water to remain in the
dispenser at the end of a cycle.
NOTE: The fabric soener dispenser rotates around the wash
basket and may not be in the same spot each me.
Using Laundry Product Dispensers
NOTE: Do not add liquid laundry detergent, single-dose
laundry packets, color-safe bleach, Oxi-type boosters, or
fabric softener crystals to dispensers. They will not dispense
correctly. Add to the basket prior to adding laundry.
"EEQPXEFSFE)&EFUFSHFOU
*.1035"/5 Use only High Efficiency detergents. The
package will be marked “HE” or “High Efficiency.” Low-water
washing creates excessive sudsing with a regular non-HE
detergent. Using regular detergent will likely result in longer
cycle times and reduced rinsing performance. It may also
result in component failures and noticeable mold or mildew.
HE detergents are made to produce the right amount of
suds for the best performance. Follow the manufacturer’s
instructions to determine the amount of detergent to use.
/05&4
■Use only powdered HE detergent in the detergent
dispenser. Add liquid HE detergent or single-dose packets
to the basket prior to adding laundry.
■See “Washer Maintenance” for information
on recommended method of cleaning washer dispensers.
"EEMJRVJEDIMPSJOFCMFBDI
UPEJTQFOTFS
Bleach will be dispensed automatically during the wash part
of the cycle. Do not overfill, dilute, or use more than 1 cup
(250 mL). Do not use color-safe bleach or Oxi products in
the same cycle with liquid chlorine bleach.
"EEMJRVJEGBCSJDTPGUFOFS
Pour a measured amount of liquid fabric softener into
dispenser; always follow manufacturer’s directions for correct
amount of fabric softener based on your load size. Fabric
Softener is added during rinse.
*.1035"/5 Do not overfill or dilute. Overfilling dispenser will
cause fabric softener to immediately dispense into washer.
It is normal for a small amount of water to remain in the
dispenser at the end of a cycle.
NOTE: The fabric softener dispenser rotates around the wash
basket and may not be in the same spot each time.
5PVDI108&3UPUVSOPOXBTIFS
Close the washer lid. Washer will not fill, agitate or spin
with the lid open. Make sure the dispenser drawer is closed
completely, then touch POWER to turn on the washer.
4FMFDU-0"%TJ[F
Press the LOAD button to select the correct setting for
your wash load and the type of fabric being washed.
Choose a water level that allows the load to move freely
for best fabric care.
Figure 4