AMAREW AM Series User manual


EMPOWERS YOU
Thank you for choosing our AM-series.
www.amarew.com

2
Battery indicator
Extendable tiller
Cable clamps
Angle adjustment lever
Battery cable
Fin
Figure A
Depth adjustment screw
Transom mounting screws
Propeller
Counter force bolt
Control box
AMAREW® AM-series product manual

3
p.4
p.4
p.4
p. 5
p. 5
p. 5
p. 6
p. 6
p. 6
p. 7
p. 7
p. 8
p. 8
p. 9
p. 9
p. 10
p. 11
p. 12
General information
Safety information
Wiring and battery recommendation
First time running
Propeller installment
Fin installment
Tiller handle installment
Usage instructions
Attaching the motor to your boat
Depth and steering adjustment
Connecting a battery
Battery indicator
Speed control
Replacing the propeller
Maintanance
Storage
Technical data
Warranty
Table of contents
AMAREW® AM-series product manual

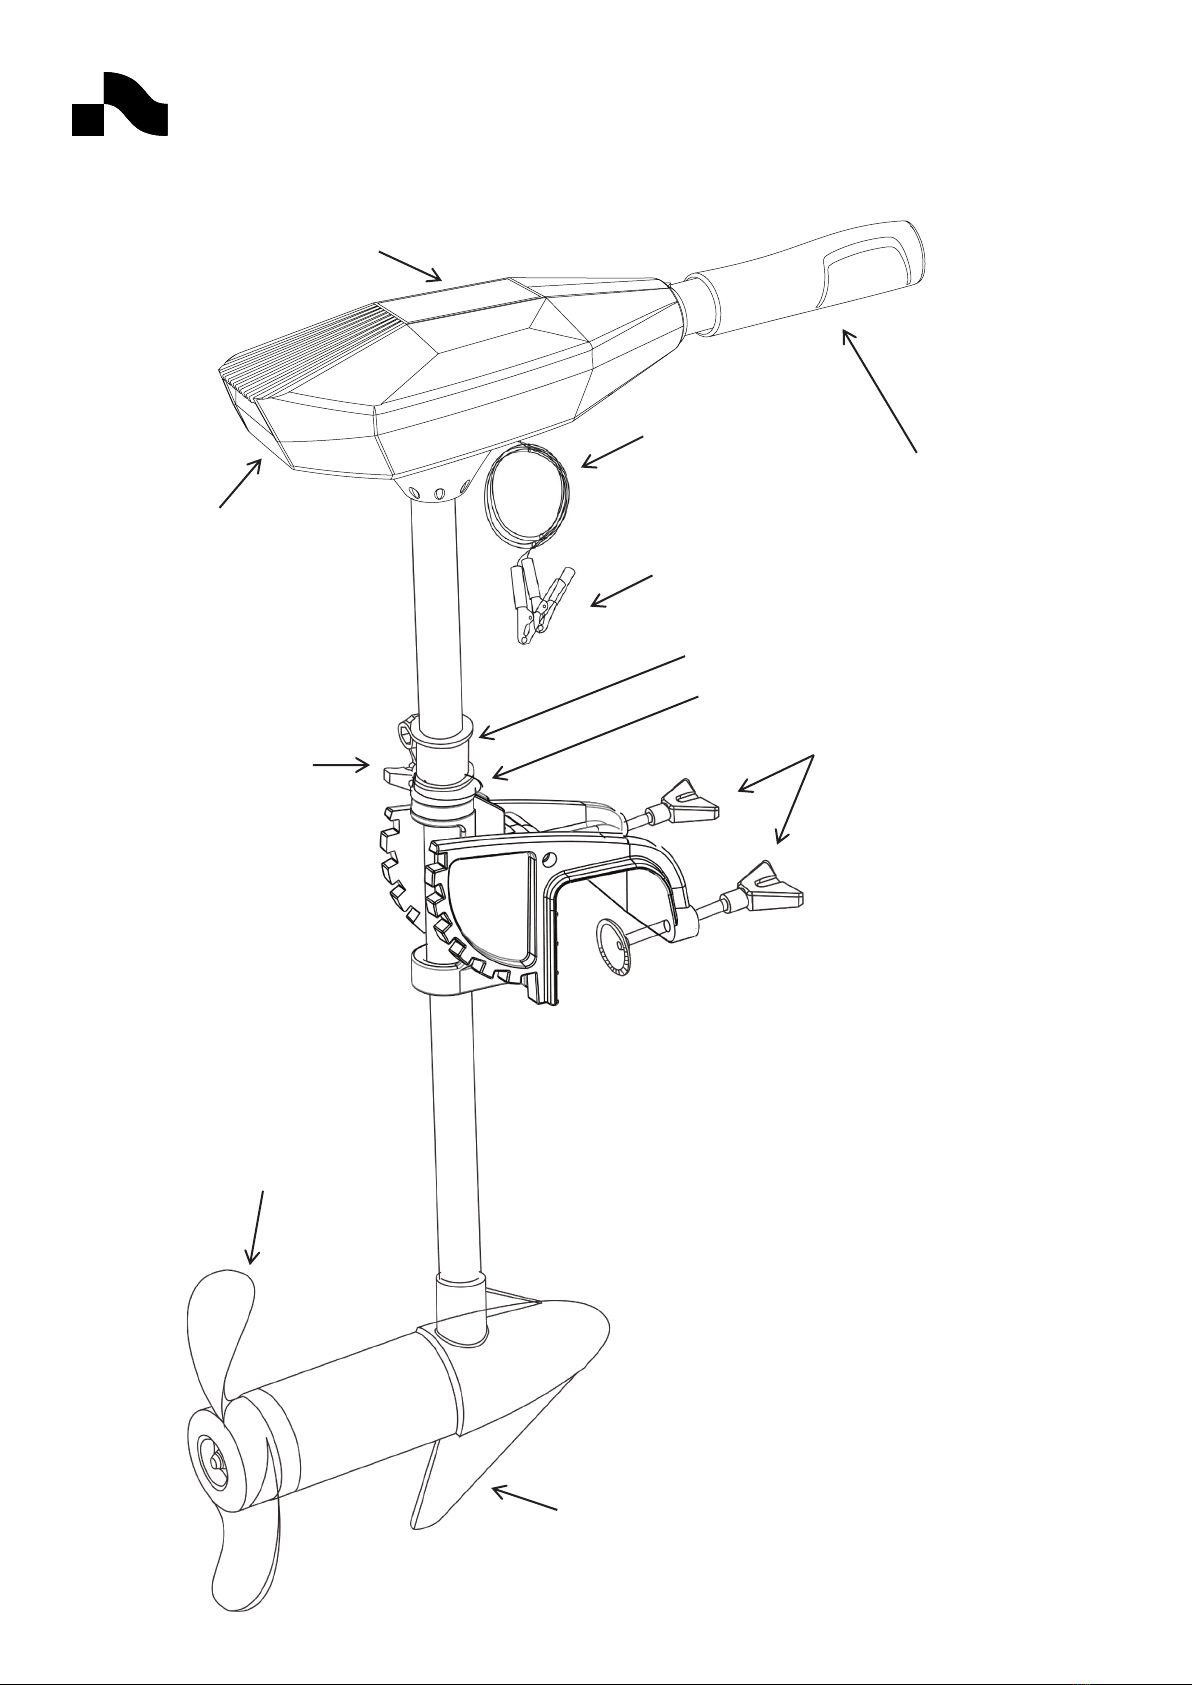
Congratulations! And thank you for choosing an AMAREW® electric outboard motor.
We hope you will love using it. AMAREW® Electric outboard motors are designed and
developed by our specialized engineering team. After years of effort, we have succeeded
in producing superior electric outboard motor series that fit various customers’
requirements and provide a high level user experience.
Please read and retain this manual before using your motor. This manual contains
information that describes the procedures for a safe operation and the daily
maintenance of your electric outboard motor. A safe operation will prevent personal
injuries and product damage.
Do not allow children (<18 years old) to operate the electric outboard motor. Do not
modify the unit in any way or add accessories that are not intended for this product.
Never fully submerse the unit. If the unit is accidentally submersed, disconnect the
battery(ies) and leave it to dry.
Warning: Always disconnect the power cables from the motor when replacing the
propeller, removing debris around the propeller, charging the battery(ies), transporting
the boat or when the motor is not in use.
For AM-series motors up to 66LBS, AMAREW® recommends to use a 12 volt deep cycle
marine battery. For AM-series motors with a thrust over 66LBS, the deep cycle marine
battery should be 24 volt. Each battery should at least have an 50 ampere rating or
higher. To extend running time an additional battery could also be used.
Warning: Be sure that the speed control handle is in the zero (“0”) position before
connecting to the battery(ies), as a rotating propeller can cause personal injury.
General information
Safety information
Wiring and battery recommendation
4
AMAREW® AM-series product manual

Propeller installment:
Make sure the propeller and the pin are aligned correctly. Otherwise the propeller
cannot be properly fixed. Place the propeller, washer and knob respectively. Then hold
the propeller with one hand and tighten the knob with your other hand, by turning it
clockwise (see figure B).
Warning: Always disconnect the power when installing the propeller. Watch out for the
sharp edges of the propeller during the installation.
Fin installment:
Take the plastic fin out of the accessory box (see figure C). Disconnect the screws and
find the screw holes on the bottom side of the lower unit. Keep the fin and screw holes
aligned. Then insert and tighten the screws with a wrench or spanner. Make sure the
screws are properly tightened to prevent the fin from loosening.
First time running
5
Figure B
Figure C
AMAREW® AM-series product manual

Tiller handle installment:
Find the sticker securing the marble on the aluminum pipe and carefully tear it off. Keep
the tiller handle aligned with the aluminum pipe. Adjust the direction in accordance
with the plastic part on top of the aluminum pipe (see figure D). Adjust the angle to push
the aluminum pipe in to the handle. Lightly press down the marble to get it through the
handle. Once you hear the “click” and the handle is pushed to the end, the handle is fully
in place.
Warning: This is a one-way installment. Once installed, do NOT attempt to pull out the
handle again, since the controls could be damaged.
Attaching the motor to your boat:
Attach the motor to the stern of the boat and tighten the two transom mounting screws
securely while taking care not to over tighten. To adjust the angle of the motor after you
attached it to the stern of the boat, hold the motor head with one hand and press the
angle adjustment lever with your other hand (see figures A and E). Press and hold the
angle adjustment lever until the desired angle has been reached. You can now release
the lever while ensuring the mechanism locks securely.
Warning: When adjusting the angle of the electric outboard motor, make sure the area
between the shaft and the hull of the boat is clear, as you might get injured. When
mounting or detaching the electric outboard motor, make sure that the battery is
disconnected.
Usage instructions
6
Figure D
AMAREW® AM-series product manual

7
Depth and steering adjustment:
Hold the motor shaft with one hand, loosen the depth adjustment screw and set the
motor to the desired depth. After the desires depth is reached, retighten the depth
adjustment screw securely. Adjust the steering force according to your needs by
loosening or tightening the counter force bolt (see figures A and E).
Warning: The motor can only be used in waters with a depth of at least 80 cm
Connecting a battery:
Before connecting the cable clamps to the battery terminals, ensure that the speed
control handle is in the zero (“0”) position and be sure to stand clear of the propeller.
Make sure that the battery terminals are clean, as a clean connection will minimize
power waste and extracts maximum power from the battery. If required, connect the
batteries in series first.
Then connect the red cable to the positive (+) terminal and the black cable to the
negative (-) terminal (see figure F). You will see that the battery indicator has turned on.
The motor is now powered up.
Warning: Make sure to always have the speed control handle in the zero (“0”) position
before connecting the battery(ies), as a rotating propeller can cause personal injury.
Remember to always disconnect the motor from the battery(ies) before the motor
leaves the water, as a rotating propeller can cause personal injury.
Figure E
Counter froce bold
Depth
Adjustment
Screw
Angle adjustment lever
AMAREW® AM-series product manual

8
Battery indicator:
The battery indicator (see figure A) represents the actual battery voltage. The remaining
battery capacity depends on the type and the specifications of the battery that is
being used. Please refer to your battery specifications in order to obtain a thorough
understanding of the remaining power.
Warning: Make sure to test the range of your battery(ies) carefully, as the motor will
only have limited power once the battery(ies) is drained.
Speed control:
Make sure the speed control handle is in the zero (“0”) position. If you see that the battery
indicator is turned on, this means that the motor can be started any time. You can now
adjust the speed according to your wish, in five forward and three reverse speeds, by
turning the handle. Turn the handle clockwise to move forward and anticlockwise to
go backwards (see figure G). When you don’t want to move, set the handle back into
the zero (“0”) position. No power will be used in this setting. The telescopic tiller can be
extended up to 14cm, to accommodate your needs, simply by pulling out the handle.
Warning: Always disconnect the battery(ies) once the motor leaves the water, as a
rotating propeller can cause personal injury.
Figure F
Figure G
AMAREW® AM-series product manual

9
Hold the propeller blade and loosen the propeller knob. It can only be done counter
clockwise and manually, without tools. Pull the propeller straight off. If the propeller is
stuck, grasp one blade with one hand and tap lightly on the backside of the opposite
blade with a rubber mallet until the propeller comes off. If the propeller pin is bent or
broken, replace it. Align the new propeller with the propeller pin. Reinstall the propeller
knob and tighten it manually and clockwise (see figure B).
Warning: Make sure that the motor has been disconnected from the battery(ies) before
replacing the propeller. Do not strike the propeller pin with a hammer to remove the
pin. Damaging the motor in this way will not be covered by warranty.
1. Before each use, make sure to check the wiring. Check for loose connectors, wire rust,
scratches and cracks in the cables and connectors. Clean the connectors if they are
not 100% clean and replace the cables and connectors whenever necessary.
2. After each use, wash the engine thoroughly with fresh water. Especially after usage
in salt water.
3. Every month, add grease to all the moving parts in order to prevent corrosion.
4. When the propeller breaks, remove the propeller and replace the pin (see previous
next section).
Warning: A lack of maintenance on the wiring and connectors may cause the wiring
and connectors to overheat or even burn.
Warning: Remember to wash the motor with fresh water each time after it has been
used it in salt water, as it this greatly reduces the possibility of corrosion.
Replacing the propeller
Maintenance
AMAREW® AM-series product manual

10
When storing the motor, lubricate all moving parts and screws and store it in a well
ventilated, dry area. Do not leave the motor outside for more than one day, especially
not in the water as this will damage the lower unit.
Storage
AMAREW® AM-series product manual

11
Technical data
AMAREW® AM-series product manual

12
Warranty
Limited warranty coverage (2years):
AMAREW® warrants its products against defects in material or workmanship. This
warranty offers coverage for two yearsfrom the date of purchase, depending on the
specific parts for which warranty is requested (see the table below). The reference for
the coverage period is the product serial number together with your original proof of
purchase. The repair or replacement of parts or the provision of service under this
warranty, does not extend the duration of the warranty compared to the original
expiration date.
Conditions that must be met in order to obtain warranty coverage
Warranty coverage is available only from authorized AMAREW® dealers and
resellers. Routine maintenance, as discussed in this manual, is mandatory to
maintain warranty coverage.
How to obtain warranty coverage
Please return the product to an authorized dealer for inspection if the product is not
working properly. A proof of purchase must be shown in order to obtain warranty. The
dealer then takes care of inspection and any necessary repairs.
If the services provided are not covered by the warranty, the buyer must pay for all
labor, all material and all other expenses related to the provided service. The buyer has to
pay for all related transportation and / or travel time.
This warranty does not cover the following aspects
This warranty does not cover routine maintenance, adjustments, damage due to misuse,
abnormal use, use of the product that is not specified in this manual, renunciation,
immersion, installation in a way that is not specified in this manual, charging the battery
without detaching motor, handling, improper maintenance or repair, use of an accessory
or part that is not made or sold by AMAREW®, extending or trimming of cables, or the
modification and/or removal of parts.
AMAREW® AM-series product manual
R10
This manual suits for next models
6
Table of contents
Other AMAREW Outboard Motor manuals