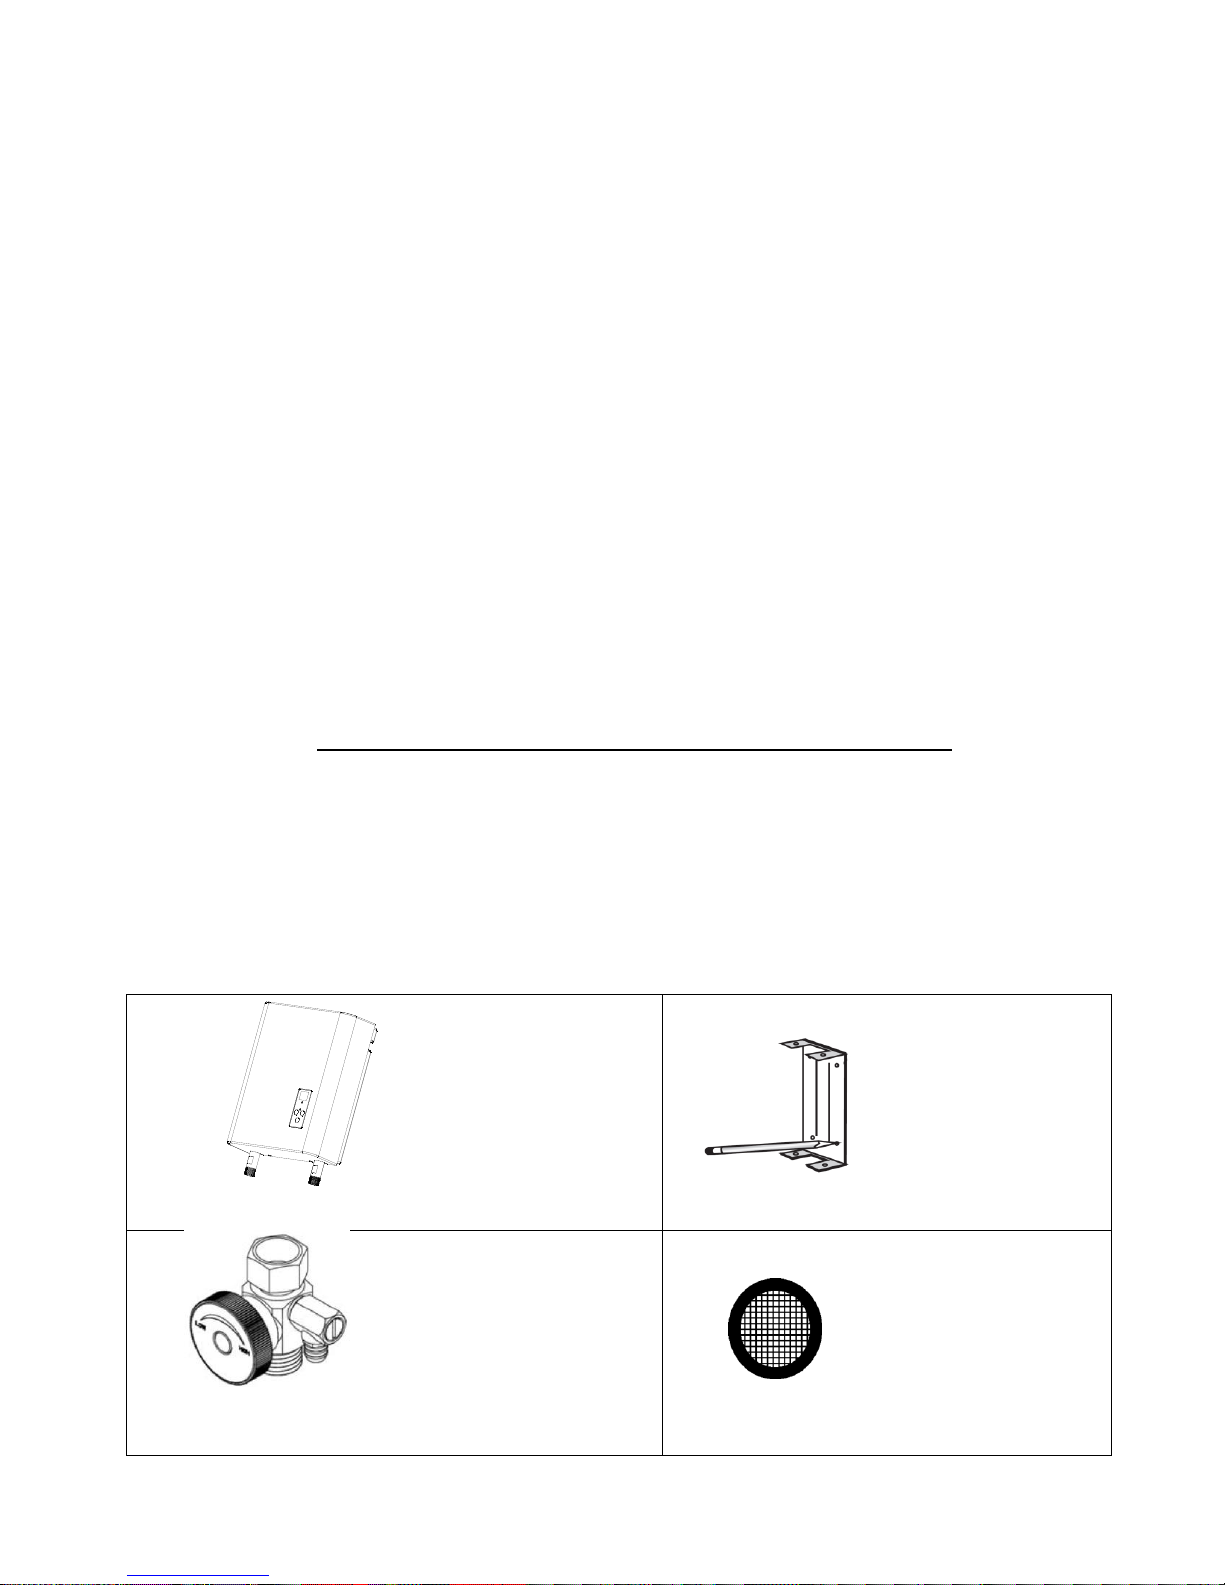
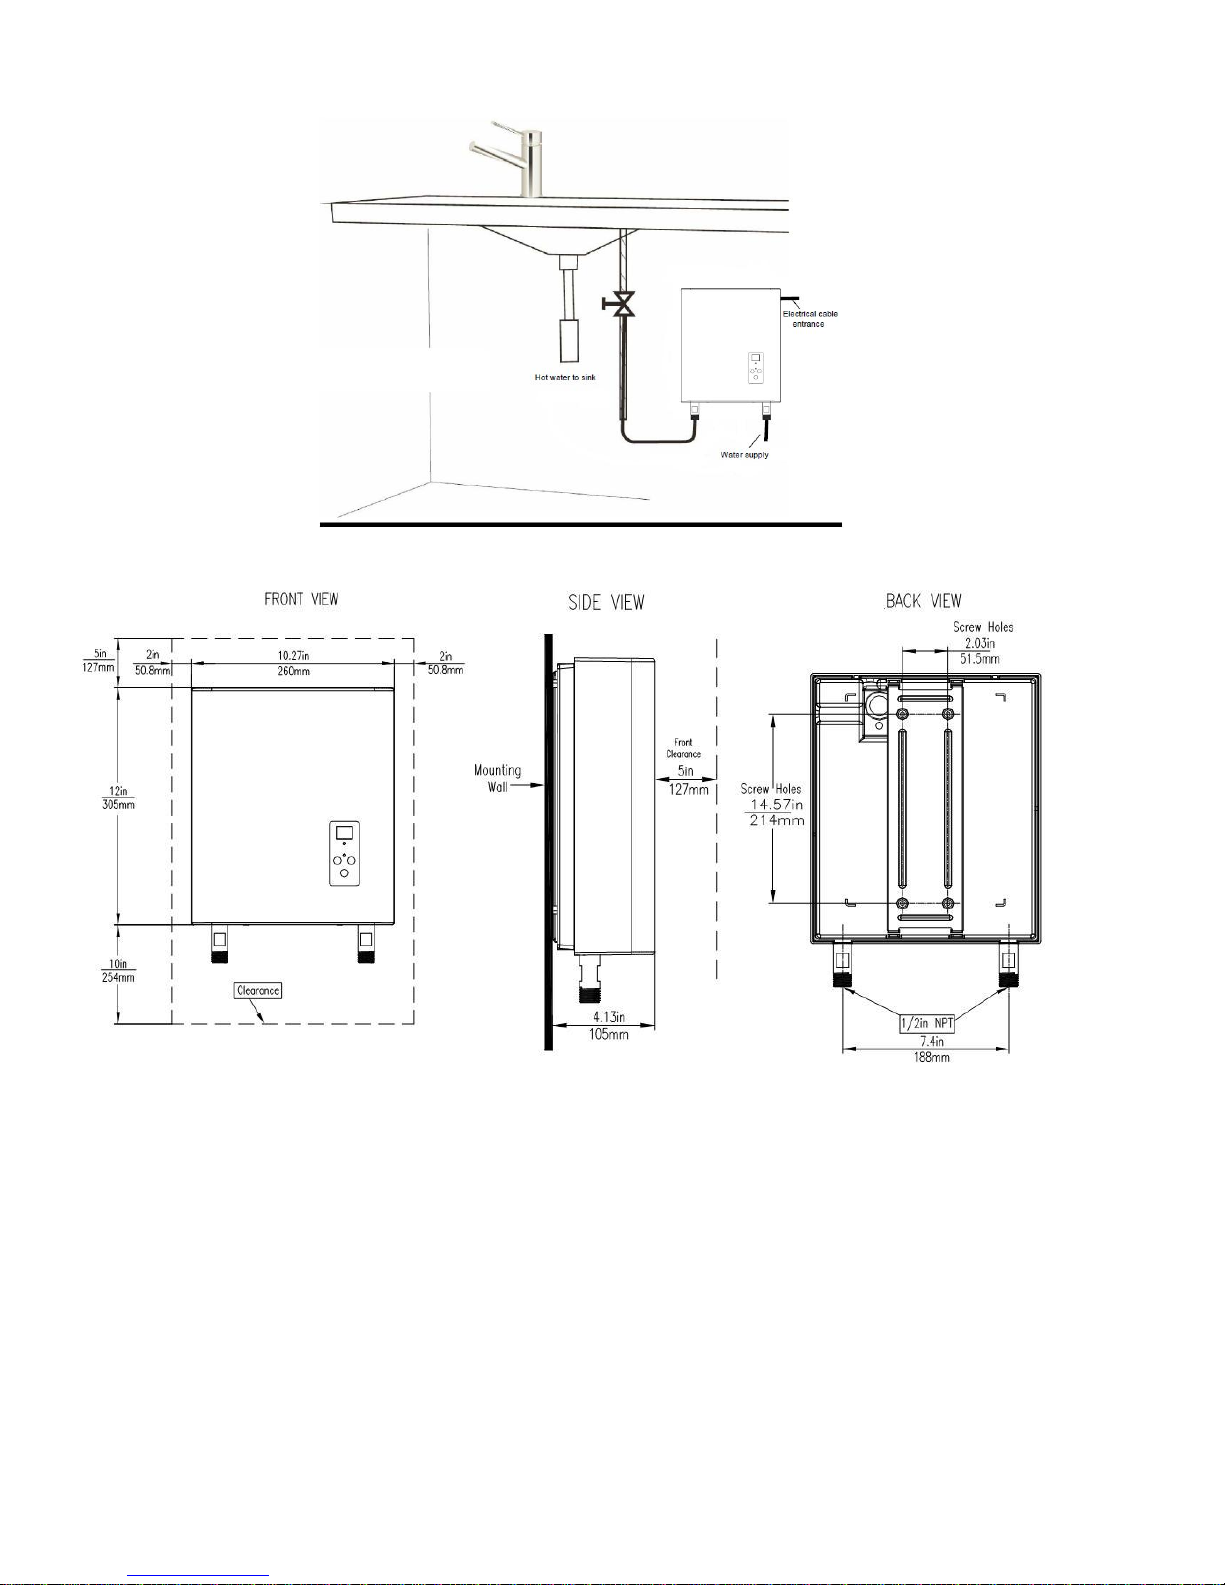
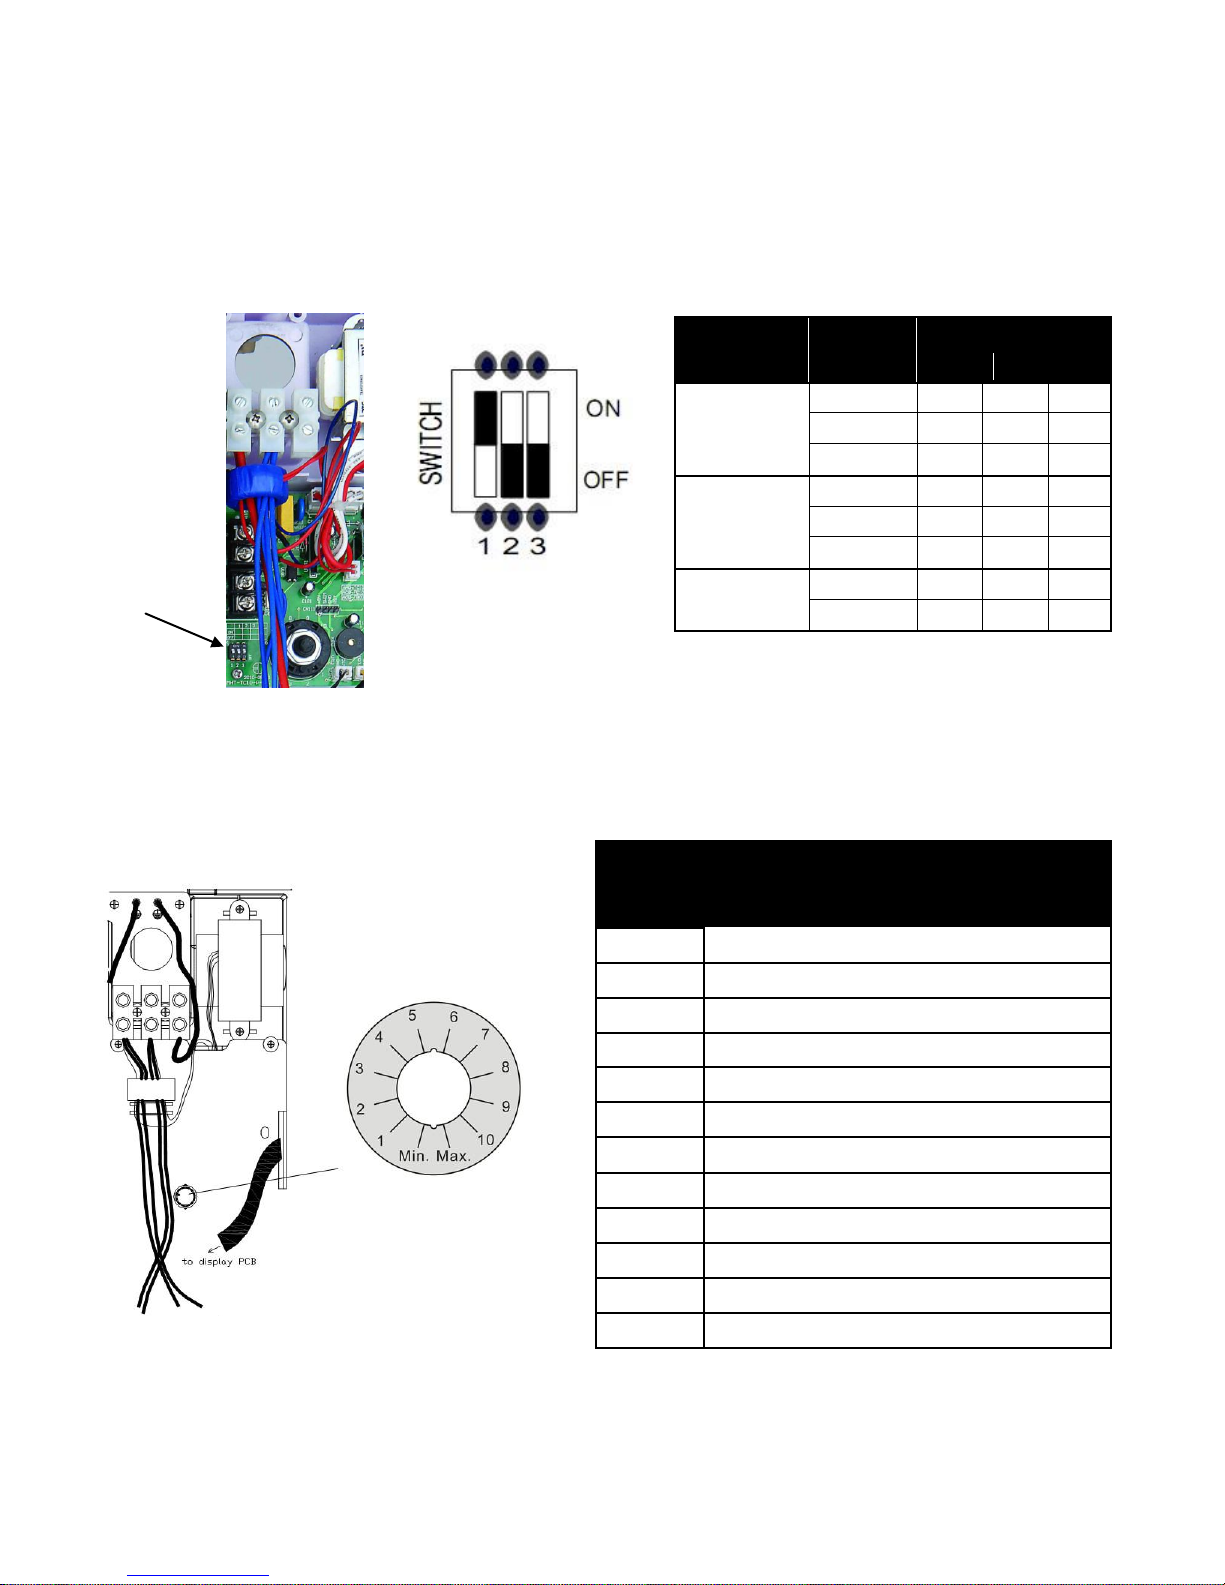
American Hometec AHQ-TC10 User manual

Electric Tankless Hot Water Heater
Installation and Operation Manual
Model: AHQ-TC10/ACQ-TC10Y/ACQ-TB03X
American Hometec, Inc.
3411 Silverside Road
Hanby Building
Wilmington, DE 19810
Section 2 Français
Sección 3 Español
www.AmericanHometec.com
service@americanhometec.com
Toll Free: 1
-
800
-
295
-
8039

2
Contents
INTRODUCTION
…………………………………………………………………………………
3
PACKING LIST
…………………………………………………………………………………
3
IMPORTANTSAFETYINSTRUCTIONS
………………………………………………………
4
TYPICAL INSTALLATION
……………………………………………………………………
5
MOUNTING
……………………………………………………………………………………
5
CONNECT WATER
……………………………………………………………………………
7
CONNECT ELECTRICAL
……………………………………………………………………
7
START UP
……………………………………………………………………………………
11
OPERATION
…………………………………………………………………………………
12
MAINTENANCE
………………………………………………………………………………
13
SYSTEM SPECIFICATIONS
…………………………………………………………………
13
SPARE PARTS
………………………………………………………………………………
14
TROUBLESHOOTING
………………………………………………………………………
15
DIAGNOSTIC CODES
………………………………………………………………………
16
LIFETIME LIMITED WARRANTY
……………………………………………………………
17
IMPORTANT: KEEP THIS MANUAL FOR FUTURE REFERENCE

3
Introduction
Thank you for purchasing the American Hometec
®
Electric Tankless Water Heater.
In order to ensure proper installation, safe operation, and long life, please carefully
read theinstructions. Installation should only be completed by licensed
professionals. Theuse of electrical and plumbing professionals ensures the
installation is in fullcompliance with all required building, plumbing and electrical
codes.
KEEP THIS MANUAL for future reference. This booklet includes useful
informationabout the product, maintenance requirements and the details of
your productwarranty.
Packing List
The following contents are included. If any items are missing contact American
Hometec’s toll free support line: 1-800-295-8039.
Item Item# Quantity
Water Heater A 1
Wall mounting bracket B 1
Pressure relief valve C 1
Inlet water filter D 1
Mounting paper (not pictured) 1
Screws (not pictured) 8
Anchor (not pictured) 4
A: Water Heater
B: Wall Mounting
Bracket
C: Pressure relief valve
D: Inlet Water Filter

4
IMPORTANT SAFETY INSTRUCTIONS
When using this electrical equipment, basic precautions should always
befollowed, including the following:
(a)
READ AND FOLLOW ALL INSTRUCTIONS.
(b)
CANADA: A green terminal (or a wire connector
marked "G", "GR", "GROUND", or "GROUNDING") is
provided with the control box. To reduce the risk of
electric shock, connect this terminal or connector to the
grounding terminal of the electric service or supplypanel
with a continuous copper wire in accordance with the
Canadian Electrical Code, Part I.
(c)
This product shall be protected by a Class A
ground fault circuit interrupter.
(d)
SAVE THESE INSTRUCTIONS
FAILURE TO FOLLOW INSTALLATION, OPERATING OR
MAINTENANCE INSTRUCTIONS IN THIS MANUAL COULD RESULT IN
PERSONAL INJURY OR DEATH.
USE ONLY LICENSED PROFESSIONAL CONTRACTORS FOR THE
INSTALLATION OF THIS PRODUCT. FOLLOW ALL APPLICABLE CODES.

5
TYPICAL INSTALLATION
Figure 1: Typical Installation
Figure 2: Dimensions and Clearance
Mounting
1. Choose location
1) Orientation
:
Only install unit vertically with inlet and outlet connectionson
the bottom. DO NOT install horizontally or upside down.
2) Install indoors. Product not designed for outdoor installation.

6
3) Caution: DO NOT INSTALL IN A BATH ENCLOSURE OR SHOWER STALL .
For Canada Only (required standard language that does not apply to this
Coilless Technology® tankless): DO NOT CONNECT TO A SALT-
REGENERATED WATER SOFTENER OR A WATERSUPPLY OF SALT WATER
4) Do not install the water heater in cold location, below the freezing point
ofwater (32oF / 0oC).
5) Clearance required: Clearance required:5” above, 10” below, 2” to each
side and 5” in the front.
6) Do not install the water heater near engine compartments or fuel tanks.
2. Mount
1) Use theWall mounting bracket
(B)
and a pencil to mark the location of the
holes(2 on the top and 2 on the bottom). The template will ensure
clearancerequirements are maintained.
2) Attach the
wall mounting bracket (B)
to wall using the anchors and screws
provided.
3) Lift the water heater and slide the tab of the wall mounting bracket on the
backof the
water heater (A)
over and into the opening on the
wall
mountingbracket (B)
as shown in Figure 3. Lock them by the screws (2 on the
top and 2 on the bottom)provided.
4)
Note: Only licensed professionals should open the cover panel of
Figure 3: Mounting
Diagram

7
Connect Water
1. Notes
Labels on the unit near the connections indicate cold water inlet andhot wateroutlet.
Use a PTFE based pipe sealant or tape to ensure leak free connections.
Do not sweat fittings or weld pipe to unit.
Isolation valves are recommended.
Hard connections or flexible braided tubing connections are both acceptable.
However, flexible braided tubing is easier to use.
CAUTION
: DO NOT OVERTIGHTEN, MAY BREAK THE PIPE CONNECTION AT HEATING
ELEMENT.
2. This unit does not require a pressure relief valve. However if local codes require, install
the supplied
pressure relief valve (C)
.
3.Install the inlet water filter (D) in the cold water inlet. Install the filter such that it is
easily removable for inspection and cleaning.
4. Test water connections for leaks. Turn on water and purge water through the water
heater and system. Flow for 1
-
2 minutes. Ensure all air is eliminated.
Connect Electrical
Note: Only licensed professionals should open the cover panel of unit.
1. Open the front panel of the unit by removing two small screws from the
bottom of the cover and then lift the front cover out. Feed the electrical
cable into unit through cable aperture on back of the unit.
2. Determine the power capacity setting for the application.

8
Model AHQ-TC10 Electric Tankless Heater
Application
One sink with regular
flow rate or up to three
sinks with low flow
faucets of 0.5 GPM
One sink with
regular flow
rate in warm
area
One sink with low
flow faucets
Power setting selection
Setting 1
Setting 2
Setting 3
Power setting 240V
9.5 kW
7.2kW
4.8 kW
Rated voltage
240 V60 Hz (Suitable for 208V to 240V)
Max Current load 240V
39.6 A
30 A
20 A
Breaker required
40 A
30 A
20A
Wire size required
8 AWG
10 AWG
12 AWG
Model ACQ-TC10Y Electric Tankless Heater
Application
One sink with regular
flow rate or up to three
sinks with low flow
faucets of 0.5 GPM
One sink with
regular flow
rate in warm
area
One sink with low
flow faucets
Power setting selection
Setting 1
Setting 2
Setting 3
Power setting
9.5 kW
8.3 kW
5.5 kW
Rated voltage
277 V 60 Hz
Max Current load
34.3 A
30 A
19.9 A
Breaker required
40 A
30 A
20A
Wire size required
8 AWG
10 AWG
12 AWG
Model ACQ-TB03X Electric Tankless Heater
Application
One sink with low
flow rate faucets
One sink with low
flow rate faucets
Power setting
selection
Setting 1
Setting 2
Power setting
3.4 kW
2.4 kW
Rated voltage
120 V 60 Hz
Max Current load
28.3 A
20 A
Breaker required
30 A
20A
Wire size required
10 AWG
12 AWG

9
3. Select the power capacity setting by setting the dip switches 1 to 3 as shown
in thefollowing figure to the setting you have determined for your application.
Remove 4 screws to remove the cover of the control board. The dip switches
are located on the left bottom part of the control board as shown in the
picture below.
Dip Switches
Figure 4: Dip Switch Setting
(Max Temperature Setting)
4. Open the front panel of the unit by removing two small screws from the
bottom of the cover and then lift the front cover out. This is a knob to set
the highest temperature. Factory Default Temperature is 104oF (40℃).
MODEL NO
POWER
(at 240 v)
SETTING
1
2
3
AHQ-TC10
9.5KW
ON
OFF
OFF
7.8KW
OFF
ON
OFF
4.2KW
OFF
OFF
ON
ACQ-TC10Y
9.5KW
ON
OFF
OFF
8.3KW
OFF
ON
OFF
5.5KW
OFF
OFF
ON
ACQ-TB03X
3.4KW
ON
OFF
/
2.4KW
OFF
ON
/
Setting
Temperature MAX(℉/℃)
AHQ-TC10/ACQ-TC10Y/ACQ-B03X
Min
70/21
1
75/24
2
81/27
3
86/30
4
91/33
5
97/36
6
102/39
7
106/41
8
109/43
9
115/46
10
120/49
Max
125/52
Figure 5: Highest temperatureSetting
Dip Switch

10
5. Use the appropriate 1 inch electrical clamp (not supplied) and 1 –1 ½ inch
electrical washer (not supplied) installed in the Units Electrical cable access
hole. Then pass the appropriate sized electrical cable through the clamp
and tighten.
6. Connect the wires from circuit to the terminal block;for TC10 and TC10Y
connect to L1, L2 terminals for TB03X connect to L and N terminals. Tighten
screws.
WARNING:If not installed correctly, electrical control system will be
damaged and warranty will be voided.
7. Connect the ground wires to the terminal block connection labeled
G.Tighten screws.
8. Ensure ground service wire from the G terminal of the unit is connected to
the grounding block in the electrical panel.
9. CAUTION: CONNECT ONLY TO A CIRCUIT PROTECTED BY A CLASS A
GROUND FAULT CIRCUIT INTERRUPTER.
USE COPPER CONDUCTORS ONLY.
CANADA: USE BONDING CONDUCTOR IN ACCORDANCE WITH THE
CANADIAN ELECTRICAL CODE, PART I. A green terminal (or a wire
connector marked "G", "GR", "GROUND", or "GROUNDING") is provided
with the control box. To reduce the risk of electric shock, connect this
terminal or connector to the grounding terminal of the electric service or
supply panel with a continuous copper wire in accordance with the
Canadian Electrical Code, Part I.
Metal plate with 2 grounding wire
connected. One to water pipes and
the other to ground
terminal.Terminal:Wire from power
supply to G.
Ground wire from
output water pipe to
metal plate.
Ground wire
connecting incoming
and output water pipes
Figure 6: Internal Diagram

11
Start Up
1. Open water inlet and outlet. Turn on water and let water flow through
unit forone to two minutes and double check to ensure there are no
leaks.
CAUTION:DO NOT OPERATE UNIT DRY.
2. If no leaks are found, turn on the power to unit at breaker.
3. Turn on the water heater power switch located on the control panel on
the frontof the unit.
FOR REFERENCE: Temperature for bathroom sink is typically set to 98oF / 37oC and for
kitchen istypically set to 110oF / 43oC. Adjust temperature to meet your comfort needs.
However, temperature should not exceed the highest temperature due to
possibility of scalding.
4. Menue navigation/Set temperature to display Celsius or Farenheit.
6. Set the desired water temperature by pressing power level “UP” or
“DOWN” button on the control panel. Turn the hot water faucet on all
the way and let the initial cold water in the pipe run out, you will get the
LED display shows actual outlet water temperature,Factory
Default Temperature is 104℉
Light on showsheating
UP and DOWN buttons for adjusting water temperature1℃(1℉)
by up or down each time. The temperature will increase/Decrease
4 times per second when holding 2 seconds. To lock the
temperature set, hold both UP and DOWN buttons down for 3
seconds till LED display showing “Lc” indicating lock function on.
Release both buttons. The LED display will show “Lc”and current
water temperature, temperature set alternately every 1 second.
To unlock temperature setting, hold both UP and DOWN buttons
for 1 second. If the inlet water temperature is 3℃higher than the
setting water temperature, it will stop the water heating and
show “H”on the LED display.
POWER button for turning heater on or off.If the heater will not be
in use for a long time (such asduring vacation), this POWER button is
recommended to beturned off.Holding the button 5 seconds and
more can switching between ℃/℉display.
Light on showspower on

12
hot water close to the temperature you set. How close to the
temperature you set depends on how close you have installed the unit to
the fixture. Regardless of varying incoming water temperature, this unit
will supply hot water at a constant temperature that is close to the
temperature you set (or factory default setting at 104°F if you have not
changed the default temperature setting), provided the hot water
application is within the unit’s capacity. The power settingas follows:
Power Adjustment Range AHQ-TC10
Power setting selection (Fig 4)
Setting 1
Setting 2
Setting 3
Power setting
9.5 kW
7.2 kW
4.8kW
Power Adjustment Range ACQ-TC10Y
Power setting selection (Fig 4)
Setting 1
Setting 2
Setting 3
Power setting
9.5 kW
8.3 kW
5.5kW
Power Adjustment Range ACQ-TB03X
Power setting selection (Fig 4)
Setting 1
Setting 2
Power setting
3.4 kW
2.4 kW
Register the unit for warranty purposes at www.americanhometec.com
Operation
The heater supplies hot water at a constant temperature when it is
operated within its designed capacity. The heater automatically adjusts its
power consumption to match the demand of hot water so that you enjoy
maximum energy savings.
Do not block the discharge of the pressure relief valve (if installed).
This unit is designed with safety features to protect against scalding.
Thefollowing required information is provided to the consumer:
WARNING! Hot water can produce 3
rd
degree burns in 6
seconds at 140
o
F / 60
o
C andin 30 seconds at 130
o
F / 54
o
C
The unit is not designed to withstand freezing temperatures during
standby. Attempting tooperate the unit while frozen will cause irreversible
damage.
A flow rate of > 0.5 gpm is required to enable the unit.

13
Continuousoperating at very low flows can result in damage to the
heatingmechanism
Figure 7: Sequence of Operation (Scalding Prevention)
Maintenance
Particles in the inlet water will be removed by the
inlet filter (D)
.This filter
shouldbe inspected and cleaned on a regular basis. If the filter is clogged,
the unit canfunction improperly or it may even be damaged or destroyed.
System Specifications
Model AHQ-TC10 Electric Tankless Heater
Power setting selection
Setting 1
Setting 2
Setting 3
Power setting
9.5 kW
7.2 kW
4.8 kW
Rated voltage
208 V -- 240 V60 Hz
Max Current load
39.6 A
30 A
20 A
Breaker required
40 A
30 A
20A
Wire size required
8AWG
10 AWG
12 AWG
Water flow minimum
0.4 gpm (1.5 l/min)
Water temperature
1250F (520C) maximum
Water proof rating
IPX 4
Water supply pressure
3 –150 psig (0.02 –1.0MPa)

14
Model ACQ-TC10Y Electric Tankless Heater
Power setting selection
Setting 1
Setting 2
Setting 3
Power setting
9.5 kW
8.3 kW
5.5 kW
Rated voltage
277 V 60 Hz
Max Current load
34.3 A
30 A
19.9 A
Breaker required
40 A
30 A
20A
Wire size required
8 AWG
10 AWG
12 AWG
Water flow minimum
0.4 gpm (1.5 l/min)
Water temperature
1250F (520C) maximum
Water proof rating
IPX 4
Water supply pressure
3 –150 psig (0.02 –1.0MPa)
Model ACQ-TB03X Electric Tankless Heater
Power setting selection
Setting 1
Setting 2
Power setting
3.4kW
2.4 kW
Rated voltage
120 V 60 Hz
Max Current load
28.3 A
20 A
Breaker required
30 A
20A
Wire size required
10 AWG
12 AWG
Water flow minimum
0.4 gpm (1.5 l/min)
Water temperature
1250F (520C) maximum
Water proof rating
IPX 4
Water supply pressure
3 –150psi(0.02-1.0Mpa)
Spare Parts
The following spare parts are available for purchase and maybe replaced by
alicensed professional. Please contact American Hometec, Inc.’s toll free support
line at 1-800-295-8039.

15
Parts
Part Number
AHQ-TC10
ACQ-TC10Y
ACQ-TB03X
Pressure Relief Valve
TC10PRV
TC10YPRV
TB03XPRV
Control panel
TC10CP
TC10YCP
TB03XCP
Inlet water filter
TC10F
TC10YF
TB03XF
Wall mounting kit (wall mounting
bracket and screws)
TC10WM
TC10YWM
TB03XWM
PCB circuit board
TC10PCB
TC10YPCB
TB03XPCB
Temperature sensor
TC10TS
TC10YTS
TB03XTS
Magnetic floater
TC10MF
TC10YMF
TB03XMF
Flower switch
TC10FS1
TC10YFS1
TB03XFS1
Transformer
TC10TFM
TC10YTFM
TB03XTFM
Troubleshooting
Trouble
Possible Cause
Remedy
No water
Valves are closed
Filter is clogged
Open valves
Remove and clean water inlet filter (D)
Water cold
No power
Water temperature is
set too low
Check electric breaker
Check power switch on unit
Increase temperature –press “UP” button
Flow to fast to achieve desired
temperature, Slow down flow.
Water too hot
Water temperature is
set too high
Lower temperature
No hot water.
Unitshows a
diagnosticcode.
Internal problem
orunit went through
anautomatic
safetyshutdown.
Unit will automatically reset
otherwisecall our service number or a
licensedcontractor for assistance.
If you need further assistance, call American Hometec, Inc. toll free service
and support line at 1-800-295-8039. Please have product information
includingserial number, date of purchase and error code shown on the control
panel, if any,ready when you call.

16
Diagnostic Codes
Code
Indication
Remedy
E2
Inlet temperature sensor error
Change inlet temperaturesensor
E3
Outlet temperature sensor error
Change outlet temperaturesensor
E4
Outlet temperature is too high
Lower temperature level. Errorshould
disappear in a fewseconds after
correction
E5
Electric short occurred
Turn unit off and back onafter 30
seconds. If errorcode remains, do not
usethe unit. Call for
serviceimmediately
If error code does not appear any more,
the errormay be caused by
externalinterference
E6
unusual voltage situation
Waiting for the voltage back to usual

17
Lifetime Limited Warranty
Register unit at www.AmericanHometec.com
General
The manufacturer warrants this water heater and its components to be free from
defects in material and workmanship according to the terms herein.
The heating mechanism within this product is warranted against manufacturer defects
for the lifetime of the product up to 15 years for residential water heating applications
or up to 5 years for commercial and industrial applications. The remaining components
of the unit are warranted against manufacturer defects for a period of 12 months. The
warranty is to the original owner of the equipment at original installed location and is
transferable only with original receipt showing date of purchase. The warranty applies
to heaters installed within the US and Canada by licensed professionals in accordance
with the manufacturer’s installation and operating instructions and all applicable codes.
The warranty covers parts for the repair or replacement of the defective portions of the
unit and, for residential applications only, labor for a period of 12 months. The effective
date of the warranty is the verified date of purchase (original receipt) or the date of
manufacture plus ninety days.
Exclusion
THIS LIMITED WARRANTY SHALL BE THE EXCLUSIVE WARRANTY MADE BY THE
MANUFACTURER AND IS MADE IN LIEU OF ALL OTHER WARRANTIES, EXPRESSED OR
IMPLIED (WHETHER WRITTEN OR ORAL), INCLUDING, BUT NOT LIMITED TO, WARRANTIES
OF MERCHANTABILITY AND FITNESS FOR A PARTICULAR PURPOSE. THE REMEDIES S ET
FORTH HEREIN ARE THE ONLY REMEDIES AVAILABLE TO THE OWNER OR ANY PERSON.
The company does not authorize any person or company to assume any obligation or
liability in connection with the repair or replacement. Manufacturer shall not be liable
for any incidental, consequential, special or contingent damages or expenses arising,
directly or indirectly, from any defect in the water heater or the use of the water heater.
Manufacturer shall not be liable for any water damage arising, directly or indirectly,
from any defect in the water heater component part(s) or from its use.
Manufacturer shall not be liable under this warranty if the water heater is subjected
to any of the following conditions.
Misuse, alteration, unauthorized repair, neglect, accident
Has not been installed in accordance with the applicable local plumbing
and/or building code(s) and/or regulation(s)
Is not continuously supplied with potable water
Has been operated while frozen
Is exposed to inlet temperatures above highest temperature
Exposed to water pressures above pressure rating of 150 psi (1.0MPa)
Used for service in a spa, pool, boat or water craft
If heating element box was opened

18
SOME STATES DO NOT ALLOW THE EXCLUSION OR LIMITATION OF INCIDENTAL OR
CONSEQUENTIAL DAMAGES, SO THE ABOVE LIMITATION OR EXCLUSION MAY NOT
APPLY TO YOU. THIS WARRANTY GIVES YOU SPECIFIC LEGAL RIGHTS AND YOU MAY
ALSO HAVE OTHER RIGHTS WHICH MAY VARY FROM STATE TO STATE.
Making a Claim
Owner should submit the warranty claim directly to American Hometec, Inc . by
contacting us at the phone number shown below. If you are advised to return the
unit, you must obtain a Returned Materials Authorization (RMA) over the phone
BEFORE RETURNING THE UNIT. When contacting the company please have the unit’s
serial number and original receipt on hand to provide purchase date and other
necessary information. Package the heater well to prevent damage, tag the heater
with the RMA number and ship the water heater prepaid to American Hometec, Inc.
as instructed. Unauthorized returns may be rejected at the company’s discretion.
American Hometec, Inc.
www.AmericanHometec.com
1
-
800
-
295
-
8039
©2010AmericanHometec,Inc.
AHQ-TC10/ACQ-TC10Y/ACQ-B03X _ V2C-03411

1
Chauffe
‐
eau électrique sans réservoir
Manuel d'installation et d'utilisation
Modèle :
AHQ-TC10/ACQ-TC10Y/ACQ-TB03X
American Hometec, Inc.
3411 Silverside Road
Hanby Building
Wilmington, DE 19810
Sección 2
Francés
www.AmericanHometec.com
service@americanhometec.com
Numéro vert : 1
-
800
-
295
-
8039

2
Table des matières
INTRODUCTION.........................................................................................................................................3
BORDEREAU D’EXPÉDITION ......................................................................................... 3
CONSIGNES DE SÉCURITÉ IMPORTANTES................................................................ 4
INSTALLATION TYPIQUE ................................................................................................ 5
MONTAGE ............................................................................................................................. 5
BRANCHEMENT DE L'EAU .............................................................................................. 7
BRANCHEMENT ÉLECTRIQUE ...................................................................................... 7
MISE EN MARCHE ............................................................................................................ 11
FONCTIONNEMENT..........................................................................................................12
ENTRETIEN......................................................................................................................... 13
CARACTÉRISTIQUES SU SYSTÈME ............................................................................ 13
PIÈCES DE RECHANGE................................................................................................... 14
DÉPANNAGE....................................................................................................................... 15
CODES DE DIAGNOSTIC................................................................................................. 16
GARANTIE À VIE LIMITÉE............................................................................................ 17
IMPORTANT : CONSERVEZ CE MANUEL POUR CONSULTATION
ULTÉRIEURE
This manual suits for next models
2
Table of contents
Languages:
Other American Hometec Water Heater manuals
Popular Water Heater manuals by other brands

HTP
HTP Superstor Ultra SSU-30CB Installation

CountyLine
CountyLine CL42AW owner's manual

Haier
Haier Little Sea-ox FCD-JTSA50-III Service manual

Striem
Striem LB-15 Installation, operation and maintenance guide

TESY
TESY BelliSlimo DRY GCR 502724D E31 EC Instructions for use

Camplux
Camplux ME10 Use & care manual

A.O. Smith
A.O. Smith BL-80 instruction manual

AquaStar
AquaStar 125B LPS Installation and operating instructions

Eccotemp
Eccotemp L5 manual

Vulcan-Hart
Vulcan-Hart 641 series Owner's guide and installation instructions

Kenmore
Kenmore 153.332362 owner's manual

Rinnai
Rinnai CONTINUUM 2424WC Instructions for use