Quick Hardware Installation Guide English
Step 3 Connect External Cables
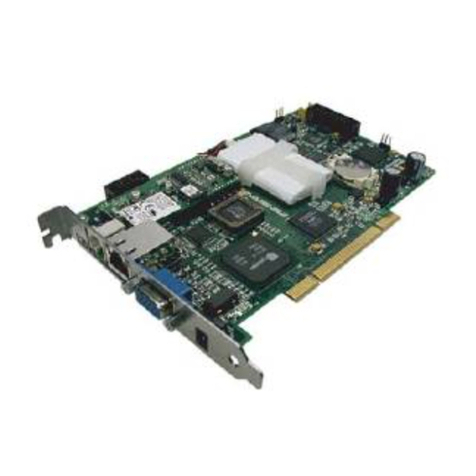
•Connect the USB cable from the back of the MegaRAC G3 card to the motherboard’s USB
port.
•Connect your VGA monitor to your MegaRAC G3 card.
•Connect the RJ45 LAN cable from your local network to your MegaRAC G3 card.
•Connect your AC adapter. (The AC adapter is an optional component.)
Step 4 Confirm the Motherboard’s BIOS Settings
Power on the motherboard and enter the BIOS. Using the following table, confirm that your
motherboard’s BIOS settings are correct.
BIOS Section Setting
Boot Options> Removable Devices AMI Virtual Floppy or USB Boot Device
Boot Options> ATAPI CDROM AMI Virtual CDROM or USB Boot Device
Advanced> PCIPnP> Configuration> Enable
Legacy USB Support
Save the BIOS settings and restart the computer.
Note: Make sure that your motherboard BIOS supports Legacy USB devices, USB Boot or
Boot to USB.
Note: On some motherboards and server boards, depress the <CTRL>, <ALT>, and <ESC>
keys simultaneously to enter the BIOS. On others use the <F2> keys. See your server’s
documentation for more information on entering the BIOS setup.
Step 5 Initial Configuration of the MegaRAC G3 card
The MegaRAC G3 card is ready to be used at this stage. If you have an AC Adapter attached to the
MegaRAC G3 card, it will be powered on even if your host system is not powered on.
At this point you may wish to do an initial configuration of the MegaRAC G3 card in order to find
its IP Address. There are two ways to do this:
a.) Via the USB interface
b.) Via the network
Via the USB Interface
i) If you have booted up your host system into an operating system, you can see the steps on
Installing Host Software Components on the Host System. You can then use the command line tool
(WinCuri or LinCuri) or the GUI tool (G3ConfigApp.exe application for the Microsoft
Windows operating systems) to configure the MegaRAC G3 card.
Via the USB Interface, Continued
ii) If an operating system has not yet been installed on your host system and you wish to configure
the MegaRAC G3 card via the USB interface from a separate “configuration system”, use the
following steps:
Note: A computer system that has at least one USB host port is required to configure the
MegaRAC G3 card via its USB interface. Most notebook computers have USB host
ports and can be conveniently located near the MegaRAC G3 card to do the
configuration. This system is known as the “configuration system”.
You must disconnect the USB cable you connected to the motherboard’s USB host port (See Step 3
Connect External Cables) and instead connect it to the configuration system’s USB port. The
operating system on the configuration system will detect the MegaRAC G3 card as a host of USB
devices and install the MegaRAC G3 card’s CD, Keyboard, and Mouse devices. When the
configuration system detects the G3 Floppy Device, it will prompt you for a driver. You can safely
click Cancel to skip this action. The G3 Floppy Device is not required on the configuration system
to configure the MegaRAC G3 card. This happens only the first time you attach a MegaRAC G3
card into the configuration system.
On the configuration system, insert the MegaRAC G3 CD. Locate the G3ConfigApp.exe
application. You do not need to install the G3ConfigApp.exe application on the configuration
system. You can run the G3ConfigApp.exe application from the MegaRAC G3 CD itself. Once
it is running, select the "I am on a system in which the MegaRAC G3 card is plugged in" option.
This means that you are connecting from a system that is attached to the MegaRAC G3 card via
USB cable.
Note: You can also use the command line tool WinCuri/LinCuri to do configuration
operations. The G3ConfigApp.exe application is used in this example for
convenience.
The G3ConfigApp.exe application displays various settings and options, such as a list of users,
network configuration options, and so on. You can exit the G3ConfigApp.exe application or
view and configure the settings and options. By default, the MegaRAC G3 card obtains its IP
Address from a DHCP server. You can view the current IP Address it obtained from the DHCP
server or change the MegaRAC G3 card’s IP Address to a static IP Address. You can also add new
users.
Once you have obtained the MegaRAC G3 card’s IP Address you can connect to the MegaRAC G3
card form a remote location and perform screen/device redirection and configuration. (See Step 6
located in the Via the Network section)
Note: You must disconnect the USB cable you connected to the configuration system’s USB
host port and reconnect it to the host system’s USB port. (See Step 3 Connect External
Cables)
Via the Network
You can access the MegaRAC G3 card from another system via the network. AMI refers to this
other system as the client system. To do this, you must know the MegaRAC G3 card’s IP Address.
If you have installed the MegaRAC G3 card on a network that uses DHCP, you can search the
network for the MegaRAC G3 card. To locate and find out its IP Address, you must run
RacTrendsSeek Locator.
Note: Make sure that you have already installed the MegaRAC G3 card Windows Software
Components on the system that you want to use to locate the MegaRAC G3 card.
1. Locate the RacTrendsSeek Locator program on your remote client system. Run the
RacTrendsSeek Locator program by double left clicking on it and left click on the Next button
after it opens.
2. Type in your Network Name. For example, Corporate. Next, you must enter a range of IP
Addresses that you want to search. Left click the Add>> button when finished.
3. The name and IP range of the MegaRAC G3 card will display in the right field. Place a check
in the box next to the range of IP Addresses. Left click on the Next button.
4. The name and IP range of the MegaRAC G3 card will display in the Selected IP Range
window. Left click on the Next button.
5. If the IP range is correct, RacTrendsSeek Locator will locate the MegaRAC G3 card. All
MegaRAC cards discovered are listed with their IP Address and Host Name. Write down the
IP Address discovered. Left click on the Finish button after RacTrendsSeek Locator discovers
all MegaRAC cards.
Note: You can use the Host Name to distinguish one card from another. The Host Name is a
combination of G3 followed by the MegaRAC card’s MAC address. For example, if
your MegaRAC G3 card’s MAC address is 112233445566, the Host Name is
G3112233445566.
6. Open the client system’s Internet Browser and type your MegaRAC card’s IP Address or its
Host Name into your Internet browser’s address field and press <ENTER>. For example, if
your MegaRAC G3 card’s IP Address is 192.168.0.55, type http://192.168.0.55
into your Internet browser’s address field. If your MegaRAC G3 card’s Host Name is
G3112233445566, type http://G3112233445566 into your Internet browser’s
address field.
7. When prompted for the user name and password, use root for the User Name and
superuser for the Password. Both are all lower-case characters.
8. Left click the OK button. After you successfully log into your MegaRAC G3 card, you are
greeted with the Welcome to MegaRAC G3 card screen.
Note: When you log in using the root user name and password, you have full administrative
powers. It is advised that once you log in, you change the root password.
Setup your Client System’s Internet Browser
You must first set up Internet Explorer browser on the client system before you can redirect the host
system’s console. Set up Internet Explorer’s Security Settings to allow the downloading of Signed
ActiveX controls and also allow it to run Signed ActiveX controls. See the MegaRAC G3 User’s
Guide located on the MegaRAC G3 CD for more information.
Step 6 Install/Boot to an Operating System
At this stage if you already have an operating system loaded on the host system, you can boot to it.
While the operating system is booting up, it will detect the MegaRAC G3 card’s USB devices (that
make device redirection possible).
The operating system will default to the standard drivers for all devices. If you are running Linux on
your host system, it will continue to use default drivers. However, if you are running the Microsoft
Windows operating systems, the Microsoft Windows operating system prompts you for a driver
when it detects the G3 Floppy Device. At this stage you can point to the MegaRAC G3 card’s INF
file located on the MegaRAC G3 CD.
Note: An actual software driver is not required. The INF file only tells the Microsoft
Windows operating system to use the standard driver. The INF file indicates to the
Microsoft Windows operating system that the MegaRAC G3 card hardware is WHQL
certified.
At this time, you can install the Host Software components provided on the MegaRAC G3 CD.
Installing Host Software Components on the Host System
American Megatrends MegaRAC G3 card Host Software components is a collection of MegaRAC
G3 card host-side and remote access components. Insert your MegaRAC™ G3 CD into the host
system. The host system is the system that has the MegaRAC G3 card installed into it.
For Microsoft Windows operating systems, browse to the following folder and file:
CDROM\ServerAgents\Win32\Setup.exe
Execute the EXE file to begin the installation of the American Megatrends MegaRAC G3 card
Windows Host Component. Follow the instructions.
For Linux operating systems, browse to the following folder and file:
CDROM\ServerAgents\Linux\G3hostapps*.i386.rpm
Execute the RPM file to begin the installation of the American Megatrends MegaRAC G3 card Host
Software components. Follow the instructions.
AMI Corporate Headquarters
American Megatrends Inc.
6145-F Northbelt Parkway,
Norcross, Georgia 30071-2976
Sales (800)828-9264 sales@ami.com
Main (770)246-8600 Fax (770)246-8790 www.ami.com
®2005 American Megatrends Inc. All Rights Reserved. Printed in the U.S.A.


