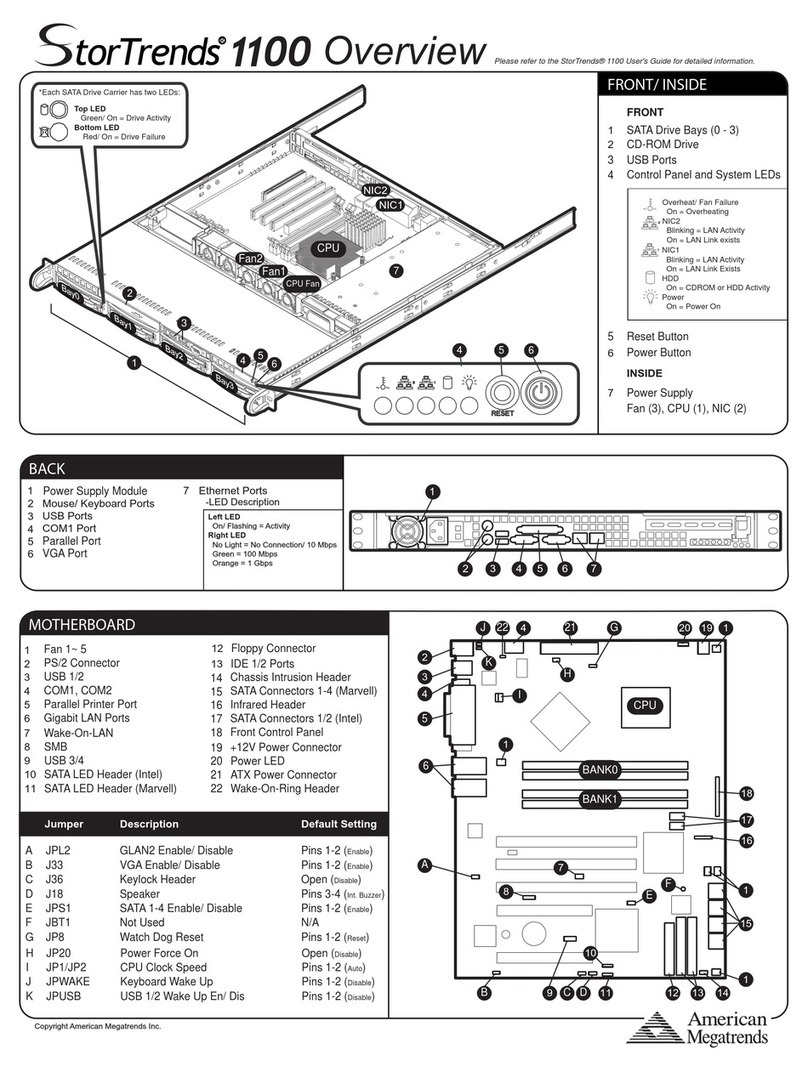
American Megatrends StorTrends 1100-P User manual

StorTrends® 1100 Set Up Guide
MAN-1100-SG
06/30/06
Thank You
Thank you for purchasing the StorTrends® 1100 storage appliance. Please take a few
minutes to review this set up guide before beginning the installation process. If you
require a further explanation of any item covered in this guide, please refer to the
installation instructions on your CD.
This manual is written for the end-user to get up and running with the unit as quickly as
possible. Installation and maintenance should be performed by experienced technicians
only.
Hardware Installation
This section provides a quick setup checklist to get your StorTrends® 1100 Storage
Appliance up and running. Following the steps in the order given should enable you to
have the system operational within a minimal amount of time.
Note: Follow the steps in the order given to complete the installation process in a minimal
amount of time. Read this section in its entirety before you begin the installation
procedure outlined in this section.
Unpack the StorTrends® 1100 Storage Appliance
You should inspect the box the StorTrends® 1100 Storage Appliance was shipped in and
note if it was damaged in any way. If the server itself shows damage, you should file a
damage claim with the carrier who delivered it.
Decide on a suitable location for the rack unit that will hold the StorTrends® 1100
Storage Appliance. It should be situated in a clean, dust-free area that is well ventilated.
Avoid areas where heat, electrical noise and electromagnetic fields are generated. You
will also need it placed near a grounded power outlet. Read the Rack and Server
Precautions in the next section.
StorTrends® 1100 Set Up Guide 1

Preparing for Setup
The box the StorTrends® 1100 Storage Appliance was shipped in includes the following:
•An 1100 Chassis
•One Power Cord
•Rails (See the Rails subsection for an expanded list)
•Rail Screws (See the Rail Screws subsection for an expanded list)
•Software Envelope (See the Software Envelope subsection for an expanded list)
Note: Your StorTrends® 1100 may or may not ship with everything listed in the Retail Packing
List. Contact your AMI authorized reseller to find out what is shipped with your
StorTrends® 1100 storage appliance if the contents do not match the ones listed in this
document.
Rails Part Qty Description
Labeled: 01-01-
813815-XXA 2 Rear Inner Chassis Rails 320 mm long (12.625 inches long).
Use 2 Flat head M4 screws to attach these to the 1100 chassis.
Labeled: 01-01-
813820-XXA 2 Rack Rails (Back Part) 305 mm long (12 inches long). Slides
into the Rack Rails (Front Part).
No number stamped
on it. It is considered
part of the 01-01-
813820-XXA part.
2 Rack Rails (Front Part) 617 mm long (24.313 inches long). The
Rack Rails (Back Part) slides into this, creating an adjustable
Rack Rail to accommodate Rack Enclosures between 64.77 cm
(25.5 inches) to 85.09 cm (33.5 inches) deep. Meaning that the
Rack Rails can be extended from 64.77 cm (25.5 inches) to
85.09 cm (33.5 inches).
Labeled: 01-01-
813811-XXA 2 Rack Rail front brackets 58 mm (2.25 inches long). These can
be attached to the Rack Rails (Front Part) using 2 Round head
M4 x 4 mm screws each. If you are securing the rails using your
own mounting screws, you do not need to use this bracket.
Rail Screws (in the bag labeled “Rail”)
Screw Qty Description
4 Flat head M4 x 4 mm [0.157]. Used to secure the Rear Inner Chassis
Rails to the 1100 Chassis.
12 Round head M4 x 4 mm [0.157]. Used primarily to secure the Rack
Rail front brackets to the Rack Rails. You only need a total of 4.
8 Flat head M5 x 12 mm [0.472]. Used in conjunction with the
supplied Washer to secure the Rack Rails to your Rack Enclosure.
8 Washer for M5. Use with the Flat head M5 screw when you secure
the Rack Rails to your Rack Enclosure.
StorTrends® 1100 Set Up Guide
2

Choosing a Setup Location
•Leave enough clearance in front of the rack to enable you to open the front door
completely (~25 inches).
•Leave approximately 30 inches of clearance in the back of the rack to allow for
sufficient airflow and ease in servicing.
Warning
Rack Precautions
•Ensure that the leveling jacks on the bottom of the rack are fully extended to the
floor with the full weight of the rack resting on them.
•In a single rack installation, stabilizers should be attached to the rack.
•In multiple rack installations, the racks should be coupled together.
•Always make sure the rack is stable before extending a component from the rack.
•You should extend only one component at a time - extending two or more
simultaneously may cause the rack to become unstable.
Server Precautions
•Review the General Safety Precautions.
•Determine the placement of each component in the rack before you install the
rails.
•Install the heaviest server components on the bottom of the rack first, and then
work up.
•Use a regulating uninterruptible power supply (UPS) to protect the server from
power surges, voltage spikes and to keep your system operating in case of a
power failure.
•Allow the power supply units and hot plug Serial ATA drive to cool before
touching them.
•Always keep the rack's front door and all panels and components on the servers
closed when not servicing to maintain proper cooling.
StorTrends® 1100 Set Up Guide 3

General Safety Precautions
Warning
General Safety Precautions
•Keep the area around the StorTrends® 1100 Storage Appliance clean and
free of clutter.
•The StorTrends® 1100 Storage Appliance weighs approximately 38 lbs. (17.3
kg) when fully loaded. When lifting the system, two people at either end
should lift slowly with their feet spread out to distribute the weight. Always
keep your back straight and lift with your legs.
•Do not open the chassis top cover.
•While working on the system, do not wear loose clothing such as neckties and
unbuttoned shirt sleeves, which can come into contact with electrical circuits
or be pulled into a cooling fan.
•Remove any jewelry or metal objects from your body, which are excellent
metal conductors that can create short circuits and harm you if they come
into contact with printed circuit boards or areas where power is present.
StorTrends® 1100 Set Up Guide
4

Rack Mounting Considerations
Feature Description
Ambient Operating
Temperature If installed in a closed or multi-unit rack assembly, the ambient
operating temperature of the rack environment may be greater than
the ambient temperature of the room. Therefore, consideration
should be given to installing the equipment in an environment
compatible with the manufacturer’s maximum rated ambient
temperature (Tmra).
Reduced Airflow Equipment should be mounted into a rack so that the amount of
airflow required for safe operation is not compromised.
Mechanical Loading Equipment should be mounted into a rack so that a hazardous
condition does not arise due to uneven mechanical loading.
Circuit Overloading Consideration should be given to the connection of the equipment to
the power supply circuitry and the effect that any possible
overloading of circuits might have on over current protection and
power supply wiring. Appropriate consideration of equipment
nameplate ratings should be used when addressing this concern.
Reliable Ground A reliable ground must be maintained at all times. To ensure this, the
rack itself should be grounded. Particular attention should be given
to power supply connections other than the direct connections to the
branch circuit (for example, the use of power strips, and so on.).
Installing the StorTrends® 1100 Storage Appliance into a Rack
This section provides information on installing the StorTrends® 1100 Storage Appliance
into a rack unit. There are a variety of rack units on the market, which may mean the
assembly procedure will differ slightly. The following is a guideline for installing the unit
into a rack with the rack rails provided with the system. You should also refer to the
installation instructions that came with the rack unit you are using.
Identifying the Sections of the Rack Rails
The StorTrends® 1100 Storage Appliance comes with Rack Rails. (Two front inner rails
should already be attached to the chassis.) The Rack Rails consists of two rear inner rails
that secure to the chassis, one on each side just behind the preinstalled front inner rails.
Note that these two rails are left/right specific.
StorTrends® 1100 Set Up Guide 5
Other manuals for StorTrends 1100-P
4
This manual suits for next models
1
Table of contents
Other American Megatrends Network Hardware manuals
Popular Network Hardware manuals by other brands

Cisco
Cisco CGR 1000 Series Getting connected guide

Matrix Switch Corporation
Matrix Switch Corporation MSC-HD161DEL product manual

National Instruments
National Instruments NI 653x user manual

B&B Electronics
B&B Electronics ZXT9-IO-222R2 product manual

Yudor
Yudor YDS-16 user manual

D-Link
D-Link ShareCenter DNS-320L datasheet