American Range ARR-ARR-27WD User manual

USE AND CARE MANUAL FOR
WARMING DRAWERS
MODEL NUMBERS: ARR-ARR-27WD, ARR-30WD, ARR-36WD
PROFESSIONAL QUALITY COOKING EQUIPMENT
R70000 030811 13592 Desmond St., Pacoima, CA 91331 818.897.0808 888.753.9898 tel www.americanrange.com
RETAIN THIS MANUAL FOR FUTURE REFERENCE

IMPORTANT SAFETY INSTRUCTIONS
2
•This appliance is only intended for the household use of
holding cooked food or dinnerware at serving
temperature. Do not use the appliance for other than its
intended use.
•Do not touch hot surfaces. Always use the handle to open
or close the drawer.
•When warming liquids, use caution when opening and
closing the drawer.
•Close supervision is necessary when this or any appliance
is used by or near children.
•The use of accessories not recommended by the
appliance manufacturer may cause injuries.
•Allow the appliance to cool before removing the drawer or
radiant heater cover.
•Extension cords are available and may be used if care is
exercised in their use.
•If a longer extension cord is used:
•The marked electrical rating of the cord set or
extension cord should be at least as great as the
electrical rating of the appliance
•The cord should be arranged so that it will not drape
over the countertop or tabletop where it can be
pulled on by children or tripped over unintentionally
or touch hot surfaces.
WARNING: If the information in this manual is not followed
exactly, a fire or explosion may result causing damage, personal
injury or death

IMPORTANT SAFETY INSTRUCTIONS
3
•Outdoor extension cords should be used with outdoor use
products. They are surface marked with suffix letters “W”
or “W-A” and with a tag stating “Suitable for Use with
Outdoor Appliances”
•To protect against electrical shock, the power cord and
plug should be kept dry and off the ground.
•Store products indoors when not in use – out of the reach
of children.
•Do not clean this product with water spray; do not spray
cleaners into the lamp socket area.
•Do not operate any appliance with a damaged power cord
or power plug or after the appliance malfunctions or has
been damaged in any manner. Return the appliance to
the nearest authorized service facility for examination,
repair, or adjustment.
•When unplugging from line power, first turn off the
unit by pressing the “ON/OFF” keypad, then remove
the plug from the wall outlet.
•This appliance conforms to all uniform safety codes and
regulations.
•The manufacturer cannot be held responsible for damage
or injury caused by improper use of this appliance.
•SAVE THESE INSTRUCTIONS in a safe place and pass
them on to any future user.

IMPORTANT SAFETY INSTRUCTIONS
4
•Before installing the warming drawer make sure that the
voltage and frequency listed on the data plate correspond
to the household electrical supply to prevent injury and
appliance damage. Consult a qualified electrician if in
doubt.
•Be certain your appliance is properly installed and
grounded by a qualified technician. To guarantee the
electrical safety of this appliance, continuity must exist
between the appliance and an effective grounding system.
It is imperative that this basic safety requirement be met.
The manufacturer cannot be held responsible for
damages caused by the lack of or inadequacy of an
effective grounding system.
•Installation, repair and maintenance work should be
performed by an authorized service technician. Work by
unqualified persons could be dangerous and may void the
warranty. Before installation or service, disconnect the
power supply to the work area by removing the fuse,
"tripping" the circuit breaker, or unplugging the unit.
•This appliance must only be used after it has been
installed in cabinetry to ensure all electrical components
are shielded.
•Never open the outer casing of the appliance.
Tampering with electrical connections or components and
mechanical parts is dangerous and can cause appliance
damage.
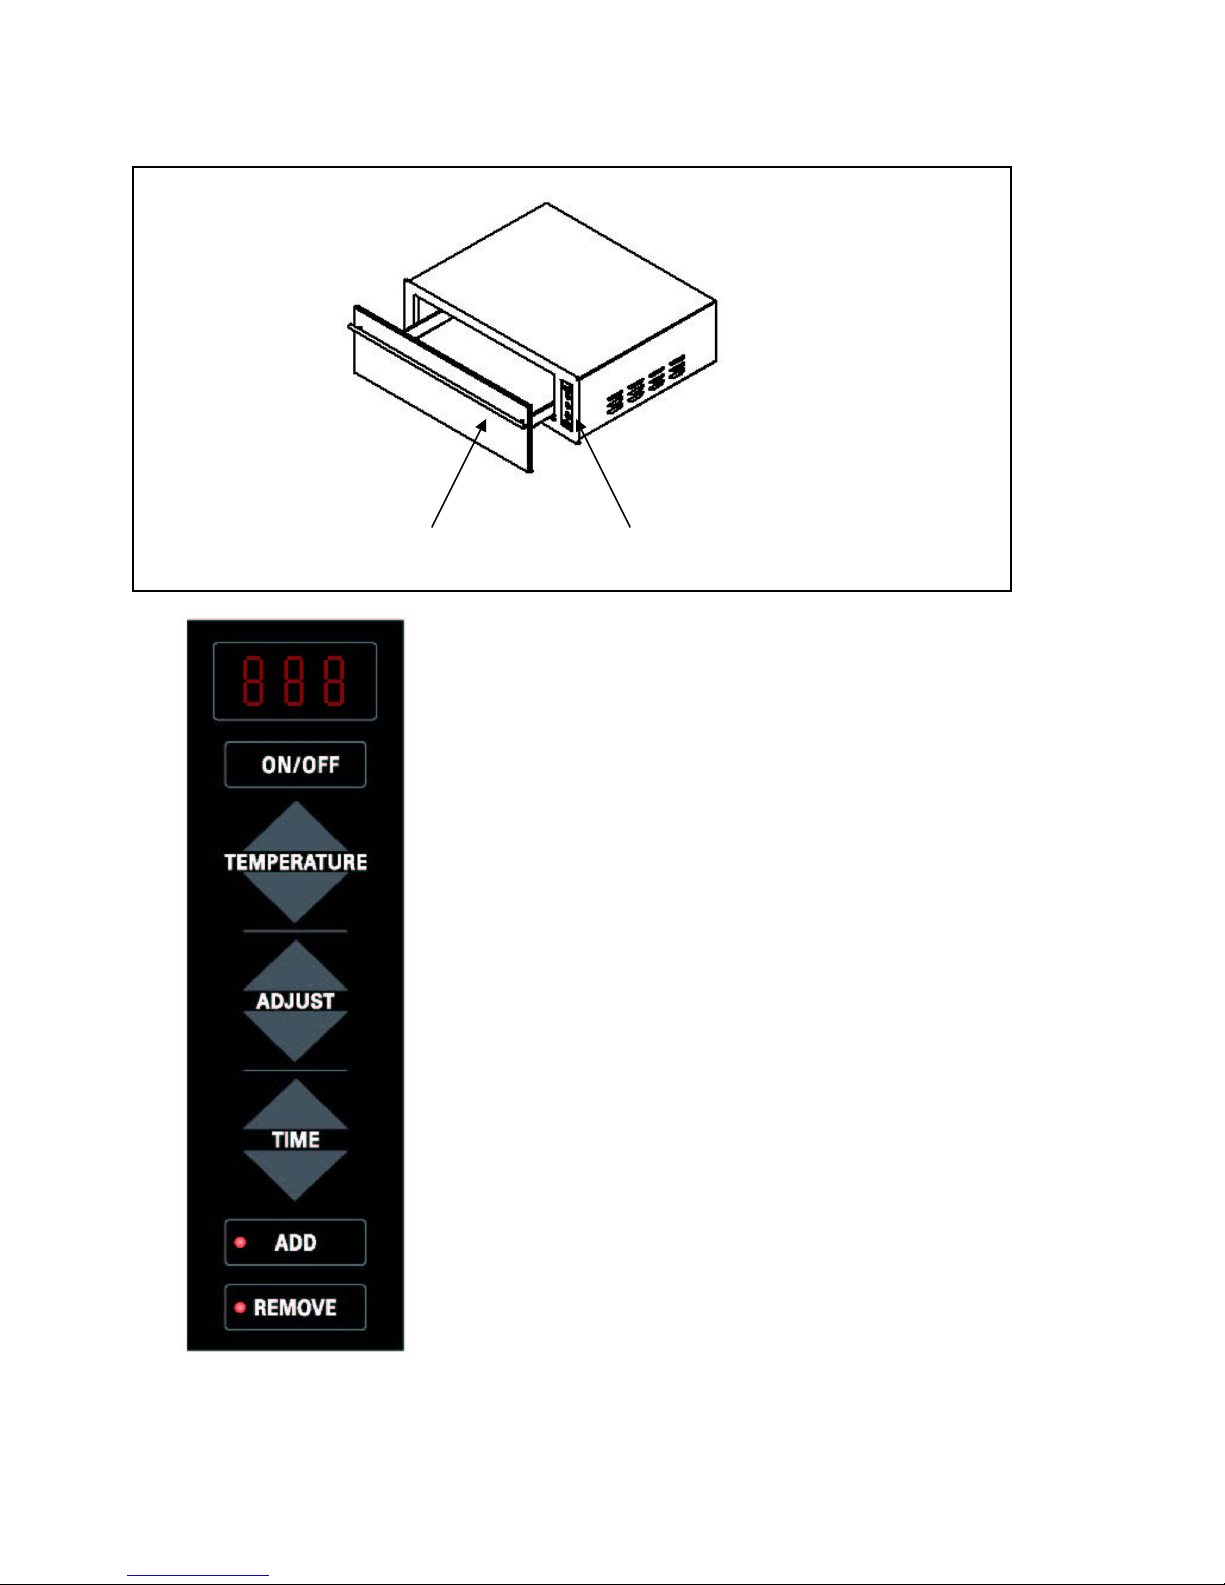
•To prevent burns, do not touch hot surfaces. When
opening and closing the drawer, use the handle provided.

IMPORTANT SAFETY INSTRUCTIONS
5
•Use dry, heat-resistant oven mitts when removing
dishes - as moist or damp pot holders used on hot
surfaces may result in steam burns. Do not substitute
towels or other bulky items for pot holders.
•Do not touch the glass protecting the side-mounted
radiant heating elements, or the fan assembly or other
interior surfaces of the warming drawer as they may be
hot.
•During and after use, do not let clothing or other
flammable materials come in contact with the glass shield
or interior surfaces of the drawer until they have had
sufficient time to cool.
•Keep children away from the appliance and its
controls. The appliance can get very hot during use.
•Flammable liquids and materials should never be
stored in or above the warming drawer.
•Do not store anything in the warming drawer. Make
sure food is not forgotten in the warming drawer; forgotten
items could melt or catch fire when the appliance is turned
on.
•Food, bread and herbs warmed for a long period in
the appliance will dry out present a potential fire hazard.
•Do not use plastic containers or plastic wrap in the
warming drawer. Items may melt and cause damage to
the warming drawer or injury to the user.

IMPORTANT SAFETY INSTRUCTIONS
6
•Do not place food in unopened containers in the
warming drawer. Pressure may build up and cause them
to explode.
•Close the drawer after removing food. An opened
drawer can be a trip or burn hazard.
•Exercise caution when warming food with high sugar
content. If heated for too long, the sugar may caramelize
or ignite.
•Before beginning, please read all instructions
carefully. Not doing so may void the warranty.
•Please observe all local and national codes and
ordinances.
•Do not remove any permanent warning labels or
plates from this product.
•To prevent injuries, do not use accessories not
recommended by the manufacturer.
•Never warm undiluted alcohol in the warming drawer as
this can easily ignite.
•Before cleaning the appliance, “trip” the circuit breaker
and allow the appliance to cool.
•Do not use a steam cleaner to clean the drawer. Steam
could penetrate electrical components and cause a short
circuit.
•Food safety is an important consideration when using a
warming drawer. At a temperature setting below 140oF
some bacterial growth may occur with some food when

IMPORTANT SAFETY INSTRUCTIONS
7
keeping it warm for more than 2 or 3 hours. Before
serving, always check to be sure the food is at a safe
temperature. This is particularly important when preparing
food for babies and children.
•Only use heat resistant dishes.
•Allow hot air or steam to escape before placing or
removing food.
•Always open the drawer carefully.
•Do not lean or sit on the drawer because this will damage
the drawer which can only hold a maximum weight of 35
lbs.
•Use a food thermometer to check the temperature of food.
•Children should not be left alone or unattended in an area
where any appliance is in use. They should never be
allowed to sit or stand on any part of the appliance.
•Do not store items of interest to children in cabinets above
or in the warming drawer. Children climbing on the
appliance to reach these items could be seriously injured.
•Wear proper clothing when operating appliances. Loose-
fitting or hanging garments should never be worn while
using the warming drawer.
•Do not leave the warming drawer unattended while in use.

IMPORTANT SAFETY INSTRUCTIONS
8
•Do not use water on grease fires! A violent steam
explosion may result. Smother the fire with a dry chemical
or foam fire extinguisher.
•Never add water to food in a hot drawer. The steam
created could cause serious burns or scalds.
•Do not use the warming drawer to heat the room. Due to
the high temperatures radiated, objects left near the
appliance could catch fire.
•When using kitchen appliances near the warming drawer,
make certain that the power cords do not come in contact
with or get caught in the drawer.

9
TABLE OF CONTENTS
IMPORTANT INSTRUCTIONS FOR SAFE INSTALLATION AND OPERATION 3-8
THE RADIANT CONVECTION WARMING DRAWER KEYPAD 10
GUIDE TO THE WARMING DRAWER 8
SPECIAL TIME ACTIVATION 8
ELECTRONIC CONTROL FACTORY PRESETS 9
HOW TO LOAD THE WARMING DRAWER 10
OPERATING TIPS 10
WARMING FOOD 10
WARMING DISHES 11
CLEANUP 11
CLEANING THE APPLIANCE FRONT AND ELECTRONIC CONTROL PANEL 11
CLEANING THE GLASS SHIELD 11
CLEANING STAINLESS STEEL SURFACES 11
WARMING DRAWER CARE 12
REMOVING THE DRAWER 12
INSTALLING THE DRAWER 12
WARMING DRAWER REPAIR 12
PROBLEMS?WHAT TO DO!13
OTHER QUESTIONS? 13
INSTALLATION INSTRUCTIONS 14
PACKING MATERIALS 14
OLD APPLIANCES 14
IMPORTANT SAFETY INSTRUCTIONS 15
ELECTRICAL CONNECTION 15
INSTALLATION 16
APPLIANCE DIMENSIONS 16
CUT OUT DIMENSIONS 16
INSTALLING THE WARMING DRAWER INTO A CABINET OR ISLAND 17
INTEGRATED INSTALLATIONS 18
PRODUCT AND CUT-OUT DIMENSIONS 20
WIRING DIAGRAM –ALL MODELS 23
WARRANTY REGISTRATION 24

10
`
◄Temperature and Time Display
◄ON/OFF Key
◄Move Up Preset Temperature List
◄Move Down Preset Temperature List
◄Increase Temperature or Time
◄Decrease Temperature or Time
◄Move Up Preset Time List
◄Move Down Preset Time List
◄Add To List Stored In Memory
◄Remove From List Stored In Memory
Drawer
Electronic Control

11
The radiant convection warming drawer is operated by electronic controls that
are only visible when the warming drawer is open. Once the warming drawer is
turned on, you will feel radiant heat immediately. Two convection fans inside the
unit will activate to evenly distribute warm air throughout the drawer.
When the selected temperature is reached, the power level of the radiant heaters
is automatically decreased to maintain the drawer at the selected temperature for
the time period selected. The convection fans will continue to operate. If the
temperature drops below the selected temperature, such as when you open the
drawer to remove or add items, the electronic control automatically increases the
power of the radiant heaters to recover.
On first press of the ON/OFF key, the unit powers up to a preset temperature
setting of 140oF for an initial preset time duration of 30 minutes.
If a different temperature is desired, you may press the Temperature Up Arrow
key or Temperature Down Arrow key and scroll through a preset list. When the
desired temperature is shown in the display, the unit will heat to the displayed
temperature.
If a special temperature entry is required, use the ADJUST Up or Down keys to
scroll to the desired entry. When the entry is satisfactory, the unit will heat to the
displayed temperature.
To add the special entry to the preset list, press the ADD key. To remove any
preset value from the preset list, press the REMOVE key. The ADD and
REMOVE key indicator lights let you know if you can add or remove the new
settings from the preset time or temperature list. When the ADD light is ON, you
can add a displayed value to the list, when the REMOVE light is ON, you can
remove the displayed value from the list.
On-Time of the unit can be recalled from the preset list, adjusted longer or
shorter, or added and removed from the preset list in a similar fashion.
To lock out the unit for child safety, or prohibit operation for any reason, press
and hold the Power ON/OFF key for 10 seconds. To unlock the keyboard, press
and hold the POWER ON/OFF key for 10 seconds.
SPECIAL TIME ACTIVATION
Beyond the preset times indicated in the Time Up or Down preset list, special
time durations for observing the Sabbath as well as operating the unit in a
“Continuous” mode are available. To set the unit for Sabbath operation:

Before the Sabbath -
- Use the Temperature Up or Temperature Down keys to set desired
temperature.
- Press the Time Up or Adjust Up key until the letters Sabb are displayed
(short for Sabbath).
The unit remains in this “programming mode” for a 30 second time period
after the last key press. During this time period, the customer can re-
check the temperature setting if necessary.
- After the 30 seconds time period, the ADD and REMOVE LEDs will go
out, though, Temperature Up, Temperature Down, ON/OFF and Time
Down Keys remain active. This means that the Temperature Up and
Temperature Down keys can be used to step through all temperature
presets. There is no indication anything is happening other than the
heating lamps will brighten for Temp Up adjustments above the current
temperature.
- Pressing ON/OFF shuts off the unit. The next press of the ON/OFF key
turns on the unit with the "last temperature used" and "Sabb" time as
settings. Pressing the Temperature Down key returns the unit to running
using the "last temperature used" and "con" (continuous time) settings.
During the Sabbath –
- Open the drawer one time only, remove the food, and press the ON/OFF
Key.
Please note: the "Continuous" setting requires close supervision to prevent fires.
Forgotten food will dry out and could potentially ignite.
To re-establish factory presets, turn the unit off and then press the key
combination REMOVE and POWER ON/OFF. The following will then become
available in the TEMPERATURE and TIME lists.

ELECTRONIC CONTROL FACTORY PRESETS
Preset Temperatures:
80°F
100°F
120°F
140°F
160°F
180°F
Preset Times:
30 minutes
45 minutes
1:00 hour
2:00 hours
4:00 hours
Sabbath (84 hours)
Continuous (forever)
The drawer load capacity will depend on the type and size of your food and
dishes. The maximum weight that the drawer will hold is 35 lbs, so, do not put or
rest heavy items on the drawer.
Operating tips
•For larger quantities of food, it may be necessary to use a higher
temperature.
•Heating food in heat resistant glass and ceramic containers may require
higher temperatures or longer times than heating food in metal dishes
because glass does not conduct heat as well as metal does.
•Allow extra time for the temperature to recover after adding or checking on
food or dishes.
•Do not block the vents on the bottom and top at the right inside of the drawer.
This will prevent food and dishes from warming evenly.
Please note: Be careful not to place food too close to the side located radiant
heating elements. Increased temperature at that side and proximity to the
radiant heaters may cause a fire!

Warming food
•Open the drawer and place food on the floor of the drawer.
•Press the ON/OFF keypad - temperature of 140°F will be displayed (with 30
minutes operating time).
•If necessary, press the Temperature Up or Down keys to select other desired
temperature settings. Press the Adjust Up or Down key to fine tune your
setting if required. Add the new setting to the preset list by pressing the ADD
key, remove the setting from the preset list by pressing the REMOVE key.
•Press the Time Up or Down keys to change the desired time setting. Once
again, press the Adjust Up or Down key to fine tune your setting if required.
Add the new setting to the preset list by pressing the ADD key, remove the
setting from the preset list by pressing the REMOVE key.
•Close the drawer.
The warming drawer can be turned off at any time by pressing the ON/OFF key.
Take care when opening and closing the loaded drawer to prevent spills
Keep the drawer closed while in use to prevent food from drying out. Remember,
food may continue to cook while being warmed in the drawer.
When warming is complete keep the drawer open for a few minutes to allow the
humidity to evaporate.
Warming dishes
•The warming drawer can also be used to warm glass, pyrex or ceramic
heat resistant dishes.
•Open the drawer.
•Place the dishes in the drawer, arranging them in the drawer for best
results.
•Set the temperature to 140oF.
•Set the time to 15 minutes.

•Close the drawer.
•After 15 minutes the drawer will shut off.
CAUTION!THE DISHES MAY BE VERY HOT!
Carefully remove dishes using oven mitts.
Food and dishes can also be warmed simultaneously.
Keep in mind that the temperature setting to keep food warm may be higher than
the temperature required to warm dishes.
Cleanup
CAUTION: Before servicing, disconnect the power supply by either removing the
fuse, shutting off the power main or manually "tripping" the circuit breaker. Do
not clean or remove the warming drawer until it has cooled.
Cleaning the appliance front and electronic control panel
All external surfaces and controls can be cleaned with warm water and liquid dish
soap applied with a sponge.
Wipe the surfaces dry using a soft cloth.
Cleaning the glass shield
The surface of the glass shield can be cleaned with a glass cleaner.
Cleaning stainless steel surfaces
Stainless steel surfaces can be cleaned using a non-abrasive stainless steel
cleaner.
Avoid the following on all surfaces:
- abrasive cleaning agents, such as powder or cream cleansers,
- abrasive sponges, pot scourers or sponges that were used with abrasive
cleaning agents,
- oven sprays.
Removing the drawer
•The drawer can be removed for easier cleaning.

•Pull the drawer completely out and release the center lock, located
underneath the drawer, and push the slide into the drawer cavity as far as it
will go.
•Reaching around to the left and right side, release both side slide locks and
pull the drawer straight out.
BE CAREFUL WHEN REMOVING THE HEAVY DRAWER.
•Clean all surfaces of the drawer with a solution of warm water and liquid dish
soap.
•Wipe drawer surfaces dry with a soft cloth.
Installing the drawer
•Push all slides into the drawer cavity.
•Slip all inner ball races forward, keeping the slides in the cavity.
•Align the drawer with the inner ball races and carefully push the drawer into
the cavity. You should feel the drawer traveling on the slide system.
•Push the drawer all the way into the cavity, then carefully pull the drawer
forward to be sure the slides are engaged.
Warming drawer repair
Repairs should only be carried out by a qualified and trained person in
accordance with local and national safety regulations. Unauthorized repairs
could cause an injury or machine damage. Some minor problems can be fixed
without a service call.

Problems? What To Do!
If the drawer does not heat…
There is no power to the warming drawer, or Plug the appliance into the outlet,
the circuit breaker has tripped. or reset the circuit breaker.
If the food is not warm enough…
Adjust the temperature setting. Check that the fan vents have not been
blocked by large plates or dishes.
If dishes are not warm enough…
The wrong temperature was selected, or Check the temperature setting or
the dishes need more time to warm. increase the heating timer setting.
If food or dishes are too hot… Check the temperature setting and make sure
food is not too close to the heating element.
If the appliance is noisy… This is not a problem. The circulation fans
which distribute heated air make a sound
whentheyoperate.
Any other questions?
In the event of a fault which you cannot easily fix yourself, please contact your
Appliance Dealer.
When contacting Technical Service please quote the Serial Number and Model
Number of the radiant convection warming drawer. This information is visible on
the silver data plate located beneath the drawer.

CONTENTS
PACKING MATERIALS
The cardboard box and packing materials that protect the appliance during
shipping have been designed to be biodegradable and recyclable. Please be
sure that any plastic wrappings, bags, etc. are disposed of safely and kept out of
the reach of children.
OLD APPLIANCES
This appliance contains materials that can be recycled. Please contact your local
recycling authority about the possibility of recycling these materials. Please be
sure that the appliance presents no danger to children while being stored for
disposal. Before discarding an old appliance, unplug it from the outlet and cut off
its power cord. Remove any drawers to prevent trapping hazards.

IMPORTANT SAFETY INSTRUCTIONS
CAUTION: Before servicing, disconnect the power supply by either removing the
fuse, shutting off the power main or manually "tripping" the circuit breaker.
Installation work and repairs should only be performed by a qualified technician
in accordance with all applicable codes and standards. Repairs and service by
unqualified persons could be dangerous and the manufacturer will not be held
responsible.
Before connecting the appliance to the power supply, make sure that the voltage
and frequency listed on the data plate correspond with the household electrical
supply. Consult an electrician if in doubt. Only operate the warming drawer after
it has been installed.
Installer: Please leave these instructions with the consumer.
ELECTRICAL CONNECTION
This appliance is equipped with a 5 ft long power cord with a three-prong
grounding plug ready for connection to a standard 120 VAC, 60 Hz, 15 AMP
power source.
INSTALLATION TIPS
•The warming drawer should be located in the counter at a convenient height
for easy access.
•The drawer should be installed clear of drafts caused by open doors and
windows.
•Proper clearance must be allowed for the warming drawer to open without
interference.
•The warming drawer must be secured to cabinetry to prevent the drawer from
tipping when loading or unloading.
•The warming drawer should be level to prevent the drawer sliding open or
closed on its own. The drawer cannot be leveled after it has been installed. If
necessary install a shelf inside the cabinetry to support the drawer.

Appliance dimensions
ARR-36WD - 35 7/8” wide by 9 7/8” flange; 34 3/8” by 8 7/8” high by 23 7/8” deep chassis
ARR-30WD - 29 7/8” wide by 9 7/8” flange; 28 3/8” by 8 7/8” high by 23 7/8” deep chassis
ARR-27WD - 26 7/8” wide by 9 7/8” flange; 25 3/8” by 8 7/8” high by 23 7/8” deep chassis
Cut-out dimensions
ARR-36WD – 34 5/8” wide by 9” high
ARR-30WD – 28 5/8” wide by 9” high
ARR-27WD – 25 5/8” wide by 9” high
IMPORTANT
Please verify by measuring actual appliance from box.
…measure twice, cut once…
This manual suits for next models
2
Table of contents
Other American Range Warming Drawer manuals