AMI Marine X-VHFR User manual

X-VHFR
Audio and Data Recorder
User Guide
© This Guide and the information contained therein is the property of AMI Marine Ltd.
It must not be reproduced or otherwise disclosed without prior consent in writing from AMI Marine Ltd

Page 2of 10
08020 - X-VHFR User Guide Iss01.docx
Document Issue
NOTE: All alterations must be verified by re-authorisation and approval of the complete document.
Document
Issue
Date
Modification Number (where applicable)
Brief Record of Change and Reason for Change
Iss01
27.05.2020
Original Issue of User Guide (SW v1.3.5.3)
AMI Marine Ltd
Unit 9 Crosshouse Centre
Crosshouse Road
Southampton
SO14 5GZ
United Kingdom
Tel No:
Email:
Web:

Page 3of 10
08020 - X-VHFR User Guide Iss01.docx
X-VHFR User Guide
CONTENTS
Document Issue ..................................................................................................................2
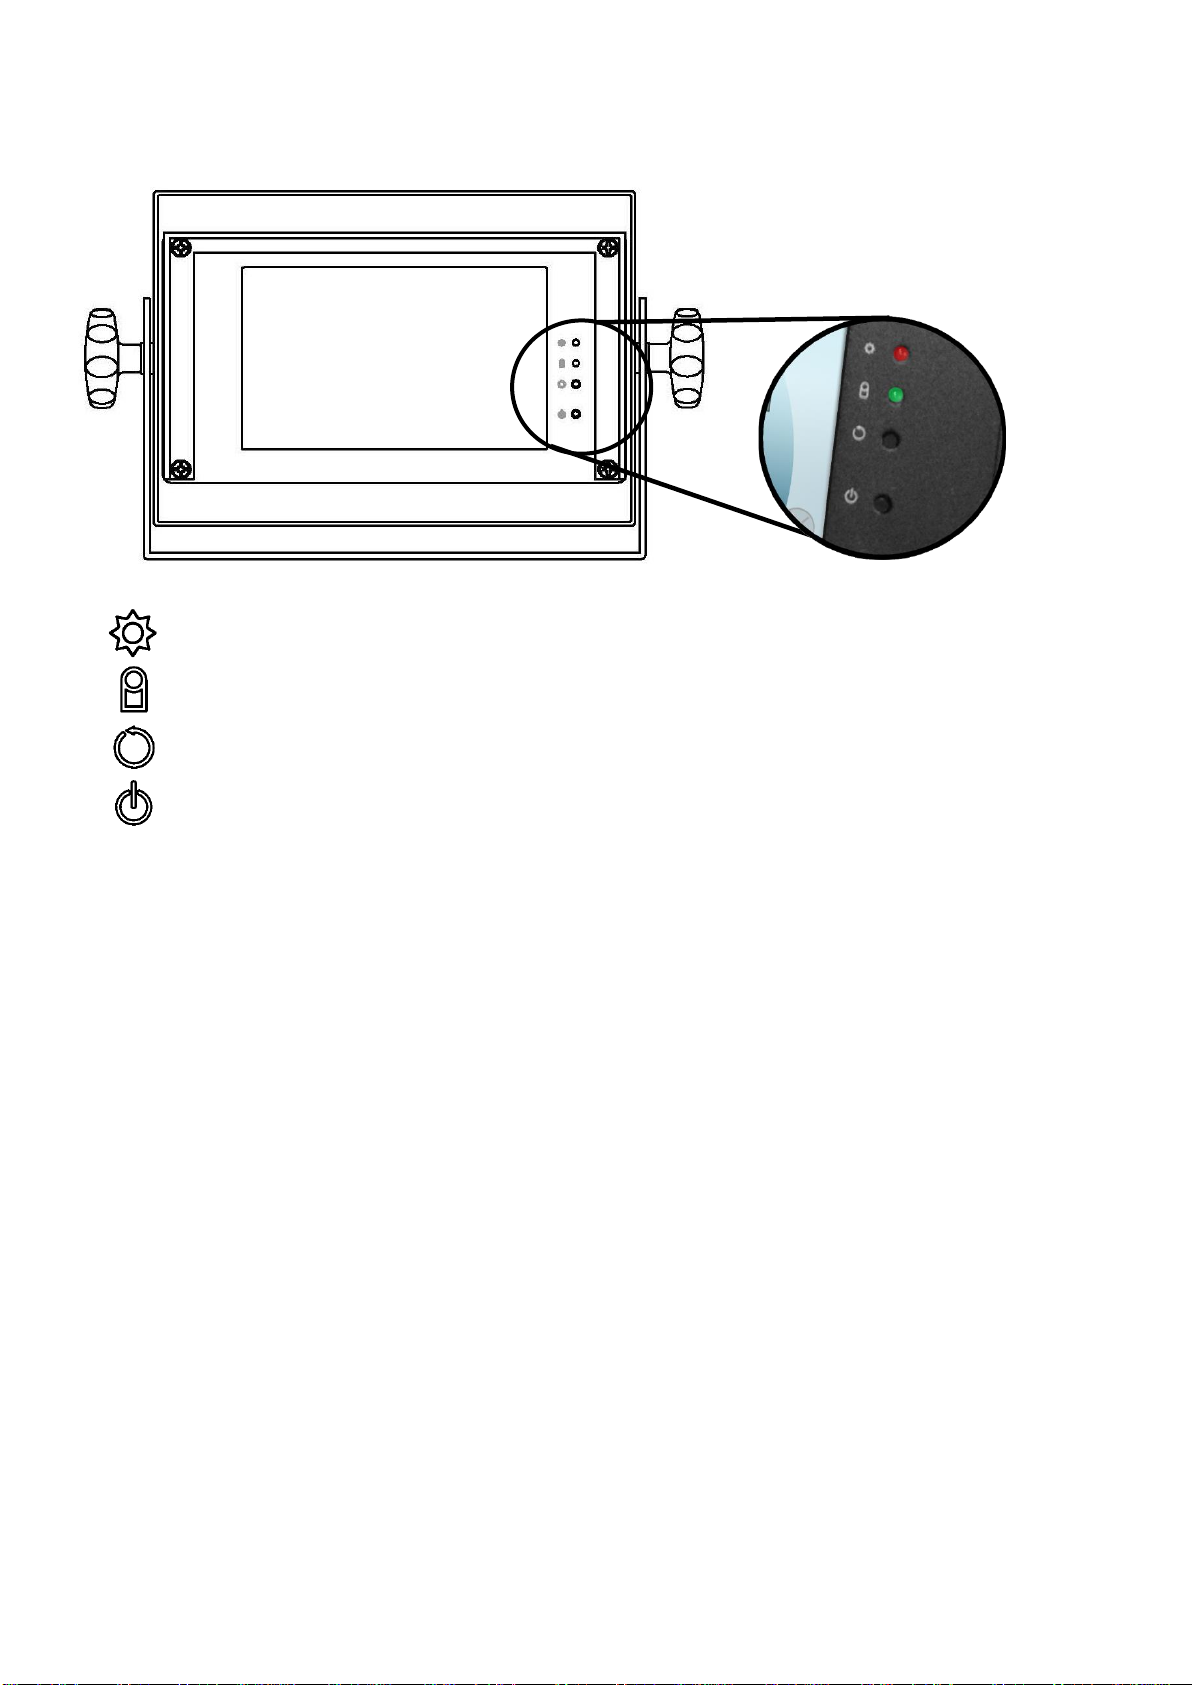
Hardware Buttons and Indications....................................................................................4
Software Buttons and Indications.....................................................................................5
Safe Removal of the External Storage ..............................................................................5
User Displays......................................................................................................................6
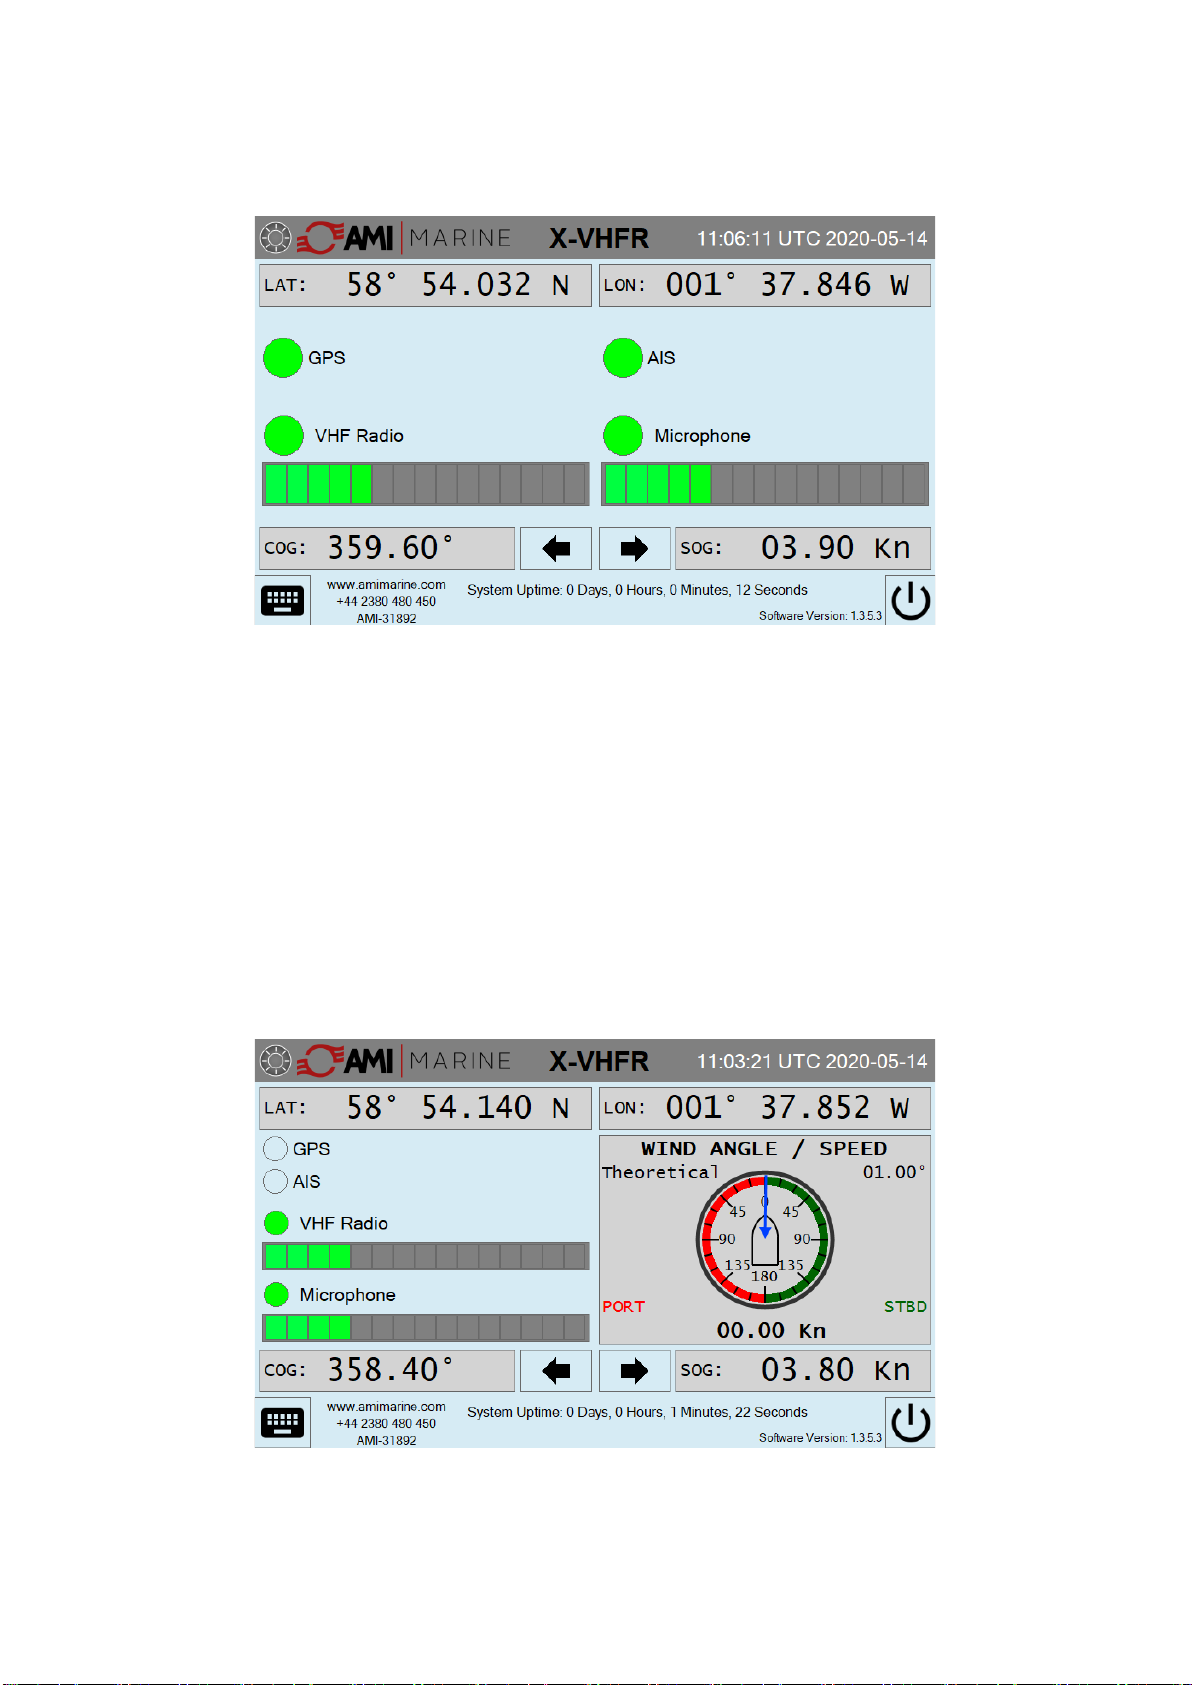
Main Display - Standard ..................................................................................................................................6
Main Display –Wind Indication........................................................................................................................6
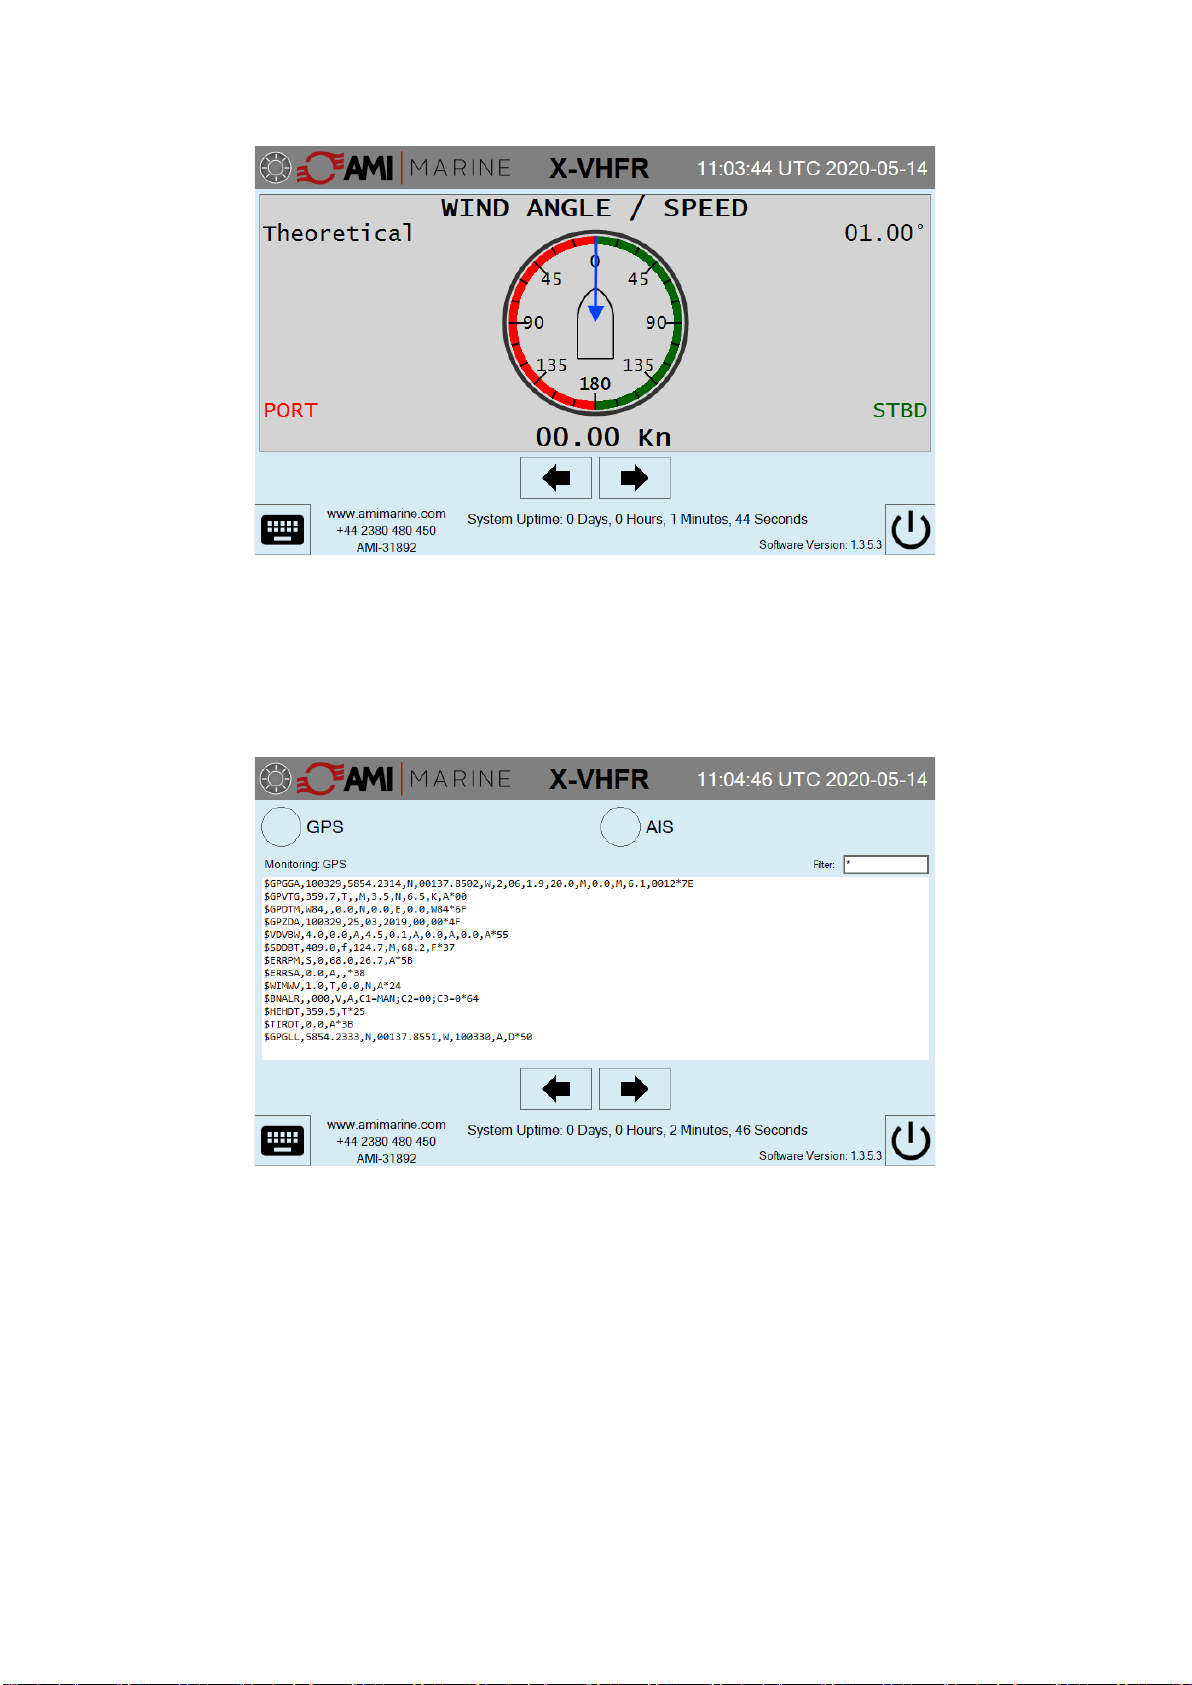
Wind Information Display.................................................................................................................................7
Serial Data Monitoring .....................................................................................................................................7
Storage Status.................................................................................................................................................8
Event Log.........................................................................................................................................................8
Day and Night Mode........................................................................................................................................9
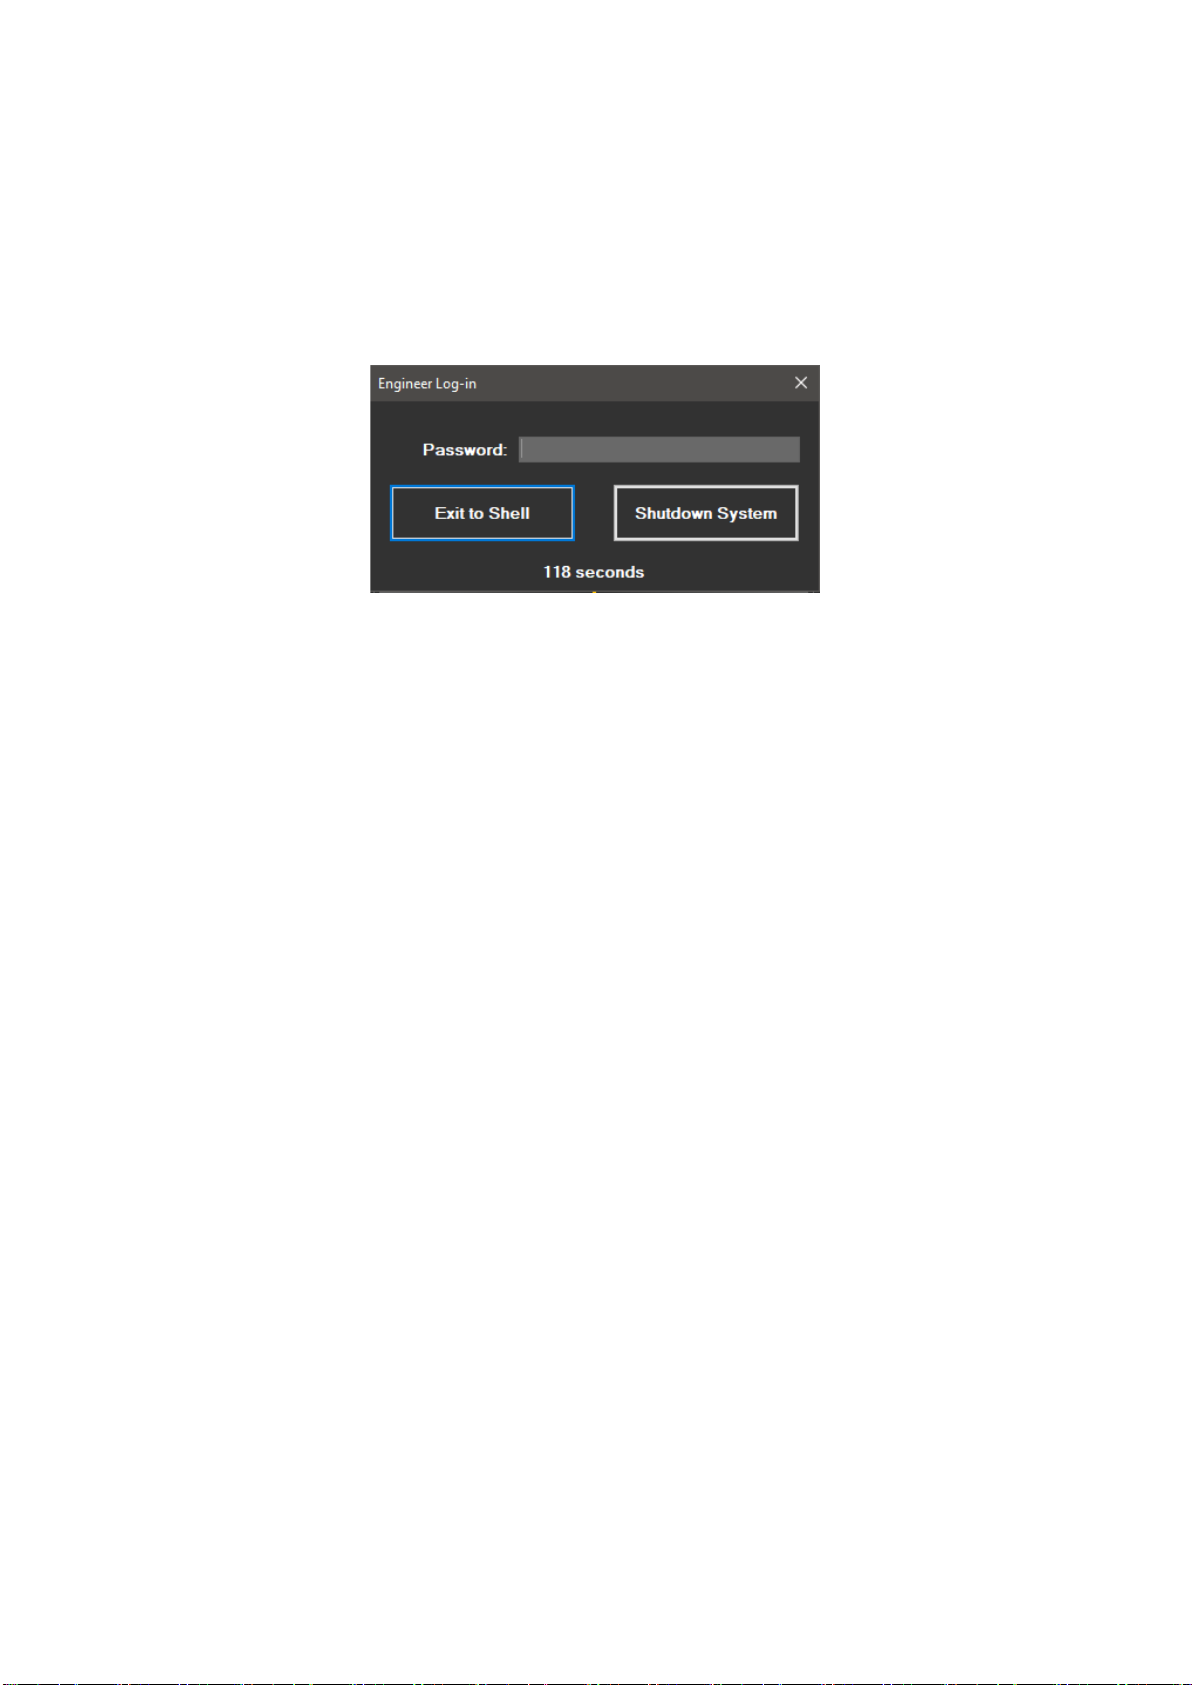
System Shutdown.............................................................................................................10

Page 4of 10
08020 - X-VHFR User Guide Iss01.docx
Hardware Buttons and Indications
Red LED
Power Indication
Green LED
Internal Hard Disk Activity
Recessed Button
No Function
Power Button
Hold for 4 Seconds to Hard Power Off*
Press to reboot after soft shutdown
*This should only be carried out in extreme cases as the operating system will not close in an organised manner using this method of powering
down the main processor display unit

Page 5of 10
08020 - X-VHFR User Guide Iss01.docx
Software Buttons and Indications
The above images show the Light and Dark Theme options. All features are the same in both themes.
The ‘Right Arrow’ button will display the next screen in the sequence.
The ‘Left Arrow’ button will return you to the previous screen.
The ‘Brightness’ button will take you to the Night and Brightness option screen.
The ‘Shutdown’ button allows the user to shutdown off the system safely or exit to the
windows desktop*
The ‘Keyboard’ button will open the on-screen keyboard for text entry, allowing
interaction without a physical keyboard.
The ‘Eject’ button is to allow for safe removal of the external storage device (LTRM),
avoiding data corruption.
All control buttons are present on each page, with exception of the Eject button which is only present on the LTRM
page.
Safe Removal of the External Storage
Pressing the Eject button will result in a dialogue requesting confirmation to eject the drive. Pressing ‘Yes’ will
prompt a second dialogue stating that the drive may be safely removed.
To indicate removal of the dive the LTRM indication will turns from green to yellow.
If the drive is currently being written to, a dialogue will be displayed to say that the drive may not yet be ejected,
after a further 10 seconds press the Eject button again.
Caution –Damage may be caused if the external storage drive is removed before the ‘Safe to Remove’ message is
displayed.
* Where a UPS is not in use the X-VHFR system should always be shut down prior to main power being removed.
Removal of power prior to shutting down the X-VDR may result in corruption of data or the operating system.
Light Theme
Dark Theme

Page 6of 10
08020 - X-VHFR User Guide Iss01.docx
User Displays
Main Display - Standard
The Main Display screen shows the status of the active data ports and connected audio devices.
The data indicator icon will flash green in time with the received data,
A yellow status icon indicates that no data is being received on the respective input port.
The audio status indicator will remain solid green when audio is being received.
Audio level indicators will rise and fall in time with the received audio signals.
The GPS data is used to display the current Latitude, Longitude, Course Over Ground (COG) and speed Over Ground
(SOG) in real-time.
The UTC data and time are displayed in the top right corner of the display.
Main Display –Wind Indication
Where wind data is received, and the option is selected in the configuration, the Wind Speed and Direction will be
displayed in graphical format along with all other items available on the Main Display.

Page 7of 10
08020 - X-VHFR User Guide Iss01.docx
Wind Information Display
Where wind data is received, and the option is selected in the configuration, the Wind Speed and Direction will be
displayed in full screen graphical format.
Serial Data Monitoring
Individual ports may be selected for monitoring to confirm the data being received.
Tapping each of the data input icons will select the port for the monitored data, which will be shown in the
monitoring window.
In addition, specific NMEA messages may be monitored. Using the onscreen keypad characters may be entered into
the filter box, resulting in only those characters being displayed.
For example, typing $GP will display only messages beginning with the characters $GP

Page 8of 10
08020 - X-VHFR User Guide Iss01.docx
Storage Status
The storage drive Information is displayed as shown for the LTRM external storage drive. Within the capacity charts
Blue indicates used space with Grey indicating unused space on the drive.
If a storage device is removed or develops a fault, a caution state will be raised and the LTRM box will tur yellow.
An indicator in the top left of the LTRM status box will flash green to show data transfer activity
The ‘Eject’ button must be pressed to safely remove the external storage drive from the X-VHFR to avoid
data corruption.
Event Log
The Event Log window shows the most recent entries that have been stored in the event log file.
Choosing ‘Show Time’ will add the time stamp to the beginning of the log entry.
Selecting ‘Hide Time’ will remove the time stamp from the beginning of the log entry.

Page 9of 10
08020 - X-VHFR User Guide Iss01.docx
Day and Night Mode
Pressing the brightness control button will open the Day/Night Mode window, allowing minimum and normal
brightness settings to be configured as well as day and night mode settings.
The Night Mode colour scheme will be the same whether the ‘Light’ or ‘Dark’ theme has been selected in the
configuration.
The display may be set to automatically switch between day and night mode at Sunrise and Sunset, based on the GPS
information.
The currently selected option will be underlined.
‘Never’ is the default setting –the brightness will never dim to a lower level.
Selecting a time period will cause the display to dim to the chosen level after the selected time period has elapsed.
When ‘Automatically change at Sunrise and Sunset’ is selected, the system will switch between Day and Night mode
based on the GPS location, date and time, at sunset and sunrise.
Night Mode
Brightness Control

Page 10 of 10
08020 - X-VHFR User Guide Iss01.docx
System Shutdown
To shut down the X-VHFR system ready for safe removal of power, the ‘Shutdown’ button or AMI logo in the title bar
should be pressed.
A user interactive notification will appear offering the choice of ‘Exit to Shell’ or ‘Shutdown System’
Not entering a password, or entering an incorrect password within 120 seconds, will result in the system dialogue
closing and the X-VHFR application continuing to run as normal.
Entering the correct password and selecting ‘Shutdown System’ will close the main application and safely shut down
the system. Power may now be removed.
Table of contents
Popular Measuring Instrument manuals by other brands

Samoa
Samoa 383 700 Technical service guide

Sierra
Sierra TM100 instruction manual

Endress+Hauser
Endress+Hauser COM 381 operating instructions

TSI Instruments
TSI Instruments VelociCheck 8330 Operation and service manual

Tektronix
Tektronix TLA7AA1 instructions

Photon Systems Instruments
Photon Systems Instruments AquaPen-C AP 110-P Manual and user guide