Amica EGSP 64511 V User manual

DISHWASHER
Please carefully read these Operating Instructions before using the appliance!
OPERATING INSTRUCTIONS EN
EGSP 64511 V

2
Carefully read the operating instructions before plugging dishwasher to a
power outlet and using the appliance. Operating instruction include tips
that will help you avoid the risk of injury and damage to the appliance.
Keep dishwasher documentation in a safe place for possible future use.
These operating instructions have been prepared for a range of applianc-
es and some features described herein may not apply to your appliance.
DEAR CUSTOMER,
THANK YOU FOR PURCHASING AN AMICA APPLIANCE
Symbols appearing in these instructions have the following meaning:
This indicates actions that must not be
performed by the user.
Risks resulting from improper operation
of the appliance. Activities that must be
performed by a qualied technician.
This appliance is intended exclusively for
domestic use.
The manufacturer reserves the right to
introduce changes, which do not affect
operation of the appliance.
Important information concerning proper
operation of the appliance and your per-
sonal safety.
Tips on how to use the appliance.
i
Information on how to protect the environ-
ment.
CONTENTS
SAFETY INSTRUCTIONS FOR USE 3
CARE FOR THE ENVIRONMENT 6
INSTALL THE APPLIANCE 7
FEATURES AND COMPONENTS 9
PREPARE THE APPLIANCE FOR OPERATION 11
LOAD DISHES INTO DISHWASHER 15
TURN ON THE APPLIANCE AND SELECT PROGRAMME 18
TABLE OF PROGRAMMES 20
CLEANING AND MAINTENANCE 21
ERROR CODES AND TROUBLESHOOTING 22
PRACTICAL ADVICE AND USEFUL INFORMATION 23
INSTALL THE APPLIANCE IN A CABINET 24

3
SAFETY INSTRUCTIONS FOR USE
Before you install the
appliance
Check the appliance for
transport damage. Never
install or use a damaged
appliance. If in doubt,
contact your seller.
Before use
• See installation notes
(below).
• Refer the grounding
system installation to
a qualied electrician.
• The manufacturer
shall not be liable for
any damage arising
from the use of a non-
grounded appliance.
• Before using the ap-
pliance, verify that the
data given on the rat-
ing plate matches that
of local power outlets.
• Do not plug in the ap-
pliance before and dur-
ing installation.
• Always use the original
plug that came with the
appliance.
• Do not use an exten-
sion cord to connect
the appliance to the
wall outlet. Extension
cords are not suffi-
ciently safe (e.g. they
may overheat).
• Make sure the plug
is easily accessible
after installing the ap-
pliance.
• Do not use an exten-
sion cord to connect
the appliance to the
wall outlet. Extension
cords are not suffi-
ciently safe (e.g. they
may overheat).
• Make sure the plug
is easily accessible
after installing the ap-
pliance.
This appliance can be
used by children aged 8
years and older or per-
sons with physical, men-
tal or sensory handicaps,
or those who are inexpe-
rienced or unfamiliar with
the appliance, provided
they are supervised or
have been instructed
how to safely use the ap-
pliance and are familiar
with the associated risks.
Ensure that children do
not play with the appli-
ance. Children should
not be allowed to clean or
maintain the appliance.
Children less than 3 years
of age shall be kept away
unless continuously su-
pervised.

4
Child safety
• Do not allow children
to play with the appli-
ance.
• Dishwashing deter-
gents can be caustic
and irritate the eyes,
mouth and throat.
Read the safety notes
from detergent manu-
facturer.
• Never leave children
unsupervised when
the appliance is open.
It can contain residue
detergent.
• Dishwasher water is
not suitable for drink-
ing. Danger of injury
from the caustic chem-
icals.
• When you open the
door during a pro-
gramme, be careful
as water temperature
is high
• To avoid injury always
place long and sharp/
pointed items (e.g.
forks, knives) in the
cutlery basket, pointing
down, or at on the top
basket.
Daily maintenance
• Use the appliance for
household dishwash-
ing only.
• Do not use solvents in
the appliance as there
is a risk of explosion.
• Do not sit or stand on
the open door and do
not place any objects
on it. The device may
overturn.
• Do not open the door
when the appliance is
operating. Hot water
or steam can be re-
leased.
• Do not leave the door
open, because they it
can pose a hazard.
In case of problems
• Refer repair and modi-
cations of the appli-
ance to qualied tech-
nicians only.
• In the event of prob-
lems or repairs, unplug
the appliance from the
wall outlet:
• Unplug the appliance
by pulling the plug,
• turn off the circuit
breaker.
• Do not pull the power
cord, pull the plug only.
Close the water supply.
SAFETY INSTRUCTIONS FOR USE

5
Recommendations
• To save energy and
water, rinse food resi-
due of the dishes be-
fore loading the dishes
into the dishwasher.
Run the dishwasher
with full load.
• Use pre-wash pro-
gramme only when
needed.
• Load bowls, cups and
mugs bottom facing
up.
• Do not load in the ap-
pliance any dishes that
are not dishwasher
safe and do not load
too many dishes.
i
Dishes and utensils
that are not suitable for
dishwashers.
• Ashtrays, candles,
cleaning pastes,
paints, chemicals, fer-
ro-alloys;
• Forks, spoons and
knives with a handle
made of wood, ivory
or Nacre, glued items,
items contaminated
with abrasive powders,
acid or base
• Plastic dishes that are
not resistant to high
temperature, contain-
ers made of copper or
tin;
• Aluminium and silver
items (may be stained
or loose lustre)
• Some delicate types
of glass, porcelain with
decorative prints, as
prints may fade even
after the first wash;
some crystal dishes
as they may lose their
transparency, glued
silverware sensitive
to high temperatures,
lead crystal glass,
chopping boards,
items made with syn-
thetic bres;
• Absorbent objects
such as a sponge or
kitchen cloths are not
suitable for the dish-
washer.
Before buying dishes in
the future make sure they
are dishwasher safe.
SAFETY INSTRUCTIONS FOR USE

6
CARE FOR THE ENVIRONMENT
RECYCLING
Packaging and some
parts of the appliance
are made of materials
suitable for recycling.
They are marked with the
recycling symbol and in-
formation about the type
of material.
Before using the appli-
ance remove all pack-
aging and dispose of it
in accordance with the
regulations.
Warning!
The packaging can be
dangerous for children.
Recyclable materials
can be taken to local
waste collection. Addi-
tional information can
be obtained from local
authorities and at waste
disposal points.
SCRAPPING OF AN
OLD APPLIANCE
In accordance with
European Directive
2012/19/EU and
Polish legislation
regarding used
electrical and electronic
goods, this appliance is
marked with the symbol
of the crossed-out waste
container.
At the end of its useful
life, this product must
not be disposed of with
normal municipal waste.
Instead, it should be tak-
en to an electronic waste
collection and recycling
point. It is indicated by
the symbol on the prod-
uct itself, or on the Op-
erating Instructions or
packaging.
The materials used in
making of this appliance
can be reused, as in-
dicated. By reusing or
recycling the materials or
parts, you will be playing
an important part in pro-
tecting our environment.
Information about the rel-
evant disposal points for
worn-out electrical goods
is available from your lo-
cal authorities.
Thank you for your con-
tribution to environmental
protection.
To avoid risks, prevent
the appliance pending
transport from being
used.
Disconnect the plug and
cut the power cord. Also
damage the door lock.

7
INSTALL THE APPLIANCE
Placement of the product
• When choosing the place of installation,
make sure you will be able to easily load and
remove dishes and utensils from the dish-
washer.
• Do not place the appliance in a room where
the temperature can fall below 0°C.
• Before installing unpack the appliance follow-
ing the instructions on the packaging.
• Place the appliance close to the water valve
and drain. When installing the dishwasher as-
sume that the connection will not be changed.
• When you move the appliance do not handle it
by the door or control panel.
• Leave some room on all sides to have
convenient access to the dishwasher when
cleaning.
• Make sure that when you set the dishwasher
you do not crush the water supply and drain
hose. Also, make sure that the appliance is
not places on the power cord.
• Level the appliance using the adjustable legs.
Proper level ensures trouble-free opening and
closing the dishwasher doors.
• If the dishwasher door will not close properly,
check that the appliance stands rmly on the
oor, if not, adjust using the adjustable legs.
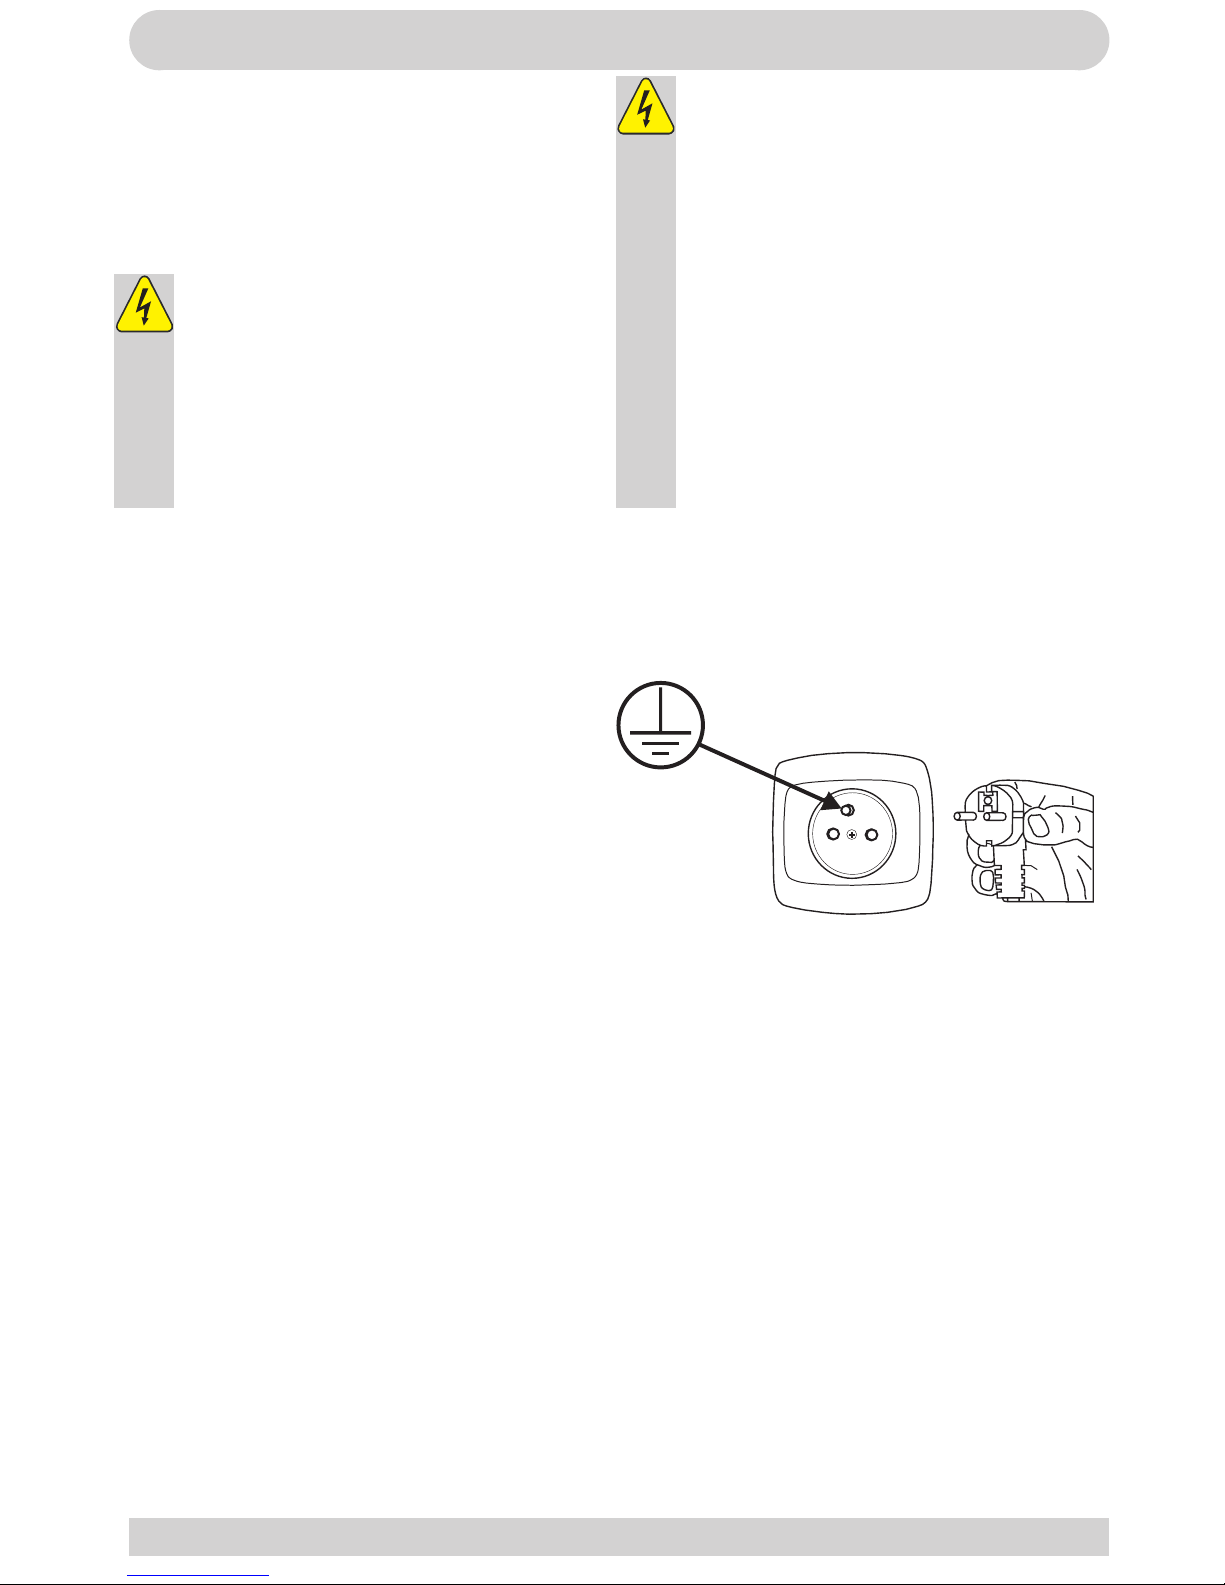
Water supply connection
Make sure that domestic water supply system is
suitable for the dishwasher. It is recommended
to install a lter in the water supply line to avoid
damage to the appliance due to impurities (such
as sand, clay, rust, etc.) that occasionally occur in
water. This will also prevent accumulation of sedi-
ment after dishwashing.
Water supply hose
Do not use the water supply hose from the old
dishwasher. Use the new water supply hose
provided with the appliance. Before connecting,
rinse the hose with water. Connect the water sup-
ply hose directly to the
water feed valve. The
domestic water system
pressure should be at
least 0.03 MPa and up
to 1 MPa. If the water
pressure exceeds 1
MPa, install pressure
reducing valve.
When the connection is
ready, open the valve
completely and check
for leaks.
For safety reasons,
close the water supply
tap after every wash.
NOTE: Aquastop water supply is used in
some dishwasher models. Dangerous volt-
age could occur with Aquastop. Do not cut
the Aquastop water supply. Do not allow it
to bend or twist
i
The drain hose
The drain hose can be connected directly to a
water drain or kitchen sink stub pipe. You can also
drain the water directly into the sink using the spe-
cial bracket (if available), placing the drain hose
outlet on the kitchen sink edge. The drain hose
connection should be made at least 50 cm and up
to 110 cm from the oor.
If the drain hose is longer than 4 m, dishes
may not be washed properly. The manu-
facturer is not be held responsible for such
a situation
Important!
For safety reasons, close the water tap
after every wash
min 50cm/max 110cm min 50cm/max 110cm

8
INSTALL THE APPLIANCE
Electrical connection
Grounded plug must be connected to a grounded
power outlet with a proper voltage. If there is no
grounding, refer this to a qualied electrician. If
you operate the appliance without proper ground-
ing, the manufacturer does not assume any liability
for the possible resulting damage.
Domestic electrical system must be pro-
tected with a 10-16A fuse.
The appliance must be supplied with 220-
240 V AC. If the supply voltage is 110 V,
use 3000W, 110/220 V set-up transformer
to connect the appliance. Do not connect
the appliance during installation.
Always use the plug provided with the ap-
pliance. When you operate the appliance
at lower voltage the dishwashing efciency
will deteriorate and may damage the ap-
pliance.
The power cord may only be replaced by
authorized service or a qualied electri-
cian. Failure to comply with these rules
may lead to an accident.
For safety reasons, you should always un-
plug the appliance after you have nished
using it.
In order not to avoid electric shock, do not
remove the plug from the wall outlet with
wet hands.
When you unplug the appliance from the
wall outlet, always pull the plug. Never pull
the power cord.

9
FEATURES AND COMPONENTS
The features and components of the appliance (g. 1):
1. Spray arms
2. Cutlery basket
3. Upper basket
4. Inner tube
5. Lower basket
6. Salt container
7. Detergent dispenser
8. Mugs and cups shelves
9. Spray arms
10. Main lter
11. Water supply hose connection
12. Water drain hose
13. Regulator

10
FEATURES AND COMPONENTS
Control panel (g. 2):
1) On/Off turn the appliance on/off
2) MENU button - the entrance to the menu of the appliance. In Menu mode, there is:
- Section selection program
- Function delayed start
- Section selection of additional features washing
- Set the water hardness
- Section language settings
3) OK button - Button to conrm selected functions from the appliance menu
4) Button + - button to move through the displayed menu (left)
5) Button - - button to move through the displayed menu (right)
6) Display - on the display there are the following indications:
- No salt
- No rinse aid
- Delay time, fault codes
- Indicators of programs
- Features
- Warning twisted in the water supply valve
When you nish the selected program (regardless of the functions used or the type of program) software
program settings will be saved. If the display shows a message about the need to replenish the salt and
rinse aid operation is possible without replenishment.
1
2
3
456

11
PREPARE THE APPLIANCE FOR OPERATION
The importance of water descaling
A dishwasher requires soft water (with
low calcium content) to operate efciently.
Otherwise, white residue main remain on
the dishes and inside the appliance. This
has a negative impact on the quality of
dishwashing, rinsing and drying. When
the water ows through the softener, ions
responsible for the water hardness are
removed, and the water becomes soft, for
best dishwashing results. Depending on
the degree of water hardness, the ions
responsible for water hardness accumulate
quickly inside the water softener. There-
fore, the water softener must be regener-
ated to operate with the same efciency
during the next wash. This is why special
salt is used in the dishwasher.
i
Fill the salt container with water only before
rst use.
Do not add kitchen salt to the dishwasher. The salt
dispenser can degrade over time. When you start
a programme special salt dispenser is lled with
water. Therefore, you should pour the special salt
before starting the dishwasher.
Special salt will be washed away during the
dishwashing programme. If you pour the special
salt and do not intend to run a dishwashing pro-
gramme, run the quick programme with an empty
dishwasher in order to prevent corrosion.
Add special salt
Only use special salt intended for dishwashers. To
add special salt you must rst remove the lower
basket and then open the lid of the salt dispenser
by turning it counter clockwise - (1). Fill the special
salt dispenser (~ 1.5 kg of special salt) and water
Before rst use
• Before using the appliance, verify
that the data given on the rating plate
matches that of local power outlets.
• Remove all packing materials from
inside of the appliance.
• Prepare special salt (water softener).
• Add 2 kg special salt (intended for
dishwashers) to the salt dispenser and
ll it with water to the brim.
• Pour into the rinse aid dispenser.
(2) using the supplied funnel (2). Replace and
close the lid. If the salt indicator on the control
panel lights up, rell the special salt dispenser.
i
The test strip
The dishwashing effectiveness is linked to water hardness. Therefore, the appliance is equipped
with a system to reduce the hardness of the water supply. The dishwashing effectiveness is
improved when the system is set correctly. To check water hardness contact the municipal water
company or determined the water hardness using test strip (if available).
Open the
test strip
package
Open the
water tap for
1 min.
Immerse the
test strip in
the water for
1 second.
Once
removed
shake off
the residual
water
Wait 1 min.
Set the dishwasher water hardness in accord-
ance with the measurement made
Level 1 – no calcium
Level 2 – very small calcium content
Level 3 – small calcium content
Level 4 – medium calcium content
Level 5 – high calcium content
Level 6 - very high calcium content
Use only the special salt intended for
dishwashers.

12
PREPARE THE APPLIANCE FOR OPERATION
Fill the detergent dispenser
Press latch to open the detergent dispenser, as
shown in gure. (1) The detergent dispenser
features volume marking. Using these markings
(lines) you can measure the correct amount of
detergent. The dispenser can accommodate a
maximum of 30g of detergent.
Open the pack with dishwasher detergent and
in the case of heavily soiled dishes pour 25 cm³
detergent into the main wash compartment (b) or
15 cm³ for less soiled dishes. (2) If the dishes re-
mained unwashed for an extended period of time
or if food has dried, pour 5 cm³ detergent (a) into
the pre-wash compartment and start the dishwash-
er. Depending on the amount of soil and the water
hardness you may need to add more detergent.
Multi-component (multitab) detergents (eg.
2-in-1, 3-in-1, etc.)
There are three types of detergents:
1. Containing phosphates and chlorine,
2. Containing phosphates and no chlorine,
3. Containing no phosphates and no chlorine.
The latest tablets are generally phosphate-free.
Since phosphates have water softening proper-
ties, we recommend adding salt to the container
even if the water hardness is only 6°dH. If you use
phosphate-free detergent where water is hard,
white residue may be visible on the dishes. You
can prevent this by increasing the amount of deter-
gent. Chlorine-free detergents have less bleaching
effect. Stains may not be entirely removed. Select
the programme with a higher wash temperature.
Generally, using multi-component detergents
suitable results are obtained only under certain
conditions. Such detergents contain rinse aid and/
or special salt in a specic amount. It is recom-
mended to use special salt when using multi-
component tablets.
What you should pay attention to when using
these tablets.
• Always check the type of detergent used and
whether it is a multi-component product.
• Make sure that the detergent used is appropri-
ate for tap water hardness.
• Follow the instructions on the product packag-
ing.
• If the detergent is in the form of tablets, never
place it the cutlery basket. Always place the
tablet in the detergent dispenser compartment.
• The use of these detergents yields good
results only in certain applications. Using
this type of detergent you should contact the
manufacturer for information about proper use.
• If you use the detergent properly and dish-
washer settings are correct you can save on
salt and/or rinse aid.
• If dishwashing results while using 2-in-1 or
3-in-1 detergents are not satisfactory (traces of
lime scale on the dishes), please contact the
detergent manufacturer. The warranty does
not cover complaints due to the use of multi-
component detergents.
Recommended use: For best results using
multi-component cleaning agents, add
special salt and rinse aid in the dishwasher
and set the water hardness and amount of
rinse aid to the lowest setting.
The solubility of the detergent tablets made
by different manufacturers can vary with
regard to temperature and time. It is there-
fore not recommended to use detergent
tablets in quick programmes. It is recom-
mended to use powder detergents in quick
programmes.
i
Always store detergents in a dry, cool
place, out of reach of children. Add deter-
gent to the dispenser immediately before
using the appliance.
Warning: If encounter another problem
when using a multi-component detergent,
please contact the detergent manufacturer.

13
Stop using multi-component detergents
• Add special salt and rinse aid to dispensers.
• Set the water hardness to the highest level (6)
and run an empty dishwasher.
• Adjust the water hardness.
• Adjust rinse aid setting.
PREPARE THE APPLIANCE FOR OPERATION
Add rinse aid to the dispenser and adjust set-
ting
Use rinse aid to prevent the formation of white
water drops, lime scale spots, white streaks that
may occur on the dishes, as well as to improve
the drying process. Contrary to popular belief, it
not only serves to obtain a shiny dishes, but also
to facilitate drying. For this reason, make sure
there is always sufcient amount of rinse aid in the
dispenser.
If the rinse aid indicator on the control panel lights
up, add rinse aid to the dispenser.
To add rinse aid remove the dispenser lid by
unscrewing it (1). Add rinse aid until the level indi-
cator becomes dark. (4) Replace the lid and turn
it until markings align. Use rinse aid level indicator
to make sure the level is sufcient. Dark colour (4)
indicates sufcient rinse aid level in the dispenser,
and the light colour (4) indicates you need to add
rinse aid to the dispenser.
You can adjust rinse aid dosage from 1 to 6. The
factory setting for the rinse aid is 4. Adjust to a
higher dose if streaks remain on the dishes after
drying or to a lower dose if blue residue collets on
the dishes.
Warning: Use only rinse aid designed for
domestic dishwashers. Wipe up spilled
rinse aid with a cloth as it will cause the
formation of large amounts of foam, and
thus will reduce the dishwashing effective-
ness.
Full
¾ full
½ full
¼ full (add more)
Empty
1
1
2
3
4

14
PREPARE THE APPLIANCE FOR OPERATION
Water hard-
ness
German de-
grees [dH]
French de-
grees [dF]
British degrees
[dE]
Water hard-
ness level
indicator
Salt consump-
tion [g/cycle]
1 0~5 0~9 0~6 H1 0
2 6-11 10-20 7-14 H2 9
3 12-17 21-30 15-21 H3 12
4 18-22 31-40 22-28 H4 20
5 23-34 41-60 29-42 H5 30
6 35-55 61-98 43-69 H6 60
If the water hardness is higher than the maximum values given in the table above, or if you use water
from a deep well, it is recommended to use lters and water treatment equipment.
NOTE: The factory settings are for the water hardness level 4.
Water hardness table
The use of detergents
Use a detergent for domestic dishwashers.
On the market you can nd detergent in-
tended for dishwashers in the form of pow-
der, gel and tablets. The detergent must be
placed in the dispenser before starting the
dishwasher. Store detergent in a cool and
dry place, out of reach of children.
Do not overll the detergent dispenser,
otherwise the detergent may not dissolve
completely and leave streaks on the
dishes.
If you need more information on the deter-
gent used, please contact the manufac-
turer directly.
i
Open the door, turn the device on standby.
Press the MENU button and select Set-
tings section salt consumption. Press the
“+” or “-” to select the appropriate setting
for your region. The following settings are
H1-H2-H3-H4-H5-H6.
Press “OK” to complete the setting.
1
2
3

15
LOAD DISHES INTO DISHWASHER
Upper basket
The upper basket is designed for washing delicate
dishes such as glasses, cups, plates, etc.
Dishes that are placed in the upper basket should
be less soiled than dishes in the lower basket.
In addition, you can place long forks, knives and
spoons horizontally on shelves so as not to ob-
struct the spray arms.
Lower basket
Place the plates, bowls, pots, etc in the lower bas-
ket. Make sure that the dishes in the lower basket
do not block spray arm and it can freely rotate.
Place large pans and heavily soiled items such as
pots, pans, lids, dishes, etc. in the lower basket.
Place dishes upside down, so that water does not
collect inside.
Fold the shelves
Fold the shelves to increase the capacity of the
upper basket. You can place the glasses and
mugs on the shelves.
Fold lower basket elements
In order to make more room for pots and pan you
can fold basket elements as shown in the gure.
Place the dishes in such a way that they
do not block the spray arm.
i
Raise the basket Press the handle
upward to lower the
basket.
Adjust the height of upper basket
You can adjust the height of the upper basket to
make more room for large dishes, both on the
upper and lower basket. To adjust the height of the
upper basket raise it to upper position and push
the handle up to lower the lower basket — see
gure below.
Handle adjustment

16
LOAD DISHES INTO DISHWASHER
Cutlery basket
Place knives and forks in the cutlery basket, sepa-
rately from each other, and make sure they do not
touch as this may cause poor washing results.
Note: Cutlery must
not project outside the
cutlery basket outline
For best washing results place knives and forks in
the cutlery basket, and make sure:
■ Items do not touch
■ Items are placed vertically
■ Longest times are in the middle of the basket
Cutlery shelf can be set in 5 different
positions:
First position: raise the
left shelf, left and right
shelf are tilted.
Second position: set the
left shelf in the lower
position, the left shelf is
set at, while the right
shelf is tilted.
Third position: raise
the right shelf, the two
shelves are set at.
Fourth position: Move
the right shelf to the left,
the shelves overlap.
Fifth position: Remove
the right shelf, only the
left shelf remains.

17
LOAD DISHES INTO DISHWASHER
The standard load and test results
Capacity:
The upper and lower basket: 14 place settings. Set the upper basket to the upper position. Place the
cups on the shelves.
Detergent/rinse aid
5+30g, in accordance with the EN 50242, IEC 436 international standards/rinse aid dose: 6
Test programme
Eco, in accordance with the EN 50242 international standard
Upper basket
Lower basket
Cutlery basket
Tests specication according to EN 50242
Capacity —14 standard place settings
Upper basket setting — lower position
Programme — ECO
Rinse dose setting — 6
Water hardness setting — H4
Tablespoons
Forks
Knives
Teaspoons
Dessert spoons
Food serving spoons
Food serving forks
Spoons for sauces

18
TURN ON THE APPLIANCE AND SELECT PROGRAMME
Turn on the appliance
The dishwasher can be turned on only after inserting the dishes, give all the necessary chemicals
dispensers, check that the spray arms can rotate freely and the door is closed:
1. Open the door Press
2. Press the MENU button, using the „+” and „-” select the section of programs suitable program and
press the „OK” if it is necessary, select additional functions.
3. If necessary, you can select additional functions.
4. Close the dishwasher door and after approx. 10 seconds, the dishwasher will start the job.
5. During the operation of the dishwasher in the lower part of the right side there will be blue spotlight
(Blue Dot) falling on the oor. The light stays lit when the dishwasher is running.
If the dishwasher door while the device is opened the device enters a pause, and every minute
is sounding stops the operation (the LED stops blinking and the program will burn with steady
light). To return to operation close the door.
After completion of the wash
When the machine has nished, you hear a noise that lasts approx. 8 seconds and the bottom of the
right side will blink blue spotlight (Blue Dot) falling on the oor. The light will ash for 5 minutes or less
in the case of early intervention. Carefully open the dishwasher door, being careful because in the
dishwasher may be a large amount of hot steam, turn it off using the button (1) and tighten the water
supply valve to the appliance. Dishes after opening the door are hot and prone to damage, so carefully
slide the two baskets of dishes. Do not empty the unit of blood for about 15 minutes to speed the drying
process.
1
2
3

19
TURN ON THE APPLIANCE AND SELECT PROGRAMME
Change programme
The cycle takes place at a time can be modied only if they last only for a short period of time. Other-
wise, there may have been already released detergent and discharge waste water through the device.
In this case, you must top up the detergent dispenser.
1. Open the door, the device goes into standby mode.
2. Press the MENU button and using the “+” and “-” choose another program and conrm with “OK”.
3. Close the dishwasher door and after approx. 10 seconds, the dishwasher will start the job.
If you wash, the dishwasher door is open, the unit goes into pause mode. The device signals
the door open at 1 minute until a proper closing of the dishwasher door. After closing the door,
dishwasher will launch later in the program after approx. 10 seconds.
12

20
TABLE OF PROGRAMMES
Table*:
** Standard programme This is a reference program for research institutes. Tests according to
EN 50242.
This programme is suitable for washing normally soiled tableware. This is the most effective pro-
gramme taking into account the total energy and water consumption for this kind of tableware.
* Programme duration, energy and water consumption value given in the table have been determined
under laboratory conditions. The actual values can differ.
Programme
name
Auto Intensive Normal **ECO Glass 1 hour 60’ Rapid 40’ Soak Party
Tempera-
ture 45-55°C 65°C 55°C 45°C 45°C 60°C 40°C - 40°C
Type of soil
Automatic
programme
selection for any
type of soil, in-
cluding residual
dried food on
the dishes.
Heavily soiled
dishes with
dried food
reside
Soiled dishes
with dried
food reside
Lightly soiled
glass-ware
and porcelain
Lightly soiled
glass-ware
and porcelain
Lightly soiled
dishes that do
not require full
drying
Quick pro-
gramme for
lightly soiled
dishes, which
do not require
drying
For dishes
waiting to be
washed
Quick pro-
gramme for
lightly soiled
dishes, which
do not require
drying
Soil level Varying soil Heavily
soiled Normal soil Light soil Light soil Light soil Light soil - Light soil
Amount of
detergent
5g /30g 5g /30g 5g /30g 5g /30g 5g /30g 5g /30g 30g - 20g
*Programme
duration [min] 150 175 185 195 115 60 40 8 25
*Energy con-
sumption [kWh] 0.9~1.3 1.6 1.3 0.83 0.87 1.15 0.6 0.01 0.55
*Water con-
sumption [l] 8.4~16 18 14 10 14 10.5 11.5 4 11.5
Pre-wash 50°C
Wash 60°C
Rinse 60°C
Dry
Pre-wash
Wash 45°C
Rinse
Rinse 60°C
Dry
Pre-wash
Wash 45°C
Rinse 55°C
Dry
Pre-wash 50°C
Wash 65°C
Rinse
Rinse
Rinse 65°C
Pre-wash 45°C
Automatic wash
45-55°C
Rinse
Rinse 65°C
Dry
Dry
Pre-wash 45°C
Wash 55°C
Rinse
Rinse 65°C
Dry
Wash 40°C
Rinse
Rinse 45°C
Pre-wash Wash 40°C
Rinse 40°C
Rinse 40°C
Table of contents
Other Amica Dishwasher manuals

Amica
Amica GSP 530 910 W User manual

Amica
Amica ZZG 446C User manual

Amica
Amica EGSPV 594 940 User manual

Amica
Amica EGSP 14663 V User manual

Amica
Amica EGSPU 500 910 E User manual

Amica
Amica EGSP 14895 E User manual

Amica
Amica ZZG 646C User manual

Amica
Amica DIM637ACNBH User manual

Amica
Amica EGSP 14868 V User manual

Amica
Amica EGSP 14663 V User manual

Amica
Amica ADI430 User manual

Amica
Amica GSP 14743 W User manual

Amica
Amica ZIG 645C User manual

Amica
Amica DIM62E7QH User manual

Amica
Amica EGSP 14686 V User manual

Amica
Amica ADI650 User manual

Amica
Amica EGSP 14795 E User manual

Amica
Amica ZWM 426 W User manual

Amica
Amica DIM42E6TBqD User manual

Amica
Amica ZIM 668E User manual