Amica ZWM 416 W User manual


To review the section on Troubleshooting Tips
will help you to solve some common problems
by yourself and not need to ask for the help of
professional technicians.
Dear Costumer,
Pleaseread this User Information carefully and keep it
to refer to at a later date.
Pass it on to any subsequent owner of the appliance.
This manual contains sections of Safety Instructions,
Operating Instructions,
Installation Instructions and Troubleshooting Tips etc.
Carefully reading it before using the dishwasher will help
youtouseandmaintainthe dishwasher properly.
The manufacturer, following a policy of constant
development and up-dating of the product, may
make modifications without giving prior notice.
Control Panel......................................... ..........3
Dishwasher Features..................................... ...3
A、 Water Softener............................................4
RINSE AID DISPENSER......................................6
Attention before or after loading the Dishwasher
Rack............................................................10
Removing the Dishes.......................................10
Wash Cycle Table................................................13
Turning on the Appliance.....................................13
Change the Programme.............. ...................15
... 5
.....
Forget to add a Dish.................................... .... 1
Filtering System.................................................16
B、Loading the salt into the softener....................5
C、Fill the Rinse Aid Dispenser............................5
Adjusting Rinse Aid Dispenser............................6
D、Function of Detergent .................................. 7
E .....................9、How to use the 3in1 programme
Loading the upper Rack...................................10
Adjusting the upper Rack.................................10
Loading the Lower Rack.....................................11
Folding spikes..................................................11
Silverware Basket........................................ .....12
Attention .........................................................13
Suggested remedy.............................................13
At the End of the Wash Cycle................................13
Cleaning the Spray Arms.....................................17
Cleaning the Door..............................................18
................18How to Keep Your Dishwasher in Shape
Water Connection..............................................19
Before calling for service....................................21
Error codes.......................................................22
Technical information........................................23


To get the best performance from your dishwasher,read all operating instructions before using it for the
first time.
3
11 12
Back View
13
Main Filter
5
Detergent Dispenser
6
Cup Shelf
7
Silverware Basket
8
Coarse Filter
9
Rinse Aid Dispenser
10
Inlet pipe connector
12
Drain pipe connector
11
Lower Basket
3
Spray Arms
2
Upper Basket
1
Water Softener
4
13
Tray ass
Front view
1
2
3
4
5
6
7
8
9
10
9
5
2
8
67
3
4
1
10
6 Rinse Aid Warning Light : To be on when the
dispenser needs to be refilled.
8 Door Handle: Pull it to open the door.
7 SaltLight:Tobeon whenthesoftenerneeds
to be refilled.
10 Start / Reset Button: Press this button to start or pause
the dishwasher. The process indicator light will be on
when starting.
NOTE: From left to right, the Process Indicator Lights are
Pr-rinse light, Wash light, Rinse light and Drying
light in order.
1 Power Button: To turn on/off the power supply.
2 Power Light : To be on when the Power Button is
Pressed down.
3 Delay Button: Press this button to set the delayed hours
for washing. You can delay the start of washing up to 8
hours. One press on this button delays the start of washing
by two hours.
4 Delay Light: To be on when you have delayed the start of
washing.
5 Delayed Hours ndicator ights & Process I s
To show the delayed hours when the
Delay button is pressed down and To show the process when
the machine is washing.
I L ndicator Light
9 Washing Program Selector: Turn the knob to select
wash cycles.

Before using your dishwasher for the first time:
A. Set the water softener
B. Pour 1/2 litre of water inside the salt container and then fill with dishwasher salt
C. Fill the rinse aid dispenser
D. Function of detergent
The water softener must be set manually, using the water hardness dial.
The water softener is designed to remove minerals and salts from the water, whichwouldhave
a detrimental or adverse effect on the operation of the appliance. The higher the
content of these minerals and salts, the harder your water is. The softener should be
adjusted according to the hardness of the water in your area. Your local Water Authority
can advise you on the hardness of the water in your area.
Adjusting Salt Consumption
The dishwasher is designed to allow for adjusting the amount of salt consumed based on
the hardness of the water used. This is intended to optimize and customize the level of
salt consumption so that the salt consumption could be set proceed as follows:
1. Unscrew the cap from the salt container
2. There is a ring on the container with an arrow on it (see
figure to the side), if necessary, rotate the ring in the
anticlockwise direction from the “-”Setting toward the
“ ”sign, based on the hardness of the water being used.
It is recommended that adjustments should be made in
accordance with the following schema:
+
4
Contact your local water board for information on the hardness of your water supply.
dH mmol/l
0~140~8 0~1.4 /0/
14~398~22 1.4~3.9 - 20 60
39~8022~45 3.9~8 Mid 40 30
>80>45 >8 +60 20
fH
0~10
10~28
28~56
>56
Clark
°Clark: British degree
°fH : French degree
°dH : German degree
Note:1 °dH=1.25 °Clark=1.78 °fH=0.178mmol/l
°Clark: British degree
°fH : French degree
°dH : German degree
Note:1 °dH=1.25 °Clark=1.78 °fH=0.178mmol/l
WATER HARDNESS
Selector Position Salt consumption
(gram/cycle)
Auto nomy
(cycles/1.2kgs)

Always use salt intended for use with dishwasher.
The salt container is located beneath the lower rack and should be filled as follows:
Attention!
Only use salt specifically designed for use in dishwashers! All other typesof
salt not specifically designed for use in a dishwasher,especially table salt, will
damage the water softener. In case of damages caused by the use of unsuitable
salt the manufacturer does not give any warranty nor is liable for any caused
damages.
Only fill with salt just before starting one of the complete washing programmes.
This will prevent any grains of salt or salty water, which may have been split,
remaining of the bottom of the machine for any period of time, which may cause
corrosion.
After the first wash cycle the control panel light expires.
A Remove the lower basket and then unscrew and remove the cap from the salt container.
B If you are filling the container for the first time, fill 2/3 of its volume with water (around 500ml).
C Place the end of the funnel (supplied) into the hole and introduce about 1,2kg of salt. It is
Normal for a small amount of water to come out of the salt container.
D Carefully screw the cap back on.
E Usually, the salt warning light will be off in 2-6 days after the salt container be filled with salt.
NOTE:
Rinse aid is automatically added during the last rinse, ensuring thorough rinsing, and spot
andstreakfreedrying.
Only use branded rinse aid for dishwasher. Never fill the rinse aid dispenser with any
other substances (e.g. dishwasher cleaning agent, liquid detergent). This would damage
the appliance.
5
The salt container must be refilled when the salt warning light in the control panel comes on.1.
Though the salt container is filled enough, the indicator light may not black out
before the salt fully dissolve.
If there is no salt warning light in the control panel (for some models) , you can judge when to load
the salt into the softener by the cycles that the dishwasher had run (see the foregoing schema ).
2. Iftherearespillsofthesalt,asoakprogramcouldberuntowipethemout.

To open the dispenser, turn the cap to the "open" (left) arrow and lift it out.
Pour the rinse aid into the dispenser, being careful not to overfill.
Replace the cap by inserting it aligned with "open" arrow and turning it to the closed (right) arrow.
The rinse aid is released during the final rinse to prevent water from forming droplets on your dishes
that can leave spots and streaks. It also improves drying by allowing water to sheet off the dishes.
Your dishwashers are designed to use liquid rinse aids. The rinse aid dispenser is located inside the
door next to the detergent dispenser. To fill the dispenser, open the cap and pour the rinse aid into
the dispenser until the level indicator turns completely black. The volumeoftherinseaidcontainer
is about 140ml.
Be careful not to overfill the dispenser, because this could cause over sudsing. Wipe away any spills
with a damp cloth. Don't forget to replace the cap before you close dishwasher door.
Attention!
Clean up any rinse aid split during filling with an absorbent cloth to avoid excess foaming
during the next wash.
The rinse aid dispenser has six or four settings. Always start with the dispenser set on
“2”. If spots and poor drying are problems, increase the amount of rinse aid dispensed
by removing the dispenser lid and rotating the dial to “3”. If the dishes still are not
drying properly or are spotted, adjust the dial to the next higher number until your dishes
are spot-free. We suggest you to set on “4”(Factory value is “4”)
NOTE:
Increase the dose if there are drops of water or lime spots on the dishes after washing.
Reduce it if there are sticky whitish streaks on the dishes or a bluish film onglasswareor
knife blades.
6
1
2
3
As the rinse aid diminishes, the size of the black dot
on the rinse aid level indicator changes, as illustrated below.
Full
3/4full
1/2full
1 / 4 full - Should refill to eliminate spotting
Empty
If there is no rinse-aid w arning light in the control panel, you can judge the amount of rinse-aid by the color of the optical level
indicator "D" located next to the cap. When the rinse-aid container is full, the whole indicator will be dark .As the rinse-aid
diminishes, the size of the dark dot decreases. You should never let the rinse aid get below 1 / 4 full.
D (Rinse-Aid indicator)

Based on their chemical composition, dishwasher can be split in two basic types:
conventional, alkaline detergents with caustic components
low alkaline concentrated detergents with natural enzymes
The use of “normal” washing programmes in conjunction with concentrated detergents
reduces pollution and is good for your dishes; these wash programmes are specially matched
to the dirt-dissolving properties of the enzymes of the concentrated detergent. For this reason
“normal”wash programmes in which concentrated detergents are used can achieve the
same results that can otherwise only be achieved using “intensive” programmes.
Detergent tablets of different brands dissolve at different speeds. For this reason some
detergent tablets cannot dissolve and develop their full cleaning power during short
programmes. Therefore please use long programmes when using detergent tablets, to
unsure the complete removal of detergent residuals.
The dispenser must be refilled before the start of each wash cycle following the instructions
provided in the Wash Cycle Table? Your dishwashers use less detergent and rinse aid
then conventional dishwashers. Generally, only one tablespoon of detergent is needed for
a normal wash load. Also, more heavily soiled items need more detergent. Always add the
detergent just before starting dishwasher, otherwise it could get damp and will not dissolve
properly.
Amount of Detergent to Use
Always add the detergent just before starting each wash cycle.
Only use branded detergent aid for dishwasher.
If the lid is closed: press release button. The lid springs open.
Dishwasher detergent is corrosive! Take care to keep it out of reach of children.
Proper Use of Detergent
Use only detergent specifically made for use in dishwashers. Keep your detergent fresh
and dry. Don't put powder detergent into the dispenser until you're ready to wash dishes.
7
Concentrated Detergent
Detergent Tablets
Detergent Dispenser
Detergents with its chemical ingredients are necessary to remove dirt, crush dirt and
transport it out of the dishwasher. Most of commercial quality detergents are suitable
for this purpose.
1
2

8
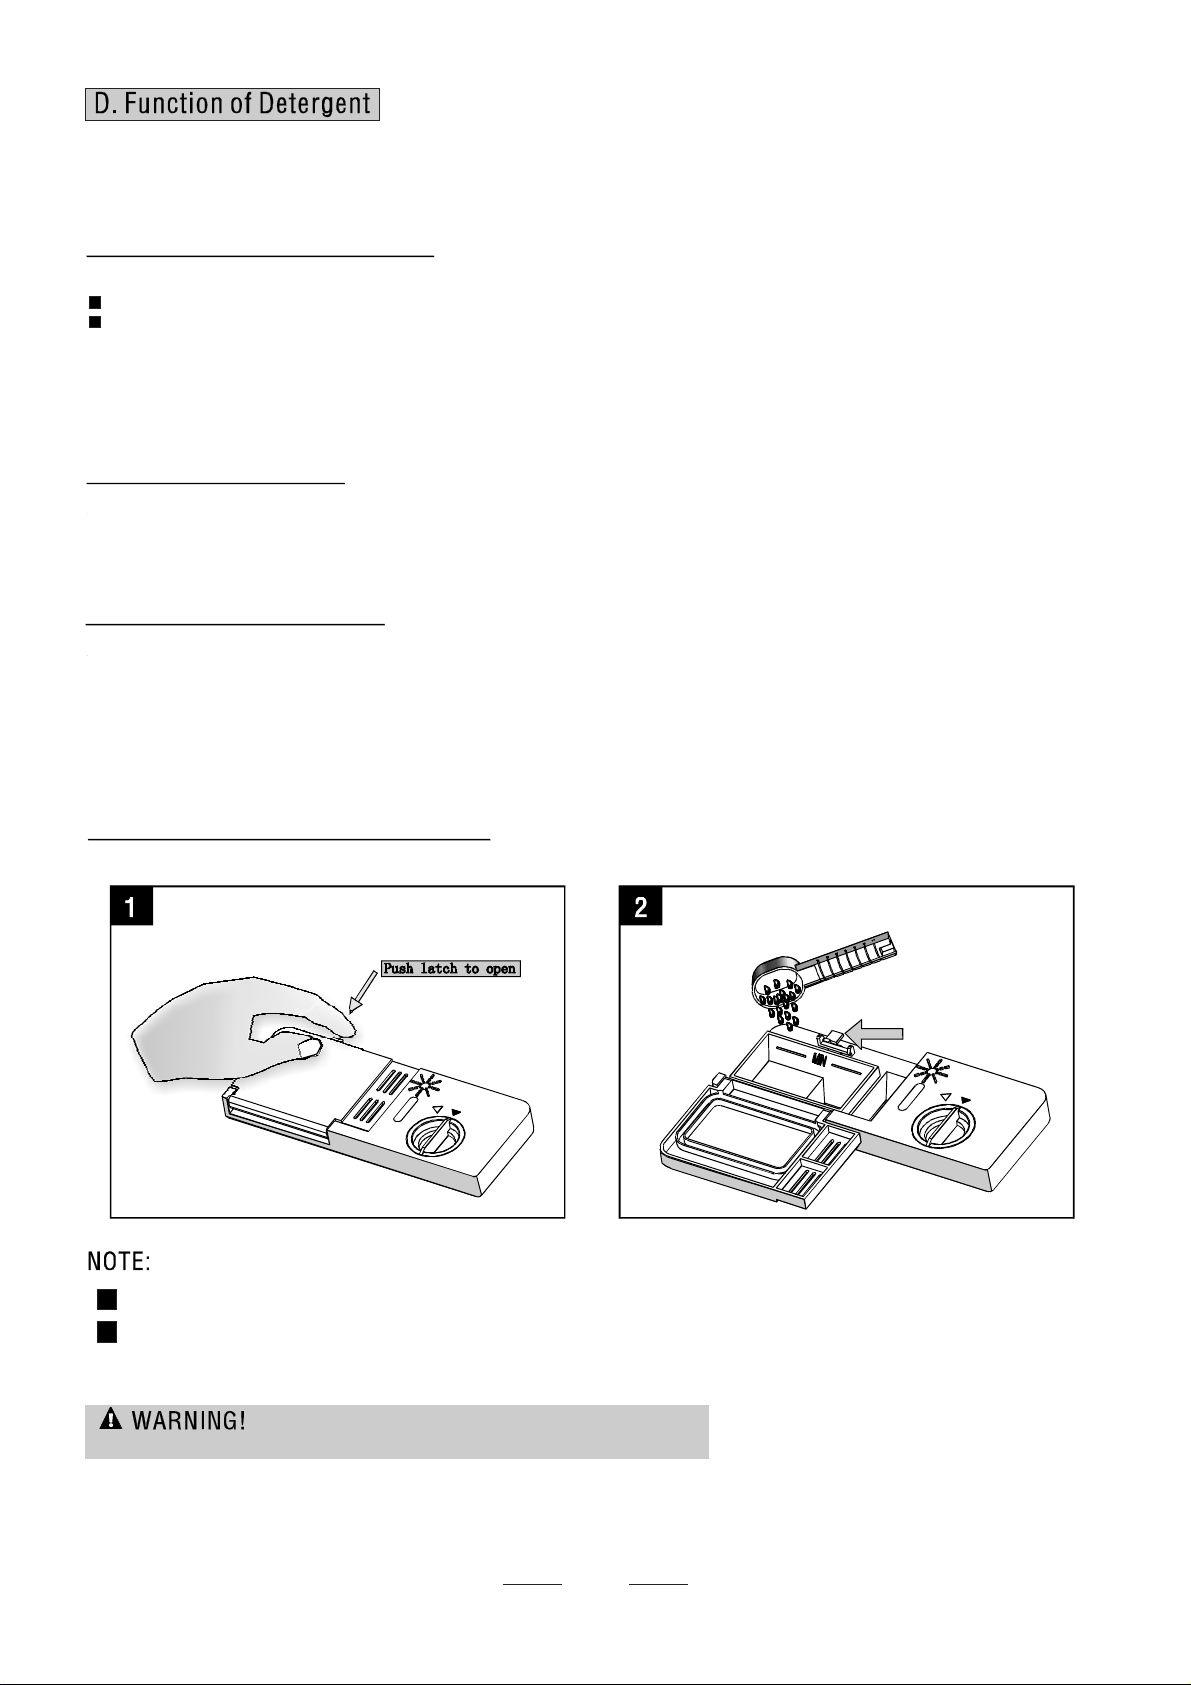
Fill the detergent dispenser with detergent.
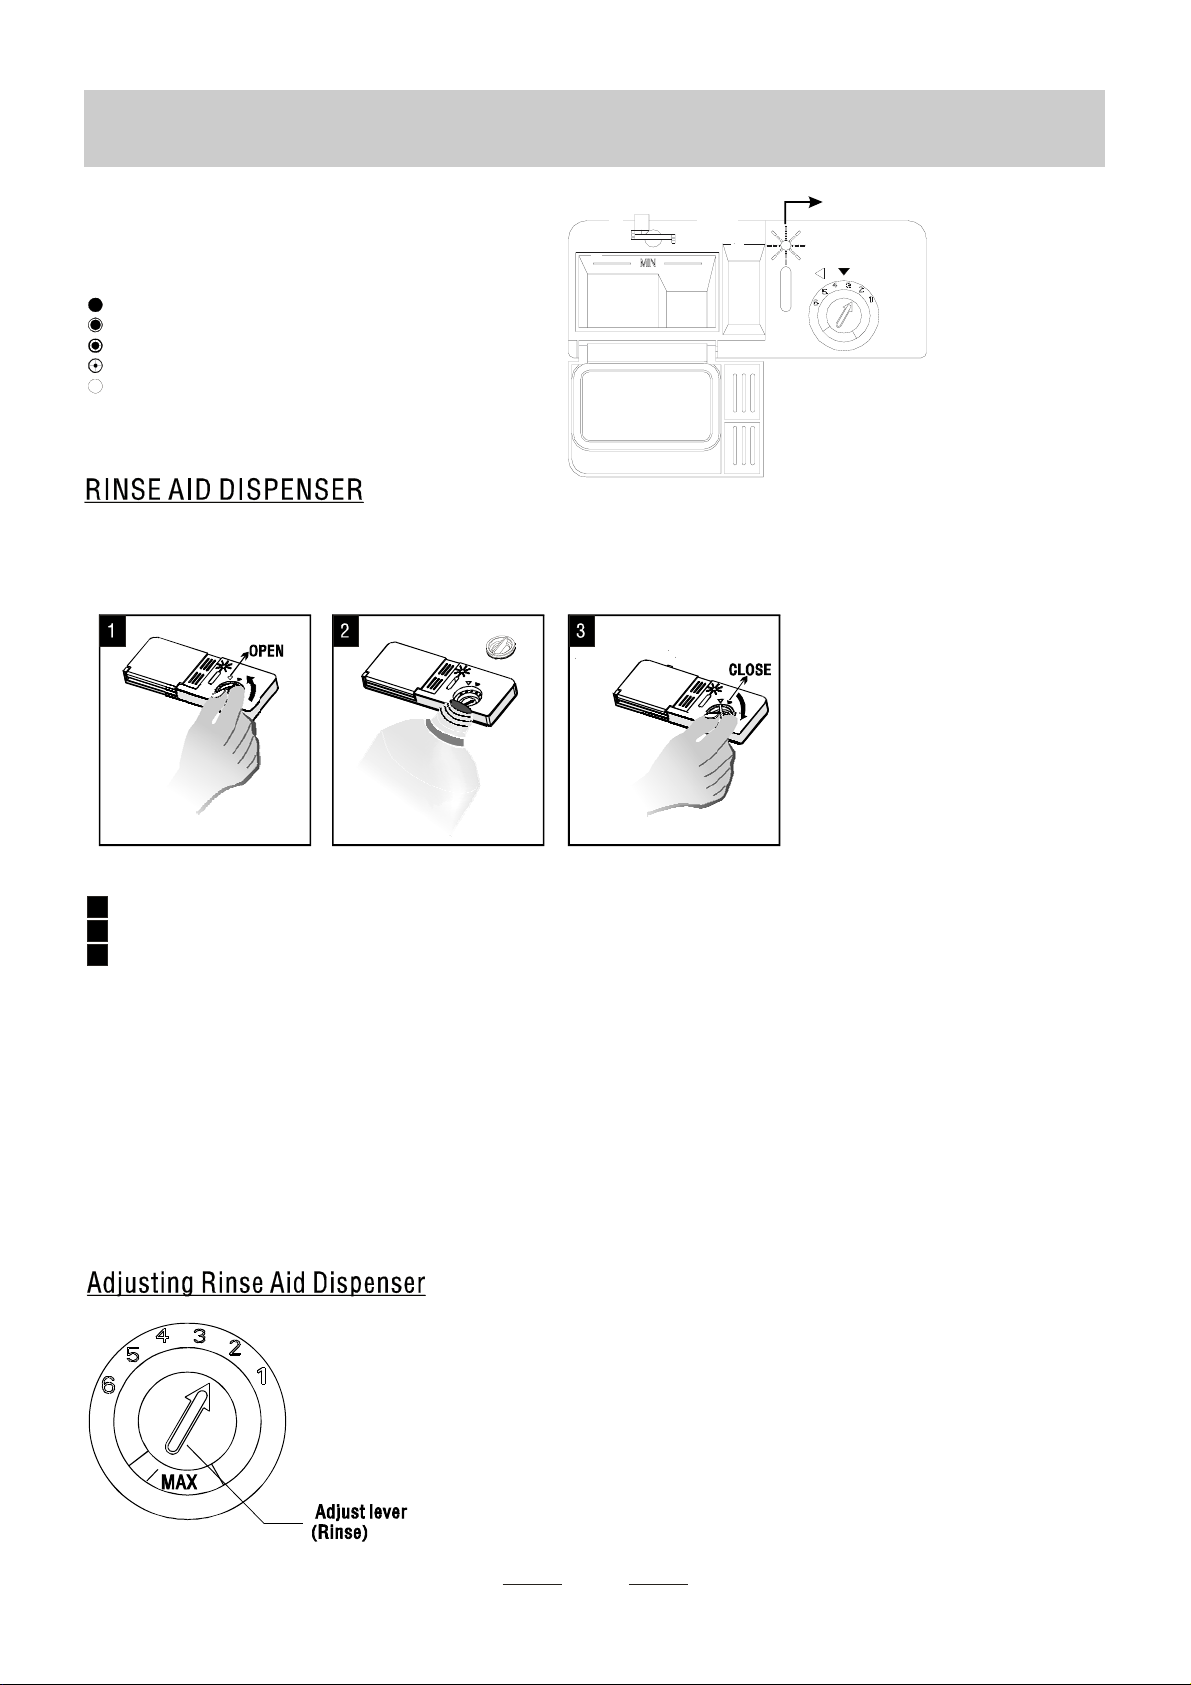
The marking indicates the dosing levels , as
illustrated on right:
The place of main wash cycle detergent placed ,
“MIN”means approximately 20g of detergen.
The place of pre-washcycle detergent placed,
approximately 5g of detergent
Please observe the manufacturers dosing and storage
recommendations as stated on the detergent packaging.
Close the lid and press until it locks in place.
If the dishes are heavily soiled, place an additional detergent dose in the pre-wash detergent
chamber. This detergent will take effect during the pre-wash phase.
You findinformation about the amount of detergent for thesingle programmes on the
last page. Please aware, that according to the level soiling and the specific hardness of
water differences are possible.
Please observe the manufacturer's recommendations on the detergent packaging.
There are 3 sorts of detergents
1.With phosphate and with chlorine
2.With phosphate and without chlorine
3.Without phosphate and without chloride
Normally new pulverised detergent is without phosphate. The water softener function of
phosphate is not given. In this case we recommend to fill salt in the salt container even when
the hardness of water is only 6 dH. If detergents without phosphate were used in case of hard
water often white spots appear at dishes and glasses. In this case please add more detergent
to reach better results. Detergents without chlorine do only bleach a little. Strong and coloured
spots will not removed completely. In this case please choose a programme with higher
temperature.
“”、“”、“”“”
,
Keep all detergents in a safe place out of children's reach.
Always add the detergent in the dispenser just before starting the dishwasher.
Detergents
Attention
Use of 2 in 1 3 in 1 4 in 1 and 5 in 1 Combination / Compact Detergents“ ”、“ ”、“ ” “ ”
These products are detergents with integrated and combined detergent/rinse aid and
salt functions. Before using these products you should first check that the water hardness
in your supply is compatible with the use of these products as per the detergent manu-
facturers (on the product packaging). These products should be strictly used according to
the detergent manufacturer's instructions. In general detergents that include rinse aid or
water softener are only able to serve good results under certain conditions: rinse aid and
water softener can not adapted to specific conditions. For this reasons in some cases
there might be unwanted cleaning or drying results. Please ask the detergent manufac-
turer to inform you about the best consume conditions. If you encounter problems when
using these products for the first time then please contact the detergent manufacturers
care line. The manufacturer of your dishwasher is not liable for damages caused by
compact detergents nor gives warranty if you use compact detergents.
When use 2 in 1 3 in 1 4 in 1 or 5 in 1 Combination / Compact Deter-
gents ,please pay attention to make sure that the size of the Combination Detergents
is fitted to the dispenser so that Combination Detergents can be ease to put in the
dispenser ,and dispenser would not be broken.
NOTE:
1
2
Fill in detergent
NOTE:
12

1、Referringtothebelowsketchmap,hangthe3in1tabletcontainerontheupper basket.
2 Referring to the below sketch map, r change the location of the container if need、 otate the upper sprayer and to make
sure the upper sprayer does not be cumbered by the 3 in 1 tablet container.
3、Put the 3 in 1 tablet into the container then start the 3 in 1 program.
Your dishwasher has a 3 in 1 program which needs not salt and rinse aid but a THREE IN
ONE tablet. And this dishwasher comes with a 3 in 1 tablet container as an accessory.
NOTE: Only 3 in 1 program uses 3 in 1 tablet. If using 3 in 1 tablet in other programs, the
appliance will not get a best performance.
9

For best performance of the dishwasher, follow these loading guidelines. Features and
appearance of racks and silverware baskets may vary from your model.
Scrape off any large amounts of leftover food. It is not necessary to rinse the dishes under
running water. Place objects in the dishwasher in following way:
1.Items such as cups, glasses, pots/pans, etc. are stood upside down.
2.Curve items, or those with recesses, should be at a slant so that water can run off.
3.They are stacked securely and can not tip over.
4.They do not prevent the spray arms from rotating while washing takes place.
Very small items should not be washed in the dishwasher as they could easily fall out of the racks.
To prevent water dripping from the upper back into the lower back, we recommend that you
empty the lower basket first and then the upper back.
The upper rack is designed to hold more delicate and lighter dishware such as glasses, coffee
and tea cup and saucers, as well as plates, small bowls and shallow pans (as longastheyare
not too dirty).
Position the dishes and cookware so that they do not get moved by the spray of water.
Attention before or after Loading the Dishwasher Racks
Removing the Dishes
Loading the Upper Rack
Adjusting the Upper Rack
If required, the height of the upper rack can be adjusted in order to create more space for large
utensils either in the upper rack or lower rack. The upper rack can be adjusted for height by
putting wheels of different height into the rails. Long items, serving cutlery, salad servers or
knives should be placed on the shelf so that they do not obstruct the rotation of the spray arms.
The shelf can be folded back or removed when not required for use.
10
1
Cups
2
Small serving bowl
3
Large serving bowl
4
Glasses
Saucers
5
6
Dish
12
3
4
6
5

We recommend that you place large items which are most difficult to clean into the lower rack:
pots, pans, lids, serving dishes and bowls, as shown in the figure to the right.
It is preferable to place serving dishes and lids on the side of the racks in order to avoid blocking
the rotation of the top spray arm.
Pots, serving bowls, etc. must always be placed top down.
Deep pots should be slanted to allow water to flow out.
The bottom rack feature fold down tine rows so that larger or more pots and pans can be loaded.
To improve stacking of pots and pans, the spikes can be folded down
11
1
Oval platter
3
Soup plates
Dessert dishes
4
2
Dinner plates
5
Silverware basket
2
3
4
1
5
4

Silverware Basket
Silverware should be placed in the silverware basket with handles at the bottom: If the rack
has side baskets, the spoon should be loaded individually into the appropriate slots,
especially long utensils should be placed in the horizontal position at the front of the
upper rack.
For washing in the dishwasher the following cutlery/dishes
Cutlery with wooden, horn china or
mother-of-pearl handles
Plastic items that are not heat resistant
Older cutlery with glued parts that is not
temperature resistant
Bonded cutlery items or dishes
Pewter or cooper items
Lead crystal glass
Steel items subject to rusting
Wooden platters
Items made from synthetic fibres
Do not put in items that are dirty of
cigarette ash, candle wax, lacquer or
paint. If you buy new dishes please make
sure that they are suitable for dishwashers.
Some types of glasses can become
dull after a large number of washes
Silver and aluminium parts have a
tendency to discolour during washing
Glazed patterns may fade if machine
washed frequently
Please do not overload your dishwasher. There is only space for 12 standard dishes. Do not
use dish that is not suitable for dishwashers. This is important for good results and for
reasonable energy consume.
Before loading the dishes, you should:
Remove large left-over
Soften remnants of burnt food in pans
Dishes and cutlery must not impede the rotation of the spray arms
Load hollow items such as cups, glasses, pans etc. with the opening downwards so that
water cannot collect in the container or a deep base
12
NOTE:
NOTE:
Are not suitable Are of limited suitability
Loading cutlery and dishes
When loading the dishes and cutlery, please note:
Do not let any item extend through bottom.
Teaspoons
4
Soup spoons
2
Forks
1
Serving fork
8
Serving spoon
6
Knife
5
3
Dessert spoons
7
Gravy ladle
1
1
1
1
1
4
7
8
1
1
1
6
2
2
2
2
2
2
2
2
5
5
5
5
5
5
5
5
3
3
3
6
4
4
4
4
4
4
4
3
3
3
3
3

13
Di
To
T
shes and items of cutlery must not lie inside one another, or cover each other
avoid damage to glasses, they must not touch
Load large items which are most difficult to clean into the lower rack
he upper rack is designed to hold more delicate and lighter dishware such as glasses, coffee
and tea cups
Attention!
Possible causes:
Suggested remedy:
Long bladed knives stored in an upright position are a potential hazard!
Long and/or sharp items of cutlery such as carving knives must be positioned
horizontally in the upper basket.
Damage to glassware and other dishes
Type of glass or manufacturing process. Chemical composition of detergent.
Water temperature and duration of dishwasher programme.
Use glassware or porcelain dishes that have been marked dishwasher-proof by the
manufacturer
Use a mild detergent that is described as kind of dishes If necessary, seek further
information from detergent manufacturers.
Select a programme with as low a temperature.
To prevent damage, take glass and cutlery out of the dishwasher as soon as possible
after the programme has ended.
When the working cycle has finished, the buzzer of dishwasher will moo for 8 second ,then stop .
Turn off the appliance using the power button, shut off the water supply and open the door of
the dishwasher. Wait a few minutes before unloading the dishwasher to avoidhandlingthe
dishes and utensils while they are still hot and more susceptible to breakage. They will also dry
better.

14
1
Starting a wash cycle...
Draw out the lower and upper basket, load the dishes and push them back. It is
commended that loading the lower basket first, than the upper one (see the section
entitled "Loading the Dishwasher").
Pour in the detergent (see the section entitled "Salt, Detergent and Rinse Aid").
Insert the plug into the socket. The power supply is 220-240VAC 50 HZ, the
specification of the socket is 12A 250V AC.
Make sure that the water supply is turned on to full pressure.
Close the door, press the Power Button, and the Power light will come on. Turnthe
Washing Program Selector to select a desired wash cycle.
Press the (on selected models) to set the delayed hours for washing.
NOTE: If you want not to delay the start, skip this step.
Press the Start/Reset button to start the washing or to delay the start of thewashing.
When the washing is over, you can shut off the switch by pressing the Power Button.
Delay button
4
5
6
7
2
3
For normally soiled loads,
such as , plates, glasses
and lightly soiled pans.
standard daily cycle.
pots
For lightly soiled loads,such
as plates,glasses,bowls and
lightly soiled pans.
For the heaviest soiled loads,
such as pots,pans,casserole
dishes and dishes that have
been sitting with dried food
on them for a while.
Ashorterwashforlightly
soiled loads that do not
need drying.
For dishes that need to be
rinsed and dried only.
Normal
Economy
Intensive
Rapid
Rinse
Pre-wash
-wash
Wash (70 ℃)
Rinse
Rinse
Rinse (55 ℃)
Drying
(50℃)
Pre (50℃)
Pre-wash(50 ℃)
Wash (50 ℃)
Rinse
Rinse (65 ℃)
Drying
Pre-wash
Wash (50 ℃)
Rinse (60 ℃)
Drying
Wash (40 ℃)
Rinse(45℃)
Rinse
Wash(40 )
℃
Rinse(70 ℃)
Drying
3in1
For normally soiled loads,
such as , plates,glasses
and lightly soiled pans.
standard daily cycle.
pots
Pre-wash
Wash (50 ℃)
Rinse (70 ℃)
Drying
(EN 50242)
140
150
120
30
80
4/20 g.
4/20 g.
15 g.
1.2
0.95
0.74
0.80
0.40
18
12
11
7
10
150
0.85 11
4/20 g.

15
A forgotten dish can be added any time before the detergent cup opens.
Open the door a little to stop the washing.
After the spray arms stop working,you can open the door
completely.
Add forgotten dishes.
4
3
2
1
It is dangerous to open the door when washing,because the hot water may scaldyou.
The program light isn't blingking and is light , only in this case the programme has ended.
1.Switch off the dishwasher by pressing the ON/OFF button.
2.Turn off the water tap!
Open the door carefully. Hot steam may escape when the door is opened!
Hot dishes are sensitive to knocks. The dishes should therefore be allowed to cool down around
15 minutes before removing from the appliance.
Openthedishwasher'sdoor,leaveitajarandwaitafewminutesbeforeremoving the dishes.
In this way they will be cooler and the drying will be improved.
Unloading the dishwasher
It is normal that the dishwasher is wet inside.
Empty the lower basket first and then the upper one. This will avoid water dripping from the
upper basket onto the dishes in the lower one.
Close the door, then press the start/pause button ,the
dishwasher will work after ten second.
Premise: A cycle that is underway can only be modified if it
has only been running for a short time. Otherwise,
the detergent may have already been released,
and the appliance may have already drained the
wash water. If this is the case, the detergent dispenser
must be refilled (see the section entitled " Loading
the Detergent " ).
Press Start/Reset button more than three seconds the machine will
be in stand by state ,then you can change the program to
the desired cycle setting (see the section entitled " Starting a wash cycle...").
NOTE: If you open the door when washing, the machine
will pause. When you close the door and press the
Start/Reset Button, the machine will keep on working
after 10 seconds. The process indicator lights show
the state of the dishwasher:

16
The filter prevent larger remnants of food or other objects from getting inside the pump. This residue can
occasionally clog up the filters.
The filter system consists of a coarse filter,a flat (Main filter)
And a microfilter(Fine filter).
Main filter
Food and soil particles trapped by this filter are pulverized by a
special jet on the lower spray arm and washed down the
drain.
Coarse filter
Larger items, such as pieces of bone or glass, that could clog
the drain are trapped in the coarse filter. To remove an item
caught in this filter, gently squeeze the taps on the top of this
filter and lift it out.
Fine filter
This filter holds soil and food residue in the sump area and
prevents it from being redeposit on the dishes during a cycle.
- Inspect the filters for obstructions every time the dishwasher has been used.
- By unscrewing the coarse filter.you can remove the filter system.Remove any food remnants and clean the
filters under running water.
1
2
3
2
3
1
2
3
step1:contrarotate the C ,
and then lift it up;
oarse filter
step2:lift the Main filter up
step3:lifttheFinefilterup
If do it from step1 to step 3, the filter system will be removed; while if do it from step3 to step 1, the filter system
will be installed.
NOTE:
1

17
It is necessary to clean the spray arms regularly for hard water chemicals will clog the spray
arm jets and bearings. To remove the spray arms, screw off the nut clockwise to take out the
washer on top of the spray arm and remove the arm. Wash the arms in soapy and warm water
and use a soft brush to clean the jets. Replace them after rinsing them thoroughly.
Cleaning the Spray Arms
Caring for the Dishwasher
To clean the control panel use a lightly dampened cloth then dry thoroughly. To clean the exterior
use a good appliance polish wax.
Never use sharp objects, scouring pads or harsh cleaners on any part of the dishwasher.
Protect Against Freezing
If your dishwasher is lefted in an unheated place during the winter, ask a service technical to:
1.Cut off electrical power to the dishwasher.
2.Turn off the water supply and disconnect the water inlet pipe from the water valve.
3.Drain water from the inlet pipe and water valve. (Use a pan to catch the water)
4.Reconnect the water inlet pipe to the water valve.
5.Remove the filter in the tub the bottom and use a sponge to use up water in sump.
Filter assembly
For best performance and results, the filter assembly must be cleaned. The filter efficiently
removes food particles from the wash water, allowing it to be recirculated during the cycle. For
this reason, it is a good idea to remove the larger food particles trapped in the filter after each
wash cycle by rinsing the semicircular filter and cup under running water. To remove the filter
assembly, pull on the cup handle in the upward direction. The entire filter assembly should be
cleaned once a week.
To clean the coarse filter and the fine filter, use a cleaning brush. Then, reassemble the filter
parts as shown in the figures left and reinsert the entire assembly in the dishwasher, positioning
in its seat and pressing downward.
The dishwasher must never be used without the filters. Improper replacement of the filter may
reduce the performance level of the appliance and damage dishes and utensils.
Never run the dishwasher without the filters in place. When cleaning the filters, don't knock on
them. Otherwise, the filters could be contorted and the performance of dishwasher could be
debased.

18
Never use a spray cleaner to clean the door panel for it could damage the door lock and electrical components. It is not allowed
to use the abrasive agent or some paper towel becauseof the risk of scratching or leaving spots on the stainless steel surface.
After every wash, turn off the water supply to the
appliance and leave the door slightly ajar so that
moisture and odors are not trapped inside.
Before cleaning or performing maintenance, always
remove the plug from the socket. Do not run risks.
To clean the exterior and rubber parts of the dishwasher,
do not use solvents or abrasive cleaning products.
Rather, use only a cloth and warm soapy water.
To remove spots or stains from the surface of the
interior, use a cloth dampened with water and a little
white vinegar, or a cleaning product made specifically
for dishwashers.
When you go on holiday, it is recommened that you run a
wash cycle with the dishwasher empty and then remove
the plug from the socket, turn off the water supply and
leave the door of the appliance slightly ajar. This will help
the seals last longer and prevent odors from forming
within the appliance.
If the appliance must be moved, try to keep it in the vertical
position.If absolutely necessary, it can be positioned on
its back.
One of the factors that cause odors to form in the
dishwasher is food that remains trapped in the seals.
Periodic cleaning with a damp sponge will prevent this
from occurring.
To clean the edge around the door, you should use only a soft warm, damp rag. To prevent
penetration of water into the door lock and electrical components, do not use a spray cleaner
of any kind.
Also, never use abrasive cleaners or scouring pads on the outer surfaces because they will
scratch the finish. Some papers towels can also scratch or leave marks on thesurface.
After making sure that the voltage and the frequency values for the current in the home
correspond to those on the rating plate and that the electrical system is sized for the
maximum voltage on the rating plate, insert the plug into an electrical socket which is
earthed properly. If the electrical socket to which the appliance must be connected is not
appropriate for the , replace the socket,rather than using a adaptors or thelikeas
they could cause overheating and burns.
plug
Insure proper ground exists before use
This appliance must be grounded. In the event of a malfunction or breakdown, grounding will
reduce the risk of electric shock by providing a path of least resistance of electric current. This
appliance is equipped with a cord having an equipment-grounding conductor and a grounding
plug. The plug must be plugged into an appropriateoutlet that is installed and grounded in accordance
with all local codes and ordinances.
Table of contents
Other Amica Dishwasher manuals

Amica
Amica EGSPU 500 920 E User manual

Amica
Amica EGSP 14797 E User manual

Amica
Amica EGSPV 593 910 User manual

Amica
Amica ZIG 445C User manual

Amica
Amica EGSPV 594 940 User manual

Amica
Amica ADF650WH User manual

Amica
Amica ZIM656PB User manual

Amica
Amica ZWM 426 W User manual

Amica
Amica ADI651 User manual

Amica
Amica ZIM 688 EUK User manual

Amica
Amica ADF610WH User manual

Amica
Amica ZWM 626 W User manual

Amica
Amica EGSP 14668 V User manual

Amica
Amica GSP 542 010 W User manual

Amica
Amica ADF630WH User manual

Amica
Amica DIM437ACBEU User manual

Amica
Amica ADI650 User manual

Amica
Amica EGSPV 587 920 User manual

Amica
Amica ZZG 646C User manual

Amica
Amica GSP 546 110 W User manual