Amica ZZV614W User manual

Dishwasher
ZZV614W
Instruction manual
Sticker with serial number of appliance

CONTENTS
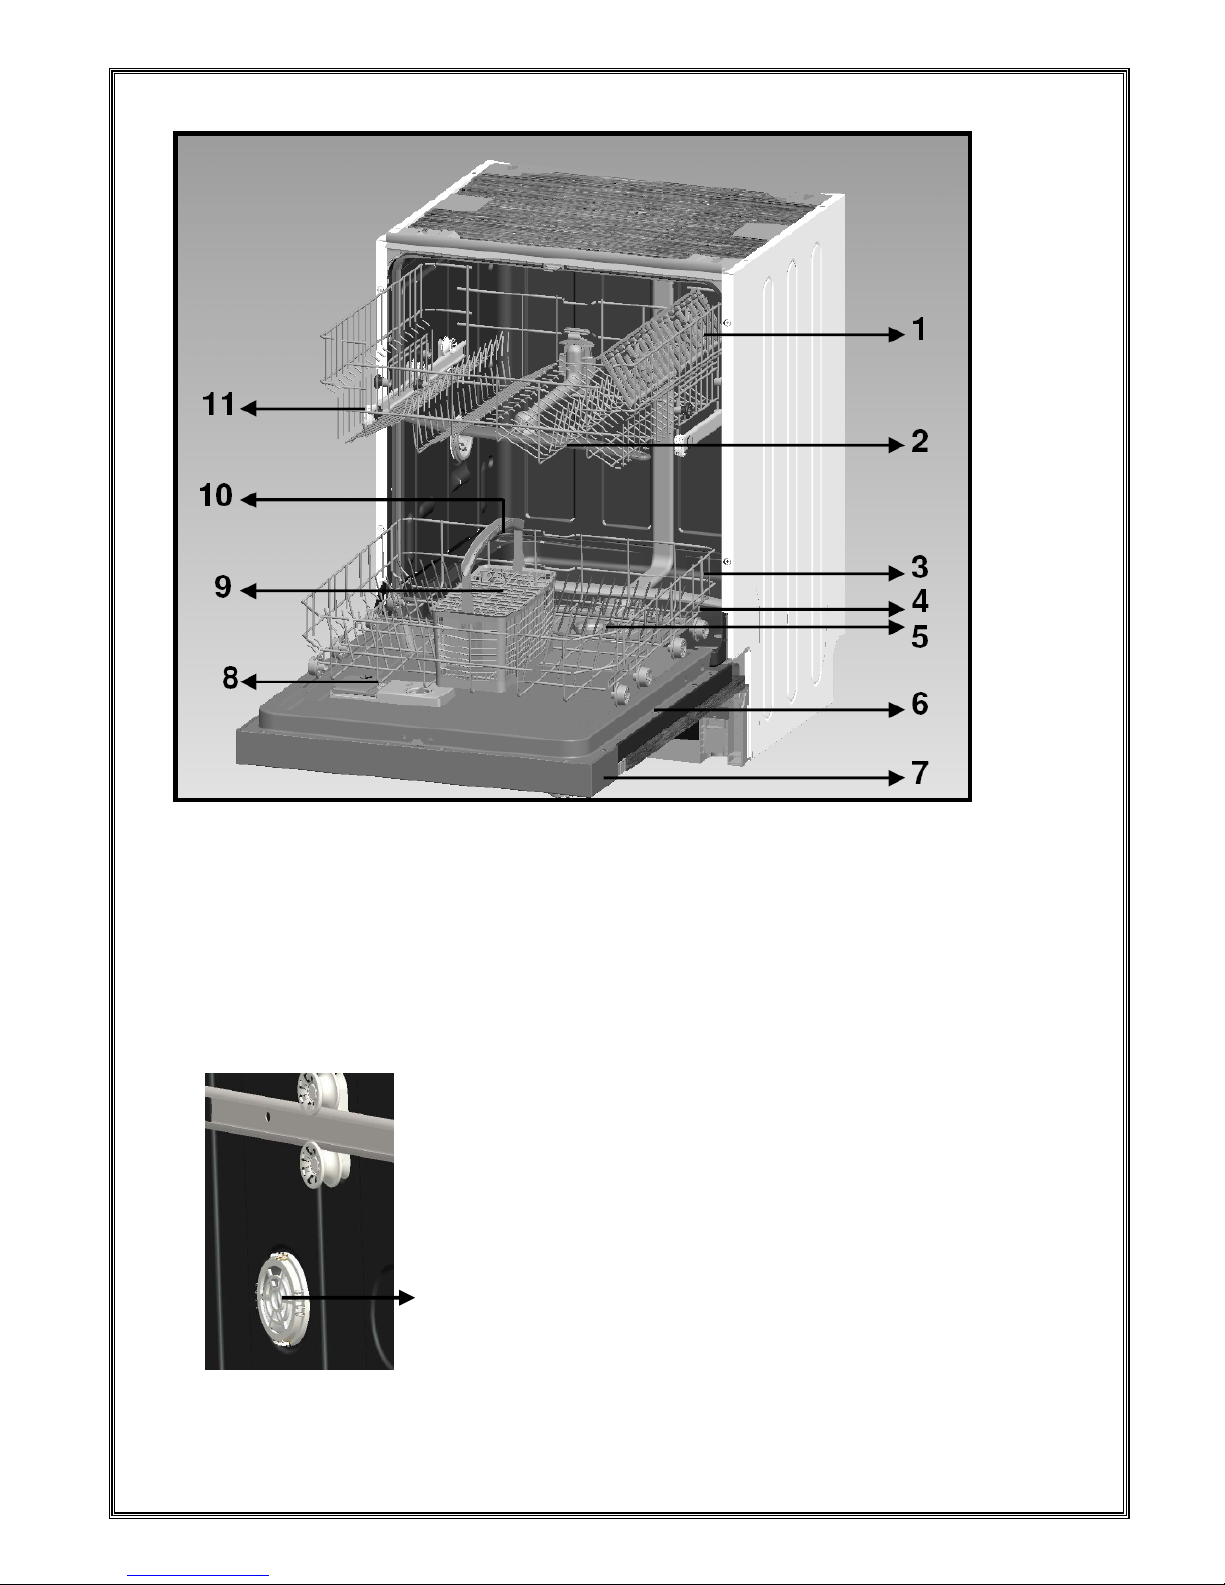
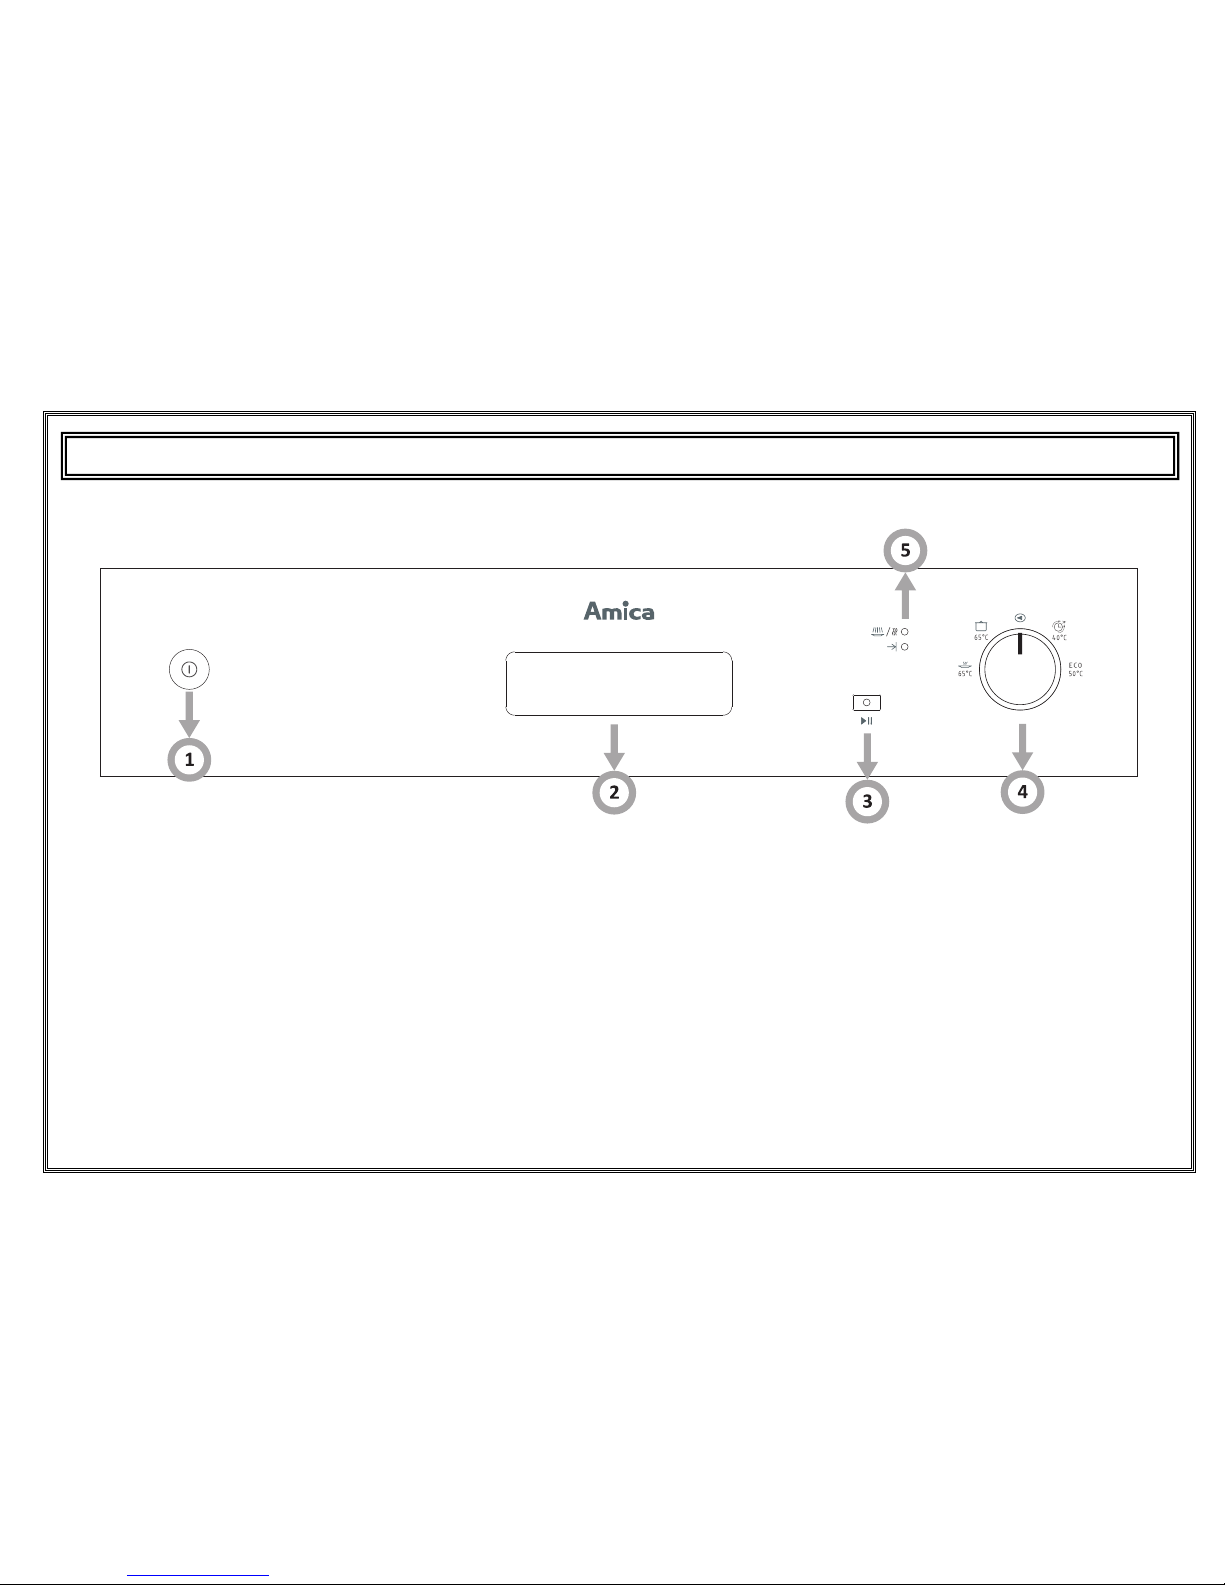
Getting familiar with your machine ………………………………………………………. 2
Safety information and Recommendations………………………. .............................. 3
Installing the machine ………………………………………………………………………. 7
•Positioning the machine ………………………………………………………………...
7
•Water connections …………………. ......................................................................
7
•Water inlet hose ….………………………………………………………………………
8
•Water outlet hose …..………………. ......................................................................
8
•Electrical connection…………………………………………………………………….. 9
Preparing the machine for use ……………………………………………………………. 10
•The importance of water decalcification ……………………………………………… 10
•Filling with salt …………………………………………………………………………… 10
•Testing strip………………………………………………………………………………. 11
•Adjusting salt consumption……………………………………………………………... 11
•Detergent usage ……………………. ......................................................................
13
•Filling the detergent compartment……………………………………………………... 13
•Combined detergent ……………………………………………………………………. 13
•Filling with rinse aid and making the setting………………………………………….. 14
Loading your dishwasher .…………………………………………………………………….. 16
•Dish rack …………………………………………………………………………………… 15
•Alternative basket loads …………………………………………………. ..........................
17
Programme descriptions .……………………………………………………………………...
18
•Programme items …………………………………………………………………………...
18
Switching on the machine and selecting a programme……………. ............................. 19
•Switching on the machine………………………………………………………………….. 19
•Programme follow-up……………………………………………………………………….. 19
•Changing a programme ……………………………………………………………………
19
•Changing a programme with resetting ……………………………………………………
20
•Switching the machine off ….………………………………………………………………
20
Maintenance and Cleaning . ............................................................................................. 21
•Filters ..……………………………………………………………………………………….
21
•Spray arms ………………………………………………………………………………….. 22
•Hose filter ……………………………………………………………………………………. 22
Failure codes and what to do in case of failure …………………………………………. 23
Practical and useful information……………………………………………………………... 25

1. Upper basket with racks 7. Control Panel
2. Upper spray arm 8. Detergent and rinse-aid dispenser
3. Lower basket 9. Cutlery basket
4. Lower spray arm 10. Salt dispenser
5. Filters 11. Upper basket track latch
6. Rating plate
1
:Thissystem
provides better drying performance
for your dishes.
Active drying unit
1.

1.) Power On/Off Button
When the Power On/Off button is pressed, the lamp on the
Start/Pause button starts lighting.
2.) Door Handle
The door handle is used to open/close the door of your
machine.
3.) Start/Pause Button
Once you press the Start/Pause button, the programme you
selected with the programme selector button will start running
and the status indicator lamp “wash/dry” will light up.
In the stop condition while wash/dry led is On, Start/Pause led will blink.
4.) Programme selector knob
With the programme selector knob, you can select a suitable programme
for your dishes.
5.) Wash-Dry / End-of-cycle indicator
You can monitor the programme status with the help of ‘wash/dry’ and
‘end’ indicators.
•Wash/Dry
•End
2
GETTING FAMILIAR WITH YOUR MACHINE

When using your dishwasher,
follow the precautions listed below:
This appliance is intended to
be used in household and
similar applications such as:
-staff kitchen areas in shops,
offices and other working
environments;
-farm houses;
-by clients in hotels, motels
and other residential type
environments;
-bed and breakfast type
environments.
This appliance can be used
by children aged from 8 years
and above and persons with
reduced physical, sensory or
mental capabilities or lack of
experience and knowledge if
they have been given
supervision or instruction
concerning use of the
appliance in a safe way and
understand the hazards
involved. Children shall
not play with the appliance.
Cleaning and user
maintenance shall not be
This appliance is not intended
for use by persons(including
children )with reduced
physical, sensory or mental
capabilities, or lack of
experience and knowledge,
unless they have been given
supervision or instruction
concerning use of the
appliance by a person
responsible for their safety.
(For IEC60335-1 )
This appliance is for indoor
use only, for household use
only.
To protect against the risk of
electrical shock, do not
immerse the unit, cord or plug
in water or other liquid.
Please unplug before cleaning
and maintenance the
appliance.
Use a soft cloth moisten with
mild soap, and then use a dry
cloth to wipe it again.
made by childrenwithout
supervision. For EN60335-1
( )
3

This appliance must be
earthed. In the event of a
malfunction or breakdown,
earthing will reduce the risk
of anelectric shock by
providing a path of least
resistance of electric current.
This appliance is equipped
with a cord having an
equipment-earthing conductor
and a grounding plug.
The plug must be plugged into
an appropriate outlet that is
installed and earthed in
accordance with all local
codes and ordinances.
Improper connection of the
equipment-earthing
conductor can result in the
risk of an electric shock.
Check with a qualified
electrician or service
representative if you are in
doubt whether the appliance
is properly grounded.
Do not modify the plug
provided with the appliance;
If it does not fit the outlet.
Do not abuse, sit on, or stand
on the door or dish rack of the
dishwasher.
Do not operate your
dishwasher unless all
enclosure panels are properly
in place.
Open the door very carefully
if the dishwasher is operating,
there is a risk of water
squirting out.
Do not place any heavy
objects on or stand on the
door when it is open.
The appliance could tip
forward.
When loading items to be
washed:
1) Locate sharp items so that
they are not likely to damage
the door seal;
2) Warning: Knives and other
utensils with sharp points
must be loaded in the basket
with their points down or
placed in a horizontal position.
Have a proper outlet installed
by a qualified electrician.
4

Check that the detergent
powder is empty after
completion of the wash cycle.
Do not wash plastic items
unless they are marked
dishwasher safe or the
equivalent.
For plastic items not
so
marked,
check the
manufacturer's
recommendations.
Use only detergent and rinse
additives designed for an
automatic dishwasher.
Never use soap, laundry
detergent, or hand washing
detergent in your dishwasher.
Children should be
supervised to ensure that
they do not play with the
appliance.
The door should not be left
open, since this could
increase the risk of tripping.
If the supply cord is damaged,
it must be replaced by the
manufacturer or its service
agent or a similarly qualified
person in order to avoid a
hazard.
During installation, the power
supply must not be
excessively or dangerously
bent or flattened.
Do not tamper with controls.
The appliance is to be
connected to the water mains
using new hose sets and that
old hose-sets should not be
reused.
The maximum number of
place settings to be washed
is 6,8,9,10,12,14.*
The maximum permissible
inlet water pressure is 1MPa.
The minimum permissible
inlet water pressure is 0.04
MPa.
5

Dispose of the dishwasher packaging material
correctly.
All packaging materials can be recycled.
Plastic parts are marked with the standard
international abbreviations:
PE for polyethylene, e.g. sheet wrapping material
PS for polystyrene, e.g. padding material
POM polyoxymethylene, e.g. plastic clips
PP polypropylene, e.g. Salt filler
ABS Acrylonitrile Butadiene Styrene, e.g. Control
Panel .
Packaging material could be
dangerous for children!
For disposing of package and
the appliance please go to a
recycling centre. Therefore
cut off the power supply cable
and make the door closing
device unusable.
Cardboard packaging is
manufactured from recycled
paper and should be
disposed in the waste paper
collection for recycling.
By ensuring this product is
disposed of correctly, you
will help prevent potential
negative consequences for
the environment and human
health, which could otherwise
be caused by inappropriate
waste handling of this product.
For more detailed information
about recycling of this
product, please contact your
local city office and your
household waste disposal
service.
DISPOSAL: Do not dispose
this product as unsorted
municipal waste. Collection of
such waste separately for
special treatment is
necessary.
6

Capacity 12 place settings
Height 820 mm - 870mm
Width 598mm
Depth 573mm
Net Weight 41kg
Electricity input 220-240 V, 50 Hz
Total Power 1900 W
Heating Power 1800 W
Pump Power 85 W
Drain Pump Power 57,5 W
Water supply pressure 0.03 MPa (0,3 bar)-1 MPa (10 bar)
Current 10 A
Technical specifications
ConformitywiththestandardsandTestdata/ECDeclaration
of Conformity
All stages related to the machine are executed in accordance
with the safety rules provided in all relevant directives of the
European Community. 2004/108/EC, 2006/95/EC,IEC 436/DIN
44990, EN 50242
Important Note for User:For softcopy of this user manual,
please contact following address:
"[email protected]”.In your e-mail, please
provide the model name and serial number (20 digits) which
you can find on the appliance door.
7

Water connection
Be sure that the indoor plumbing is suitable for installing a dishwasher. Also, we recommend that you
fit a filter at the entrance of your place or apartment so as to avoid any damage to your machine
because of any contamination (sand, clay, rust etc.) that might be occasionally carried in through the
mains water supply or the indoor plumbing, and to forestall such complaints as yellowing and
formation of deposits after washing.
Water inlet hose
Do not use the water inlet hose of your old machine, if any. Use the new water
inlet hose supplied with your machine instead. If you are going to connect a
new or long-unused water inlet hose to your machine, run water through it for a
while before making the connection. Connect the water inlet hose directly to
the water inlet tap. The pressure supplied by the tap should be at a minimum
of 0.03 Mpa and and at a maximum of 1 Mpa. If the water pressure is above 1
Mpa, a pressure-relief valve should be fitted inbetween.
After the connections are made, the tap should be turned on fully and checked
for water tightness.
For the safety of your machine, make sure to always turn off the water inlet tap
after each wash programme is finished.
NOTE: Aquastop water spout is used in some models. In case of
using Aquastop, a dangerous tension exists. Do not cut Aquastop
water spout. Do not let it get folded or twisted.
8
Positioning the machine
When determining the place to put your machine on, take care to choose a place where you can
easily load and unload your dishes.
Do not put your machine in any location where there is the probability for the room temperature to fall
below 0°C.
Before positioning, take the machine out of its packaging by following the warnings located on the
package.
Position the machine close to a water tap or drain. You need to site your machine, taking into
consideration that its connections will not be altered once they are made.
Do not grip the machine by its door or panel in order to move it.
Take care to leave a certain clearance from all sides of the machine so that you can comfortably move
it back and forth during cleaning.
Make sure that the water inlet and outlet hoses do not get squeezed while positioning the machine.
Also, make sure that the machine does not stand on the electrical cable.
Adjust the machine’s adjustable feet so that it can stand level and balanced. Proper positioning of the
machine ensures problem-free opening and closing of its door.
If the door of you machine does not close properly, check if the machine is stable on the floor it
stands; if not, adjust the adjustable feet and ensure its stable position.
INSTALLING THE MACHINE

Electrical connection
The earthed plug of your machine should be connected to an earthed outlet supplied by suitable
voltage and current. If there is no earthing installation, have a competent electrician carry out an
earthing installation. In case of usage without earthing installed, our company will not be responsible
for any loss of usage that might occur.
The indoor fuse current value should be 10-16 A.
Your machine is set according to 220-240 V. If the mains voltage in your location is 110 V, connect a
transformer of 110/220 V and 3000 W inbetween. The machine should not be plugged in during
positioning.
At low voltage, Wash efficiency of your machine decreases.
Always use the coated plug supplied with your machine.
The machine’s electrical cable should be replaced by an authorised service or an authorised
electrician only. Failure to do so may lead to accidents.
For safety purposes, always make sure to disconnect the plug when a wash programme is finished.
In order not to cause an electric shock, do not unplug when your hands are wet.
When disconnecting your machine from the mains supply, always pull from the plug. Never pull the
cord itself.
9
Water outlet hose
The water drain hose can be connected either directly to the water drain
hole or to the sink outlet spigot. Using a special bent pipe (if available),
the water can be drained directly into the sink via hooking the bent pipe
over the edge of the sink.
This connection should be at a minimum of 50 cm and and at a maximum
of 110 cm from the floor plane.
Warning: When a drain hose longer than 4 m is used, the dishes might
remain dirty. In that case, our company will not accept responsibility.

Prior to using the machine for the first time
•Check whether the electricity and supply water specifications match the values indicated by the
installation instructions for the machine.
•Remove all packaging materials inside the machine.
•Set the water softener.
•Add 2 kg salt into the salt compartment and fill with water up to a level at which it will almost
overflow.
•Fill the rinse aid compartment.
The importance of water decalcification
For a good washing function, the dishwasher needs soft, i.e. less calcareous water. Otherwise, white
lime residues will remain on the dishes and the interior equipment. This will negatively affect your
machine’s washing, drying and shining performance. When water flows through the softener system,
the ions forming the hardness are removed from the water and the water reaches the softness
required to obtain the best washing result. Depending on the level of hardness of the inflowing water,
these ions that harden the water accumulate rapidly inside the softener system. Therefore, the
softener system has to be refreshed so that it operates with the same performance also during the
next wash. For this purpose, dishwasher salt is used.
Filling with salt
Use softener salt specifically
produced for use in dishwashers.
To put softener salt, first remove the
lower basket and then open the salt
compartment cap by turning it
counter clockwise.12At first use fill
the compartment with 2 kg salt and
water 33 at overflowing level If
available,using the funnel 44
provided will make filling easier. refit
the cap ,and close it After every
20th-30th wash, add salt into your
machine until it fills up (approx. 1.5
kg) Fill the salt compartment with
water at first use only.We
recommend that you use
smallgrained or powder softener
salt.
Do not put table salt into your
machine.Otherwise, the function of
the softener compartment may
decrease over time. When you start
your dishwasher, the salt compartment gets filled with
water.Therefore, put the softener salt prior to starting your machine.
This way, overflowing salt gets immediately cleaned up through the wash operation. If you are not
going to wash any dishes immediately after putting salt, then run a short washing program with an
empty machine in order to avoid any damage ( to prevent corrosion ) to your machine due to the salt
overflow while filling in the salt container.
PREPARING THE MACHINE FOR USE
10

In order to understand whether or not the amount of softener salt in your machine is sufficient, check
the transparent section on the salt compartment cap. There is sufficient salt if the transparent section
is green. Salt has to be added if the transparent section is not green.
Testing strip
The washing effectiveness of your machine depends on the softness of the tap water. For this reason,
your machine is equipped with a system that reduces the hardness in mains water supply. The
washing effectiveness will increase when the system is correctly set. To find out the water hardness
level of water in your area, contact your local water board or determine water hardness level by using
the test strip(if available).
Adjusting salt consumption
Table of Water Hardness Level Settings
If the hardness of the water you use is above 90 dF (French hardness) or if you are using well
water; you are recommended to use filter and water refinement devices.
NOTE: Hardness level is adjusted to level 3 as a factory setting.
Open the
testing
strip.
Run
water
through
your tap
for 1
min.
Keep the
testing
strip in
water for 1
sec.
Shake the
testing strip
after taking it
out of water.
Wait for
1 min. Make your machine’s water hardness
setting according to the result obtained
through the testing strip.
11

Adjusting salt consumption
Adjust the water softener according to how hard your tap water is.
Move the programme selector knob to the 0 (Reset) position while your machine is
not in operation.1
After resetting your machine, press the Start/Pause button and keep it pressed
down.2
Meanwhile, energise the machine by pressing the Power On/Off button. 4
Keep Start/Pause keys press until program monitor lights are on and off. 2
After the lamps “Wash/Dry-End” have flashed 3 ,release the Start/Pause
button. 2
Your machine displays the latest entered water hardness setting.
You can adjust the levels by pressing the Start/Pause button 2according to
Table of Water Hardness Level Settings.
After adjusting the water hardness level , press on/off button to save the settings
in memory. 4
12

Detergent usage
Use a detergent specifically designed for use in domestic dishwashers.
You can find powder,gel,and tablet detergents in the market that have been designed for
household dishwashers.
Detergent should be put into the compartment prior to starting the machine. Keep your
detergents in cool, dry places out of reach of your children.
Do not fill detergent into the detergent compartment more than required; otherwise it may cause
scratches on your glasses as well as lead to a poorly dissolved detergent.
Should you need more information concerning the detergent you will use, contact detergent
manufacturers directly.
Filling the detergent compartment
Push the latch to open the detergent container as shown in
the image. 1 Detergent pod has level lines inside. It is possible
to measure the right detergent amount using these lines.
Detergent pod can take totally 40 cm3detergent.
Open the dishwasher
detergent and pour
into the larger
compartment a25 cm3
if your dishes are
heavily soiled or 15
cm3if they are less soiled.2If your dishes have been
kept dirty for a very long time, if there are dried food
wastes on them, and if you have overly loaded the
dishwasher, pour a5cm3detergent into the pre-wash
compartment and start your machine.
You may have to add more detergent into your machine, depending on the degree of soil and
on the water hardness level in your area.
Combined detergents
Detergent manufacturers also manufacture combined detergents that are called 2 in 1 – 3 in
1- 5 in 1...
The 2 in1 detergents contain detergent+ salt or rinse aid . While using the 2 in 1 detergents,
it should be observed which functions the tablet consists of.
The other tablet detergents also have detergent+rinse aid +salt+various extra functions.
Generally, combined detergents produce sufficient results under certain usage conditions only.
Such detergents contain rinse aid and/or salt in preset amounts.
Points to consider when using this type of products:
•Always make sure to check the specifications of the product you will use or whether or not
it is a combined product.
•Check if the detergent used is appropriate for the hardness of mains water that machine is
appertaining to.
•Observe the instructions on packagings when using such products.
•If such detergents are in the form of tablets, never put them into the interior section or the
cutlery basket of the dishwasher. Always put the tablets into the detergent compartment in
the detergent dispenser.
13

•They produce good results for certain types of usage only. If you are using this type of
detergents, you need to contact the manufacturers and find out about the suitable
conditions of use.
•When the conditions of use of such products and the machine settings are appropriate,
they ensure savings in salt and/or rinse aid consumption.
•Contact the detergent manufacturers if you are not obtaining good wash results (if your
dishes stay calcareous and wet) after having used 2 in 1 or 3 in 1 detergents. The scope of
warranty for your machine does not cover any complaints caused by the use of these types
of detergents.
Recommended usage: If you want to obtain better results while using combined detergents,
add salt and rinse aid into your machine and adjust the water hardness setting and the rinse aid
setting to the lowest position.
Solubility of the tablet detergents produced by different companies can vary depending
on the temperature and time. Therefore, it is not recommended to use such detergents
in short programs. It is more suitable to use powder detergents in such programs.
Warning: Should any problem, which you have not encountered before, arise with the use of
this type of detergents, contact the detergent manufacturers directly.
When you give up using combined detergents
•Fill the salt and rinse aid compartments.
•Adjust the water hardness setting to the highest position and run an empty-wash.
•Adjust the water hardness level.
•Make the suitable rinse aid setting.
Filling with rinse aid and making the setting.
Rinse aid is used to prevent the stay of white water drops, lime stains, white film strip-
shaped stains that may form on the dishes, as well as to increase
the drying performance. Contrary to the popular beliefs, it is used
not only for obtaining shinier dishes but also for obtaining sufficiently
dried dishes. For this reason, care
should be taken that there is adequate
amount of rinse aid in the rinse aid
compartment and only polishing
material produced for use at
dishwashers should be used.
To put rinse aid, remove the rinse aid
compartment cap by turning it.1Fill the rinse aid compartment with
rinse aid until the rinse aid level indicator becomes dark;2refit the
cap and close it by turning it in a way
that the nails will correspond to one
another. By checking the rinse aid level indicator on the detergent
dispenser, you can understand whether or not your machine
needs rinse aid. A dark indicator b means that there is rinse aid in
the compartment, while a light indicator ashows that you need to
fill the compartment with rinse aid.
The rinse aid level adjuster can be set to a position between 1 and
6. Factory setting for rinse aid is the position 3.
You need to increase the degree of the adjuster if water stains
form on your dishes after a wash, whereas you need to decrease the degree if a blue
stain is left when wiped by hand.3
14

Warning: Use only those rinse aid materials which are allowed for use in the machine. As rinse
aid residues left as a result of overflowing will create extremely high amounts of foam and thus
reduce the washing performance, remove the excess amount of rinse aid by wiping it with a rag.
If you properly place your dishes into the machine, you will be using it in the best way in terms
of energy consumption, washing and drying performance.
There are two separate baskets for you to load your dishes into your machine. You can load into
the lower basket such round and deep items as pots with long handles, pot lids, plates, salad
plates, cutlery sets.
The upper basket has been designed for tea plates, dessert plates, salad bowls, cups and
glasses. When placing long-stem glasses and goblets, lean them against the basket edge, rack
or glass supporter wire and not against other items. Do not lean long glasses against one
another or they cannot remain steady and may receive damage.
It is more appropriate to locate the thin narrow parts into the middle sections of baskets.
You can place spoons among the other cutlery sets in order to prevent them from sticking to
one another. You are recommended to use the cutlery grid in order to obtain the best result.
To avoid any possible injuries, always place such long-handle and sharp-pointed dishes as
serving fork, bread knife etc. with their sharp points facing down or horizontally on the baskets.
Warning: Place your dishes into your machine in a way that they will not prevent the upper and
lower spray arms from spinning.
LOADING YOUR DISHWASHER
15
Top basket
Height Adjustable Rack
These racks are designed to increase the capacity of the
top basket. You can place your glasses and cups on the
racks. You can adjust the height of these racks. Thanks to
this feature, you can place different sizes of glasses under
these racks.
Thanks to height adjustment plastics mounted on the
basket, you can use your racks in 3different heights. In
addition, you can place long forks, knives and spoons on
these racks laterally, so that they do not block the
revolution of propeller.

Top basket height adjustment while it is full
Machine is designed to let you adjust the height of your top
basket upwards or downwards, without removing it from your
machine when it is full, and create large spaces at the top or
bottom area of your machine as needed. Basket of your machine
is set to upper position in factory settings.
In order to raise your basket, hold it from both sides and pull it
upwards. In order to lower it, hold it from both sides again, and
leave it.
In loaded basket adjustment mechanism, make sure that both sides are in the same position (up
or down).
Lower Basket
Folding Racks
Folding racks consisting of four parts that are located on the lower basket of your machine are
designed in order to let you place big items easier such as pots, pans, etc. If requested, each
part can be folded separately, or all of them can be folded and larger spaces can be obtained.
You can use folding racks by raising them upwards, or by folding.
Bottle Rack
Bottle rack is designed to let you wash items with large
openings and higher items easier. You can pull out bottle rack
in the direction of the arrow as shown on the picture when you
do not use it.
16
ab
cd
2
ab
cd
1

Alternative basket loads
Lower Basket
Top basket
Faulty loads
17
Important Note for Test Laboratories
For detailed information on performance tests, please contact following address:
“[email protected]” . In your email, please provide the model name and
serial number (20 digits) which you can find on the appliance door.

PROGRAMME
DESCRIPTIONS
18
Programme items
Warning: Short programs do not include a drying step
The values declared above are the values obtained under laboratory conditions according to
relevant standards. These values can change depending on conditions of product’s use and
environment (network tension, water pressure, water input temperature and environment
temperature).
Programme No Reference
Programme
names and
temperatures 4 0 ° C 5 0 ° C 6 5 ° C
Super 50 min .
**
Quick 30 min. Eco Intensive
6 5 ° C
Type of food
waste coee, milk, tea,
cold meats,
vegetables, not
kept for long
coee, milk, tea,
cold meats,
vegetables, not
kept for long
soups, sauces,
pasta, eggs,
pilaf, potato and
oven dishes,
fried foods
Level of soil small medium medium
Detergent
amount
B: 25 cm 3/
15 cm 3
A: 5 cm 3
BA+B A+B
Programme
30 165 50
(kW hours)
0,90 0,95 1,35
Water 12,4 12,0 12,7
117
1,55
17,2
Prewash
50 ° C w a s h
Hot rinse
Dry
End
40 ° C w a s h
Cold rinse
Hot rinse
End
65 ° C w a s h
Cold rinse
Hot rinse
End
soups, sauces,
pasta, eggs,
pilaf, potato and
oven dishes,
fried foods
high
A+B
Pre wash
65 ° C w a s h
Cold rinse
Hot rinse
Dry
End
Table of contents
Other Amica Dishwasher manuals

Amica
Amica EGSP 14684 V User manual

Amica
Amica ZIG 645C User manual

Amica
Amica ZIG 665C User manual

Amica
Amica GSP 14743 W User manual

Amica
Amica GSP 530 910 W User manual

Amica
Amica ZIM669ELH User manual

Amica
Amica EGSPV 587 920 User manual

Amica
Amica MP 416 AGW User manual

Amica
Amica EGSP 14663 V User manual

Amica
Amica EGSP 14868 V User manual

Amica
Amica ZIV413 User manual

Amica
Amica GSP 14744 S User manual

Amica
Amica EGSPV 580 910 User manual

Amica
Amica DFV41E6AISMG User manual

Amica
Amica EGSP 14685 E User manual

Amica
Amica ZIA 448 User manual

Amica
Amica DFV61E6aWEU User manual

Amica
Amica GSPT 526 910 W User manual

Amica
Amica ZWM 496WUK User manual

Amica
Amica DIM637ACNBH User manual