Amiko Mini Combo HD User manual

1
CONTENTS
1. SAFETY.............................................................................................................................................................3
2. INTRODUCTION.............................................................................................................................................3
3. FEATURES........................................................................................................................................................4
4. REMOTE CONTROL......................................................................................................................................5
5. FRONT PANEL ................................................................................................................................................6
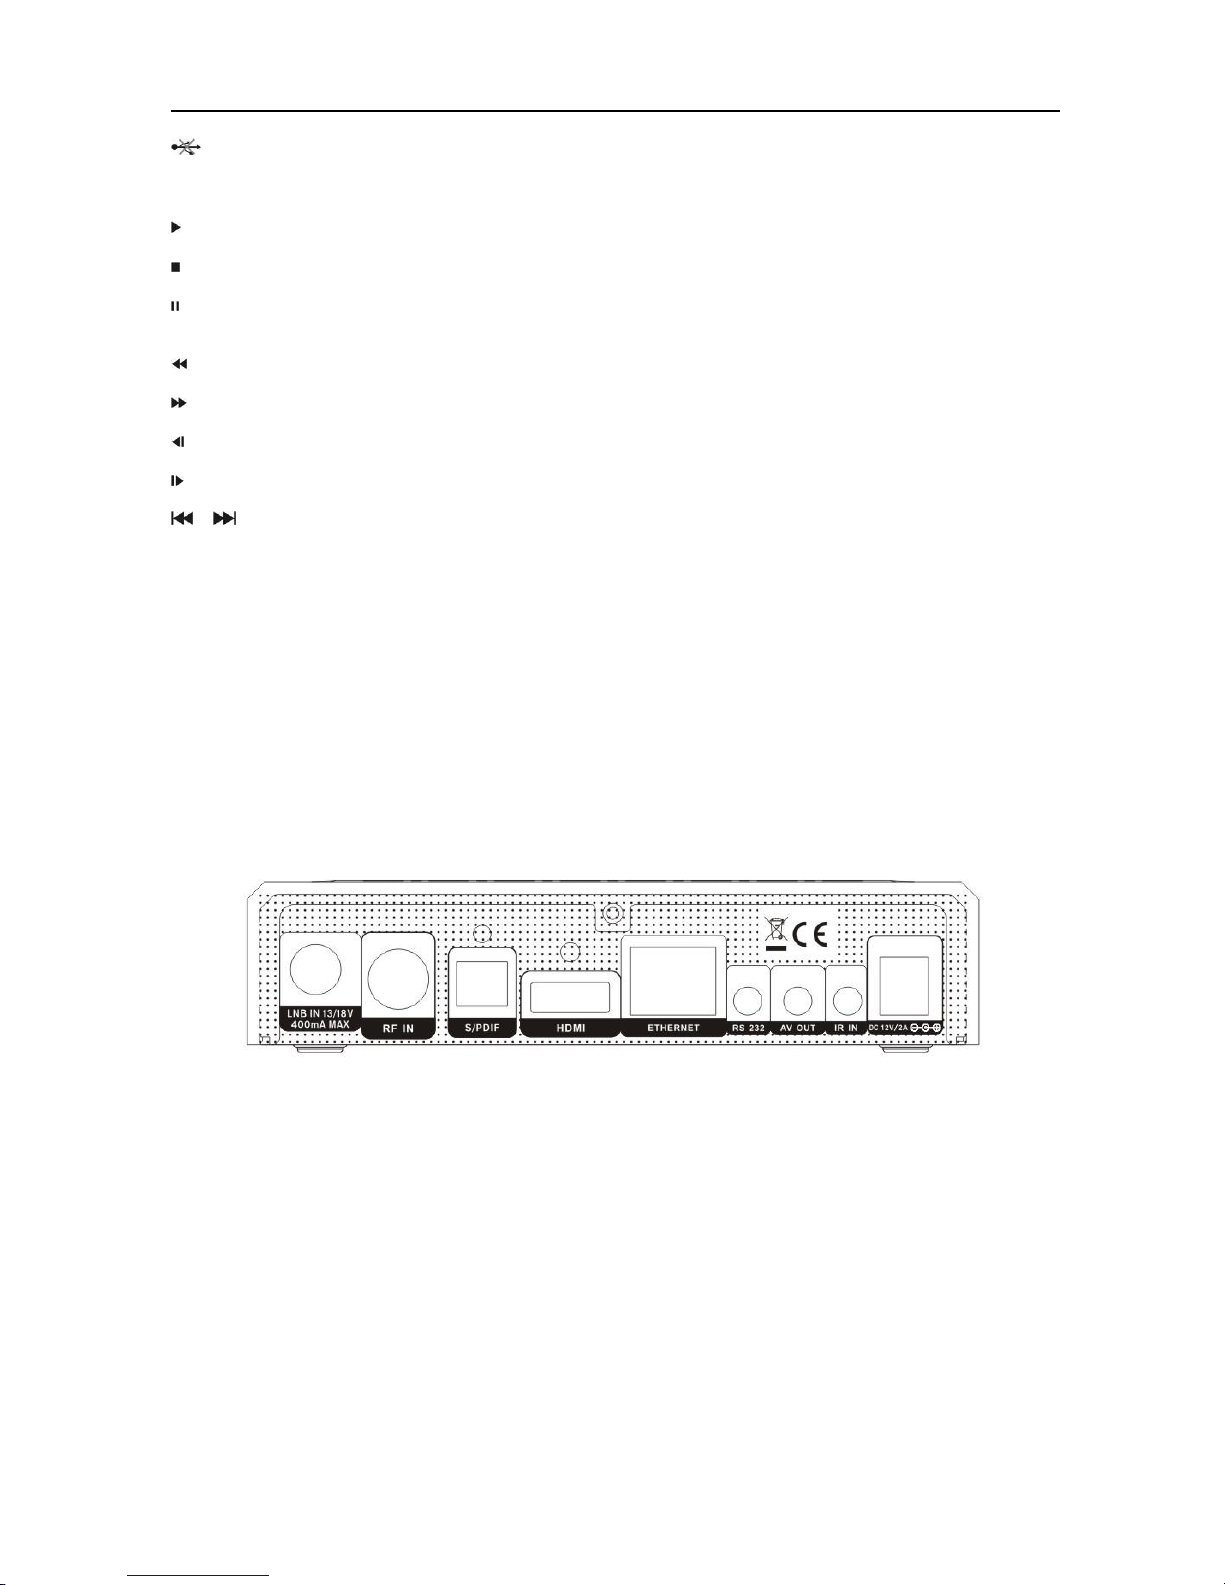
6. REAR PANEL...................................................................................................................................................6
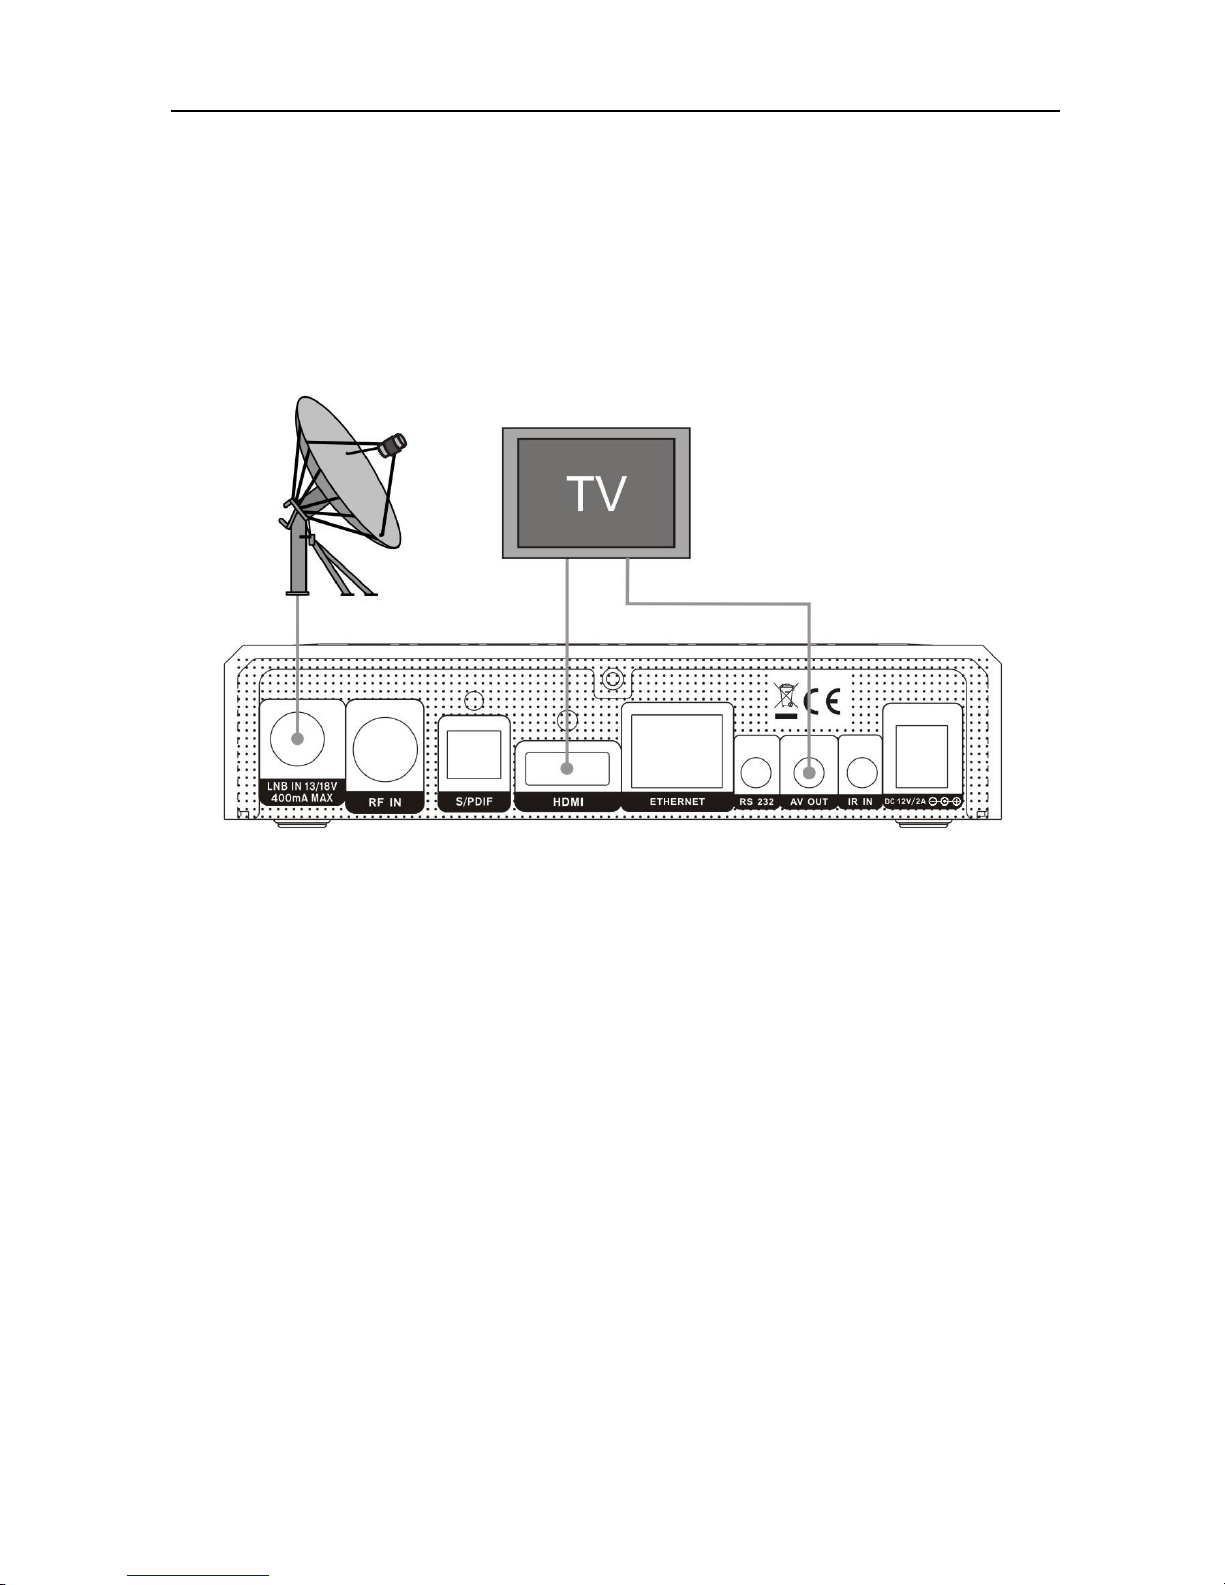
7. CONNECTING YOUR SYSTEM ...................................................................................................................7
8. BASIC OPERATIONS .....................................................................................................................................8
8.1 TURN ON STB...................................................................................................................................................8
8.2 POWER..............................................................................................................................................................8
8.3 CHANNEL UP/CHANNEL DOWN........................................................................................................................8
8.4 VOLUME UP/VOLUME DOWN-..........................................................................................................................8
8.5 NUMBER...........................................................................................................................................................8
8.6 MUTE ...............................................................................................................................................................8
8.7 PAUSE...............................................................................................................................................................8
8.8 RECALL ............................................................................................................................................................8
8.9 FAVORITE.........................................................................................................................................................8
8.10 AUDIO...........................................................................................................................................................9
8.11 INFORMATION ...............................................................................................................................................9
8.12 EPG..............................................................................................................................................................9
8.13 TV/RADIO.................................................................................................................................................10
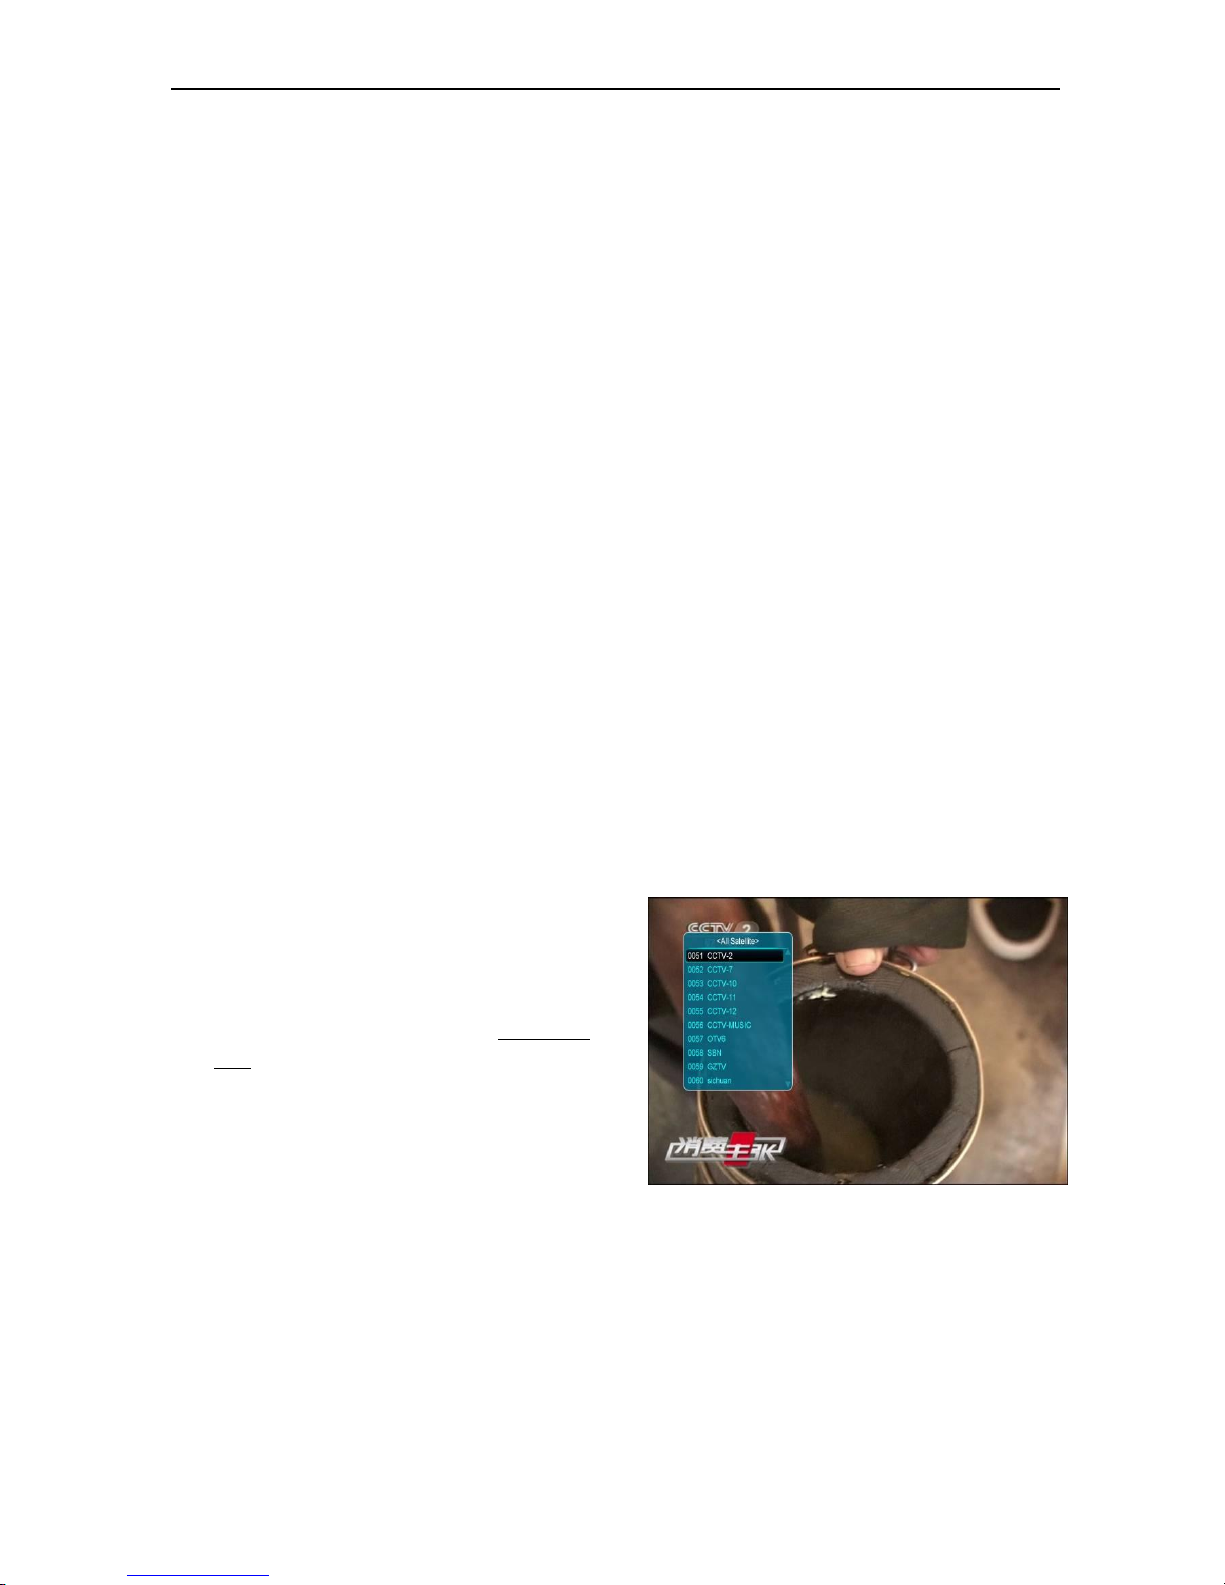
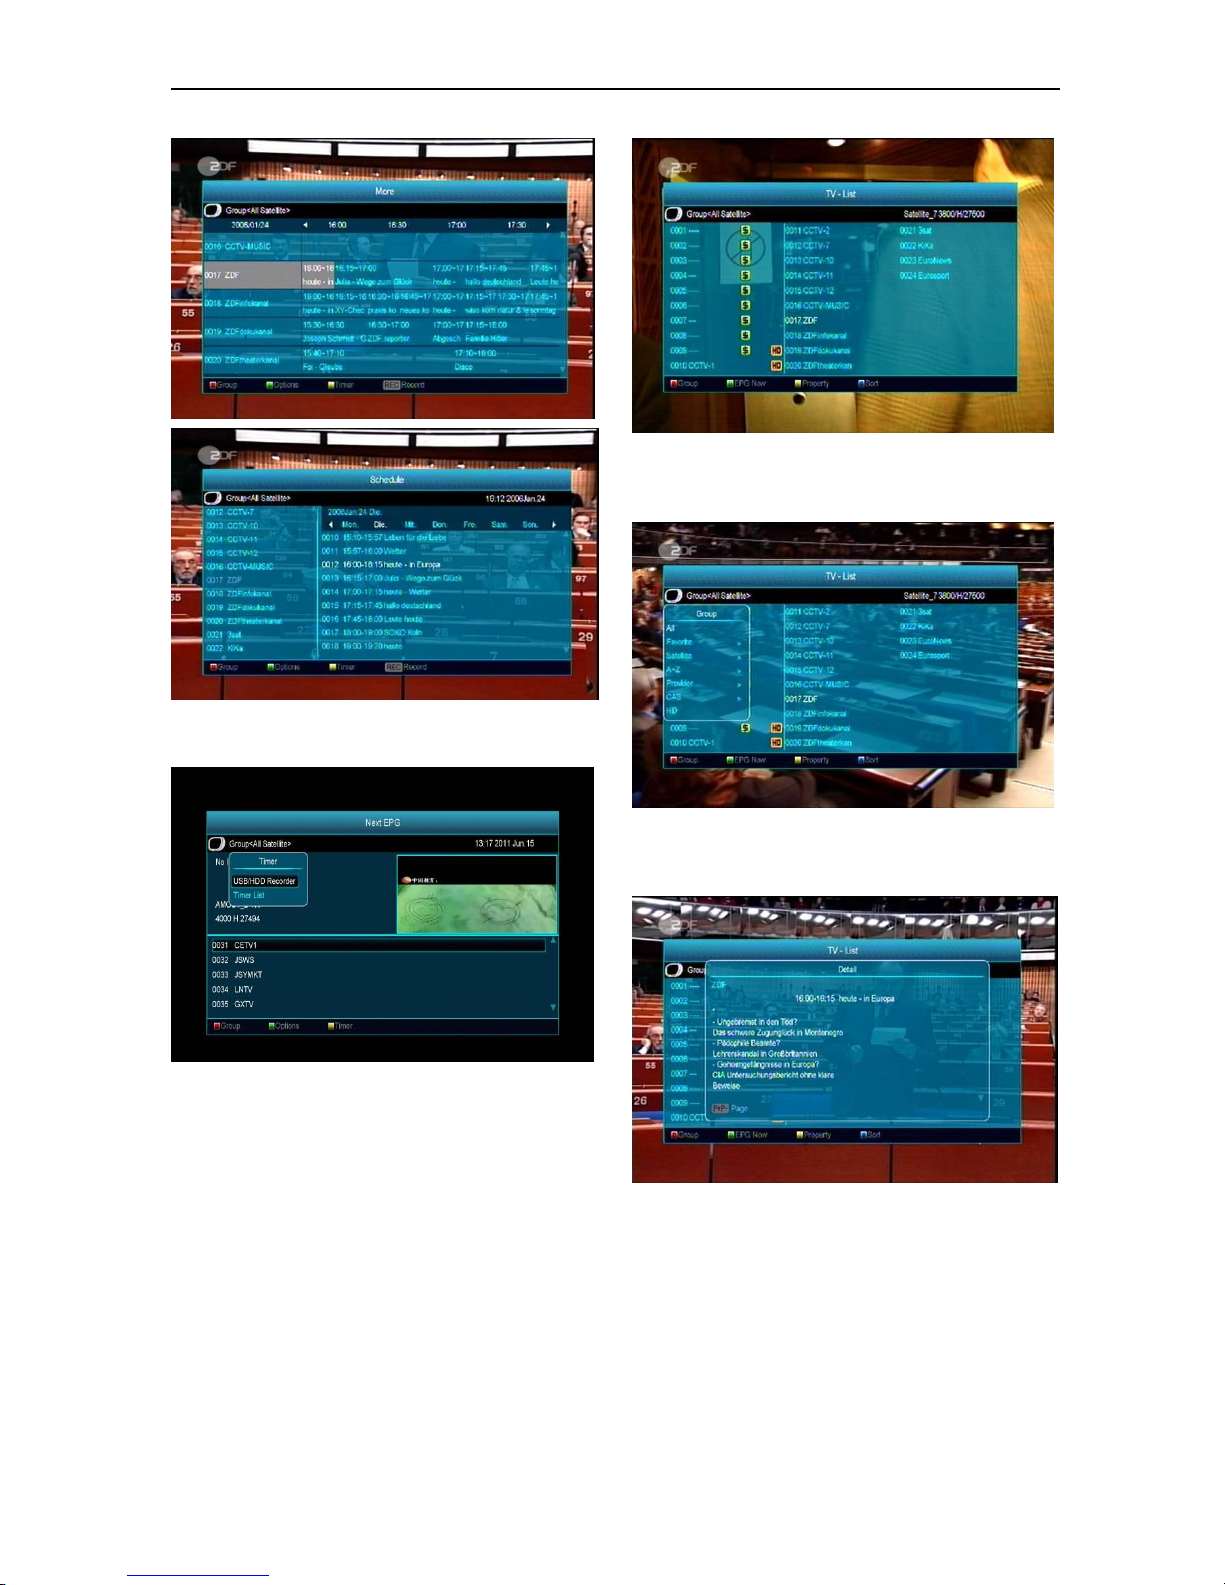
8.14 CHANNEL LIST............................................................................................................................................10
8.15 SLEEP..........................................................................................................................................................11
8.16 PAGE UP/PAGE DOWN ................................................................................................................................11
8.17 TEXT .........................................................................................................................................................11
8.18 SUBTITLE ....................................................................................................................................................11
8.19 FIND............................................................................................................................................................11
8.20 ZOOM..........................................................................................................................................................12
8.21 MENU..........................................................................................................................................................12
8.22 VIDEO FORMAT...........................................................................................................................................12
8.23 EXIT............................................................................................................................................................12
9. SERVICE.........................................................................................................................................................12
9.1 ORGANIZING SERVICE ....................................................................................................................................12
9.2 ORGANIZING FAVOURITES..............................................................................................................................14
10. INSTALLATION ............................................................................................................................................14
10.1 SATELLITE INSTALLATION SATELLITE ........................................................................................................15
10.2 FASTSCAN SATELLITE ................................................................................................................................17
10.3 AUTO INSTALLATION ..................................................................................................................................17
10.4 SATELLITE GUIDE .......................................................................................................................................17
10.5 TERRESTRIAL INSTALLATION......................................................................................................................17
10.6 CABLE INSTALLATION ................................................................................................................................18
11. PREFERENCE................................................................................................................................................18
11.1 LANGUAGE .................................................................................................................................................18
11.2 PARENTAL CONTROL ..................................................................................................................................19
11.3 TIME SETTING.............................................................................................................................................20
11.4 TIMER .........................................................................................................................................................20
11.5 A/V CONTROL ............................................................................................................................................21
11.6 MISCELLANEOUS SETTINGS ........................................................................................................................22
11.7 OSD SETTING .............................................................................................................................................22
12. SYSTEM ..........................................................................................................................................................23

2
12.1 INFORMATION .............................................................................................................................................23
12.2 DEFAULT SETTING ......................................................................................................................................23
12.2.1 Default Value:.........................................................................................................................................23
12.2.2 Delete All Channels:...............................................................................................................................23
12.2.3 Save default value...................................................................................................................................24
12.3 SOFTWARE UPGRADE..................................................................................................................................24
12.4 UPGRADE BY USB......................................................................................................................................25
12.5 BACKUP TO USB.........................................................................................................................................25
13. CONDITIONAL ACCESS.............................................................................................................................25
13.1 CA SETTING....................................................................................................................................................25
14. USB...................................................................................................................................................................26
14.1 FILE LIST.........................................................................................................................................................26
14.1.1 Record Files............................................................................................................................................26
14.1.2 MP3 Files................................................................................................................................................26
14.1.3 Image Files..............................................................................................................................................28
14.1.4 Video.......................................................................................................................................................29
14.1.5 Software ..................................................................................................................................................29
14.1..6 All...........................................................................................................................................................30
14.2 STORAGE INFORMATION .................................................................................................................................30
14.3 PVR SETTING..................................................................................................................................................30
14.4 USB SPEED TEST ............................................................................................................................................31
14.5 REMOVE USB DEVICE SAFELY!......................................................................................................................31
15. INTERNET......................................................................................................................................................31
15.1 NETWORK LOCAL SETTING.............................................................................................................................31
15.2 HTTP UPGRADE...............................................................................................................................................32
15.3 FTP UPGRADE.................................................................................................................................................32
15.4 FTP.................................................................................................................................................................32
15.5 WEATHER FORECAST......................................................................................................................................33
15.6 RSS READER...................................................................................................................................................33
15.7 YOUTUBE........................................................................................................................................................34
15.8 GOOGLE MAPS................................................................................................................................................34
16. GAME ..............................................................................................................................................................34
16.1 TETRIS ............................................................................................................................................................35
16.2 SNAKE.............................................................................................................................................................35
16.3 OTHELLO.........................................................................................................................................................35
17. NEW FEATURES...........................................................................................................................................35
17.1 EQUALIZER .....................................................................................................................................................35
17.2 TIME SHIFT .....................................................................................................................................................35
17.3 RECORD ..........................................................................................................................................................36
18. TROUBLE SHOOTING.................................................................................................................................37
19. SPECIFICATIONS.........................................................................................................................................38

3
1.SAFETY
This HD Receiver has been manufactured to satisfy the international safety standards. Please read
the following safety precautions carefully.
MAINS SUPPLY: 100 - 240V AC 50/60Hz
OVERLOADING: Do not overload wall outlet, extension cord or adapter as this may result in fire or
electric shock.
LIQUIDS: Keep liquids away from the HD Receiver. The apparatus should not be exposed to dripping
or splashing and no objects filled with liquids, such as vases, shall be placed on the apparatus.
CLEANING: Disconnect the HD Receiver from the wall outlet before cleaning .Use a light damp cloth
(no solvents) to dust the HD Receiver.
VENTILATION: The slots on top of the HD Receiver must be left uncovered to allow proper airflow to
the unit. Do not stand the HD Receiver on soft furnishings or carpets. Do not expose the HD Receiver
to direct sunlight or do not place it near a heater. Do not stack electronic equipment on top of the HD
Receiver.
ATTACHMENTS: Do not use any attachments that are not recommended as these may cause
hazard or damage the HD Receiver.
CONNECTION TO THE SATELLITE DISH LNB: Disconnect the HD Receiver from the mains before
connecting or disconnecting the cable from the satellite dish.
FAILURE TO DO SO CAN DAMAGE THE LNB.
CONNECTION TO THE TV: Disconnect the HD Receiver from the mains before connecting or
disconnecting the cable from the satellite dish.
FAILURE TO DO SO CAN DAMAGE THE TV.
EARTHING: The LNB cable MUST BE EARTHED to the system earth for the satellite dish.
LOCATION: Place the HD Receiver indoors in order not to expose to lightening, rain or sunlight.
2.INTRODUCTION
Thank you for purchasing this HD Receiver.
This HD Receiver is fully compliant with the international DVB standard and thus transmits digital
images, sounds, information guides and teletext directly to your TV through the satellite broadcasting.
Now you can comfortably see and receive digitally transmitted music, news, movie and sports satellite
broadcasts in your office or at your home. You can enjoy interesting games embedded in HD
Receiver.
In service search section, both the automatic service search method and the manual search mode
are provided. Also it supports DiSEqC 1.0, 1.2 and USALS, enabling you to move your antenna in
order to focus preferred satellite. You can save up to 6000 TV and Radio services and work around
with the favorite, Lock, Delete, Move and Sort functions.
The menu is very modern and supports multiple languages. All functions can be carried out using the
remote control and some of the functions can also be carried out using the front panel. The HD
Receiver is easy to use and adaptable for future advances. Please be aware that new software may
change the functions of the HD Receiver.
If you have any difficulties concerning the operation of your HD Receiver, please refer to the relevant
section of this manual, including the ‘Troubleshooting’. This Manual will provide you with useful
information on using this HD Receiver.

4
3.FEATURES
High Definition STB decoder, Full HD 1080p output via HDMI
CONAX CAS7 embedded
Under 0.5 Watt Standby power consumable
Hybridtuner for DVB-S2, DVB-T2/T/C
S/PDIF for digital audio or Dolby digital bit stream output
DiSEqC 1.0, 1.1, 1.2 ,USALS and Unicable supported
USB 2.0 Host, USB-WIFI supported
RJ45 for 10Mbps Ethernet interface
Video Decoding: MPEG-4/H.264, MP@ML, MP@HL,MP@HL, [email protected], H[email protected], XVID, DIVX
Audio Decoding: LPCM,AAC-LC,HE-AAC,MP3,Dolby plus
6000 channels (TV and Radio) programs
Electronic Program Guide (EPG)
Subtitle supported
Teletext supported by VBI insertion and software emulation
PVR Ready, Recording and TimeShift
Blind scan, Fast scan and LCN function
Parental lock facility by channel and program event
RTC(Real-Time-Clock)
Full Picture In Graphic(PIG) function
Multilingual menu text supported
Software upgrade via USB, Http, FTP and RS232

5
4.Remote Control
You can power on/off the receiver, operate on screen menu, and
use a variety of hot key function.
POWER
To switch your receiver on from standby or standby to on.
MUTE
Used to enable or disable the audio
NUMERIC KEYS
Used to select channels or enter programming parameters
TV / RADIO
Receiver switches between TV and Radio mode.
(ZOOM)
Press key select zoom times, from X1 to X16.
RECALL
Return to the previous menu or status.
TV/SAT
Receiver switches between TV and receive mode.
INFO
To display channel status or various program information of current service.
EPG(Electronic Program Guide)
Display the Programs guide on screen when available.
MENU
Displays the Main Menu on the screen, or return to the previous menu or
status.
EXIT
Cancel the user selection and return to the viewing mode from a menu.
OK
To select menu option, or to updated on entry.
<,> KEY
To adjust volume level, or to move cursor left or right in the menu.
^,v KEY
To change channels, or to move cursor up or down in the menu.
PAGE+/PAGE-
To move up the cursor to the next or previous page
in the menu or channel list.
●REC
Has different functions per menu.
Teletext
Shows teletext information of the current channel supports.
Subtitle
Subtitle Display.
F1
In case your TV is connected through RF Modulator (UHF), select output
channel number between CH21 and CH69 with up and down key.
(FIND)
Use to prompt find channels sort by character.
TIMER
Press timer key you can setup up the Standby time.
V
.
FORMAT
Press V.FORMAT button to switch the display mode among "AUTO",
"480i","480p", " 576i", "576P", "720P_50","720P_60,"1080i_50","
1080i_60" ," 1080P_50" and" 1080P_60"
FAV(FAVORITE)
To set receiver to the favorite server mode,
display the favorite channel.
FOLDER
Press this button to enter the Record Manager menu directly.
AUDIO(Red Key)
Audio channels setup, to select audio mode; Left, Right , Stereo, Mono.
OPTION(GREEN KEY)
Shows NVOD information of the current channel supports.
SAT
Display the satellite list at normal picture.
Play Mode
Select the play mode in MP3 or JPEG player.

6
USB
To remove the USB Hard Disk safely.
TMS(Time Shift)
Press this button to display Time Shift info bar.
Play
To play the MP3, JPEG, or Record files.
Stop
To stop the Time Shift, recording, or MP3/JPEG player.
PAUSE
Used to select the freeze function.
Press once to freeze the screen picture.
PAGE-
To start Fast Backward function.
PAGE+
To start Fast Forward function.
SB
To start Slow Backward function.
SF
To start Slow Forward function
/ PREV/NEXT
Switch to preview or next file in play mode
5.Front panel
Remote Sensor: Detects infrared signal from remote control unit.
POWER Indicator: while the receiver is power on and at standby mode.
Signal Indicator: When receiving signal is strong, the signal indicator is lighted.
Card Slot: One CA Interface for Conax.
USB: USB 2.0 Host, connect to USB hard disk, or flash disk. (on the left side of the receiver)
Display: (LED type) Indicates operating status of receiver.
6.Rear Panel
Please refer to the diagram above for all possible connections of your receiver
Do not connect the unit to the mains socket until all other connections have been connected and checked.
Your configuration can vary depending on model.
LNB IN 13/18V 400mA MAX: This port is to connect the coaxial cable from LNB of your Dish.
RF IN: This port is to connect the coaxial cable from terrestrial antenna.
S/PDIF: Digital Audio interface, connect to AV amplifier S/PDIF input terminal.
HDMI: Audio and Video output socket for TV set with HDMI Input Jack only
ETHERENT: This is used for internet connection.
RS 232: This port is used to connect your receiver and computer through a serial cable.
AV OUT: This RCA connector is used to connect TV using RCA cable.
IR IN: Connect an External IR-Sensor (Infrared).
DC 12V:This is used to connect an external 12V adapter.

7
7.Connecting Your System
There are two ways to connect the receiver to your existing TV system. We recommend using one of
the following cases for the best result:
1. If you have a high definition television set, you should use a HDMI cable for best result, Plug one
end of the cable into the HDMI socket on the receiver, and the other end into the matching socket on
your television. In this case, you do not have to make audio connections because the HDMI connector
can output stereo audio or Dolby digital audio.
2. Connect one end of RCA cable to the AV mini jack on the back of the receiver and the other end to
a AV mini jack on your TV.
Finally connect the coaxial cable from the LNB to the LNB IN jack on the receiver.
With External Audio / Hi-Fi System
To connect any external Audio Hi-Fi system, the receiver has been provided with two RCA connectors
at the back of the receiver marked with Audio L and R.
Connect an RCA stereo cable from the AUDIO L, R jacks on the back of the receiver to the LINE,
AUX, SPARE OR EXTRA input jacks on your Hi-Fi System.
6.1 TV with Motorized System (DiSEqC 1.2)
Connect one end of your coaxial cable to the LNB IN connector on the receiver and the other end to
the REC or Receiver connector on the DiSEqC 1.2 motor.
Connect the coaxial cable from the LNB to the LNB connector on the DiSEqC 1.2 motor.
All our receivers are designed to be DiSEqC 1.0 and DiSEqC 1.2 compatible.
This allows multiple antennas to be connected to the receiver at the same time.
If you have two or more fixed antennas or LNBs, then we recommend you use a DiSEqC 1.0
switch.
Connect the coaxial cable from the first LNB to the LNB 1 or LNB A input connector of the DiSEqC
switch.
Do the same for any other LNBs that you have.
Connect one end of a coaxial cable to the RF output connector of the DiSEqC switch,
connect the other end to the LNB IN socket on the receiver.
To the digital receiver, you can connect either a single satellite antenna directly or LNB of
multi-feed equipment.

8
8.Basic Operations
8.1 Turn on STB
First, press the [Device’s Main Power] to turn on the unit.
When the STB is first used, it will play the first channel
from the default Channel List. If it’s not the STB’s first
use, STB will play the same channel viewed before
turning off.
?Frequently Asked Question
Q: The power of my STB has been turned on and not
in Standby mode, but the TV screen showed
nothing:
A: Make sure the TV set has been set to the correct
video input (not the TV channels). For example, if you
have connected the unit with the Video1 input of the TV
set, the TV set has to be switched to Video1.
Q: The power of my STB has been turn on and not in
Standby mode, but the TV screen showed
nothing except one box with “No Signal” image.
A: That means the channel, which you select, is no
signal. It could be several causes:
1 The channel which you select is not in your
allocate satellite. The simply solution is to change
channel.
2 The signal of current TV channel is too weak. You
can try to change channel to other strong signal
channels. If the problems still exist, please consult
your local dealer or other professionals for
technical service.
3 You use the Dual LNB, and you need Modify LNB
Type
8.2 Power
1 Press [Power] Key can enter the Standby mode
2 In Standby mode, press [Power] Key again to call
back the unit and go to the previous channel
3 User can also disconnect the device’s main power
to end the Standby mode.
8.3 Channel Up/Channel Down
In full screen, press [CH+/CH-] to change channel.
8.4 Volume Up/Volume Down-
In full screen, press [VOL+/VOL-] to adjust volume.
8.5 Number
In full screen, use numeric keys and press [OK] on the
Remote Control Unit to change channel.
8.6 Mute
1 Press [MUTE] key to mute the sound and the
screen will show mute OSD icon.
2 Press [MUTE] key again to restore sound.
8.7 Pause
1 In playing mode, press [Pause] key, the picture will
be paused, but the sound of the channel will still
continue.
2 Press [Pause] key again, the screen’s picture will
skip over to the current playing picture, and the
sound of the channel will play correspondingly.
8.8 Recall
Press [RETURN] key will directly switch to the previous
channel that you played before current channel.
8.9 Favorite
1 In full screen, press [FAV] key, it will display the
“Favorite list” window on the left of the screen,
which you can watch like below.
2 In the " Favorite list " window you can move
highlight by pressing [Channel Up/Channel Down]
key to select favorite Channels.
3 In the " Favorite list " window you can press
[Left/Right] key to select favorite groups, Pressing
[P-/P+] keys can implement the “Page up/Page
down” function

9
4 Press [Exit] key to exit the current window.
? Frequently Asked Question
Q: Why does the screen display “No Favorite
Channel”, after pressing [Favorite] key?
A: It is because you haven’t set any channels as
“favorite channel”. Please refer to Favorite
.
8.10 Audio
1 In full screen, press [AUDIO] key to open the
“Audio” window on the screen.
2 You can modify the audio track by pressing
[Channel Up / Channel Down] key and modify the
audio mode by pressing [Volume Up / Volume
Down] key.
3 Mode: Left/Right/Stereo/Mono
8.11 Information
In full screen, press [INFO] key (press [INFO] key and
[RED] key) to open information screen, the window
shows the parameters of current channel.
8.12 EPG
1 The STB has an Electronic Program Guide (EPG)
to help you navigate channels through all the
possible viewing options. The EPG supplies
information such as channel listings and
starting/ending times for all available channels.
2 Press [EPG] key to display EPG screen.
3 Press [Red] key to select the channels by different
group, such as by Favorite/Satellite/Provider/CAS
etc.
4 Press [Green] key to select different display modes
among Now EPG, Next EPG, More and Schedule,
like the following picture:

10
5 Press [Yellow] key in EPG menu to set a record
timer or go to Timer List menu.
6 In EPG menu, when you select one event by
highlighting item, you can set this event to record
timer list directly by pressing [REC] button.
7 In EPG menu, press [Exit] to close EPG screen.
8.13 TV/RADIO
In TV mode, pressing [TV/RADIO] key can switch to
Radio mode. In Radio mode, press [TV/RADIO] key to
switch to TV mode.
8.14 Channel List
1 In full screen, press [OK] key to enter “Channel
List”.
2 Press [Red] key to change the different group.
which you can watch, like below.
3 Press [Green] key to display details information for
EPG Now
4 Press [Yellow] key to change the current channel’s
property, such as FAV/ Lock/ Skip/ Delete/
Rename.

11
5 Press [Blue] key to open the “Sort” window like
below. There are five kinds of sorting ways. You
can press [Channel Up/Channel Down] key to
move highlight and press [OK] key to confirm your
selection.
6 The five ways of sorting are:
Default: Sorting by scanning result.
FTA/$: Sort channel through free and
scrambled sequence. Free channels will
appear at the beginning of the channel list
and scrambled channels will appear at the
end of the channel list .
Lock: Accumulate all locked channels and list
in the end of TV Channel List.
Name (A-Z): Sort in Alphabetical Order,
ignore “$” symbol.
Name (Z-A): Sort in Alphabetical Order,
ignore “$” Symbol.
7 Press [Up/Down] key to move highlight and press
[OK] key to play the highlighted channel.
8 Press [P -/ P +] key to page up and page Down.
9 Press [Exit] key to exit the channel list.
8.15 Sleep
1 This function can set sleep timer. When you set a
sleep timer and the time arrives, the system will
automatically enter standby mode.
2 Pressing [SLEEP] key, it will switch the mode
between Sleep Timer Off /10/30/60/90/120
minutes.
8.16 Page Up/Page Down
In Channel list, press [Page+/Page-] key to page up and
page down the channel list.
8.17 TEXT
1 Press [TTX] key in full screen, you can open
teletext page on any channel which has teletext
information.
2 If the channel has no teletext information, it will
show “No Teletext Data” on the screen.
8.18 Subtitle
1 Press [Subtitle] key in full screen, you can switch
subtitle on or off.
2 If the channel has no subtitle information, it will
show “No subtitle Data” on the screen.
8.19 Find
1 Press [Find] key in full screen can open the
“Find” window like above. You can press
[Channel Up/Channel Down/Volume
Up/Volume Down] key to move highlight and
press [OK] key to input the selected symbol
or letter into the dialogue.

12
2 After input each character, the program list on
the left will search the channel according to
your input and list the matched channel.
3 Move highlight to “OK” and press [OK] key to
close “Find” window and you can select
channel from the channels list directly.
8.20 Zoom
1 The [ZOOM] key allows you to magnify a certain
area on the images
2 Press [ZOOM] key again, the image will enlarge by
x1, x2, x4, x6, x8, x12, x16.
3 In “x2 ~ x16” image, use [Up/ Down/ left/ right]
key to move the image center area you want to
see.
4 In zoom mode, press [Exit] to close “Zoom”
window.
8.21 Menu
Press [MENU] key to open the menu, exit the current
menu to previous menu or close the window.
8.22 Video Format
1 Press [P/N] (white) key under Full Screen playback
for 1st, it will show the current system output video
resolution, continuously press this key & system
will switch its output video resolution by sequence
“Auto->480i-> 480P-> 576i-> 576p->
720P-50>720P-60>1080i-50>1080i-60>1080p-50
>1080p-60”.
8.23 Exit
Press [EXIT] key to exit the current menu to previous
menu or close the window.
9.Service
When you press [Menu] key to enter menu, there will
display the picture like below:
1 Press [Up/Down] key, you can select the submenu
Organizing services and Organizing favorites. If
Menu Lock is “On”, it will display a dialogue box for
user to input password. The default Password is
“0000”.
2 Press [OK] key to enter the “Organizing Service”.
Press [Menu] key to go back to main menu.
9.1 Organizing Service
When you enter “Organizing Service” menu, there will
display the screen like below.
1 You can move highlight by pressing [Channel
Up/Channel Down] key and [OK] key to select
the programs which you want to edit.
2 You can press [P+/P-] key to implement the
Page Up/Page Down function.
3 You can use [Red] key to switch different
Group.
4 You can press [Green] key to select the
programs by different select mode.

13
5 Press color key can implement the
corresponding function in “Organizing
Services”.
Groups
1 Press [Red] key to open the “Groups” window
like above.
2 You can press [Up/Down] key to move
highlight and press [OK] key to select group.
3 Press [Menu] key to close “Groups” List.
Options
1 Press [Green] key to open the “Options”
window like above.
2 You can press [Up/Down] key to move
highlight and press [OK] key to confirm the
select mode.
3 Press [Menu] key to close “Options” List.
Move
1 Select the channels that you want to edit in
channel list by pressing [OK] key or other
select mode.
2 Then press [Right] key to move the highlight
to right toolbar.
3 Select Move icon by pressing [Channel
Up/Channel Down] key and [OK] key.
4 Move the channels to the position that you
want and press [OK] key to confirm. Like the
following picture:
Lock
1 Select the channels that you want to edit in
channel list by pressing [OK] key or other
select mode.
2 Then press [Right] key to move the highlight
to right toolbar.
3 Select Lock icon by pressing [Channel
Up/Channel Down] key and [OK] key.
4 Lock the channel by pressing [OK] key.
Like the following picture:
Delete
1 Select the channels that you want to edit in
the channel list by pressing [OK] key or other
select mode.
2 Then press [Right] key to move the highlight
to right toolbar.

14
3 Select Delete icon by pressing [Channel
Up/Channel Down] key and [OK] key.
4 Delete the channel by pressing [OK] key.
Skip and rename
Follow the same way you can set the channel’s
Skip or rename for highlighted channel.
Find
1 Press [Find] key can open the “Find” window
like above. You can press [Channel
Up/Channel Down/Volume Up/Volume Down]
key to move highlight and press [OK] key to
input the selected symbol or letter into the
dialogue.
2 After input each character, the program list on
the left will search the channel according to
your input, and list the matched channel.
3 Move highlight to “OK” and press [OK] key to
close “Find” window and you can select
channel from the channels list directly.
9.2 Organizing Favourites
This menu is helpful in adding and deleting
services to and from the favorite group.
1 FAV List
Choose the FAV List by pressing “FAV” button.
2 Add
To add services into favorites, mark the desired
services by pressing “OK ” button in Service List,
press to choose Add mode and press “ OK ”
button.
3 Remove
To remove services from favorites, mark the
desired services by pressing “OK ” button in
Favorite List, press to choose Remove mode
and press “ OK ” button.
4 Move
You can reorder and move the service to the
preferred position in Favorite List.
5 Rename
Select the desired FAV List by pressing “FAV”
button, using , buttons to choose Rename
mode and press “ OK ” button to display keyboard,
and rename it.
6 Group, Options and Find functions
Please refer to the “Organizing Services” part in
this manual.
10.Installation

15
1 Press [Left/Right] key to select menu pages
among Service, Installation, Preference,
System, Conditional Access, Internet,USB
and Game.
2 Press [OK] key to enter the “Installation”
menu. If Menu Lock is “On”, it will display a
dialogue box for user to input password. The
default Password is “0000”.
3 Press [Up/ Down] key to select menu items.
Press [menu] key to go back to main menu.
10.1 Satellite Installation Satellite
1 Satellite: Press [OK] key to enter the Satellite
list.
2 Press [Up/ Down] key to select satellite.
Press[Page] key to page up or page down.
LNB Type
In this item, press [left/right] key can switch
among “Standard”, “User”, "unicable" and
“Universal” mode.
For Example: If you use the unicable LNB, then
you should select “Unicable” option in “LNB Type”
and press OK button will display the submenu for
Unicable setting, like the following picture, you can
select the SCIF Channel, SCIF Frequency and
Satellite Position according to your LNB type.
DiSEqC1.0/ DiSEqC1.1
DiSEqC: You can use [left/right] key to switch
options. There are several options for your
selection:
a)Disable: without DiSEqC.
b)1/2, 2/2: two ports DiSEqC
c) 1/4, 2/4, 3/4, 4/4: 4 ports DiSEqC
d)1/8, 2/8… 8/8: 8 ports DiSEqC
e)1/16, 2/16….16/16: 16 ports DiSEqC
Positioner
Positioner:In “Positioner” item, you can press [/
Volume Down]key to switch “Off / DiSEqC 1.2 /
USALS” functions.
22K
You can use [left/right] key to switch “ON / Off”.
When this item is switched to “ON”, receiver will
receive TV and radio input signal from 22K port. If
the item is switched to “Off”, the receiver will
receive all signal from 0K port.
!Notice
When you choose LNB type “Universal”, you
cannot modify 22K.

16
Polarity
In “Polarity” item, [left/right] key to switch “Auto / H
/ V” functions.
TP Edit
When you enter “TP Edit” menu, there will display
the screen like below:
1 In “Satellite” item, press [left/right] key to switch
satellite that you want to scan or press[OK]key
to enter satellite list for selection.
2 In “TP Index” item, you not only can use
[left/right] key to select transponder but you can
also use[Add] and [Delete]functions.
When you press[Green] key, it will display
“New TP” in “TP Index” item; You should set
the parameters of “TP Frequency” and
“Symbol Rate” for this new transponder. The
parameters of “TP Frequency” and “Symbol
Rate” can set using numeric keys. The
available range are “3000~13450 MHz” and
“1000~45000Ks/s”.
When you press[Yellow] key, there will show
up a warning message for reminding whether
you want to delete the current transponder or
not. If you select “Yes”, the current
transponder will be deleted, and the total
account of transponder will reduce 1
correspondingly.
When you press [Blue] key, it will display a
warning message for reminding whether you
want to delete all transponders or not. If you
select “OK”, all transponders will be deleted.
3 For the existing transponder, you can also
use numeric keys to modify the parameters of
“TP Frequency” and “Symbol Rate”.
4 When you complete your modification, press
[Red] key, it will display a dialog asking the
scan mode, program type, scan type and NIT
Search on/off. After you set up, press [OK]
key to start scanning.
5 In the “TP Scan” item, press [Exit] key to exit
the scanning and save the current
parameters.
Single Scan
1 Press [Red] key, it will display a dialog asking
the scan mode (means you want to scan all
channels or only scan free channels),
program type (means you want to scan all
channels or only scan TV/Radio channels),
scan type (means preset scan, that is
searching the existed TP. Automatic Scan
means blind scan. There is no need for
existing TP info) and NIT Search on/off. After
you set up, press [OK] key to start scanning.
2 Press [White] key into the blind scanning
immediately.
TP Scan
Press [Green] key to scan current TP’s programs.
Auto DiSEqC
Press [Blue] key to run Auto DiSEqC function, it
can find satellite connection ports automatically.
Blind Scan
Press [White] key take you directly into blind scan
mode to scan the current satellite.
Select satellites
When you Press [SAT] key, you will see the screen
like below:
1 You can press [ok] button to select one or more
satellites and then press [red] button, it will show a
dialog asking scan mode, program type, scan type

17
and NIT Search on/off. After you set up, press
[OK] key to start scanning.
2 Press [green] button to edit the name and
longitude of the select satellite.
3 Press [yellow] button to add a new satellite.
4 Press [blue] button to delete one or more satellites
that you have selected.
5 Press [white] button to move the satellite selected
(note: you can only move one satellite).
10.2 FastScan Satellite
In this menu, you can perform a fastscan by
selecting the provider and press OK button on
Start Search item.
10.3 Auto installation
“Auto Installation” is a very new and convenient
function. It will automatically detect all dishes
connected to this machine and scan the available
services belonging to the satellite matched
according to satellites and transponders data in
current database. You don’t have to input any
parameter of your antenna settings. Just press
“ OK ” button to enter this “Auto Installation” menu
then it starts scanning and shows you the result at
the end of scan.
10.4 Satellite Guide
When you enter “Satellite Guide” menu, you will
see the screen like below:
“Satellite Guide” is used for user to enter local
longitude; local latitude and satellite longitude. By
the evaluation from the receiver evaluate the
antenna azimuth and antenna elevation; user can
follow this guidance to adjust antenna.
6 You can use numeric keys to input
parameters in “Local Longitude”, “Local
Latitude” and “Satellite Longitude”.
7 You can use [Left/Right] key to select east or
west in “Local Longitude” and “Satellite
Longitude”, select north and south in “Local
Latitude”.
8 Moving highlight to “Start” item and press
[OK] key. The lower column on the screen will
calculate the corresponding value
automatically.
9 Orientation means the angle between south
and satellite.
10 Press [MENU] key to draw back to “Main”
Menu.
10.5 Terrestrial Installation
Press [OK] key to enter the selected item.

18
1 You can select the Bandwidth according different
country.
2 You can set the Tuner Power ON/OFF.
3 Press [white] key can directly into blind scan
mode to scan the current programs.
4 Press [Green] key to enter the following menu.
Scan Mode
1 There are two modes. You can scan channel by
channel or by frequency”.
2 When scan band is UHF and region is “France”,
the range of Ch No. is from 21 to 69. When scan
band is VHF and region is “France”, the range of
Ch No. is from 6 to 12.(it’s according to region)
3 You can press [left/right] key to select LCN On/Off
option.
4 Press [white] key to enter blind scan menu, or
press [Green] key to enter TP scan menu.
5 Press [Exit] key to exit the scanning.
10.6 Cable Installation
Press [OK] key to enter the selected item.
1 You can select the Scan Mode, Manual Scan or
Blind Scan.
2 You can input the Frequency by use the numeric
button of the RCU.
3 You can input the Second Frequency by use the
numeric button of the RCU, if you set the Scan
Mode to Manual Scan.
4 You can input the Symbol Rate by use the numeric
button of the RCU.
5 You can select the QAM value among
16QAM,32QAM,64QAM,128QAM and 256QAM.
6 You can turn ON or OFF the NIT Search, if you set
the Scan Mode to Manual Scan.
7 You can use numeric keys to input the
Frequency for LCN Frequency Scanning.
8 When you complete your modification, press OK
button on Search item to enter Scan menu and
then press OK button, it will begin to scan.
11.Preference
When you enter “Preference” menu, you will see the
screen like below:
In “Preference” menu:
1 Press[Channel Up/Channel Down]key to select
menu items among Language, Parental Control,
Time setting, Timer, A/V Control, Miscellaneous
Settings and OSD Setting.
2 Press[OK]key to enter the selected item.
11.1 Language
When you enter “Language” menu, you will see the
screen like below:

19
3 Menu Language: press [left/right] key to select
menu languages, the selections of languages
include: English, Russian, German, Greek,
French, Italian, Spanish, Portuguese, Arabic,
Polish etc.
4 First Audio: Some channels have more than one
audio language for choosing; by this function you
can set the first audio for this channel. If the
playing channel has the same audio as the “First
Audio” you set, system will play this audio
language as default. If the channel hasn’t the
suited audio language, then the system will
compare automatically with second audio
language. The selections of audio languages
include: English, Russian, German, Greek,
French, Italian, Spanish, Portuguese, Arabic,
Polish etc.
5 Second Audio: If the channel has no corresponded
audio with “First Audio” but have corresponded
audio with “Second Audio”, system will play the
second audio language as default. If no audio
language corresponds with the “Second Audio”,
then the default language of current channel will
be played automatically. The selections of audio
languages include: English, Russian, German,
Greek, French, Italian, Spanish, Portuguese,
Arabic, Polish etc.
6 Audio Priority: Press [left/right] key to select Dolby
Digital or Language.
7 EPG: Press [left/right] key to select EPG language.
8 Subtitle Language: Press [left/right] key can select
subtitle language.
9 Teletext: You can set teletext language. If the
streams have this language you can see the
teletext in language you set.
10 Press [MENU] key to draw back from “Language”
menu.
11.2 Parental Control
You can set a password for anyone who wishes to
operate in the “Installation” menu. And you can also set
the password for the locked channels. (How to set the
locked channel please refer to LOCK) Here will show
you how to set and how to revise the password.
1 In “Parental Lock” function, press [OK] key, there
will display a dialogue for you to input the
password. When you input the correct password,
you will see a screen like below:
2 Menu Lock determines that when user wishes to
enter “Installation” menu, whether user has to
input Password or not. If the setting “Menu Lock” is
“ON” this means user have to input password, if
set to “OFF” means unlocked.
3 Channel Lock determines that when user wishes
to play the locked channels, whether user has to
input the password or not. If the setting is “ON”,
playing the channels with lock mark will show a
dialogue on the screen and ask for the password.
If the setting “Channel Lock ”is “OFF”, the Lock
function will be invalid.
4 New Password is used for revising password; you
can input the new password in this item by using
numeric keys directly. After you filled in 4 numbers,
the highlight will auto skip to Confirm Password
and ask you to input the new password again. If
the password is correct, the screen will show a
message “Saving Data, Please Wait…”. After
finished saving and draw back to “System Setup”
menu, the revising is complete.

20
5 Press [MENU] key to draw back from the “Parental
Lock” menu.
11.3 Time Setting
When you enter “Local Time Setting” menu, you will see
the screen like below:
GMT Usage: This item is for the usage of GMT. You
can press [left/right] keys to switch “On/Off”.
The “GMT Offset” item is valid only when the setting
“GMT Usage” is “ON”. You can press [Volume Up /
Volume Down] keys to switch “GMT Offset” value,
and the range is “-12:00 ~ +12:00”, increase each
half hour progressively.
You can press [left/right] to control Summer time on
or off.
“Date” and “Time” items are valid only when the
setting “GMT Usage” is “OFF”. You can press
[Volume Up / Volume Down] keys to move highlight
and use numeric keys to input directly.
If the current channel provides the correct time
information, you will see the current time while you
enter “Time” menu. If the current channel doesn’t
provide time information, you will have to input the
date and time information manually.
Time Display can control time display on or off when
full screen play
Press [MENU] key to draw back from “Local Time
Setting” Menu.
11.4 Timer
Press [enter] key to open timer menu.
Current time information will display on the first
column; if the current time is incorrect, please modify
the time information in “Time” item.
Timer Number: You can press [left/right] keys to set
Timer number, and there are 8 timers in total.
Timer Mode: There are several modes for
Timer setting, including Off, Once, Daily, Weekly,
Monthly , Monthly to Friday and Satday to Sunday.
Timer Service: There are three options for “Timer
Service”, including “TV Channel” and “Radio
Channel” (timer setting for channel change and
Wakeup/Sleep) and "Record Radio" and "Record
TV" (Timer setting for Record TV or Radio program
to USB Hard Disk) and Message (reminding
message).
When you select “Channel” (timer setting for channel
change and Wakeup/Sleep) option in “Timer
Service”, the screen will display like below:
i. Channel: ress [OK] key to enter channel
list and select channel that you want
setting.
ii. Date: use numeric keys to input your
wakeup date.
iii. On Time: use numeric keys to input your
wakeup time. Once the time’s up, no matter
what the system is in standby mode or in
playing mode, the system will automatically
switch to the channel you want and start to
play.
iv. Duration: After you set a time for “Duration”
item, once the time’s up, the system will
automatically switch to standby mode. If
you do not want this function to work, set
the duration to 00:00.
v. Standby After Finish:You can press
Table of contents