Power On
Panel Layout & Basic Operation
Main Features
* PLEASE READ CAREFULLY BEFORE PROCEEDING *
Power Supply
Please connect the designated AC adapter to an AC outlet of
the correct voltage.
Please be sure to use only an AC adapter which supplies 9V
DC, 300 mA, center minus.
Unplug the AC power adapter when not using or during
electrical storms.
Connections
Always turn off the power of this and all other equipments
before connecting or disconnecting, this will help prevent
malfunction and / or damage to other devices. Also make
sure to disconnect all connection cables and the power cord
before moving this unit.
Location
To avoid deformation, discoloration, or other serious
damage, do not expose this unit to the following conditions:
Direct sunlight
Heat sources
Magnetic fields
Extreme temperature or humidity
Excessive dusty or dirty location
High humidity or moisture
Strong vibration or shock
Interference with other electrical devices
Radios and televisions placed nearby may experience
reception interference. Operate this unit at a suitable
distance from radios and televisions.
Cleaning
Clean only with a soft, dry cloth. If necessary, slightly
moisten the cloth. Do not use abrasive cleanser, cleaning
alcohol, paint thinners, wax, solvents, cleaning fluids, or
chemical-impregnated wiping cloths.
Handling
Do not apply excessive force to the switches or controls.
Do not let paper, metallic, or other objects into this unit.
Take care not to drop the unit, and do not subject it to shock
or excessive Pressure.
Precautions
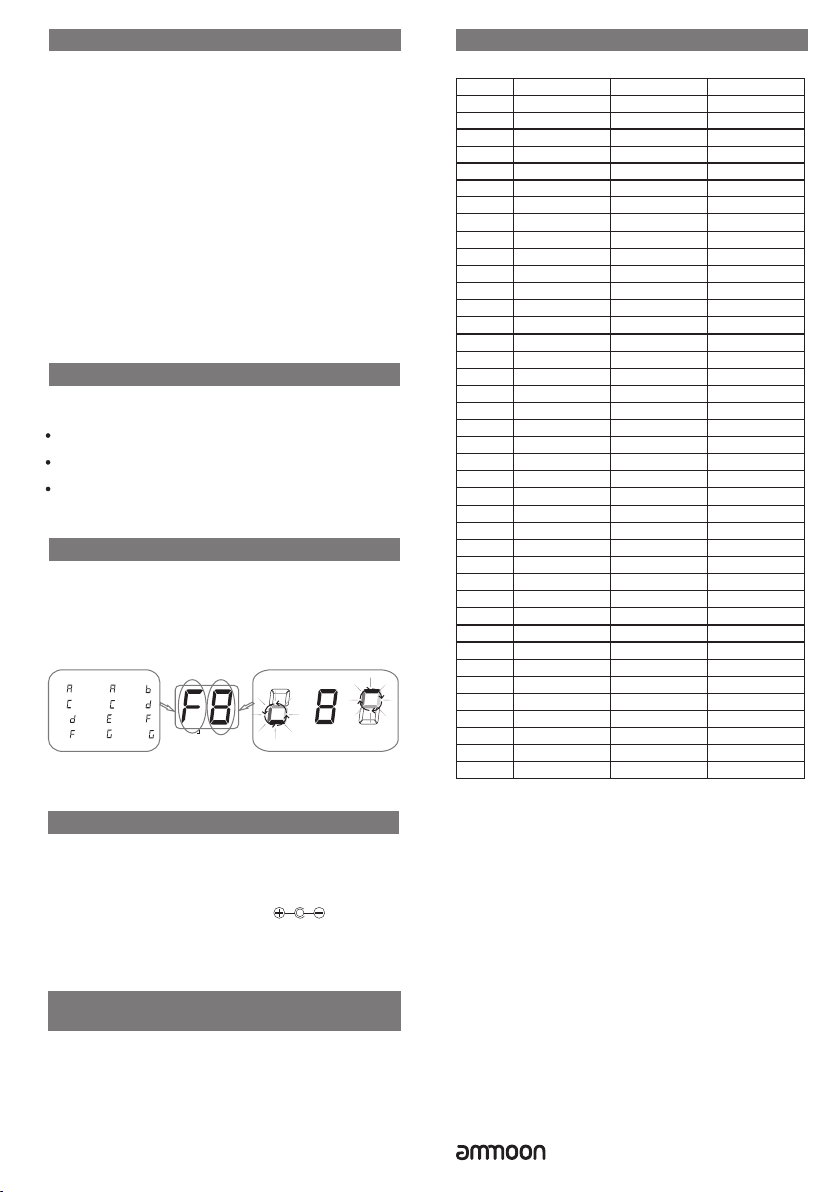
MODES
Power On
Play MODE
1
10 11
12
8
9
15
17
18
14
16
Detailed Operation
13
power switch
DC IN
For installing batteries.
7
5
6
23
4
Portable Guitar Effects
P O C K R O C K
8 effects modules
6 drive models
16 factory presets & 16 User presets
40 Drum patterns
1/8" headphones output & 1/8" Aux in
powered by battery or power adapter
Connect a 9v DC centre pin negative power supply to the
DC IN or insert 2 x AAA batteries into the battery
compartment. Set the POWER switch to the On position
Note: When the baeries power is geing low the display
will show "Lb”
1. PLAY/STOP button
Press this button to start/stop the drum machine
2. Patch button
Press to enter/exit patch mode. Rotate DRUM/VALUE
control to DR select preset patch
3. Store button
Press to store current settings to a preset patch.
4. DRUM/VALUE control
Press button to select drum machine parameters.
Rotate to adjust parameter values. Hold to access tuner.
5. DRIVE
Selects drive type
6. GAIN
Adjusts the gain of the DRIVE model
7. TONE
Adjusts the brightness of the tone
8. MOD
Rotate to select modulation effects and adjust the rate/depth
9. DLY/REV
Rotate to select delay or reverb effects and adjust the delay
time/reverb mix
10.Cab.Sim.
Switch on/off speaker cabinet simulation
11.Power
Turn power on/off
12.VOL
Adjusts the output volume
13.LCD SCREEN
Displays various information
14.INPUT
Connect instrument using a standard 1/4" jack cable
15.OUTPUT
Connect to the input of amplifier or other audio device using
a standard 1/4" jack
16.Aux In
Connect external devices such as mp3 players for audio
playback
17.PHONES
Headphone output
18.DC IN
Connect 9V DC power supply. 300mA centre pin negative.
POCKROCK has 2 modes of operation. Press the Patch
button to toggle between these modes
This is the default operating mode of POCKROCK after
powering on.
The LCD SCREEN will display "PL”
In this mode all parameter values will be equal to their
corresponding controls setings