Sonuscore TIME TEXTURES User manual

MANUAL
TIME TEXTURES

TIME TEXTURES
MANUAL
2
Document Version 1.0
Product Version 1.0
© by SONUSCORE
SYSTEM REQUIREMENTS:
Works with the FREE KONTAKT PLAYER
KONTAKT Version 6.7.1 or higher
macOS 10.14 or higher
Windows 10 or higher
4GB RAM (6 GB recommended for large KONTAKT Instruments)
At least 6.17GB of free hard disc space
Be advised that some presets of TIME TEXTURES need a fast CPU to run smoothly and require an Intel i7
processor or higher.
For the latest system requirements, please visit www.sonuscore.com

TIME TEXTURES
MANUAL
3
TABLE OF CONTENTS
1. DISCLAIMER 5
2. WELCOME TO TIME TEXTURES 6
2.1 About TIME TEXTURES ...................................................................................................6
2.2 The Sound Of TIME TEXTURES .......................................................................................6
2.3 Document Conventions ...................................................................................................7
3. INSTALLATION AND SETUP 8
3.1 Installing TIME TEXTURES ..............................................................................................8
3.2 Loading TIME TEXTURES Via Kontakt .............................................................................8
4. PAGE LAYOUT 9
5. BASIC WORKFLOWS 10
5.1 Finding Your Way Around The Interface .........................................................................10
5.2 Assigning Automation Events To The Macro Knob.........................................................10
5.3 Selecting Ranges Using A MIDI Keyboard ......................................................................13
5.4 Mapping MIDI Controllers..............................................................................................13
6. MAIN PAGE 14
6.1 Instrument Browser.......................................................................................................14
6.2 Home Page....................................................................................................................16
6.3 Control Page .................................................................................................................18
6.4 Emitter Page .................................................................................................................20
7. LFO PAGE 22

TIME TEXTURES
MANUAL
4
7.1 Using EQ........................................................................................................................23
7.2 Using LFO......................................................................................................................24
8. FX PAGE 25
8.1 Send FX.........................................................................................................................26
8.2 FX Rack.........................................................................................................................26
8.2.1 Filters .......................................................................................................................................... 28
8.2.2 Dynamics ..................................................................................................................................... 28
8.2.3 Distortion ..................................................................................................................................... 29
8.2.4 Delay............................................................................................................................................. 31
8.2.5 Reverb .......................................................................................................................................... 32
8.2.6 Modulation................................................................................................................................... 32
9. PRESETS 34
9.1 Preset Selector..............................................................................................................34
9.2 Preset Browser..............................................................................................................34
9.3 Preset Browser Filters ...................................................................................................35
9.4 User Presets..................................................................................................................36
9.4.1 Saving a User Preset ................................................................................................................... 37
9.4.2 Importing A Preset ...................................................................................................................... 37
9.4.3 Editing the tags of a User Preset................................................................................................ 38
10. SETTINGS PAGE 39
11. CREDITS 40
12. LICENSE AGREEMENT 41

TIME TEXTURES
MANUAL
5
1. DISCLAIMER
The information in this document is subject to change without notice and does not represent a commitment
on the part of Sonuscore, a label of Dynamedion – Langer & Sillescu GbR. The software described by this do-
cument is subject to a License Agreement and may not be copied to other media. No part of this publication
may be copied, reproduced or otherwise transmitted or recorded, for any purpose, without prior written per-
mission by Sonuscore, a label of Dynamedion – Langer & Sillescu GbR, hereinafter referred to as Sonuscore.
“Sonuscore” and associated logos are (registered) trademarks of Dynamedion – Langer & Sillescu GbR.
“Native Instruments”, “NI”, “Kontakt”, “Kontakt Player” and associated logos are (registered) trademarks of
Native Instruments GmbH.
Mac, macOS, are registered trademarks of Apple Inc., registered in the United States and other countries.
Windows is a registered trademark of Microsoft Corporation in the United States and/or other countries.
All other trademarks are the property of their respective owners and use of them does not imply any aliation
with or endorsement by them.
Document authored by Marvin Losch, Mathias Vatter, Andreas Hammann, Simon Schrenk, Matthias Meeh,
Shawn Basey
Software version: 1.0 (05/2022)

TIME TEXTURES
MANUAL
6
2. WELCOME TO TIME TEXTURES
Welcome to SONUSCORE’s TIME TEXTURES. TIME TEXTURES is an innovative orchestral engine bringing
ever-evolving textures to the tip of your ngers. In constant consultation with our composers, we rened this
instrument to provide your compositions with a pure and organic sound. From adding natural texture to deli-
cate string chords to creating moving atmospheric soundscapes – with its palette of 25 orchestral patches,
200+ presets and endless possible fx chain combinations we ensured that TIME TEXTURES will nd a spot in
each project. Since TIME TEXTURES comes with a great variety of features and possibilities, we‘ve put toge-
ther this document to guide you through the instrument in detail and get you started creating your rst textures.
2.1 About TIME TEXTURES
TIME TEXTURES is a Kontakt-based engine to easily create and control diverse orchestral and synthetic text-
ures and rhythms. A special feature is the ability to map almost any parameter to any position and range on
the modwheel, making it possible to change the sound in any way imaginable with a simple turn.
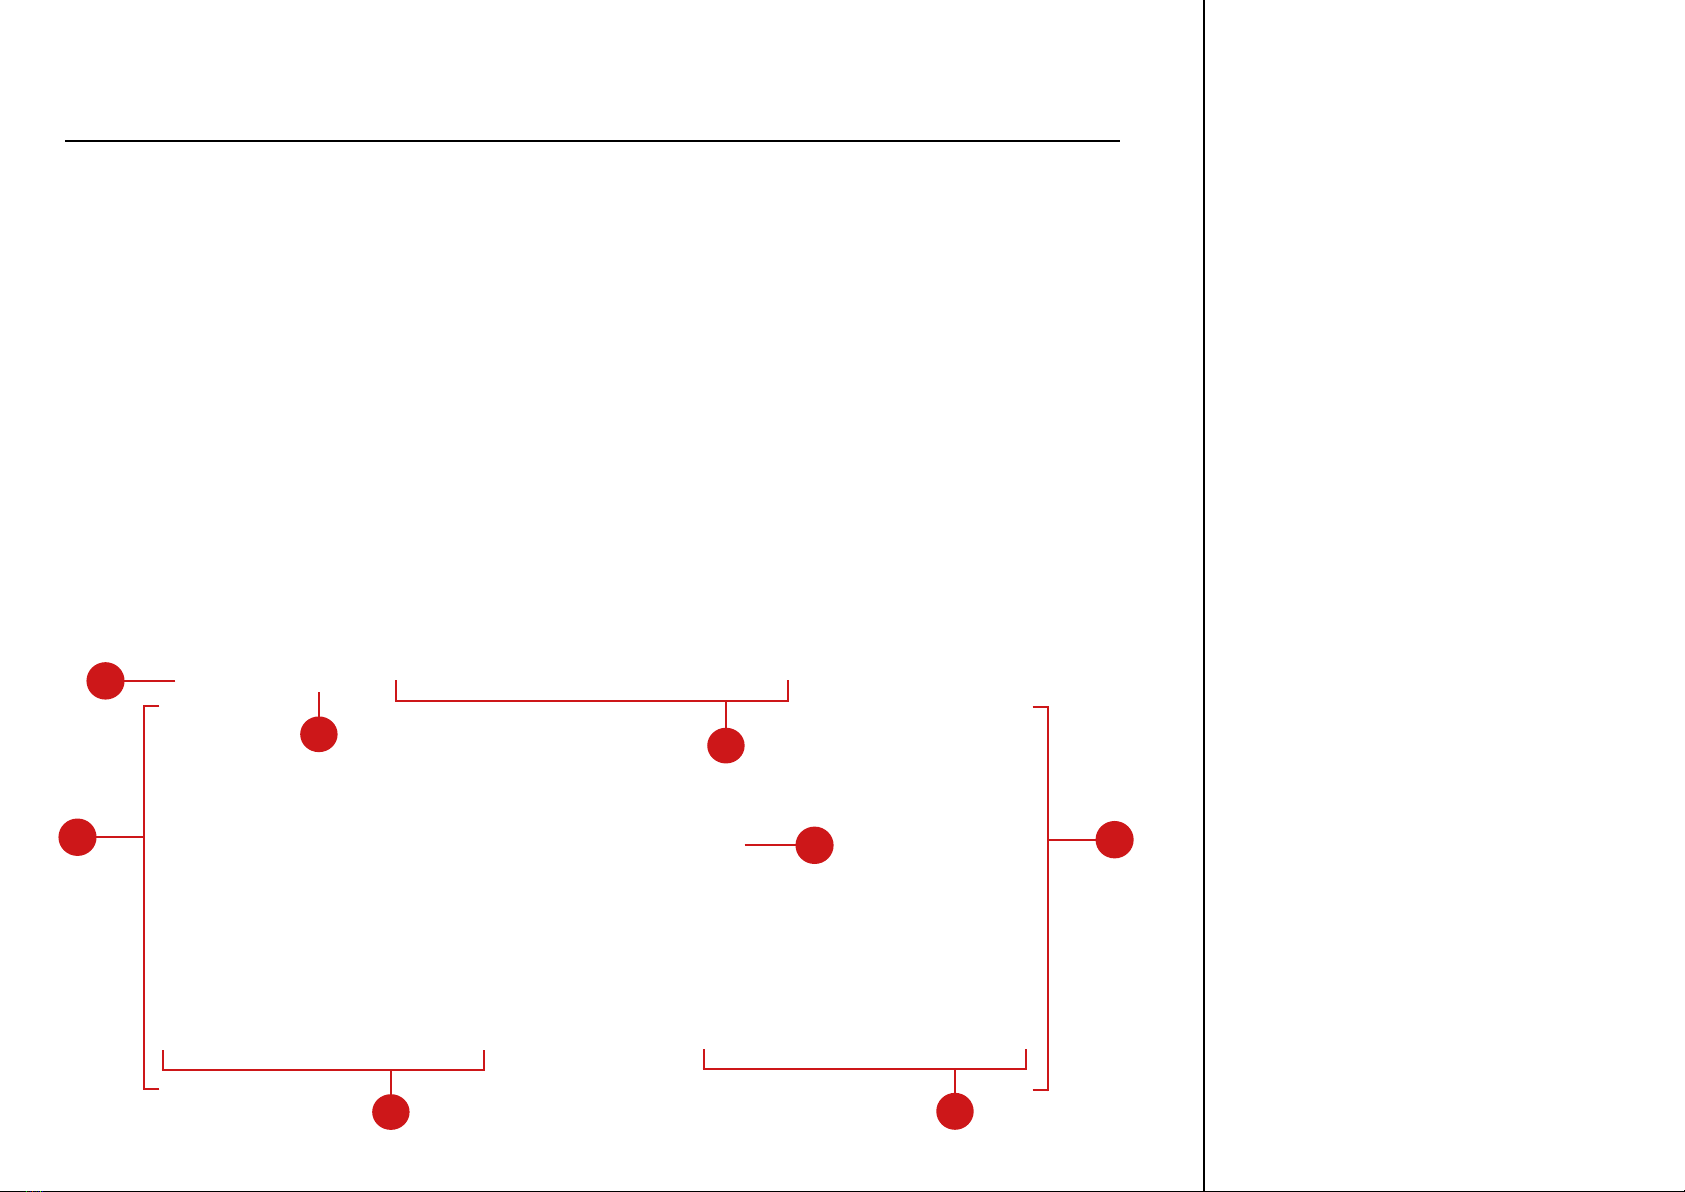
The sound itself is created by sets of sound particles launched from the two Emitters on the left and right of
the Macro Knob merging into moving soundscapes. Visually represented as circles, triangles, and squares –
the particles can be changed in character, density, order, and sound.
In addition, TIME TEXTURES’ fx chain offers the possibility to load 27 fx modules provided by Kontakt and
combine them in any order. This allows up to eight insert effects simultaneously modulating the textures and
unlocking whole new worlds of sound.
2.2 The Sound Of TIME TEXTURES
TIME TEXTURES consists of 25 instrument patches, each one meticulously recorded and sampled, with up
to six round robins and up to ve dynamic layers. For each instrument patch, we also recorded several instru-
ment-specic articulations in addition to the default articulation, which can be faded into the texture using a
slider. The string patches each have their own tremolo and staccato samples that can be activated to enrich
your texture and add movement. The woodwind patches feature Tenuto, Triplet Tongue and Staccato sam-
ples. For the Brass patches we included Tongue Staccato, Flutter Marcato and Muted Staccato articulations.
For the keys section, which here includes the harp, felt piano and grand piano samples, we recorded harp
harmonics, as well as several prepared grand piano samples.
All samples were edited in a special way that allows the TIME TEXTURES Engine to arrange them in a certain

TIME TEXTURES
MANUAL
7
order and form them into soundscapes – stringing together different sound particles in an ever-changing
way. For more information on the instrument patches, refer to 6.1 Instrument Browser.
2.3 Document Conventions
In this document the following formatting is used to highlight useful information:
Italics Indicates paths to locations on your hard disk or other storage devices.
Bold Highlights important names, concepts, and software interface elements.
Indicates warnings to specic topics mentioned in the text.
Indicates tips or referrals to different chapters.

TIME TEXTURES
MANUAL
8
3. INSTALLATION AND SETUP
Before you can create music with TIME TEXTURES, you will have to install and set up the necessary software.
Follow these instructions to get started:
3.1 Installing TIME TEXTURES
On the Sonuscore website, download the product in the form of a .zip le. If you are new to our site, you must
rst create a user account, to do so visit our page here.
1. Fill in the application form
2. Create a Sonuscore account
3. Login to your Sonuscore Account
4. Go to “My Account” and open the “Downloads” menu
5. Copy the serial number of TIME TEXTURES and go to Native Instruments’ “Native Access”
6. In Native Access, click on „Add a serial“ and paste your serial number. Then you will see TIME TEXTURES
under „Not Installed“. To Install the product, click on “Install”.
3.2 Loading TIME TEXTURES Via Kontakt
TIME TEXTURES is not an independent plug-in, so you will rst need to open an instance of KONTAKT or
KONTAKT PLAYER before you can start playing.
1. Open KONTAKT as a plug-in in your host software (DAW), or as a stand-alone application
2. Locate TIME TEXTURES in the Browser, on the left side of the user interface
3. Click Instruments to open the product’s content
4. Double-click the TIME TEXTURES.nki le to load the instrument

TIME TEXTURES
MANUAL
9
4. PAGE LAYOUT
When you open TIME TEXTURES for the rst time, you will land on the Home Page, the central submenu of the
Main Page. This is the page that provides you with the essential and most important functionalities to quickly
develop new sonic colors. The Home Page is identied by the house icon, which is shown twice – once for
the left Emitter and once for the right Emitter. This already indicates that the interface consists of two sym-
metrical, independently acting engines, or “Emitters” (1), each of which is assigned an instrument patch. The
latter can be selected by the controls which occupy the lower part of the interface on the left and right (2).
Here the Emitter can be switched on and off, the Instrument Browser can be opened and the master volume
can be adjusted.
Next to the Home Button are icons for the Control Page (4) and the Emitter Page (3) – both are used for dee-
per control of the sound particles.
Above them is the Page selection menu, where you can select a different page for the left and the right text-
ures – MAIN, LFO and FX. Very prominently in the center, the logo is framed by the Macro Knob (5), which is
the heart of the Automation Engine. Just above it are the Preset Controls (6), which allow you to scroll through
all the TIME TEXTURES’ presets and will assist you in nding your favorite texture.
For more information
on the Control and
Emitter Pages, please
refer to 6. Main Page
and its subchapters to
go into more detail.
To learn more about
the page selection
menu, please refer to
chapter 6. Main Page,
7. LFO Page, 8.2 FX
Rack
4
3
5
6
2
11
2

TIME TEXTURES
MANUAL
10
5. BASIC WORKFLOWS
TIME TEXTURES is designed to be played using a MIDI keyboard and optimized for KOMPLETE KONTROL.
The Macro Knob and the corresponding Automation Engine give you control over all parameters of the engine
and can be controlled using the modulation wheel. Further adding to its playability, you can control TIME
TEXTURES externally, record automation, or map MIDI controllers to any of the controls.
The following section guides you through the most important Workows using TIME TEXTURES, like map-
ping Automations to the Macro Knob, using a MIDI keyboard and mapping controls in TIME TEXTURES to a
MIDI controller.
5.1 Finding Your Way Around The Interface
TIME TEXTURES is formed by two Emitters positioned to the left and right of the Macro Knob. They can be
distinguished not only spatially, but also in terms of color: Emitter I has golden accents and particles, while
Emitter II on the right has cyan blue accents. The two colors are mixed only inside the Macro Knob – using
this knob, both Emitters can be operated by a single control.
Since both Emitters act independently and also have their own page layout, navigating through various inde-
pendent pages can get quite tedious. That‘s why we want to show you some workow features in this section.
Double-clicking on many controls, for instance, can activate various additional functions. For example, if you
want both Emitters to display the same page, just double-click on the LFO, MAIN or FX page and the other
Emitter will switch to the same page. The same applies to the Control Page, the Home Page and the Emitter
Page.
Since the way from the Master Volume Slider or the Instrument Browser to the respective page selectors can
be a bit long, a simple click on the instrument icon switches back and forth between the Control Page, Home
Page and Emitter Page.
Double-clicking on an articulation in the Instrument Browser selects it and closes the browser at the same
time. Double-clicking on an articulation that is grayed out (because it is already being used by the opposite
Emitter) will swap the instrument patches assigned to the Emitters.
Double-clicking on a preset in the Preset Browser also closes it and returns you to the Home Page.
5.2 Assigning Automation Events To The Macro Knob
Apart from Midi CCs and host automation in the DAW, TIME TEXTURES offers its own sophisticated auto-
To refer to the preset
handling, please go to
chapter 9. Presets.

TIME TEXTURES
MANUAL
11
mation engine that provides a simple yet powerful way to map almost any parameter of the engine to any
position on the modwheel. This eliminates the need to draw tedious little automation lines in your DAW or to
operate different controllers at the same time, because the entire TIME TEXTURES engine can be controlled
via a Macro Knob.
Since the Macro Knob is one of the central building blocks of TIME TEXTURES and allows for unique modu-
lation of your textures, we have created a short interactive tutorial on how to assign automation events. The
option to start the tutorial is displayed when you rst open TIME TEXTURES, but you can also return to it at
any time by clicking on the „Start Tutorial“ button in the settings – the gear icon in the lower right corner of
the interface.
The Macro Knob is prominently positioned in the middle of the interface and bound to your modwheel by de-
fault – but you can also control it with the mouse by dragging the small white dot over the light gray circle or
by selecting another Midi CC in the settings that you want to control it with.
It displays golden and light blue lines that symbolize automation events, i.e. events during the execution of
which a specic control in TIME TEXTURES is automated.
When and for how long such an event is executed is indicated by small indicator points (1) that move within
the boundaries of their colored automation event when the modwheel is turned or the Macro Knob is dragged.
At the same time, indicator points also move at the respective controls (2) that have been assigned an auto-
mation as soon as the Macro Knob has reached the position at which the automation is to take place.
1
2

TIME TEXTURES
MANUAL
12
To assign an automation to a control to regulate it with the Macro Knob simply:
1. Connect the control to the Macro Knob by clicking the colored Macro Icon (1). A control is only success-
fully connected when the double arrow is displayed (2). By clicking on the small cross on the right (3), you
can disconnect this control again and stop operating it with the Mvacro Knob.
2. Click and drag the double arrow so that the colored line that appears above the slider or around the knob
indicates the range you want this slider/knob to be automated.
3. While you are setting this automation line, an automation event occurs in the Macro Knob and two hand-
les (4) appear around it.
4. Move these handles to the desired positions on the Macro Knob. You will see that the automation event
increases, decreases or changes its position according to these handles.
You have now set the position on the Macro Knob/modwheel at which your automation of the control is to be
executed.
1
23
4

TIME TEXTURES
MANUAL
13
5.3 Selecting Ranges Using A MIDI Keyboard
Since in an orchestra almost every instrument has its own playable range and TIME TEXTURES allows you
to play up to two instruments simultaneously, we came up with a special color model. The two main accent
colors are used.
As for the Emitters, orange/gold represents the left instrument slot and cyan represents the right instrument
slot.
The black area is the overlap of the two instruments. As soon as you start playing in this area, both slots will
be active.
However, since the ranges of some instruments can be very far apart, you can use the Octave Slider to shift
the range in which you can play the instrument of the respective Emitter up or down by up to two octaves so
that the overlap is as large as possible.
5.4 Mapping MIDI Controllers
You can use MIDI controllers to control every Parameter in TIME TEXTURES externally and record automati-
ons. To map a knob or fader on your MIDI controller to a Parameter in TIME TEXTURES:
Ensure that the MIDI output from your controller is routed to the instance of KONTAKT you are using.
Right-click the parameter you want to map the MIDI controller to in the TIME TEXTURES user interface.
Click Learn MIDI CC automation.
Turn the knob or move the fader you want to map on your MIDI controller.
The knob or fader is mapped to the parameter in TIME TEXTURES.

TIME TEXTURES
MANUAL
14
6. MAIN PAGE
The Main Page allows you to select instrument patches, as well as determine the characteristics of the text-
ures. The subcategorization of the Main Page into the Home Page, Control Page and Emitter Page helps to
divide the deep modication possibilities of the sound particles.
6.1 Instrument Browser
To open the instrument browser, click on the articulation name next to the instrument icons (1).
You can lter between four instrument categories with a total of 12 instruments and up to four articulations
per instrument. The selected articulation will appear both next to the instrument icons and directly above the
browser (2). Here you also have the possibility to purge the samples of the respective Emitter, for example to
save RAM if only one Emitter is needed.
2
1

TIME TEXTURES
MANUAL
15
In the following table you will nd the instrument patches available:
Strings Violins Arco
Sul Pont
Harmonics
Sul Tasto
Violas Arco
Sul Pont
Harmonics
Celli Arco
Sul Pont
Harmonics
Basses Arco
Sul Pont
Harmonics
Brass Horns Swarm
Muted
Trumpets Swarm
Muted
Trombones Swarm
Muted
Woodwinds Flutes Air
Oboes Tongued
Clarinets Tenuto
Keys Piano Felt
Grand
Harp Textures
Click once to select a new instrument and articulation. Double-clicking will load the selected instrument and
articulation and close the Instrument Browser.

TIME TEXTURES
MANUAL
16
6.2 Home Page
The Home Page is the central element of the Main Page and can be opened by clicking on the Home icon
within it. The Home Page consists of the following areas, which are visible within all three sub-menus of the
Main Page:
(1) Sound Particles Field: Each texture consists of sets of sound particles – snippets of sustain samples,
tremolo samples, isolated marcatos, staccatos and other special articulations that the engine merges into
one texture. To give you some feedback on what TIME TEXTURES does with your settings, these particles
are shown here as colored geometric shapes. Circles represent basic instrument patch articulations like sus-
tains or marcatos, while triangles or squares represent the special movement articulations like staccatos for
strings or triple tongues for woodwinds.
(2) Instrument Slots: Allows you to occupy either one slot or both slots with the selection of instrument pat-
ches from different sections of the orchestra.
2
3
4
5
6
7
8
9
10
1
(1) For more information,
refer to 2.2 The Sound Of
TIME TEXTURES.

TIME TEXTURES
MANUAL
17
(3) Preset Selector: Provides controls to browse, load, change, and even save your own Presets. You can open
the Preset Browser by clicking on the currently displayed preset name.
(4) Macro Knob: The Macro Knob in the middle is per default connected to the modwheel on the MIDI key-
board and displays and controls all Automation Events.
(5) Page Tabs: Switches between the Home Page, Control Page, and Emitter Page. Click on the Icon to open
the corresponding page.
(6) Octave Slider: Shift the range of the loaded instrument patch up or down by as much as two octaves to be
able to play both Emitters simultaneously. As soon as the ranges of two instrument patches overlap, the key
range is colored black.
(7) On/Off Button: Use this button to turn the entire Emitter on and off. However, no samples will be purged.
Use the dedicated button in the Instrument Browser for this purpose.
(8) Options Menu: The Options Menu serves mainly as a workow facilitator. Click on the three dots to bring
up a dropdown menu where you can either delete all automation settings of the Emitter or copy and paste the
settings of the MAIN, LFO or FX page directly to the opposite Emitter. Once copied, the Emitter data is retai-
ned until you close the TIME TEXTURES instance or until you copy that Emitter again.
(9) Master Volume Slider: With this slider you can control the overall volume of this Emitter.
(10) Output Selector: Routes the respective channel to a specic output in KONTAKT. When set to Default,
the channel is routed to the mixer‘s main output. Selecting another entry from the drop-down menu routes
the channel directly to the respective output, bypassing the mixer‘s main output. You can use this to assign
individual outputs to each Emitter.
(3) For more information,
refer to 9. Presets.
(4) For more information
on the Automation En-
gine, refer to 5.2 Assig-
ning Automation Events
To The Macro Knob.

TIME TEXTURES
MANUAL
18
6.3 Control Page
The Control Page is the left submenu of the Main Page and provides you with the most important functions to
transform your instrument patch into a complex moving texture. Here you will nd four different parameters
for each of the two Emitters (left and right) that you can all automate and map to the Macro Knob.
(1) Dynamic:Determines which of the individually recorded dynamic levels of the sound particles will be
played. This slider is usually already assigned to the modwheel by default in conventional orchestra libraries.
TIME TEXTURES leaves this option up to you as you can use the automation controls to determine in which
range and on which position of the modwheel you want to set this parameter.
(2) Movement: For each instrument articulation in the Instrument Browser, TIME TEXTURES offers several
hand-picked Movement Articulations recorded at different dynamic levels to make your textures even more
vibrant. The additional articulations are added to the existing texture in the form of additional sound particles
and you can use the Movement Slider to control the density, frequency and volume of these particles to bring
1
2
4
3
(1) For more information
on how to do this, refer to
5.2 Assigning Automa-
tion Events To The Macro
Knob.

TIME TEXTURES
MANUAL
19
more calm or motion to your texture.
(3) Octaves: To make the textures even more vivid, the Octaves slider allows you to play some of the sound
particles in up to two higher octaves than those played on the keyboard. Higher values of the slider result in
an increasing number of particles in different octaves.
(4) Speed: The Emitters eject their sound particles at a certain rate that determines how the assembled text-
ures sound. High values will result in more dense textures, while low values will result in more fragile, spread-
out textures.

TIME TEXTURES
MANUAL
20
6.4 Emitter Page
To customize the sound particles themselves and edit them on a more granular level, you can use the Emitter
Page, its icon is located to the right of the Home Page.
(1) Attack Volume: The individual keys of the chords you play are interpreted in sequence by the TIME TEXT-
URES engine. As a result, for particularly large chords and particularly small values of the speed slider, not
all notes of the chord may be played back at the time of attack. TIME TEXTURES can compensate for this by
forcing all notes of the current chord to play when you press it. With the Attack Volume slider you can control
the volume of these “attack sound particles”. This can be especially useful with the piano instrument patches.
Try it!
(2) Seed: To generate perpetually new and changing sounds, TIME TEXTURES uses a number of randomly
2
13
456
Table of contents
Other Sonuscore Music Equipment manuals