manuals.online logo
Brands
  1. Home
  2. •
  3. Brands
  4. •
  5. AmTryke
  6. •
  7. Motorcycle
  8. •
  9. AmTryke Snappy 50-0150 User manual

AmTryke Snappy 50-0150 User manual

Revised Date: 4/30/09 Page 1 of 10
Amtryke® Model Snappy #50-0150
Carton Contents
Carefully remove and lay out all parts from the carton so as not to scratch or lose any parts or
pieces. The shipping carton should contain the pictured items on the parts pages (Pages 9-11)
Remove all packaging material and discard.
The carton will contain:
2- part boxes
2- rear wheels
1- contoured Snappy seat
1- front wheel & frame assembly
1- rear deck assembly
1- seat post tube
Revised Date: 4/30/09 Page 2 of 10
Assembly Instructions
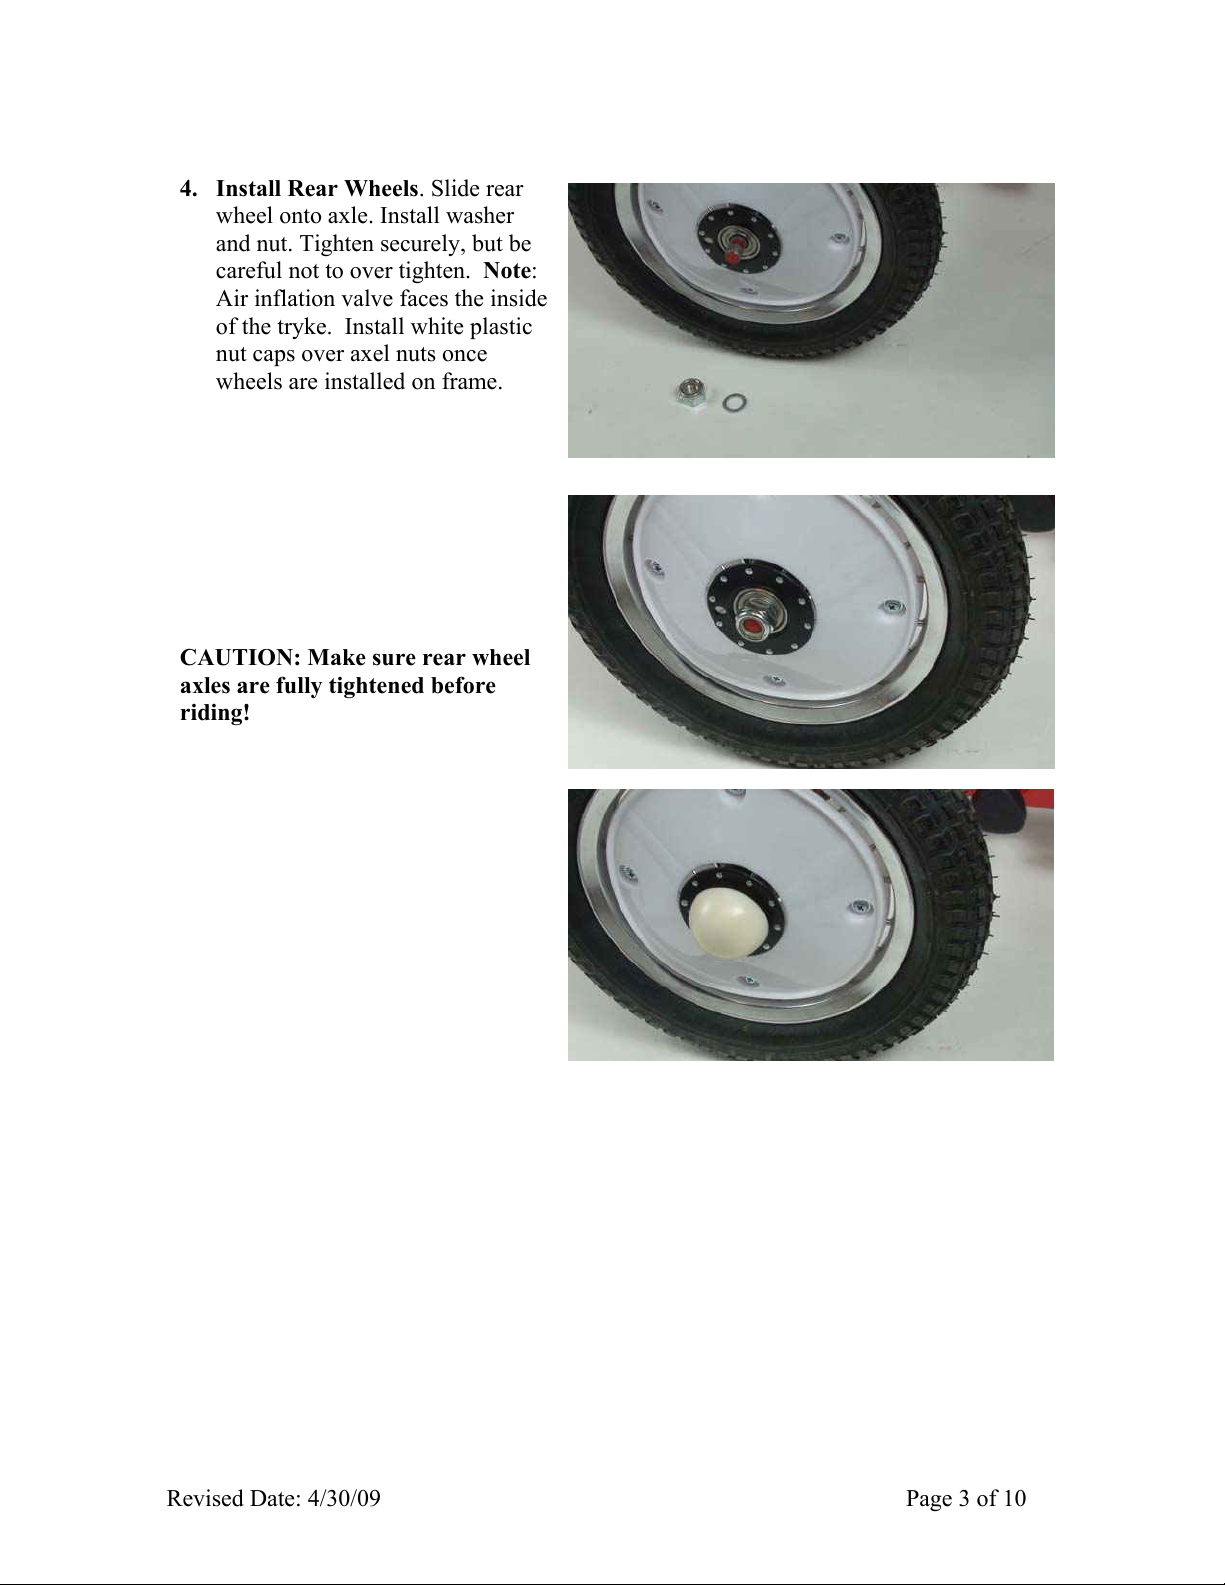
1. Main frame assembly. Slide the seat post
tube onto the front wheel & frame assembly.
Be sure to keep the two (2) seat post knob
holes on the bottom right side of the tryke.
Install the two (2) seat post knobs into their
holes. Do not completely tighten these knobs
until you adjust the tryke for the rider’s size
or leg length.
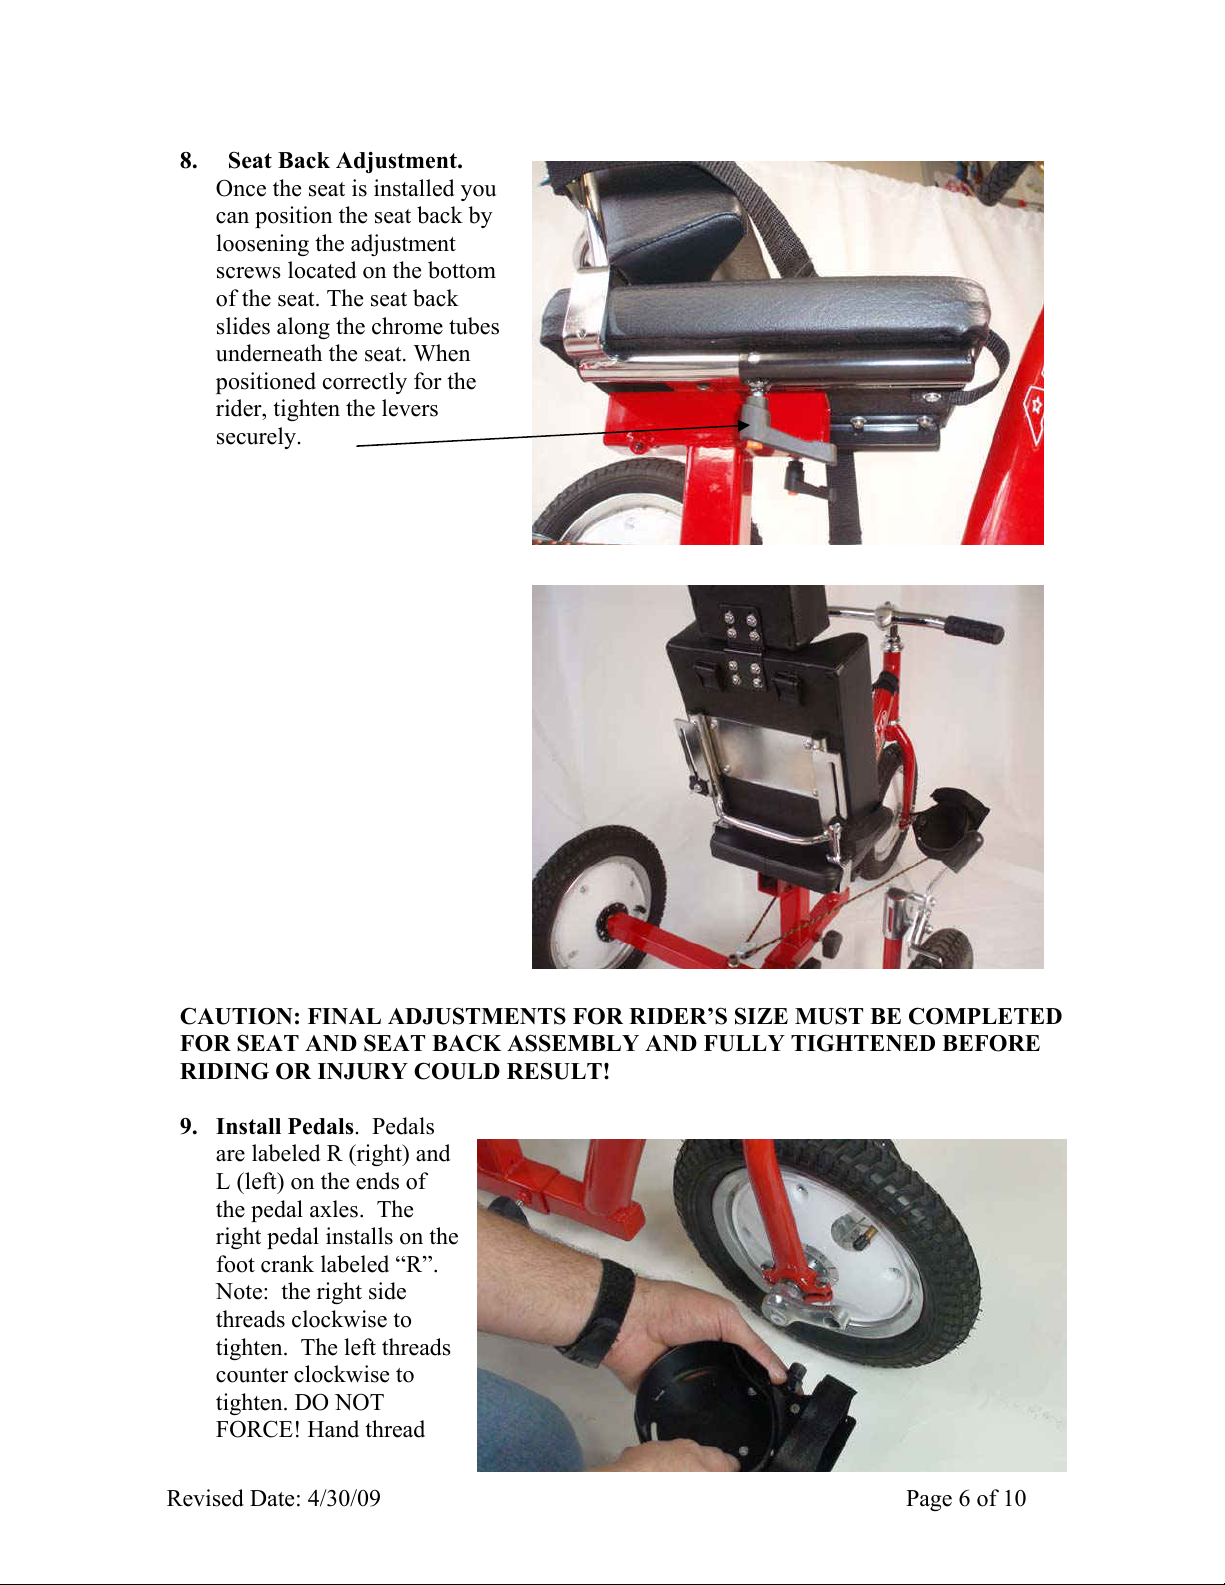
2. Place Rear Deck Assembly onto front
wheel & frame assembly. Slide the rear
deck assembly onto front wheel & frame
assembly. Note orientation. Rear axle
frame is on top of frame assembly and
vertical post for loading lock is on right
side of tryke.
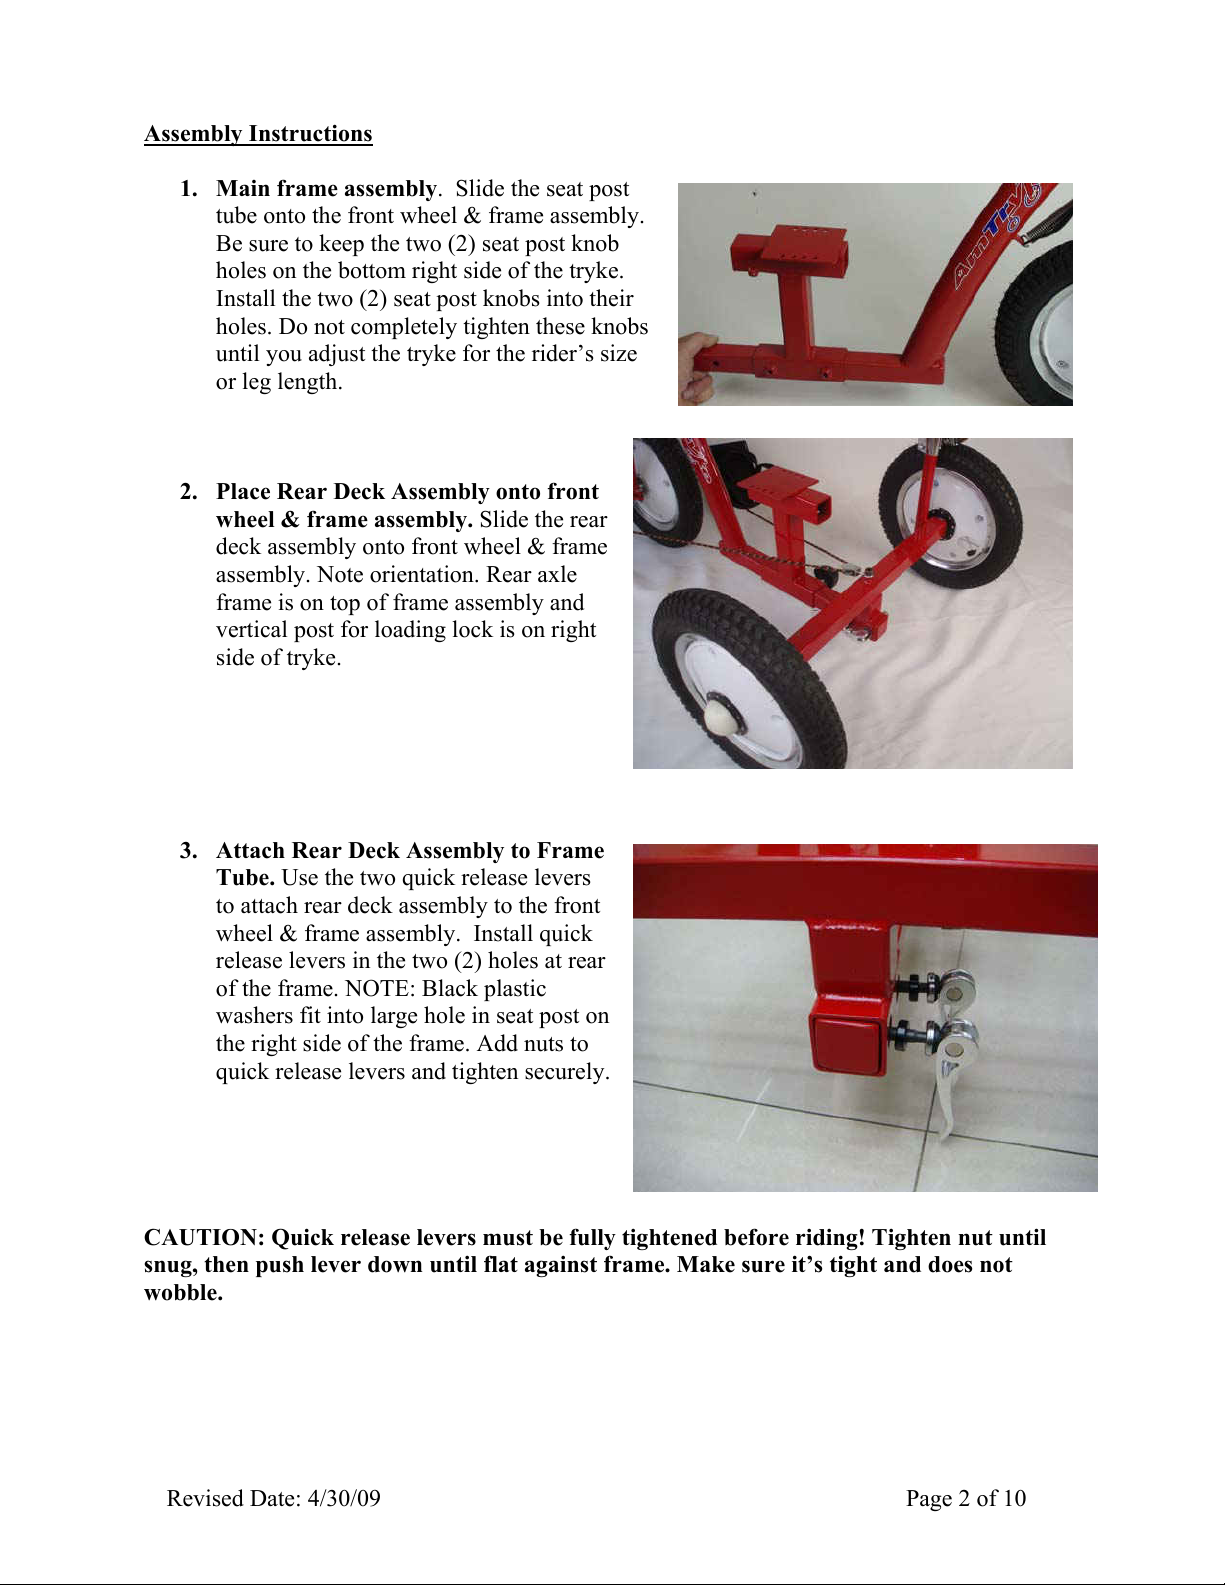
3. Attach Rear Deck Assembly to Frame
Tube. Use the two quick release levers
to attach rear deck assembly to the front
wheel & frame assembly. Install quick
release levers in the two (2) holes at rear
of the frame. NOTE: Black plastic
washers fit into large hole in seat post on
the right side of the frame. Add nuts to
quick release levers and tighten securely.
CAUTION: Quick release levers must be fully tightened before riding! Tighten nut until
snug, then push lever down until flat against frame. Make sure it’s tight and does not
wobble.
Revised Date: 4/30/09 Page 3 of 10
4. Install Rear Wheels. Slide rear
wheel onto axle. Install washer
and nut. Tighten securely, but be
careful not to over tighten. Note:
Air inflation valve faces the inside
of the tryke. Install white plastic
nut caps over axel nuts once
wheels are installed on frame.
CAUTION: Make sure rear wheel
axles are fully tightened before
riding!
Revised Date: 4/30/09 Page 4 of 10
5. Install Loading lock. Slide loading
lock on the loading lock rod on the
rear frame assembly. Top of loading
lock should be flush with the top of
tube. Take care that the lever is not
touching the tire. The handle is in
line with the tire and points towards
the front of the tryke. Tighten with
10mm wrench. CAUTION: Loading
lock is not for braking during
riding! Loading lock is only for use
in transferring rider onto tryke
when stationary.
6. Handlebars. Install the handlebar set. Insert
the handlebar stem into the top of the front
fork. Make sure the stem is inserted so that the
hash marks on the stem are inserted into the
fork. You should not be able to see the hash
marks when installed properly. Tighten the
stem tube at the top using the hex key
provided. NOTE: handlebars may be installed
with stem in either direction to accommodate
smaller or larger riders.
a. Shown here installed with stem
pointing towards back of tryke to fit
smaller rider.
Revised Date: 4/30/09 Page 5 of 10
b. Handle bar set shown here with
stem installed forward to fit
larger riders.
7. Install Snappy Seat. Seat
installs using four (4) screws
with washers. Line up holes on
bottom of seat with holes in seat
post frame. Install all four (4)
screws before tightening to
assure good alignment. When all
are installed; then tighten
securely.
Revised Date: 4/30/09 Page 6 of 10
8. Seat Back Adjustment.
Once the seat is installed you
can position the seat back by
loosening the adjustment
screws located on the bottom
of the seat. The seat back
slides along the chrome tubes
underneath the seat. When
positioned correctly for the
rider, tighten the levers
securely.
CAUTION: FINAL ADJUSTMENTS FOR RIDER’S SIZE MUST BE COMPLETED
FOR SEAT AND SEAT BACK ASSEMBLY AND FULLY TIGHTENED BEFORE
RIDING OR INJURY COULD RESULT!
9. Install Pedals. Pedals
are labeled R (right) and
L (left) on the ends of
the pedal axles. The
right pedal installs on the
foot crank labeled “R”.
Note: the right side
threads clockwise to
tighten. The left threads
counter clockwise to
tighten. DO NOT
FORCE! Hand thread
Revised Date: 4/30/09 Page 7 of 10
until you are certain threads are installed properly. See Figure 16. EASY TIP: Pedal
threads tighten towards front of bike no matter which side you are on! Use 15mm
wrench to tighten.
10. Install Pedal
Leveler String. The
pedal leveler string
threads through tubes
on the bottom rear of
each pedal. First,
install the pulley
assembly in the top
of the rear deck
assembly. The hex
head screw fits into
the hole at the top of
the frame. Start the
pedal leveler cord at
one pedal, thread
through the pulley
and then through the
remaining pedal. Pull the cord tight and either knot the end or pinch the end of the cord
using the small tubing. Use a pair of heavy pliers or a crimping tool to compress the tube.
Trim off the excess cord.
11. Install Steering Pin.
If needed install the
steering pin with loop
strap into hole in
front of fork. The
loop strap attaches to
hook strap on top of
frame so the part will
not be misplaced. The
top hole locks the
steering straight. The
lower hole allows
approximately 20-
degrees steering in
either direction. You
may find it desirable to limit steering so the rider can concentrate on learning the
pedal motion at first. Jiggle the front wheel assembly as you push the pin into the hole
and through the other side of the fork tube. Pin should insert all the way to the split ring
to be correctly seated.
Figure 18.
Revised Date: 4/30/09 Page 8 of 10
12. Accessories. There are many optional
accessories for the Snappy AmTryke®. Here
is a sample listing of some ideas for use with
this model.
a. Small or Medium laterals. Use
these for additional trunk support.
Small (#30-1501) or Medium (#30-
1502)
b. H-Harness. The standard H-Harness can be added to the Snappy seat back.
Specify 8-inch (#30-0337) or 11.5-inch (#30-0336).
c. Blue bucket chair seat. The small blow molded seat can be substituted for the
full support
Snappy seat. This
option costs less
and comes
standard with the
seat belt.
Revised Date: 4/30/09 Page 9 of 10
Fitting the AmTryke® tricycle to your Child
Note: You may need assistance while fitting the tryke to your child.
1. Engage the loading lock.
2. For Snappy seat option. Place child in saddle seat. Slide seat back assembly forward or back to
suit your child’s needs. Tighten spring release levers on underside of seat assembly.
3. With feet in pedals slide rear deck assembly along horizontal frame to the length that when leg is
extended the knee is slightly bent. Be careful not to extend frame so far that the knee locks
when extended.
4. Tighten knobs until frame is snug (no wobbling).
5. Use the two hook and loop straps to help your child keep their feet on the pedals. Pedal blocks
can be used to build up either side if needed. If you add more than one pedal block, you will lose
the heel trap. In that case, you can add optional plastic foot cups. Medium size works great with
the Snappy foot plates.
Register your AmTryke!
It is very important that you please take a moment to fill out and submit the enclosed AmTryke
registration form. This will help AmTryke, LLC keep track of what model of tryke you have
should you need accessories or replacement parts in the future!
Revised Date: 4/30/09 Page 10 of 10
Parts for the AmTryke® Model Snappy #50-0150

Popular Motorcycle manuals by other brands

APRILIA SCARABEO 300 SPECIAL - 2009 manual

APRILIA

APRILIA SCARABEO 300 SPECIAL - 2009 manual

Yamaha MT-125 owner's manual

Yamaha

Yamaha MT-125 owner's manual

ZONGSHEN ZS125-80 Service manual

ZONGSHEN

ZONGSHEN ZS125-80 Service manual

Bullit Bluroc 125 owner's manual

Bullit

Bullit Bluroc 125 owner's manual

BMW R 1100 RS Repair manual

BMW

BMW R 1100 RS Repair manual

KTM 85 SX 2018 Setup instructions

KTM

KTM 85 SX 2018 Setup instructions

Ossa TR280i user manual

Ossa

Ossa TR280i user manual

SWM RS 300 R 2017 Operation and maintenance manual

SWM

SWM RS 300 R 2017 Operation and maintenance manual

APRILIA SPORTCITY CUBE - BROCHURE 2009 brochure

APRILIA

APRILIA SPORTCITY CUBE - BROCHURE 2009 brochure

BMW R 1200 R Classic Rider's manual

BMW

BMW R 1200 R Classic Rider's manual

Yamaha midnight star XVS1300A owner's manual

Yamaha

Yamaha midnight star XVS1300A owner's manual

KTM 690 Duke AUS/UK 2014 owner's manual

KTM

KTM 690 Duke AUS/UK 2014 owner's manual

Victory Victory Cross Roads owner's manual

Victory

Victory Victory Cross Roads owner's manual

Yamaha TT-R110E owner's manual

Yamaha

Yamaha TT-R110E owner's manual

MOTO GUZZI 850 GT 1972 Riders handbook

MOTO GUZZI

MOTO GUZZI 850 GT 1972 Riders handbook

Yingang YG125-24 instructions

Yingang

Yingang YG125-24 instructions

Zontes ZT125/310T-M Maintenance manual

Zontes

Zontes ZT125/310T-M Maintenance manual

BMW F 800 GT Rider's manual

BMW

BMW F 800 GT Rider's manual

manuals.online logo
manuals.online logoBrands
  • About & Mission
  • Contact us
  • Privacy Policy
  • Terms and Conditions

Copyright 2025 Manuals.Online. All Rights Reserved.