AMX BPL-41M User manual

INSTALLATION MANUAL
55"
MAX
200x200
300x300
400x200
400x400
30 k g
(66 l b s )
R AT E D
BPL-41M
CAUTION: DO NOT EXCEED RATED LISTED WEIGHT.
SERIOUS INJURY OR PROPERTY DAMAGE MAY
OCCUR.
ATTENTION: N’EXCÉDEZ PAS LA CAPACITÉ EN POIDS
INDIQUÉE POUR CE SUPPORT. DES BLESSURES OU
DOMMAGES POURRAIENT EN RÉSULTER.
WWW.TECHNICONTACT.COM
Motorized TV Ceiling Mount with Remote Control
Support de plafond motorisé avec contrôle à distance
21
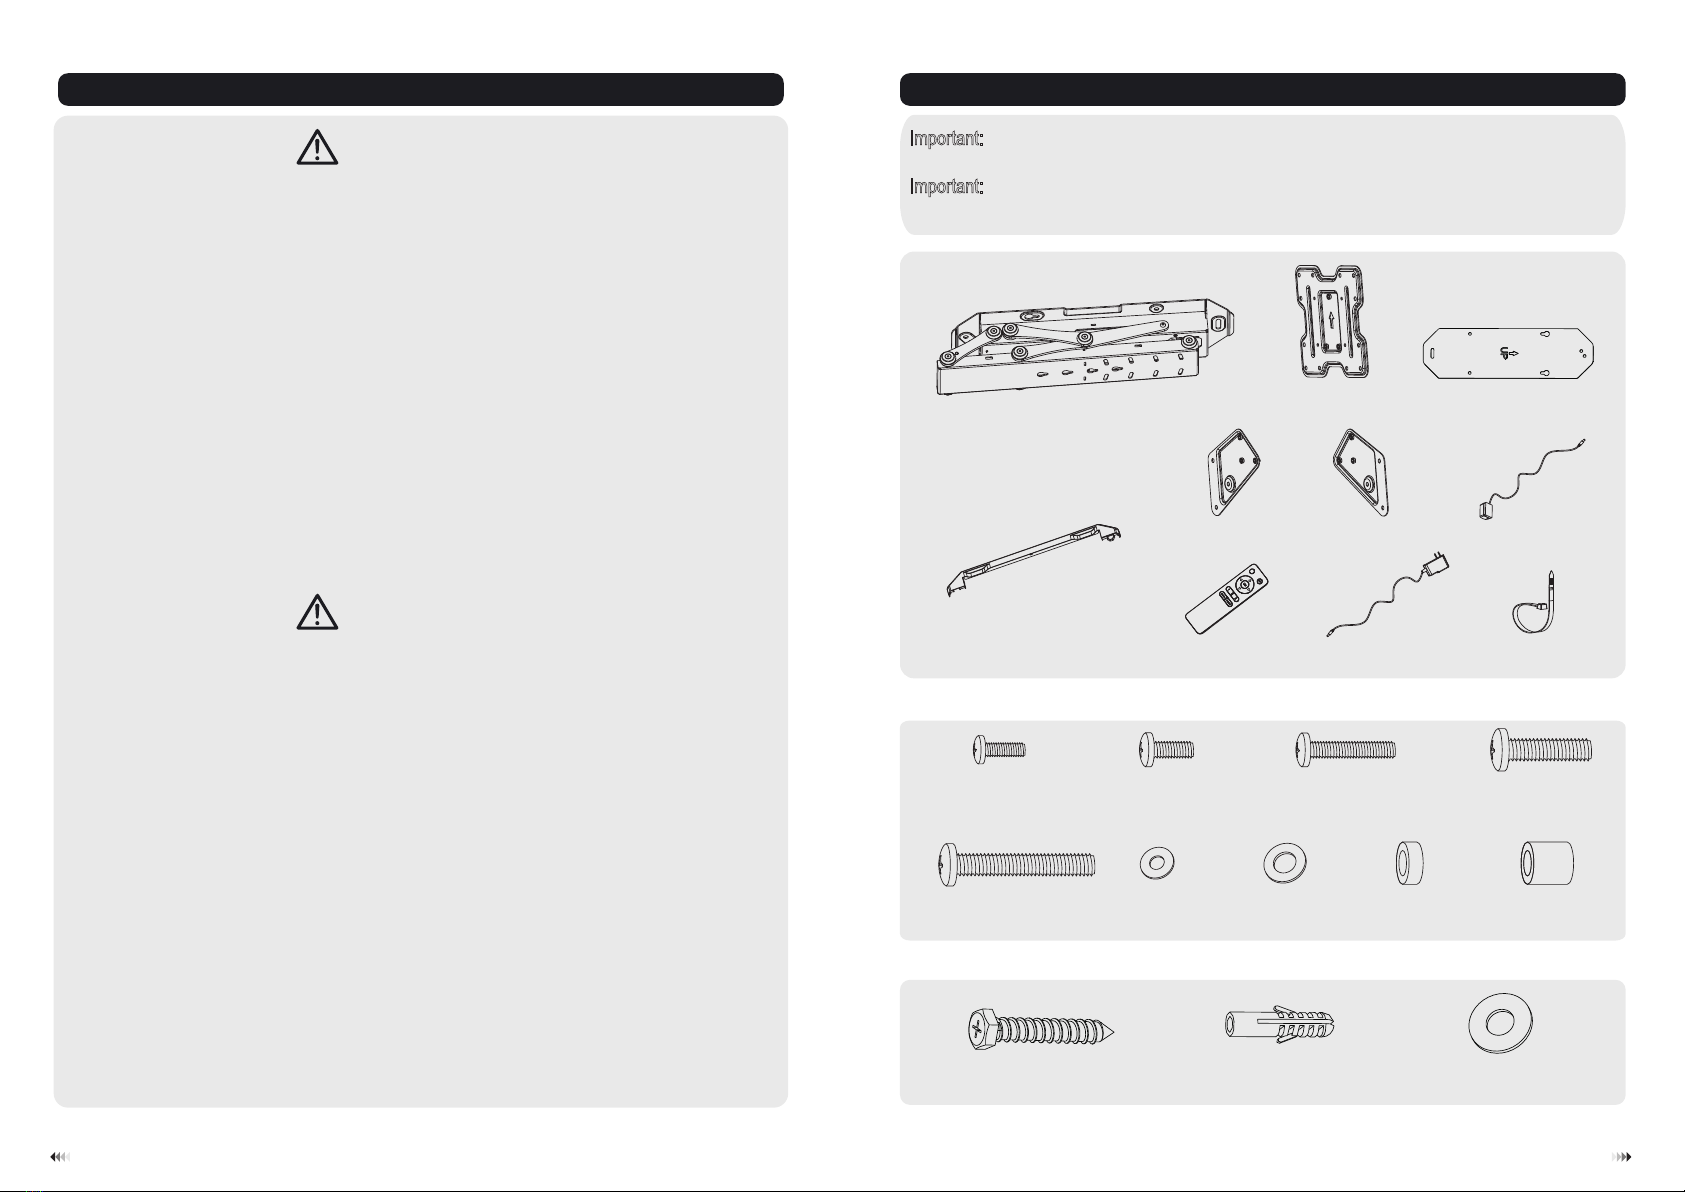
N O T E : Read the entire instruction manual before you start installation and assembly.
P a c k a g e M
P a c k a g e W
ST6.3x55 (x6)
W-A
concrete anchor
W-B
(x6) D6 washer (x4)
W-C
motorized wall mount (x1)
A
VESA plate (x1)
B
remote control (x1)
H
VESA adapter (x2)
E
VESA adapter (x2)
F
decorative cover (x2)
D
ceiling template (x1)
C
power supply (x1)
I
IR receiver (x1)
G
cable tie (x4)
J
M8x30
M-D
(x4)
M6x30
M-C
(x4)
M5x14
M-A
(x4) M6x14
M-B
(x4)
M8x50
M-E
(x4) D8 (x4)
M-G
washer
D5 (x4)
M-F
washer big
M-I
spacer (x8)small spacer (x8)
M-H
• Do not begin the installation until you have read and understood all the instructions and warning
contained in this installation sheet. If you have any questions regarding any of the instructions or
warnings, please contact your dealer or send a message to [email protected].
• This mounting bracket was designed to be installed only as specified in this manual. Improper
installation of this product may cause damage or serious injury.
• This product should only be installed by someone with good mechanical ability who has basis
building experience and fully understands this manual.
• Make sure that the supporting surface will safely support the combined weight of the equipment
and all attached hardware and components.
• Always use an assistant or mechanical lifting equipment to safely lift and position the equipment.
• Tighten screws firmly, but do not over tighten. Over tightening can cause damage to the items.
This greatly reduces their holding power.
• This product is intended for indoor use only. Using this product outdoors could lead to product
failure and personal injury.
• Please do not disassemble or change the electronic components of the product without authoriza-
tion.
• Avant de débuter votre installation, assurez-vous de bien lire les instructions et mise en garde
indiquées sur cette feuille. Si vous avez des questions relatives aux instructions, contacter votre
revendeur ou écrivez à [email protected]
• Ce support a été conçu seulement pour être utilisé avec un écran de TV. Une installation inappro-
priée de ce support pourrait être dangereuse.
• L’installation de ce support doit être effectuée seulement par une personne compétente et possé-
dant une connaissance des matériaux de construction permettant de bien comprendre ce
manuel.
• Assurez-vous que la surface utilisée peut soutenir le poids du support et celui du téléviseur
combiné.
• Assurez-vous d’être deux au moment de l’installation. Si nécessaire, n’hésitez pas à recourir à un
équipement de levage.
• Serrez les vis fermement mais sans exagération. Un trop grand serrage pourrait briser les vis et
ainsi diminuer la force de l’ancrage.
• Ce produit a été conçu pour un usage à l’intérieur seulement. Un usage à l’extérieur pourrait
éventuellement affaiblir le support et causer un détachement de ce dernier.
• Ne pas défaire l’assemblage fait au niveau de l’usine. Ne changer pas les composantes électron-
iques sans une autorisation du fabricant.
WARNING
AVERTISSEMENT
Important: Ensure that you have received all parts according to the component’s checklist prior to
installation. If any parts are missing or faulty contact your local dealer for a replacement.
Important: Assurez-vous d’avoir toutes les pièces indiquées sur cette liste avant de procéder à
l’installation.
Component Checklist | Vérification des pièces
34
W-A
W-C
W-A
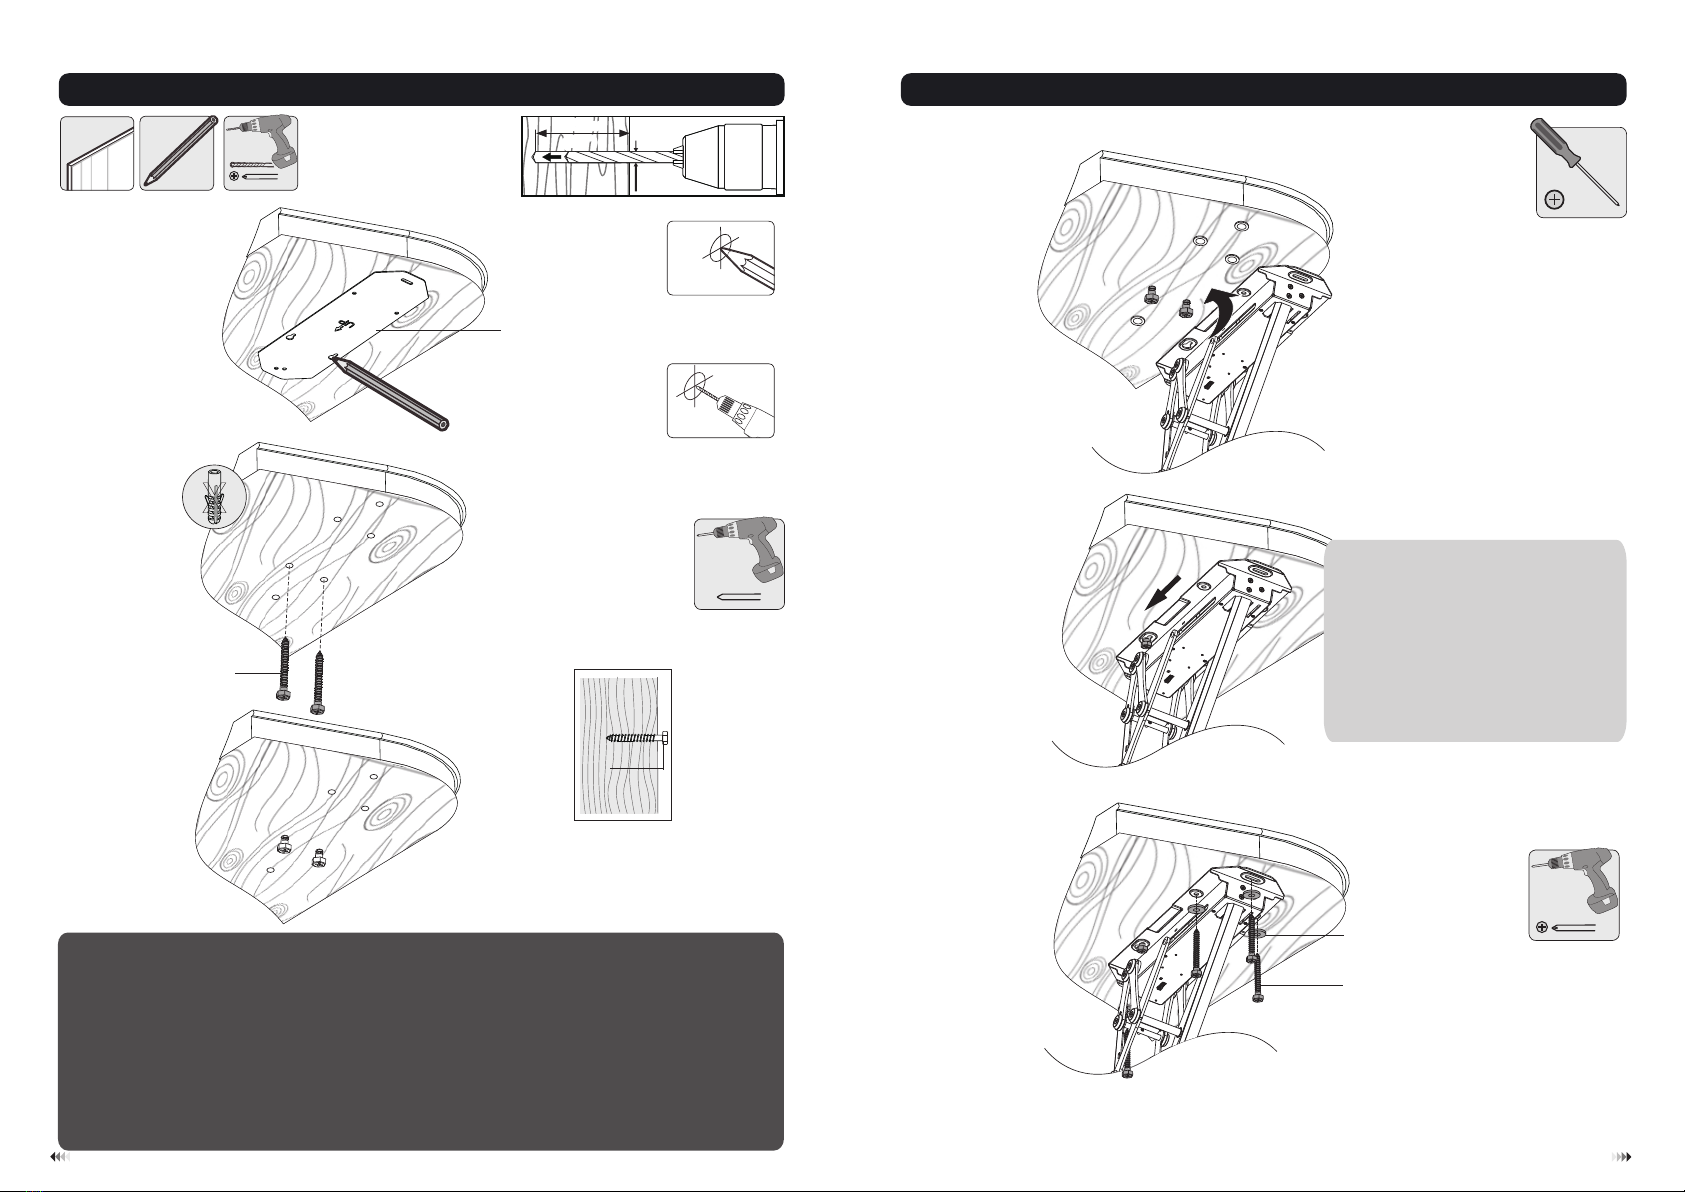
1
2
ø 4.5mm
(ø 3/16”)
55mm
(2.2")
55mm
(2.2”)
5mm
C
X
WARNING
• Installers are responsible to provide hardware for other types od mounting situations.
• Installers must verify that the supporting surface will safely support the combined weight of the equipment
and all attached hardware and components.
AVERTISSEMENT
• Les installateurs ont la responsabilité de fournir le matériel requis pour tous autres types d’installations.
• Les installateurs ont la responsabilité de déterminer si la surface d’ancrage a la capacité de supporter le
poids combiné du support et tous les autres composantes ajoutées.
Hang the ceiling mount so that the screws
fit into the keyhole openings. Slide slightly
the ceiling mount into place and then
tighten the screws.
Installer le support au plafond en utilisant les
trous prévus à cet effet. Notez qu’il est
préférable de ne pas serrer les vis de fixation
complètement de façon à pouvoir glisser le
support sous les vis. Lorsque placéà sa
position finale, serrez les 4 vis de fixation
complètement.
1A For Wooden Ceiling Mounting | Pour montage sur poutres de bois.
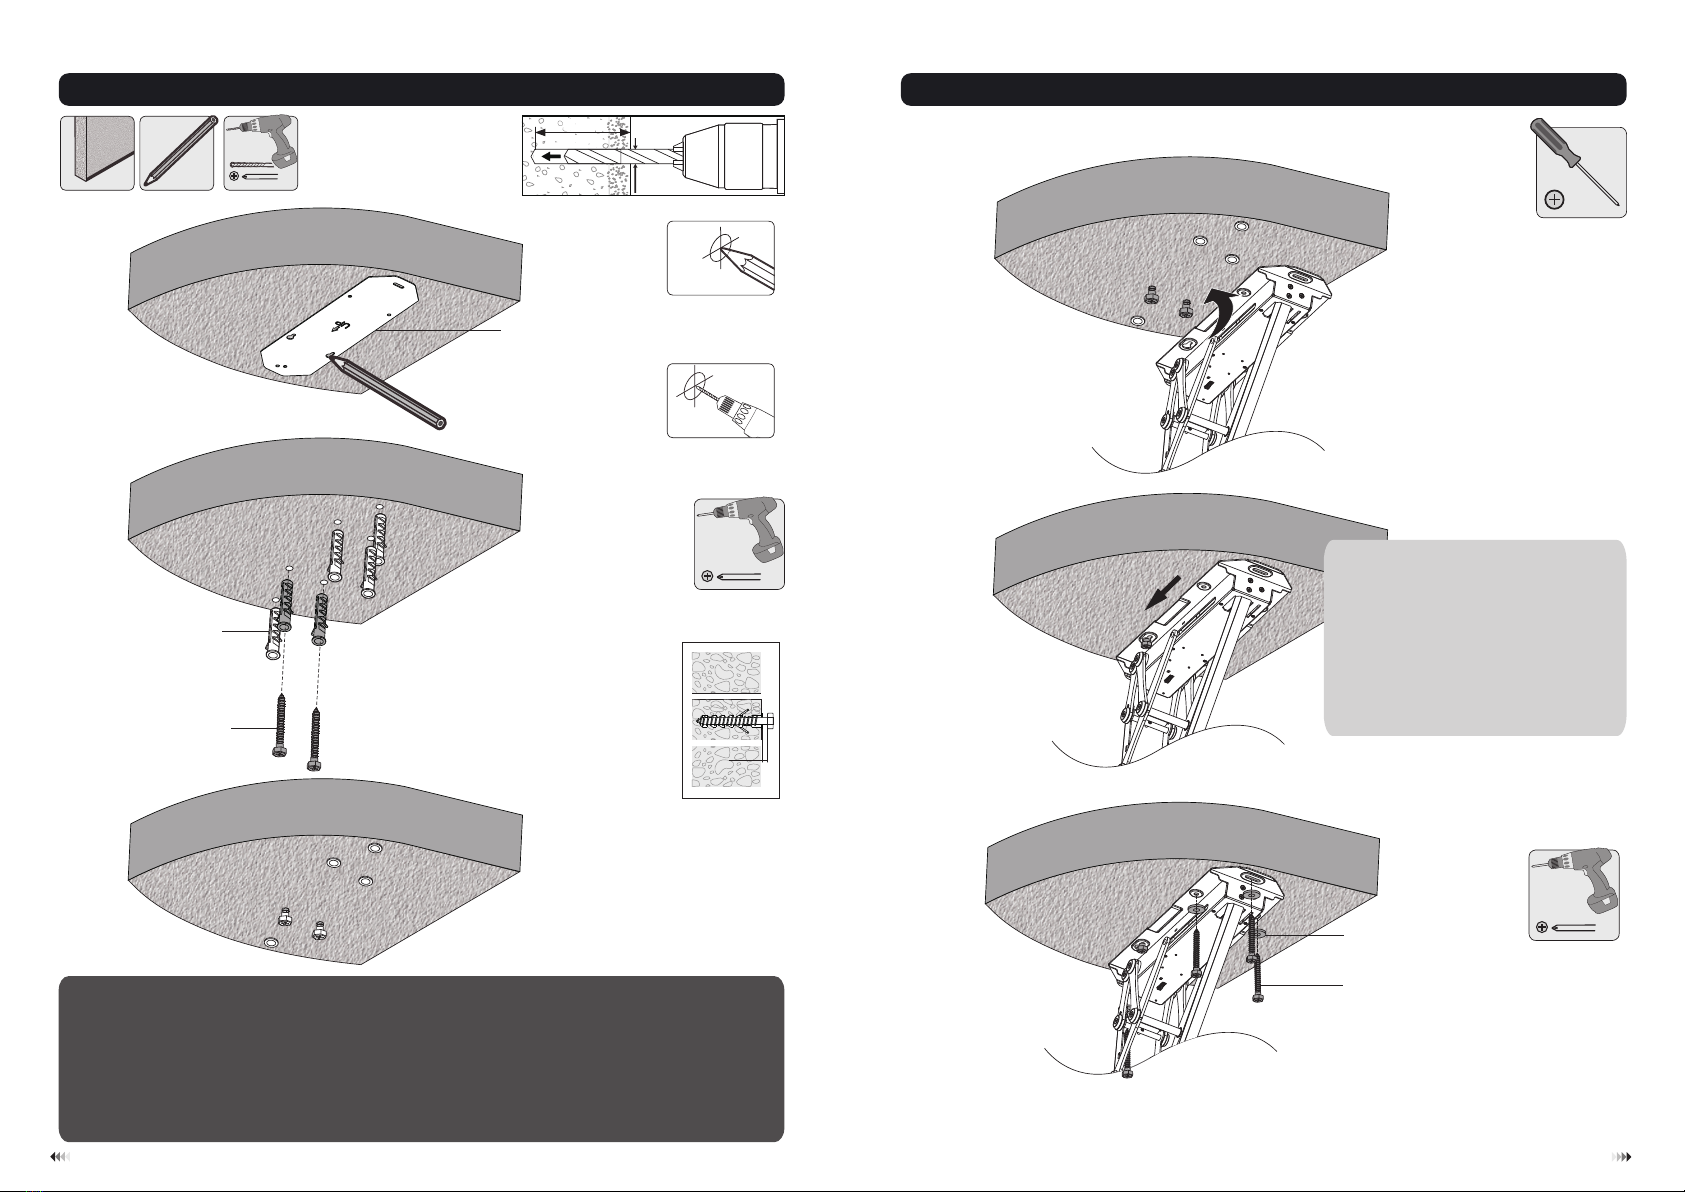
60mm
(2.4")
60mm
(2.4")
ø 10mm
(ø 3/8")
56
W-B
W-A
W-C
W-A
1
2
5mm
C
WARNING
• Installers must verify that the supporting surface will safely support the combined weight of the equipment
and all attached hardware and components.
AVERTISSEMENT
• Les installateurs ont la responsabilité de déterminer si la surface d’ancrage a la capacité de supporter le
poids combiné du support et tous les autres composantes ajoutées.
Hang the ceiling mount so that the screws
fit into the keyhole openings. Slide slightly
the ceiling mount into place and then
tighten the screws.
Installer le support au plafond en utilisant les
trous prévus à cet effet. Notez qu’il est
préférable de ne pas serrer les vis de fixation
complètement de façon à pouvoir glisser le
support sous les vis. Lorsque placéà sa
position finale, serrez les 4 vis de fixation
complètement.
1B For Solid Brick and Concrete Ceiling | Fixation sur la brique ou bloc de ciment
87
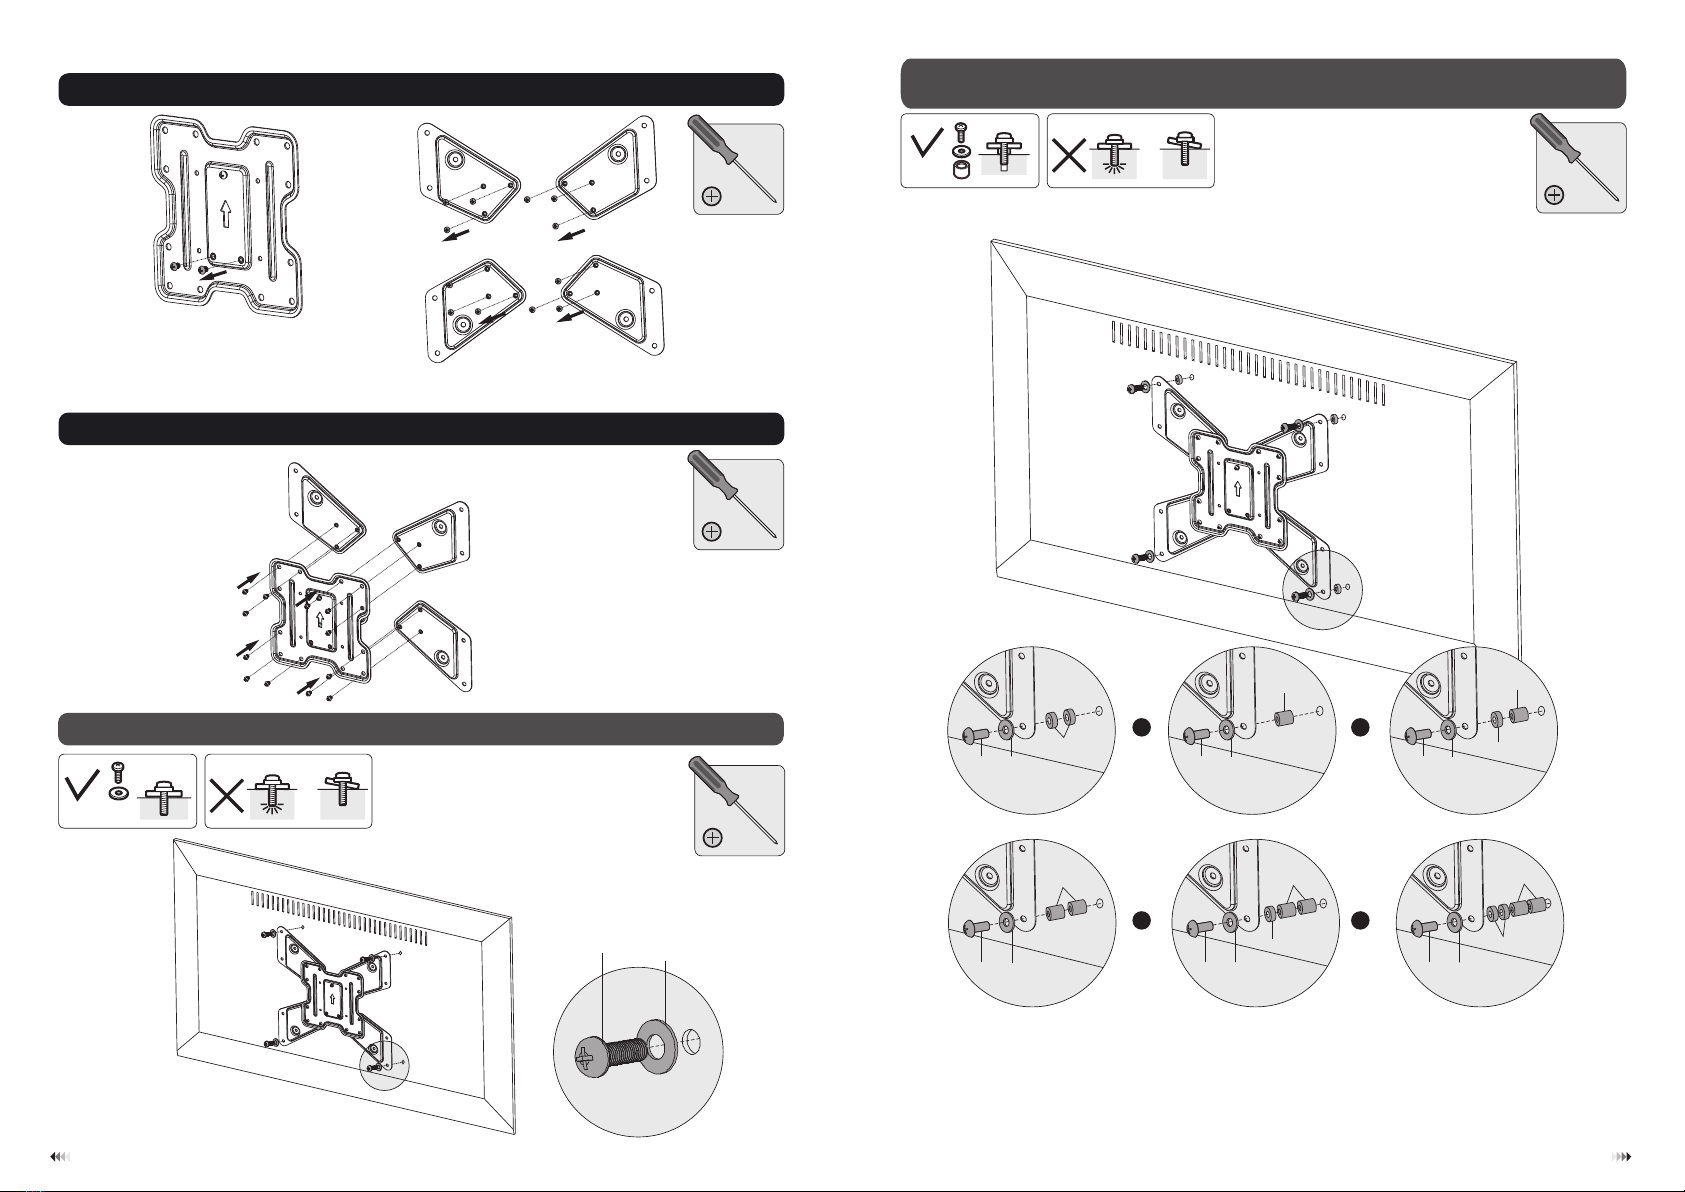
M-A
M-B M-F
M-G
o r
TV
TV
TV
TV
TV
TV M-H
M-G
M-C
M-D
M-H
M-G
M-E
M-I
M-H
M-H
M-G
M-C
M-D
M-I
M-H
M-G
M-E
M-H
M-I
M-G
M-E
M-I
M-H
M-G
M-C
M-D
M-I
o r
o r
o r
2. Installing the VESA Plate | Installation de la plaque VESA.
2-1 For Flat Back Screens | Pour écran à dos plat
2-2 For Recessed Back Screens or to access A/V Inputs
Pour écran encastré ou pour accéder aux entrées A/V
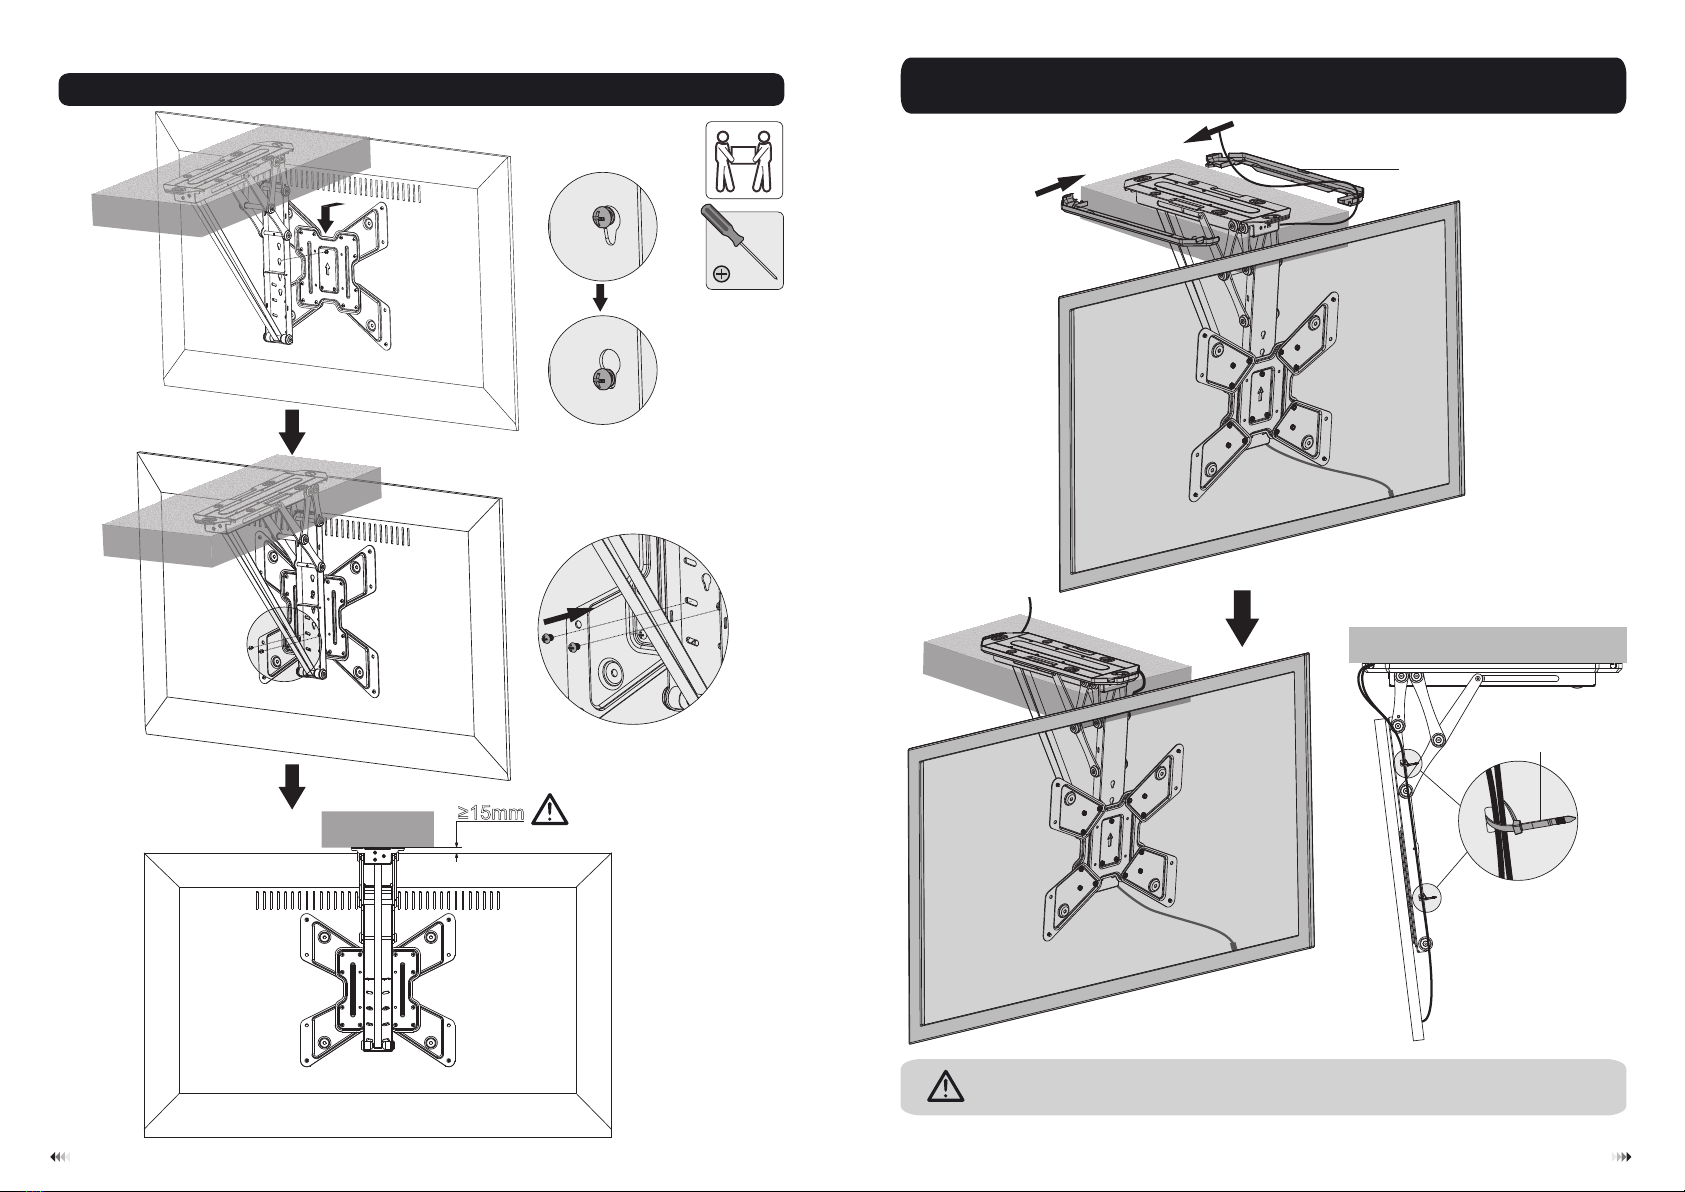
109
≥15mm
D
J
3. Hooking the TV onto the Ceiling Mount | Installation du téléviseur sur le support. 4. Installing the decorative covers and running the cables
Installation des couvercles décoratifs et l’installation du câblage.
Avoid having any cables through the mount motion space
Évitez d’avoir des câbles qui peuvent interférer lors du mouvement du support.
11 12
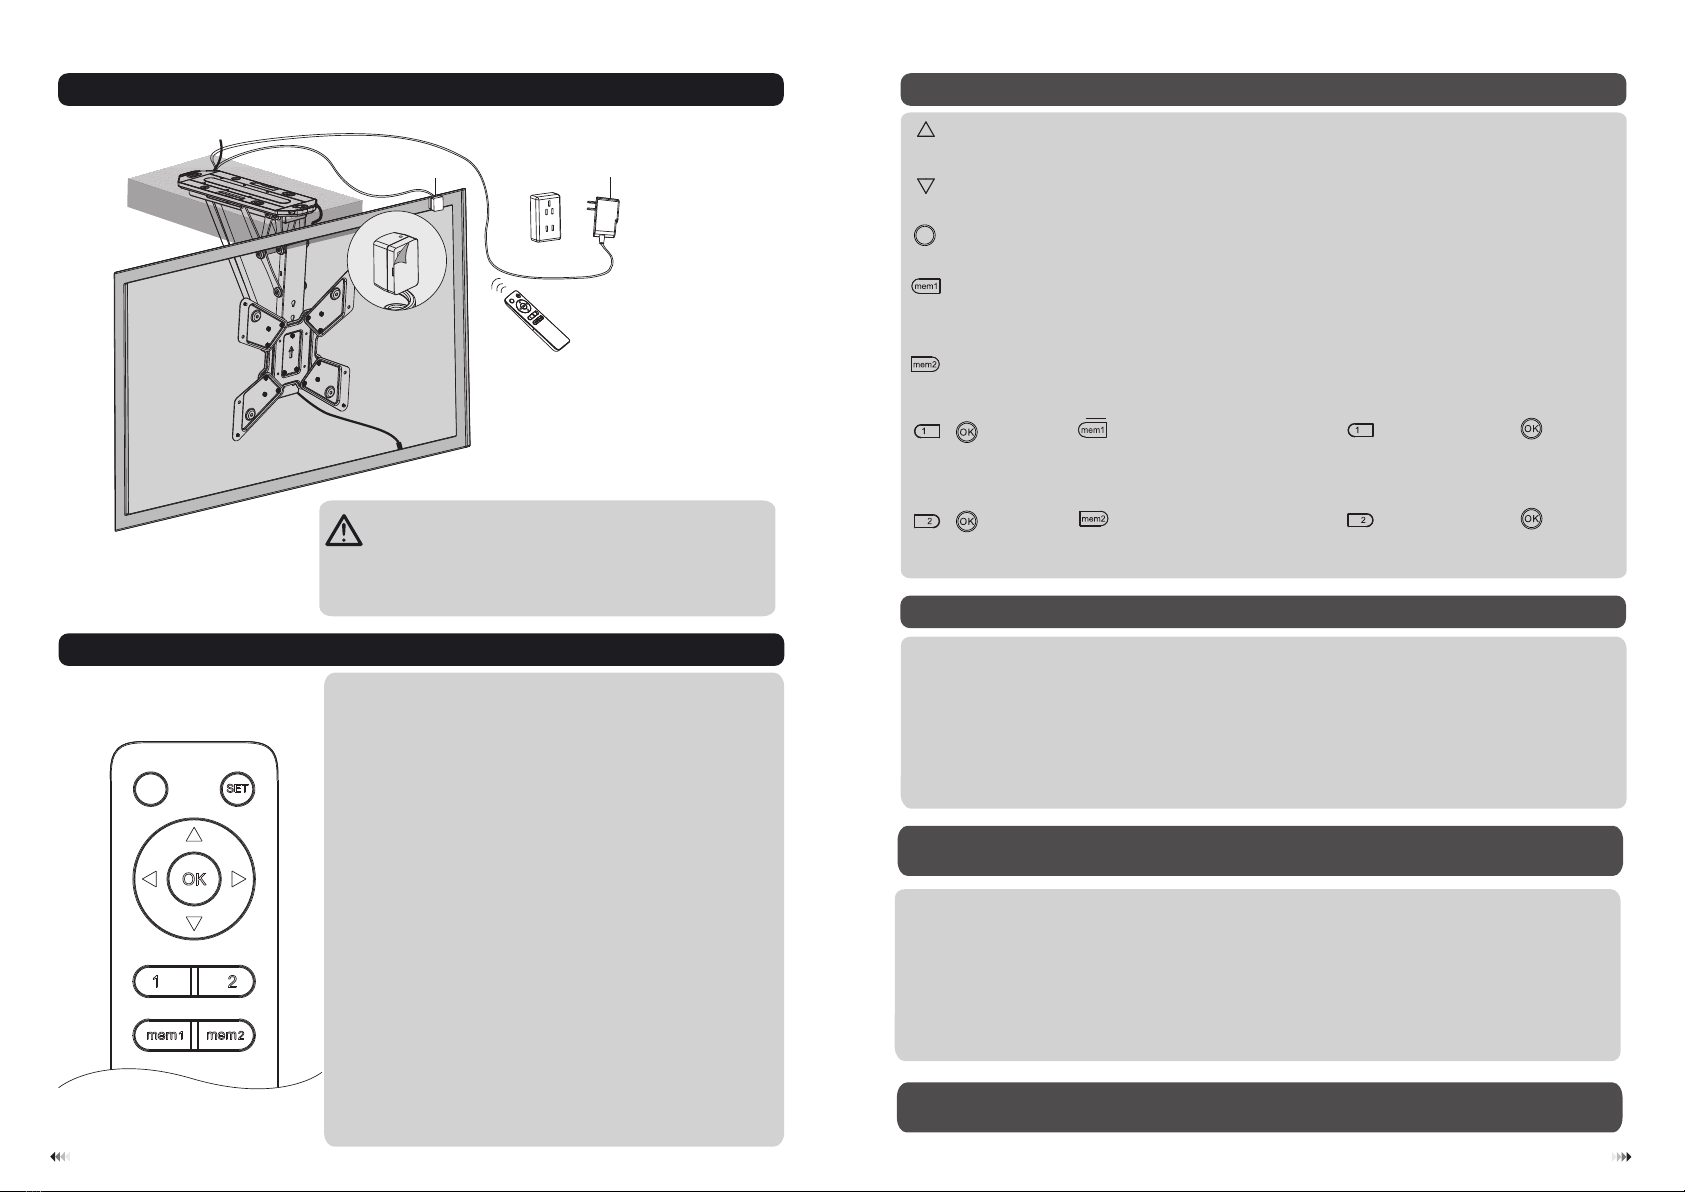
remote control
Stop button
OK
Memory button1.Press and hold for 5 seconds, the buzzer will sound twice beep beep, The memory
is saved as location 1.
Memory button2.Press and hold for 5 seconds, the buzzer will sound twice beep beep, The memory
is saved as location 2.
OUT button, downward movement
IN button, upward movement
+To recall the button(location 1). Press and release button, and then press button,
The TV ceiling mount will automatically swivel to the location1 after the buzzer sounds once.
+To recall the button(location 2). Press and release button, and then press button,
The TV ceiling mount will automatically swivel to the location2 after the buzzer sounds once.
I
G
•
•
In any position (but the minimum position against the ceiling), when manually push up the TV ceiling mount
over a distance. The TV ceiling mount will automatically return back to the minimum position against the
ceiling.
In the minimum position, when manually push up the TV ceiling mount over a little distance. The TV ceiling
mount will automatically unfold at the maximum position.
5. Placing the IR Receiver | Installation du capteur IR sur le support
Do not plug into the power outlet until it is ready to be operated.
Peel de backing paper. Place the IR receiver into desired position.
Ne branchez pas l’appareil au mur avant d’avoir complété le câblage
et être prêt à l’opérer.
Enlevez le papier arrière et placez le capteur IR à la position désirée.
6. Remote Control Operating Instructions | Mode d'emploi de la télécommande
Note : Do not operate TV mount without the TV installed or
damage to mechanism may occur.
Step 1 : First press OK button
When powered, buzzer will beep once indicating TV is in Standby state
Place the TV mount in desired pitch angle
Press and hold ‘1’ button for 5 seconds and repeat four times to
memorize position. Skip this step if the TV mount is not intended for
installation on an angled surface.
Step 2: Press the OK button to return the TV mount to operational state
Note : N’opérez pas le mécanisme du support sans son
téléviseur installé. Sinon, son enroulement pourrait
s’endommager.
Étape 1 : A l’activation, vous entendrez un Buzz confirmant que
l’appareil est branché.
En premier lieu, pressez le bouton OK.
Placez le support à la position relevée désirée.
Pressez le bouton ‘1’ pour 5 secondes. Pressez de nouveau 4 fois
afin de mémoriser la position. Si la TV est entièrement appuyée sur
le plafond, ignorez cette étape.
Étape 2 : Pressez de nouveau le bouton OK. A cette étape le
support devrait être opérationnel.
Vers le haut
Vers le bas
Arrêt
Bouton mémoire 1. Afin d’activer cette mémoire Pressez et retenez le bouton 5 secondes.
Bouton mémoire 2. Afin d’activer cette mémoire Pressez et retenez le bouton 5 secondes.
Afin de rappeler la position choisie à la mémoire. Pressez 1 + OK.
Afin de rappeler la position choisie à la mémoire. Pressez 2 + OK.
Buttons function instructions | Fonction des boutons
Manual Mode | Opération manuelle
Vous pouvez, à votre guise, placer la position désirée à l’aide du bouton haut et bas.
Learning Mode on a different Remote Control
Opération mémoire sur un contrôle à distance autre que celui fourni ici.
This TV bracket can only be operated with the supplied Remote Control. Certain TV Remote Controls
can learn 3 functions related to this bracket. Please check the instruction manual of your TV to find
out if this can be done.
Seul le contrôle à distance fourni avec ce support peut être utilisé pour l’opération. Toutefois, il est
possible de transférer 3 codes vers le contrôle à distance de votre téléviseur si ce dernier a la
capacité de mémoriser des codes extérieurs. Consultez le manuel d’opération de votre téléviseur
pour connaître la procédure.
Maintenance : Check solidity of your installation on a regular intervals.
Entretien: Vérifiez la solidité de votre installation de temps à autres.
Other AMX TV Mount manuals


Popular TV Mount manuals by other brands


Kanto
Kanto RCAD570 user manual

peerless-AV
peerless-AV ACC955 Installation and assembly

FONESTAR
FONESTAR STV-7344N instruction manual

Speaka Professional
Speaka Professional SP-TVM-701 quick start guide

Unicol
Unicol AZENITH VSX1800SC SERIES instruction manual

Gladiator Joe
Gladiator Joe GJ0A0092 quick start guide