Amytel AT3100 User manual

Owner’s Manual
AT3100
1.8GHz DECT Telephone
Non-GAP, Basic with LCD, CID, 1 Handset
TABLE OF CONTENTS
SAFETYINFORMATION ........................................................................2
GETTING STARTED ..............................................................................3
Unpacking ..................................................................................3
Your Telephone..........................................................................4
LCD Displayon the Handset .....................................................5
Basic Steps to Install..................................................................6
Charging the Handset................................................................6
BASIC OPERATIONS.............................................................................7
DuringStandby..........................................................................7
To answer an incoming call .......................................................7
Tomake a call ...........................................................................7
Using Traditional Dialing ...............................................7
Using Pre-dial ...............................................................8
Using Redial .................................................................8
Using MemoryDial.......................................................8
Call BackfromCID .......................................................9
Duringa call ...............................................................................9
Muting the Call ..............................................................9
Adjusting theVolume....................................................9
CID onCall Waiting ......................................................9
REVIEWING CID ....................................................................................9
SETTING UP MEMORYDIAL ..............................................................10
STORING CID INTO MEMORYDIAL ..................................................10
PROGRAMMING ..................................................................................11
Ringer Melody&Volume.........................................................11
Flash Timing ............................................................................11
OTHER FEATURES .............................................................................12
Shortcutto Turn Ringer On/Off................................................12
PagingtheHandset .................................................................12
Out ofRange...........................................................................12
CONFORMANCE TO REGULATION ...................................................13

This telephone is not designed for making emergencytelephone calls when
the power fails. Make alternative arrangements for access to emergency
services.
SAFETY INFORMATION
Read the safetyinstructions before first use ofthis phone.
• Use onlythe batteries supplied with this telephone.
• Do not use anymains adapter other than the one provided otherwise you
maypermanentlydamage your phone.
• Do not use the phone in damp humid conditions such as a bathroom. Do
not expose the phone or batteries to water or fire.
• Do not dispose ofused batteries with household waste or byburning.
• Do not use the handset in an explosive hazard area.
• To prevent electric shock, never tryto open the base or handset
enclosure.
• Avoid metallic contact (e.g. metal clips, keys) between the battery
contacts and charging conductors.
• There is a slight chance that your phone could be damaged byan
electrical storm. It is recommended that you unplug your phone fromthe
mains supplyand telephone socket during a storm.
Because the phone works bysending radio signals between base station and
handset, wearers ofhearing aids mayexperience interference in the formof
a humming noise.
We advise that this phone should not be used near intensive care medical
equipment or bypersons with pacemakers.
Your phone can interfere with electrical equipment such as answering
machines, TV and radio sets, clockradios and computers ifplaced too close.
It is recommended that you position the base unit at least one meter from
such appliances.
GETTING STARTED
Unpacking
This package should contain the following:
Base Unit
Base Stand
Handset
Mains Adapter
Phone Lead
Rechargeable Batteries –NiMH, 1.2V 650mAh x2, AAA size (HR 10/44)
Owner’s Manual
Ifanyofthese are missing, please contact…….
2
3

Your Telephone
LCD Displayon the Handset
Batteries in the handset need recharging
The phone is in use
Memorydial records are being retrieved or set up
The phone is in programming mode
There is a newCID not reviewed yet
The call is muted
The ringer is turned off
The handset is too far awayfromthe base.
The phone number contains more than 12 digits. The
displayonlyshows the last 12 digits.
Out of Range
Mute
Ringer Off
NewCID
Programming
Memory
Phone On
LowBattery
Extra Digits
Digit Display
LCD Display
Dialing Keys
Talk / Off
Program
Redial / Pause
CID / Volume
Clear / Mute
Recall
Memory
Page Key
Charge LED
In Use LED
4
5

Basic Steps to Install
1. Align the base unit with the base stand and snap into place. (To remove,
pull the stand fromthe front.)
2. Connect the output plug ofthe mains adapter to the socket on
the bottomofthe base unit and the mains adapter to the wall mains
supply.
3. Place the 2 AAA batteries, observing their polarities, into the battery
compartment on the handset.
4. Slide the batterydoor firmlyinto place.
5. Connect the telephone lead to the socket on the bottomofthe base
unit and to the wall phone socket.
6. Place the handset on the base unit and let the batteries charge for a full
14 hours before using.
Caution
Use onlythe mains adapter supplied with this telephone. Incorrect adapter
polarityor voltage can seriouslydamage the unit.
Adapter Model No.:
Input: 230 VAC 50 Hz
Output: 7 VDC 300 mA and 7 VAC 150 mA
Caution
RISK OF EXPLOSION IF BATTERYIS REPLACED BYAN INCORRECT
TYPE. Refer to the original type supplied with this telephone. NiMH
batteries must be disposed ofin accordance with applicable waste disposal
regulations.
Charging the Handset
Place the handset on the base cradle to recharge the handset batteries. The
charge LED will be steadilylit.
When the lowbatteryicon is displayed, the batteries need recharging.
When you are talking on the phone, you’ll also hear a warning beep.
BASIC OPERATIONS
During Standby
When the phone is not in use, the LCD
displays the handset number and all the
applicable icons (e.g. LowBattery, Ringer
Off).
To answer an incoming call …
When there is an incoming call, the phone
will ring and the CID record, ifany, will be
displayed. flashes according to the
ringing cadence. turns on when there is
CID record.
turns on ifthe phone number contains more than 12 digits. In this case,
onlythe last 12 digits are displayed.
Before answering the call, you can press to adjust the ringing volume
to a desired level.
“------------”indicates that the call is private
and the phone number is not available.
1. Press to answer the call. is
turned on.
2. Press again or place the handset
on the base cradle to disconnect.
To make a call…
Your phone allows you to dial out a phone number in various ways. In each
case, will turn on when the phone number contains more than 12 digits.
Using Traditional Dialing
1. Press and wait for the dial tone.
is turned on.
2. Use the number pad to dial the phone
number. The displayshows the digits
as you enter them.
6
7

Using Pre-dial
Pre-dial allows you to enter a telephone number and verifyit on the display
before you place the call. The LCD will displaythe last 12 digits dialed but
you can enter up to 20 digits.
1. Use the number pad to dial the phone
number. The displayshows the digits
as you enter them.
2. Ifyou make a mistake, press to
erase one digit at a time, or press and
hold ifor 2 seconds to clear the entire number and return to Standby.
3. Press to dial the telephone number. is turned on.
Using Redial
Redial works whether the last number is dialled manually, fromthe Memory
Dial or fromthe CID record.
1. Press . The last phone number
you called is shown on the display.
2. Press and hold for 2 seconds to
return to standby.
3. Press to dial the phone number.
Or
1. Press and wait for the dial tone.
2. Press . The last phone number you called is dialled out. The
displayshows the digits dialed.
Using Memory Dial
You need to create a memorydial list before using this procedure. See
Setting Up Memory Dial on page….
1. Press . is turned on.
2. Press the digit key0…9. The
displayshows the phone number
stored in that particular memory
location.
3. Press and hold for 2 seconds to return to standby
4. Press to dial the phone number. will turn off.
Call Back from CID
This feature works onlywhen the CID record contains a valid phone number.
1. Press to bring up the CID record.
2. Press to dial the phone number.
During a call…
When you are talking on the phone, you could mute the call and adjust the
volume.
Muting the Call
1. Press to mute the call. is
turned on. The caller would not be
able to hear you but you would still
be able to hear the caller.
2. Press again to unmute the call
and turn off.
Adjusting the Volume
Press to adjust the receiver volume to High, Mediumor Low.
CID on Call Waiting
Ifyou have subscribed to this service, the telephone will showthe phone
number ofanother incoming call while you are talking on the phone.
Ifyou press ,the current call will be put on hold and you could talkwith
this second caller. Subsequent presses of will toggle you between these
2 callers.
In anycase, the LCD will showthe phone number ofthe first caller.
REVIEWING CID
Your telephone keeps the last CID record received.
1. turns on when there is a newCID
record.
8
9

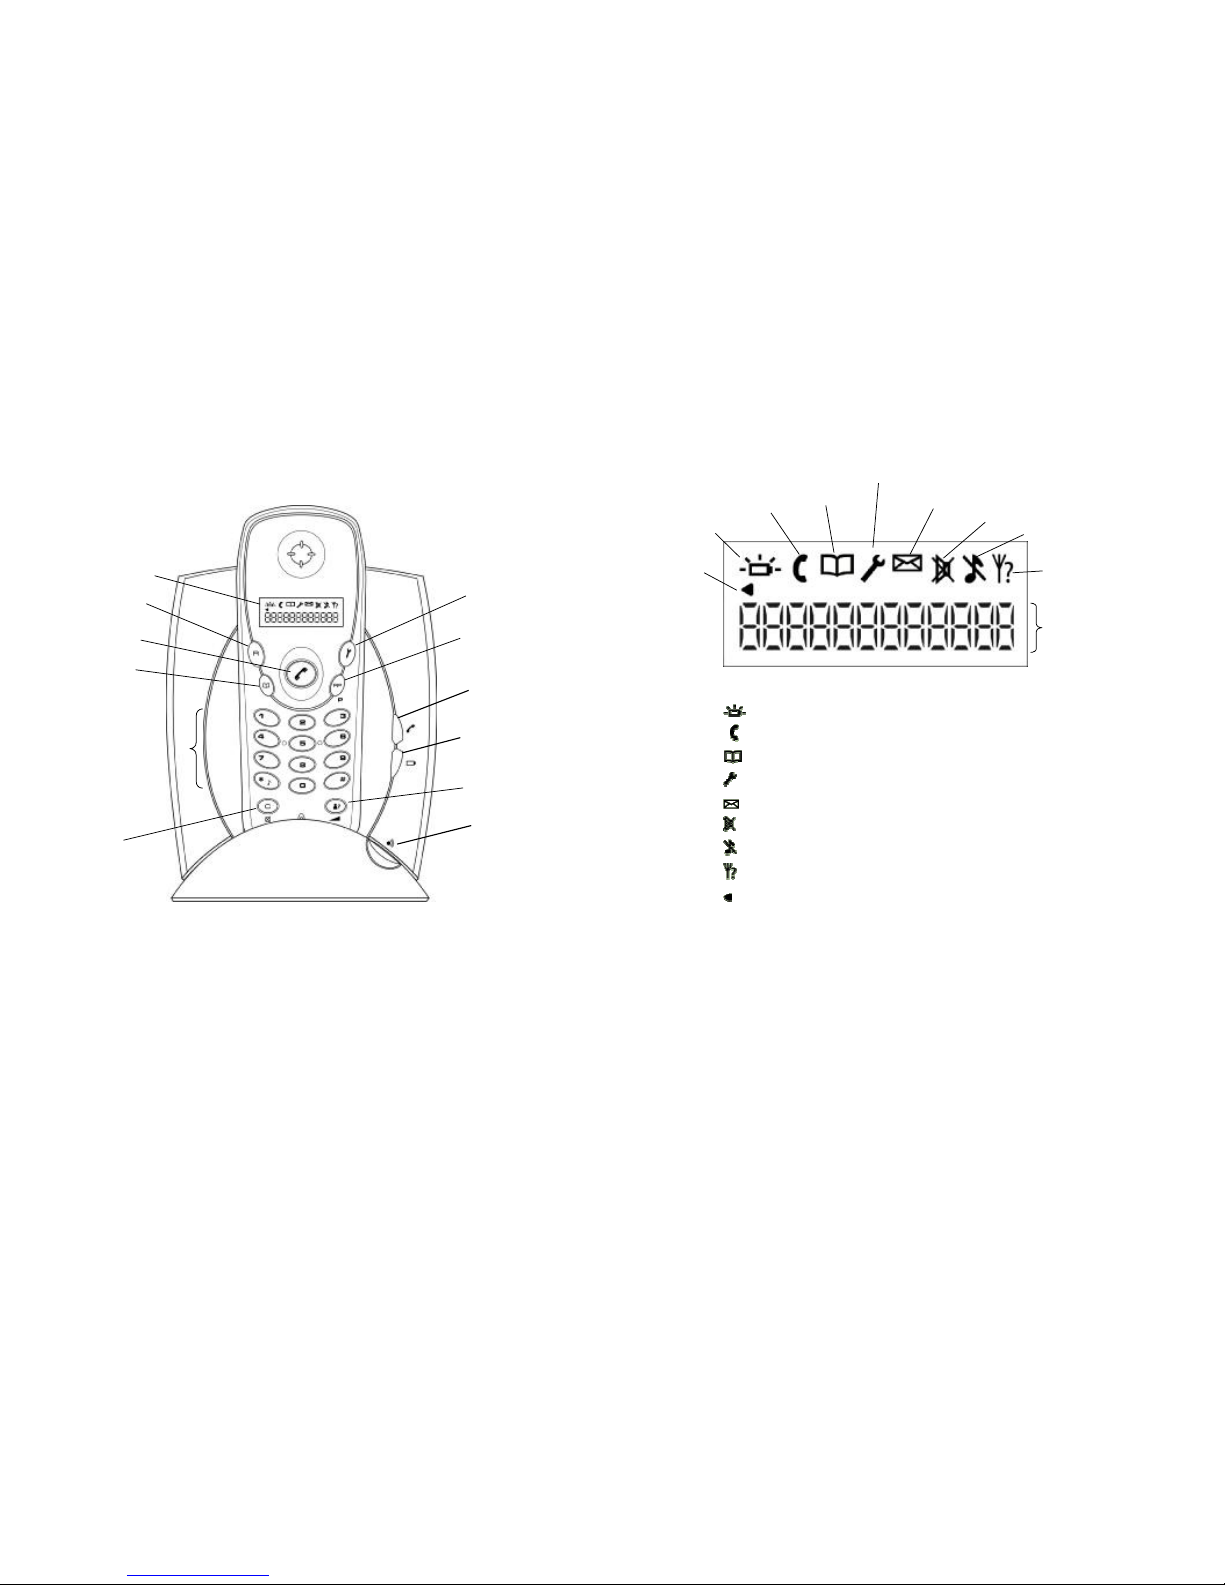
2. Press to bring the record up in
the display.
The record could hold up to 20 digits
eventhoughit onlydisplays the last 12.
Ifa number contains more than 12
digits, you will see turn on.
Ifit is a private call with no phone number, a blankscreen will be shown.
3. Press again to return to standby.
(You need to subscribe to CID service in order to utilise this feature. Contact
your local telephone company.)
SETTING UP MEMORY DIAL
There are 10 memorylocations ( 0to 9) where you could store phone
numbers. When you enter more than 12 digits, the displaywill onlyshowthe
last 12. However, the memorylocation could actuallystore up to 20 digits.
1. Use the number pad to dial the phone
number. The displaywill showthe
digits as you enter them. A 2-second
pause, displayed as “P”, could be
inserted bypressing and holding .
2. Ifyou make a mistake, press to erase one digit at a time, or press
and hold for 2 seconds to clear the entire number and return to
standby.
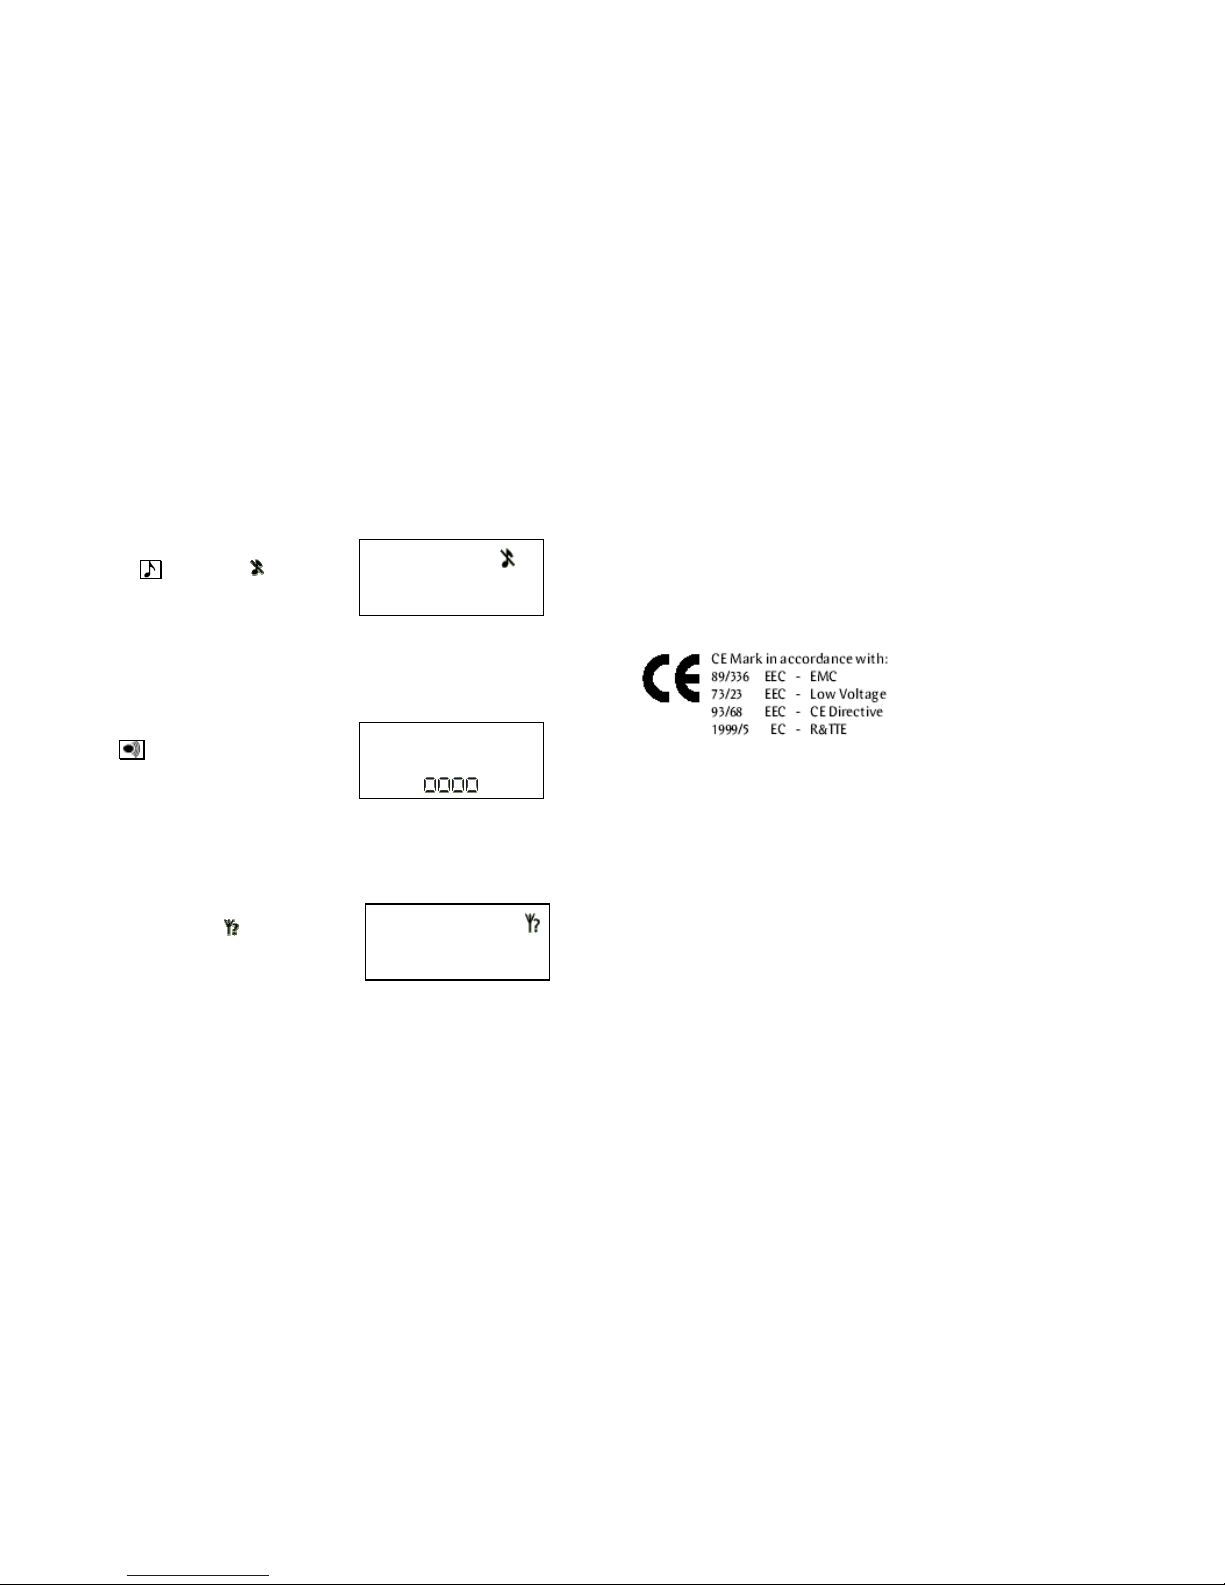
3. Press and is turned on.
4. Press 0…9to store the number.
You’ll hear 2 short beeps when the
number is successfullystored. will
then turn off.
STORING CID INTO MEMORY DIAL
You can store the last CID record received directlyinto memorydial.
1. Press to bring the record up in the display.
2. Press and is turned on.
3. Press 0…9to store the number. You’ll hear 2 short beeps when
the number is successfullystored.
PROGRAMMING
You can adjust the ringer melody, flash timing and ringer volume in the
Programming mode.
To enter the Programming mode, simplypress and hold until you hear a
beep. will turn on. Press again to exit fromProgramming mode and
return to standby. Ifchanges have been
made, you’ll hear 2 short beeps as
confirmation.
Ifyou press and hold , you’ll return to
Standbyand all the changes you’ve made will be ignored (except ringer
volume).
Ringer Melody& Volume
In Programming mode, you can press to hear the current melodyat
current volume level.
To choose among the 3 melodies, press 1or 2or 3. You will hear the
melodyonce each time you press the key.
Ringer Melody1 is the default setting.
To adjust ringer volume among the 6 different levels (including turning the
ringer off), press repeatedly. The ringer will playonce to demonstrate
the volume.
Mediumis the default setting.
This setting affects both incoming call ringing and base paging.
Flash Timing
When you are talking on the phone, pressing will send a flash signal.
You can set the flash timing as either short or long. This is different in
various countries. Checkwith your local telephone companyifyou are not
sure.
1. Press in Programming mode.
2. Press 1to choose short flash or 2to choose long flash.
Short flash is the default setting.
10
11

Flash timing could not be adjusted after the ringer melodyor volume is
adjusted. You need to exit and reenter into the Programming mode.
OTHER FEATURES
Shortcut to Turn Ringer On/Off
You can turn on/off the ringer bypressing
and holding in Standby. will turn on
when the ringer is turned off.
When the ringer is turned on using this
shortcut method, the ringer volume will be
set to medium.
This setting affects both the incoming call ringing and base paging.
Paging the Handset
You can page or locate the handset by
pressing on the base. The handset
will produce the paging tone (same as
ringer melody) for 30 seconds and LCD
displayis as shown here.
You could stop the paging bypressing anykeyon the handset.
This feature is affected bythe ringer melody, ringer volume and ringer on/off
that you’ve programmed.
Out of Range
You will be alerted when the handset is too
far awayfromthe base. will turn on.
Bring the handset nearer the base to move
it backin range.
Ifyou are talking on the phone, you’ll hear
an alert tone through the earpiece. Ifyou fail to bring the handset backin
range with the base, your call would be disconnected.
NOTE:
Telephone Functionality
Although this telephone can be used in the whole European Community, it
has been designed to operate with the [countryname(s)] analogue network
and some features maynot operate as expected when connected outside
[countryname(s)].
CONFORMANCE TO REGULATION
This product complies with the essential requirements for Radio and
Telecommunications Terminal Equipment.
For enquiries, contact …
12
13

用證
WarrantyCard
㆘購入之“奧美達”產品將於購買日起享有㆒年免費維修保用(如需維
修,請自攜到本公司維修㆗心)。此維修保用不適用於產品曾因意外、㆟為損
毀及不適當使用等情況。如需更換零件則只需收取零件費用。所有換出之零件
仍屬“奧美達”所擁有。顧客請妥存此保用證及發票正本,當需此項服務時出
示給本公司維修部。此保用證㆒經塗改或欠缺零售商 章㆒律視作無效。此保
用證只適用於香港區域。
This Amytel product is under 1year off-site guarantee as fromthe date of purchase.
This guarantee becomesinvalid if the products are under accident、humanfault or
improper operation. Amytel will onlycharge on the Spare PartCost for anychange
of spare part(s) ifneeded and the exchanged part(s) remains the propertyofAmytel.
Please safe-keep this warrantycard together withthe official purchase invoiceand
present these to ourService Centre forinspectionduring each service.
Anyalteration on this card will be considered invalid. This WarrantyCard only
applicable in Hong Kong.
型號 編號
Model_____________________________ Serial number __________________
購買日期零售商 章
Date of purchase____________________ Dealer’s Chop__________________
美達(亞洲)有限公司
香港黃竹坑道 37 號利達㆗心 21-22 樓
21-22/F.,Leader Centre,37 Wong Chuk Hang Rd.,H.K.
TEL : 2544 0097
Table of contents
Other Amytel Cordless Telephone manuals