Anatol VOLT User manual

OPERATOR’S MANUAL
VOLT
ARIES OPERATING SYSTEM
ANATOL EQUIPMENT MANUFACTURING CO.
919 SHERWOOD DR.
LAKE BLUFF, IL 60044 USA
PHONE: 847-582-1825
FAX: 847-582-1854
anatol.com 1
2020

ANATOL EQUIPMENT MANUFACTURING CO.
“Print Smarter…Not Harder”
Thank you for your purchase of the VOLT, a fully automatic
screen printing press. The VOLT is controlled from an operator-
friendly touchscreen control panel powered by our Aries
operating system, allowing the user quick and easy access to all
machine parameters.
We at Anatol welcome you to our family and look forward to a
long relationship, allowing us to serve your needs now and in
the future.
Should you have any questions or equipment service needs,
contact our service department at 847-582-1825 (USA) or +48
85 731-93-00 (Poland) between the hours of 8:00am –5:00pm
CST or fax your inquiry during normal business hours to 847-
582-1854 (USA) or +48 85 730-17-79 (Poland). When you call,
please have your machine serial number information available
so we may assist you quickly.
You may also reach our service departmentby email at
service@anatol.com
All materials and data contained in this document are
confidential and proprietary. The information contained herein
is strictly intended for customer use only.
Go to anatol.com to view other Anatol equipment and to
register your warranty.
anatol.com 2

anatol.com 3
Table of Contents
Operating Console 4
1. Lower Menu 6
2. Right Menu 8
2.1 Main Menu 9
2.1.1 Maintenance 10
2.1.2 Language and Appearance 10
2.1.3 Change User PIN Code 11
2.1.4 Advanced Settings 11
2.1.5 Access to Functions 12
2.1.6 Firmware Updates 12
2.2 Advanced Settings 13
2.2.1 Indexer and Lift Settings 14
2.2.2 Number of Heads Setting 15
2.2.3 User Management 16
2.2.4 Email Notifications 17
2.2.5 Stop After Last T-Shirt 17
2.2.6 Wi-Fi Connection 17
2.2.7 Date and Time 18
2.2.8 RS-232 Ports 18
2.2.9 Exit to Desktop 18
2.3 Machine Settings 19
2.4 Easy Setup 20
2.5 Load/Save Job 21
2.6 Pallet Warming 23
2.7 Logout/Switch Off 24
2.7.1 Logout 24
2.7.2 Presentation Mode 25
3. Virtual Carousel 26
3.1 Station (Pallet) Icons 28
3.2 Head Settings 29
3.2.1 Print Head Settings 29
3.2.2 Flash Head Settings 30
A. Quartz Flash without Temperature Sensor 30
B. Quartz Flash with Temperature Sensor 31
C. Infrared Shuttle Flash 32
3.2.3 Setting the Ink Color on the Print Head 33
A. RBG/CMYK 33
B. Pantone 33
4. Step Back Mode 34
5. Cycle Mode 35
6. Upper Taskbar 37

VOLT
Aries
Operating
System
anatol.com 4

VOLT - Aries Operating System
anatol.com 5
1
2
4
3
The main window is divided into several areas:
1. Lower menu (Page 6) –a set of buttons for controlling the machine’s basic
movements
2. Right menu (Page 8) –a set of buttons that provides additional machine functionality
3. Virtual carousel (Page 26) –illustrates the current condition of pallets and print
heads, as well as displays the current machine status and counters
4. Upper taskbar (Page 37) –shows the current user, time, job name (if saved) and
wireless internet connectivity
More information for each section can be found in the following subsections of this
manual.

1. Lower Menu
The lower menu contains all the buttons you need to control the press's basic movements. This
menu is closely correlated with the message interface and icon lights located in the center of the
Virtual Carousel (see Page 26). Before you begin printing, you will have to perform the following:
Reset
Resetting the machine is necessary after every error message and after starting the machine
or receiving an open safety bar warning. Press the Reset button to reset the machine.
Home
The press will need to be homed every time the press is started and whenever any
malfunction or emergency occurs. Press the Home button to move all servos to the home
position.
Lock
Pressing the Lock button closes, or locks, the indexer. Be sure to set the bearing on the
carousel in the right position so it will fit into the fork on the indexer when the indexer
moves into the upright, locked position.
VOLT –Aries Operating System
anatol.com 6
Unlocked Locked
Bearing Fork

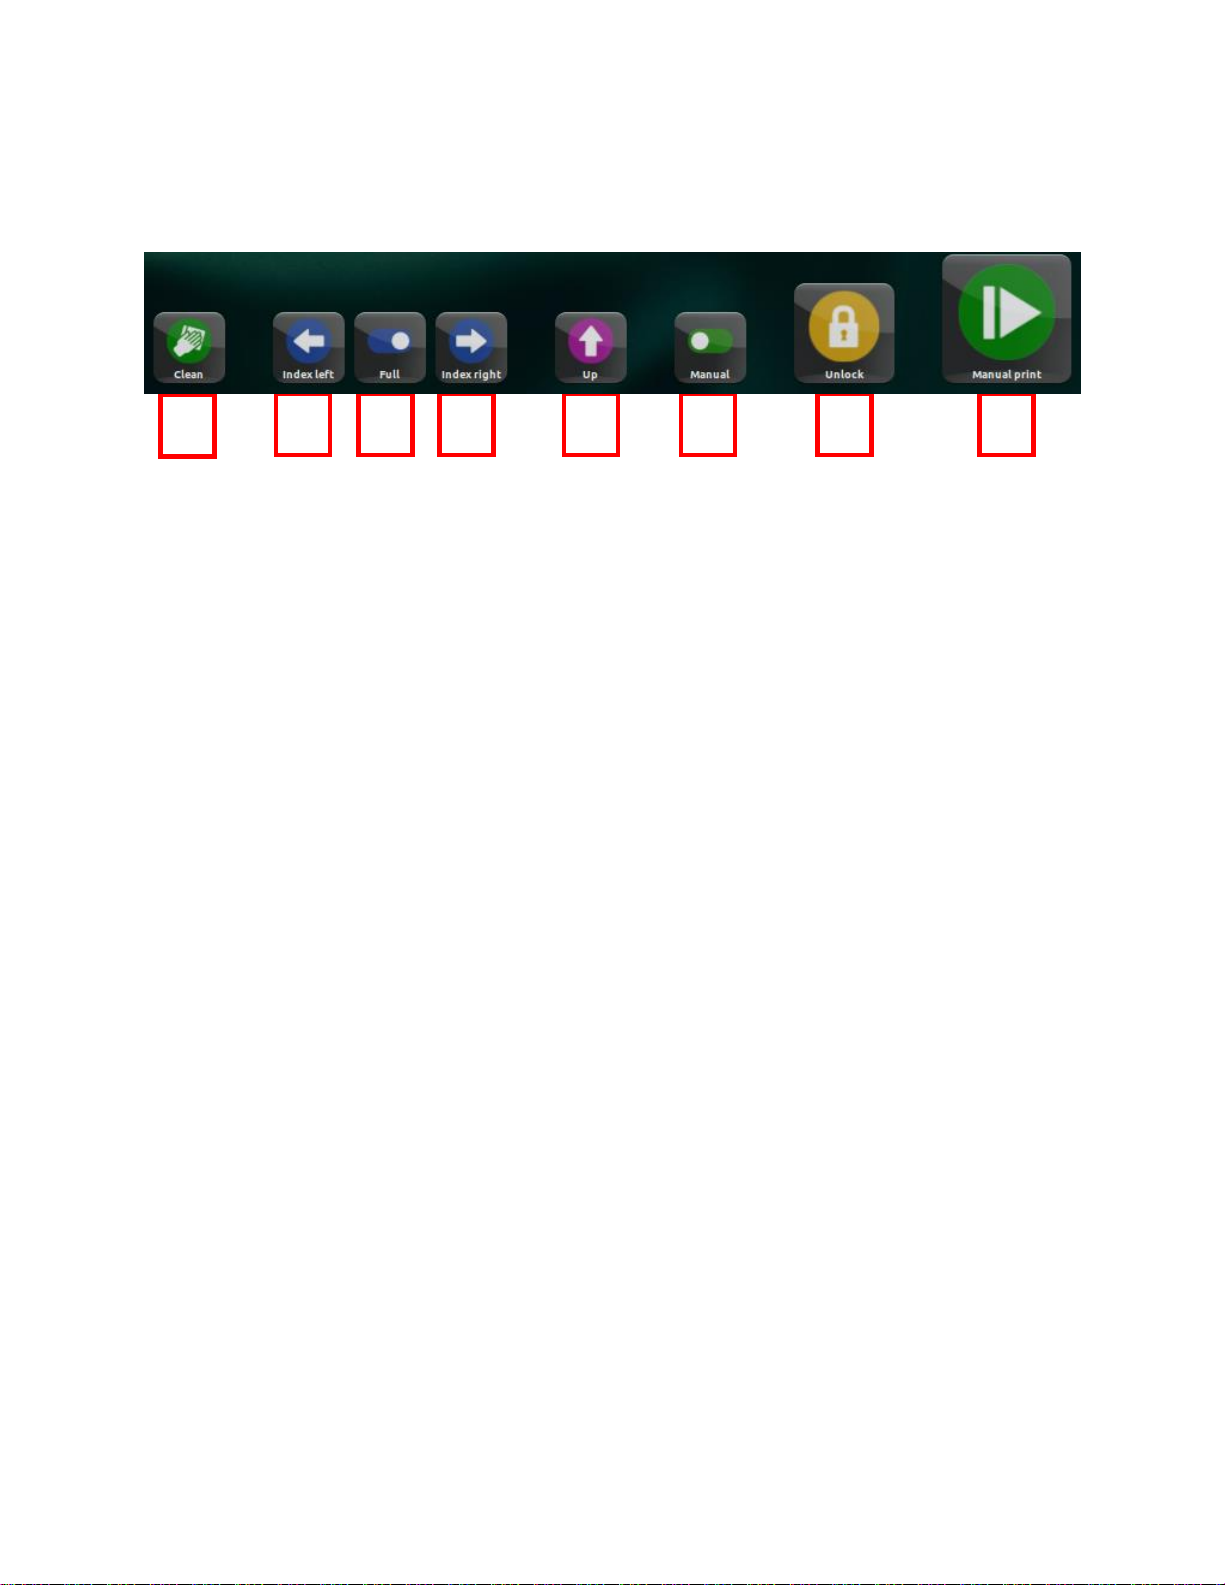
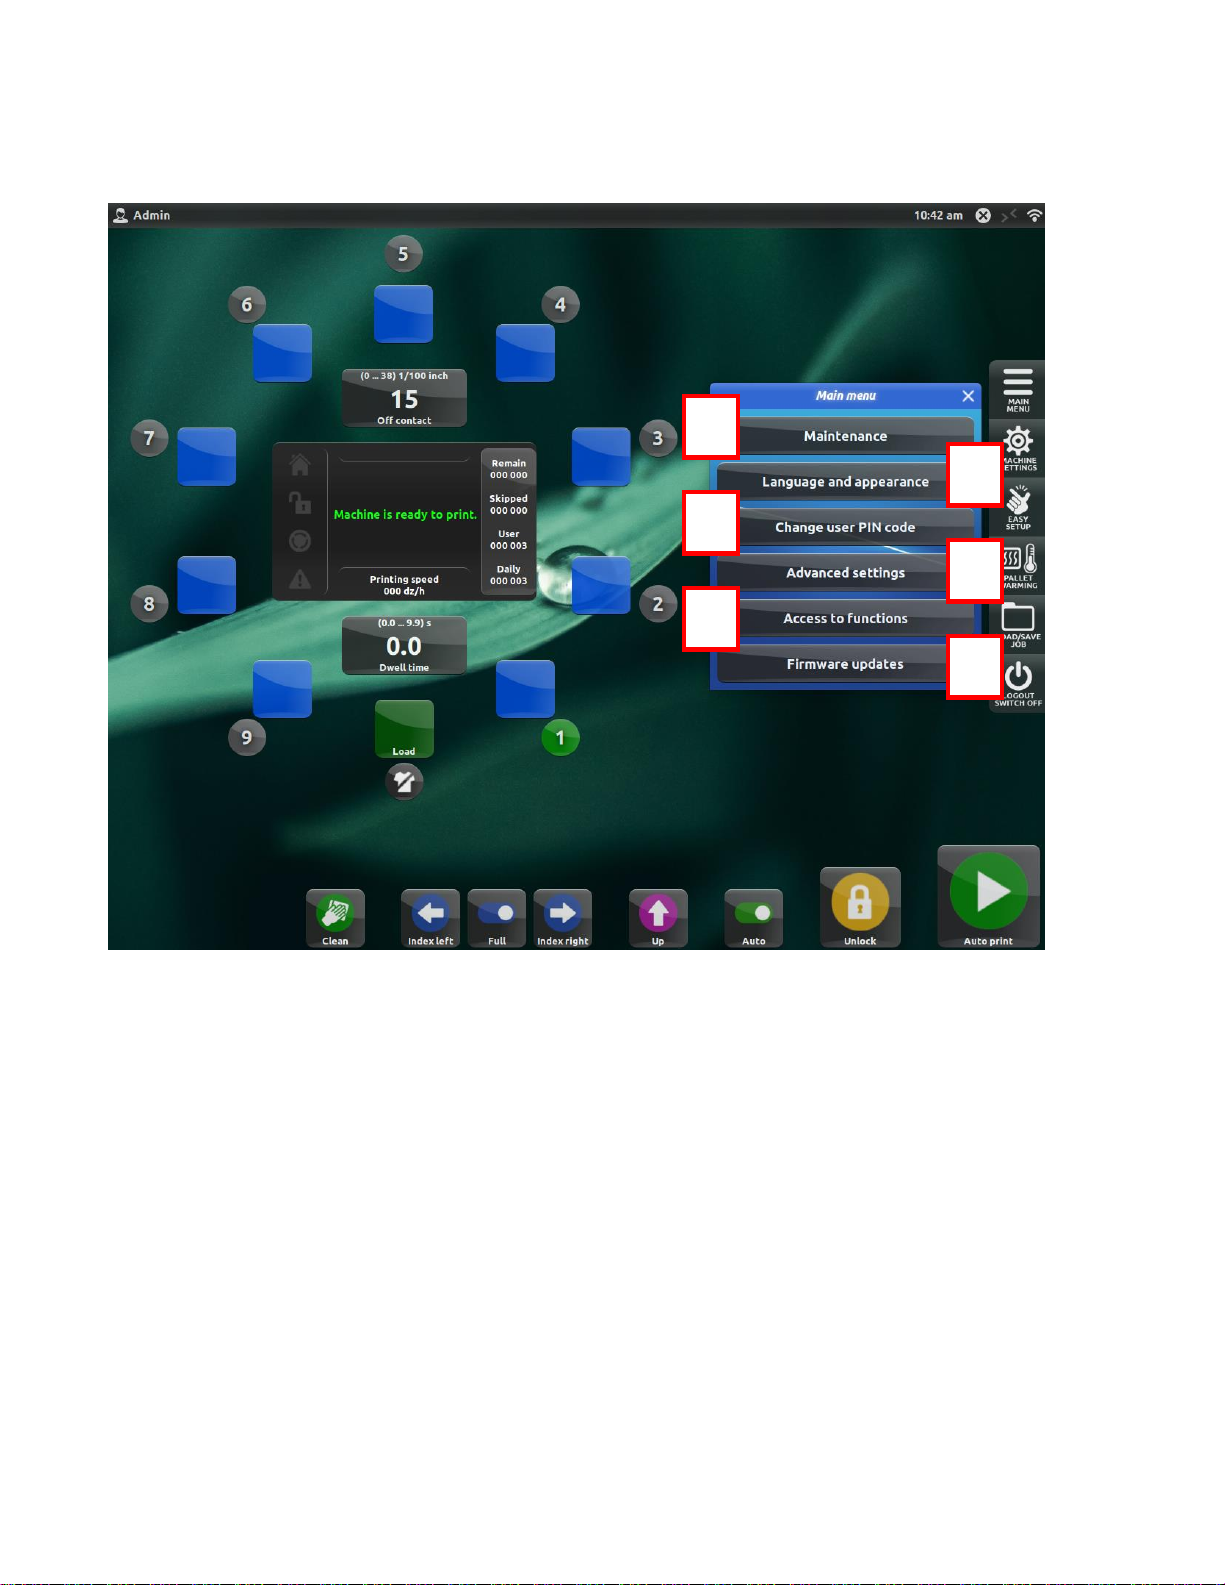
When the press is reset, homed and locked, the press is ready for printing and the full lower menu
will display, containing the buttons below:
A. Clean –pressing this button will half index the pallets between the print heads,
allowing you to clean the underside of the screens when necessary. Pressing the button
again will return the pallets to their original positions.
B. Index Left –pressing this button will execute either a full or half index left, depending
on the setting of the Full/Half Index switch. (See item 3 below)
C. Full/Half Index –toggle between executing full indexes (moving the pallets from one
station to the next) or half indexes (moving the pallets halfway between stations).
D. Index Right –pressing this button will execute either a full or half index right,
depending on the setting of the Full/Half Index switch. (See item 3 above)
E. Table Up/Table Down –pressing this button will raise or lower the table for setup
purposes.
F. Manual/Auto –switch the machine mode between Manual and Automatic printing. In
Manual mode, you need to hit the Print button for every shirt. In Automatic mode, the
machine will execute continuous printing until you hit Stop or the Remaining Shirts
counter hits zero (if activated - see Page 27).
G. Lock/Unlock –pressing this button will unlock, or open, the indexer. All buttons will
disappear from the lower menu and the Lock button will appear. When the indexer is
unlocked, or open, Free Wheel mode is enabled, allowing you to rotate the pallet
carousel by hand. This is often used for test printing.
H. Start/Stop Printing –pressing this button will begin the printing process. If Manual
print is selected, you will have to press the button to begin printing each individual
shirt. If Automatic printing is selected, the machine will execute continuous printing
until the Stop button is pressed or the Remaining Shirts counter hits zero (if activated –
see Page 27).
VOLT –Aries Operating System
anatol.com 7
ABCDEFGH

VOLT –Aries Operating System
anatol.com 8
2. Right Menu
A. Main Menu (Page 9) –View the press's maintenance schedule, change
language and appearance, change the user PIN code, access advanced
settings, enable/disable additional machine functions and modes, and
check for/download firmware updates.
B. Machine Settings (Page 19) –Adjust the duration of the audible warning
beep, change the units that measure the production speed, change the
indexing direction, set the lift/lower delay time, enable Cycle and Step
Back modes, and adjust the indexer speed.
C. Easy Setup (Page 20) –Reduces the off-contact distance to zero and
enables the Index Here function to facilitate registration during job setup.
D. Pallet Warming (Page 23) –Warm the pallets to a preset temperature for
a preset time, or for a preset number of cycles to prepare the pallets for
printing.
E. Load/Save Job (Page 21) –Save and recall job parameters to help speed
up setup times.
F. Logout/Switch Off (Page 24) –Change users, enter Presentation Mode, or
turn the machine off.
A
B
C
D
4
E
F

2.1 Main Menu
In the Main Menu, you have the ability to view the press's maintenance schedule (A), change the
menu language and appearance (B), change the user PIN code (C), access advanced settings (D),
enable/disable additional functions and print modes (E), and check for/download firmware updates
if the machine is connected to Wi-Fi (F).
See the following subsections for additional information on each function of the Main Menu.
•Maintenance –Page 10
•Language and Appearance –Page 10
•Change User PIN Code –Page 11
•Advanced Settings –Page 11, Pages 13-18
•Access to Functions –Page 12
•Firmware Updates –Page 12
VOLT –Aries Operating System
anatol.com 9
AB
CD
EF

VOLT –Aries Operating System
anatol.com 10
2.1.1 Maintenance
In the Maintenance window, you will see the
press's maintenance schedule. For each
maintenance item, you will see after how many
cycles you should perform the maintenance, as
well as a counter of how many cycles are
remaining until the next required maintenance.
When you perform the maintenance item,
press the Done icon to reset the counter.
2.1.2 Language and Appearance
In the Language and Appearance window, you
have the ability to toggle between Soft and High
Contrast icon sets. You can also set the menu
language, background color, wallpaper and screen
brightness.
Soft icons High Contrast icons

VOLT –Aries Operating System
anatol.com 11
2.1.3 Change User PIN Code
In the Change User PIN Code window, you can
change the PIN code the current user uses to log
in to the machine. This function is only available
to users with Manager or Admin roles (see User
Management –Page 16).
2.1.4 Advanced Settings
In the Advanced Settings window, you can access
advanced Indexer, Lift and Print Head settings.
You can also manage the press users, set up
automatic email notifications, set the machine to
automatically stop after the last t-shirt, toggle
temperature units between °F/°C, manage your
press's Wi-Fi connection, adjust the current date
and time, manage the RS-232 port settings, or
exit to the desktop.
The Advanced Settings window is only available
to Managers and Administrators (see User
Management –Page 16).
For more on the Advanced Settings window, see
pages 13-18

VOLT –Aries Operating System
anatol.com 12
2.1.5 Access to Functions
In the Access to Functions window, you can
enable/disable the following functions:
•Step Back Mode (See Page 34)
•Cycle Mode (See Page 35)
•Load/Save Jobs (See Pages 21-22)
•Pallet Warming (See Page 23)
•Flash Warming (See Page 31)
•Setting Ink Colors on the Print Heads
(See Page 33)
•Multiprint Table Move (See Page 29)
Only Managers and Administrators have access
to the Access to Functions window. See User
Management on Page 16.
2.1.6 Firmware Updates
In the Firmware Updates window, you can view
the current firmware version, as well as reload
the Master PCB and Print Head PCBs, and also
toggle automatic firmware updates on/off and
check for/download available firmware updates.
If the press is connected to Wi-Fi, you can check
for any available updates with the "Check for
updates" button. If an update is available and you
wish to proceed with the update, you will be
prompted to power off your machine and power
it back on to install the update. Allow at least one
minute between switching the machine off and
on again to give the system time to load the
update.
Only Managers and Administrators have access
to Firmware Updates. See User Management on
Page 16.

2.2 Advanced Settings
In the Advanced Settings window, you can access advanced Indexer, Lift and Print Head
settings. You can also manage the press users, set up automatic email notifications, set the
machine to automatically stop after the last t-shirt, toggle temperature units between
°F/°C, manage your press's Wi-Fi connection, adjust the current date and time, manage the
RS-232 port settings, or exit to the desktop.
Each section of the Advanced Settings window is described in more detail in the
following pages 14-18
The Advanced Settings window is only accessible to Managers and Administrators.
See User Management –Page 16.
VOLT –Aries Operating System
anatol.com 13

2.2.1 Indexer and Lift Settings
Please contact the Anatol Service Department at 847-582-1825 or service@anatol.com
before making any changes to the advanced Indexer and Lift Settings. Making
unauthorized changes without the assistance of Anatol Service can cause permanent
damage to your press.
In the Indexer and Lift Settings window, you have the ability to make advanced adjustments
to the indexer and lift home and distance offset positions, as well as speed. Do not adjust
these settings without the assistance of the Anatol Service Department. It is also a good
idea to take a photo of the factory settings for your own records.
VOLT –Aries Operating System
anatol.com 14

2.2.2 Number of Heads Setting
Please contact the Anatol Service Department at 847-582-1825 or service@anatol.com
before making any changes to the Number of Heads setting. Making unauthorized
changes without the assistance of Anatol Service can cause permanent damage to
your press.
VOLT –Aries Operating System
anatol.com 15

2.2.3 User Management
The User Management menu is where you can add and
delete new users for the machine. This screen is only
available to users with Manager or Admin roles –see
below.
A. Toggle on/off the ability to sign the selected
user in automatically on machine start-up
B. Displays the name of the current user
C. Opens a keypad to change the current user
name
D. Displays the current user role
E. Change the current user's role
F. Displays the current user's PIN code used to
log in to the machine
G. Change the current user's PIN code
H. Delete the user
User Roles
Functions not listed in this table are available to all
three types of user
VOLT –Aries Operating System
anatol.com 16
A
B
C
D
E
FG
H
Function Common User Manager
Administrator
Change user
PIN codes X
Indexer
speed adjustment X
Advanced settings
access X
User management
X
Email notification
setup
X X
Date and time setup
X X
Exit to desktop
X X
Access to
functions X
Firmware
updates X

2.2.4 Email Notifications
In the Email Notifications menu, you have the ability to
enter up to three different email addresses to which
productivity reports will be automatically delivered
whenever the press is powered off, if the press is
connected to Wi-Fi. Only users with Admin permissions
can set email notifications –see User Management on
Page 16.
2.2.5 Stop After Last T-Shirt
2.2.6 Wi-Fi Connection
VOLT –Aries Operating System
anatol.com 17
In the Wi-Fi connection menu,
you can connect the press to
your shop's wireless internet
network. Locate your shop's
Wi-Fi network on the list and
enter any required credentials
to connect your press to the
network.
If you are using the Remaining Shirts counter (see Page
27) to count down the shirts remaining in the print run,
you can set the machine to stop printing at the last shirt
and display a message informing the operator that it is
time to print the final shirt. Do this by toggling "Stop
after last t-shirt" to On.

2.2.7 Date and Time
In the Date and Time window, you can set the current date and time displayed on the
touchscreen. Only Administrators have access to the Date and Time screen –see User
Management on Page 16. In order to change the Date and Time settings, please contact
the Anatol Service Department at 847-582-1825 or service@anatol.com
2.2.8 RS-232 Ports
To adjust the RS-232 port settings, please contact the Anatol Service Department at 847-
582-1825 or service@anatol.com
2.2.9 Exit to Desktop
Press the Exit to Desktop icon to exit the Aries operating system and go back to the
desktop. Only Administrators have the ability to Exit to Desktop –see User Management
on Page 16. Contact Anatol Service at 847-582-1825 or service@anatol.com before exiting
to the desktop.
VOLT –Aries Operating System
anatol.com 18

2.3 Machine Settings
In the Machine Settings window, you have the ability to adjust the duration of the audible warning
beep (A), change the units used to measure production speed (B), change the indexer direction
(C), adjust the lift (D)/lower (E) delay time, toggle between Cycle mode, Step Back mode and
Regular printing (F), and adjust the indexer speed (G).
A. Adjust the duration of the audible warning beep from 0-3 seconds
B. Change the units used to measure production speed of the press. View production
speed in dozens per hour (dz/h) or pieces per hour (pcs/h).
C. Change the indexing direction from clockwise to counter-clockwise.
D. Set the delay time before the pallets will raise to the Table Up position.
E. Set the delay time before the pallets will lower to the Table Down position.
F. Enable/disable Cycle mode, Step Back mode, or Regular Printing mode. Only one
mode can be active at a time.
G. Set an indexer speed of slow, regular or fast (only available for Managers and
Administrators –see User Management on Page 16)
VOLT –Aries Operating System
anatol.com 19
A
BC
ED
F
G

2.4 Easy Setup
Easy Setup mode is used to help you easily prepare your press for a print run. Easy Setup will
reduce the off-contact setting to zero and enable the Index Here function to help facilitate
registration during setup. The button is located in the right menu. By default, this feature is
disabled.
1. To activate the function, press the Easy Setup button. A window will display
information about Easy Setup mode. Press "OK" to continue.
2. All counters will be deactivated. The machine is still ready for printing.
3. In Easy Setup mode, the table will raise to a zero off-contact position so the
screens can be easily aligned with the artwork on a film positive placed on a
pallet underneath, to facilitate registration. When Easy Setup is turned off, the
off-contact distance returns to the preset level.
4. When Easy Setup is active, the Index Here button will appear in the Head Settings
window.
5. When the machine is operating in any of the print modes (Manual, Automatic or
Test mode), the off-contact distance returns to the preset level displayed in the
main window.
VOLT –Aries Operating System
anatol.com 20
Other manuals for VOLT
1
Table of contents