Power Shot EasyShot User manual

STAPLE
EXIT
Light Duty Stapler
360118-PS
Instruction Manual
Important Information. Please read carefully before use.
Manual de Instrucciones
Información importante. Por favor, léala atentamente antes de usar la herramienta.
Guide D’Utilisation
Renseignements importants. Prière de lire attentivement avant d’utiliser.
Rev. 9/00

USING YOUR EASYSHOT®STAPLER
PowerShot Tool Company brings you a new concept in staplers - putting the power where you need it
directly over the staple exit with its unique forward action stapler. It can be used for a variety of applications around the home and
office . To make sure you get the most from your stapler, please read the following instructions carefully.
EASYSHOT®STAPLER SELECTION GUIDE
To maximize performance, your EASYSHOT®stapler has been designed to work with genuine EASYSHOT®brand light duty staples
in three lengths: 1/4" inch, 5/16" inch and 3/8” inch. The EASYSHOT®stapler is also compatible with other brands of light duty
staples such as Arrow®JT-21®and T-27TM* and Stanley®TR45TM** brand light duty staples.
COMMON APPLICATIONS FOR STAPLE LENGTH:
1/4" Display Signs; Window Shades; Window Screens;
Draperies; Shelf Paper; Light Upholstery; Plastic Film;
Decorations; Paper (2 to 10 sheets)
5/16" Insulation; Upholstery; Weatherstripping; Wall Decorations;
Crafts; Covering Cornices, Leatherettes; Paper (10 to 20 sheets)
3/8" Canvas; Wire Mesh; Upholstery; Low Voltage wire; Foam Board;
Any 1/4” thick material; Paper (20 up to 40 sheets).
1. Loading Staples
Make sure there are no staples jammed from previous usage by checking the handle operation.
CAUTION: IF A STAPLE IS JAMMED, POINT THE STAPLER AWAY FROM YOURSELF AND
OTHERS BEFORE OPENING THE TRACK AS THE JAMMED STAPLE MAY BE FIRED OUT UPON
OPENING
i) Turn gun upside down and tilt the gun away from yourself.
ii) Grasp the staple track at the buttons and squeeze to release, then slide it away from the staple chamber, in direction shown
(fig 1).
iii) Drop staples in. Be sure the legs are pointing up (fig. 1a).
Your stapler is now ready for use.
2. Using Your EASYSHOT ®Stapler
The EASYSHOT®stapler has a unique forward action design to give maximum ease of use and control. To use, grasp the handle of
the stapler, making sure that the staple exit is pointing away from you (fig.2). Place it firmly on the workpiece and push the handle
steadily down towards the staple exit to activate. Maximum leverage is gained by pushing down at the front of the handle using the
force of your arm rather than just squeezing with the hand. In vertical applications the front finger hole provides added support.
*Arrow®and JT-21® and T-27TM are registered trademarks of the Arrow Fastener Company.
**Stanley® and TR45TM are registered trademarks of The Stanley Works.
EASYSHOT®has many other useful features - each designed to help make stapling easier and more comfortable (fig.4).
A. Staples Remaining Window- Use the Staples Remaining Window, located on the left side of the gun,
to determine when it's time to reload
BFinger Hole- Provides an area to grip firmly
C. Track Release- Easy to use and one piece staple track
3. Clearing Staple Jams
In the unlikely event of a staple jam, make sure that the bottom of the stapler is pointing away from yourself and others before carrying out the following
instructions.
WARNING: ALWAYS WEAR EYE PROTECTION.
CAUTION: JAMMED STAPLES MAY SPRING FREE UNEXPECTEDLY AS TRACK IS OPENED.
i) Turn the gun sideways so that the staple exit is pointing away from yourself and others (fig.3).
ii) Carefully release track by gripping buttons and pushing away (fig.3).
iii) Slide track out (fig.3a) and remove all remaining staples.
iv) Reload staple gun as described in section 2.
NOTE: The track movement may be stiffer than usual if there is a staple jam.
!
!

4. Using Desktop Attachment
The EasyShot® Light Duty Staple Gun has a desktop attachment that easily converts to a desktop stapler capable of stapling up to
40 sheets of paper!
To Attach:
i) Locate on either side of the staple gun a small circular indent next to the staple track release button(Fig5)
ii) With staple exit pointing away from yourself and others hold the main housing of the gun(do not grip the handle)
iii) Starting on one side fit the circular projection on the desktop attachment into the circular indent on the gun (Fig. 6); then
snap other side into place.
iv) Place attachment and stapler level on the desk. Place papers to be stapled between the desktop attachment and staple exit on
gun and press down at the front of the handle using the force of your arm (Fig.7).
Note: When reloading staples, you must first remove the desktop attachment.
Storing Your EASYSHOT®
When you have finished using your EASYSHOT stapler, unload remaining staples before storage.
Always store in a dry place out of the reach of children.
CUSTOMER ASSISTANCE
If you have any questions concerning the operation or application of this product, please contact:
PowerShot Tool Co. Inc., Wytheville, Virginia 24382
www.PowerShot-Tool.com
IMPORTANT
To assure product safety and reliability, repairs and maintenance and other adjustments should be performed by qualified
PowerShot Tool Co. staff. This tool contains no customer serviceable components.
Home Use Warranty (A Full Two Year Warranty)
PowerShot Tool Co. warrants this product for two years against any defects that are due to faulty material or workmanship. Please
return the complete unit, transportation prepaid, to seller for free replacement (proof of purchase may be required). This warranty
does not apply to accessories.
30 DAY MONEY BACK GUARANTEE
If you are not satisfied with your EasyShot® Stapler, return it to the seller within 30 days of purchase (proof of purchase required).

WARNING: TO MINIMIZE THE RISK OF EYE INJURY,
ALWAYS USE EYE PROTECTION. When using mechanical tools
basic safety precautions should always be followed to reduce the risk of
personal injury, including the following:
READ ALL INSTRUCTIONS
1. BE AWARE OF THE STAPLE EXIT POINT. The unique forward action design of
the EASYSHOT®puts the “high” part of the handle in the front. Be sure this
product is in the proper position in your hand before using.
2. POINT THE GUN AWAY FROM YOURSELF AND OTHERS at all times and
especially when opening the track to clear a jammed staple. As the track is
opened, the jammed staple may be shot out unexpectedly.
3. PLACE STAPLE EXIT POINT FIRMLY AGAINST WORK SURFACE BEFORE
FIRING. Staples fired “into the air” can cause serious injury.
4. ALWAYS USE THE PROPER STAPLE SIZE. This product accepts .03” wire
gauge light duty staples only. Do not try to use heavy duty (.05”), desk, or wire
staples in this product.
5. KEEP WORK AREA CLEAN. Cluttered areas and benches invite injuries.
6. CONSIDER WORK AREA ENVIRONMENT. Don’t expose tool to rain. Keep
work area well lit.
7. KEEP CHILDREN AWAY. All visitors should be kept away from work area. Do
not let visitors contact tool.
8. STORE IDLE TOOLS. When not in use, tools should be stored in dry, high or
locked-up place — out of reach of children.
9. DON’T OVERREACH. Keep proper footing and balance at all times.
10. STAY ALERT. Watch what you are doing. Use common sense. Do not operate
tool when you are tired.
11. BE CAUTIOUS NOT TO STAPLE INTO ELECTRICAL WIRES especially those
which may be hidden from view.
SAVE THESE INSTRUCTIONS FOR FUTURE USE
IMPORTANT SAFETY INSTRUCTIONS
!

A
C
STAPLE
EXIT 4
11a
STAPLE
EXIT
3
3a
STAPLE
EXIT
2
B
6
Mem
o
To: PowerShot Tool Co.
From: Marie Power
Date: September 12, 200
0
7
Circular Indent
(hole)
5
Circular
Projection

USO DE SU ENGRAPADORA EASYSHOTTM POWERSHOT TOOL CO.
PowerShot Tool Co. le ofrece un nuevo concepto en engrapadoras, proporcionándole la potencia en
donde la necesita, directamente arriba de la salida de las grapas, con su engrapadora única de acción
progresiva. Se puede utilizar para una gran variedad de aplicaciones en el hogar y la oficina. Para
sacar el provecho máximo de su engrapadora, procure leer con atención las siguientes instrucciones.
GUIA DE SELECCION DE GRAPAS EASYSHOTTM
Para lograr los mejores resultados, su engrapadora EASYSHOT ha sido diseñada para funcionar con las grapas
genuinas marca EASYSHOT para aplicaciones livianas en dos tamaños: 1/4 a 5/16 pulg (6,36 a 7,93 mm). La
engrapadora EASYSHOT también es compatible con otras marcas de grapas para aplicaciones livianas, tales
como las grapas Arrow®JT-21®y T-27TM* y Stanley®TR45TM**
1. Carga de grapas
Asegúrese de que no hayan grapas atascadas de usos anteriores, verificando el funcionamiento correcto del mango.
PRECAUCION: SI HAY UNA GRAPA ATASCADA, APUNTE LA ENGRAPADORA ALEJADA
DE SI MISMO Y DE LOS DEMAS ANTES DE ABRIRLA, YA QUE LA GRAPA ATASCADA
PUEDE SALIR DISPARADA AL ABRIR EL CARRIL
i) Voltee la engrapadora con la parte de abajo hacia arriba, inclínela y apunte en dirección alejada de sí mismo.
ii) Sostenga el carril de las grapas apretando los botones para que se abra; luego, deslícelo hacia afuera, según
lo indica la figura 1.
iii) Cargue las grapas. Asegúrese de que las patas de las grapas apunten hacia arriba (fig. 1a).
La engrapadora está lista para ser utilizada.
2. Uso de la engrapadora EasyShot TM
La engrapadora EASYSHOT tiene un diseño único de acción progresiva para facilitar al máximo su uso y control.
Para usarla, tome el mango de la engrapadora, asegurándose de que la salida de las grapas esté apuntando alejada
de sí mismo (fig. 2). Colóquela firmemente sobre la pieza de trabajo y empuje el mango en forma pareja con la
mano hacia la salida de las grapas para activarla. Para obtener la potencia máxima, empuje la parte delantera del
mango hacia abajo, usando la fuerza de todo su brazo, en vez de apretar solamente con la mano. Para las aplica-
ciones verticales, el orificio delantero para el dedo proporciona soporte adicional.
*Arrow® y JT-21® y T-27TM son marcas registradas de la compañía Arrow Fastener.
**Stanley® y TR45TM son marcas registradas de la compañía The Stanley Works.
ESP
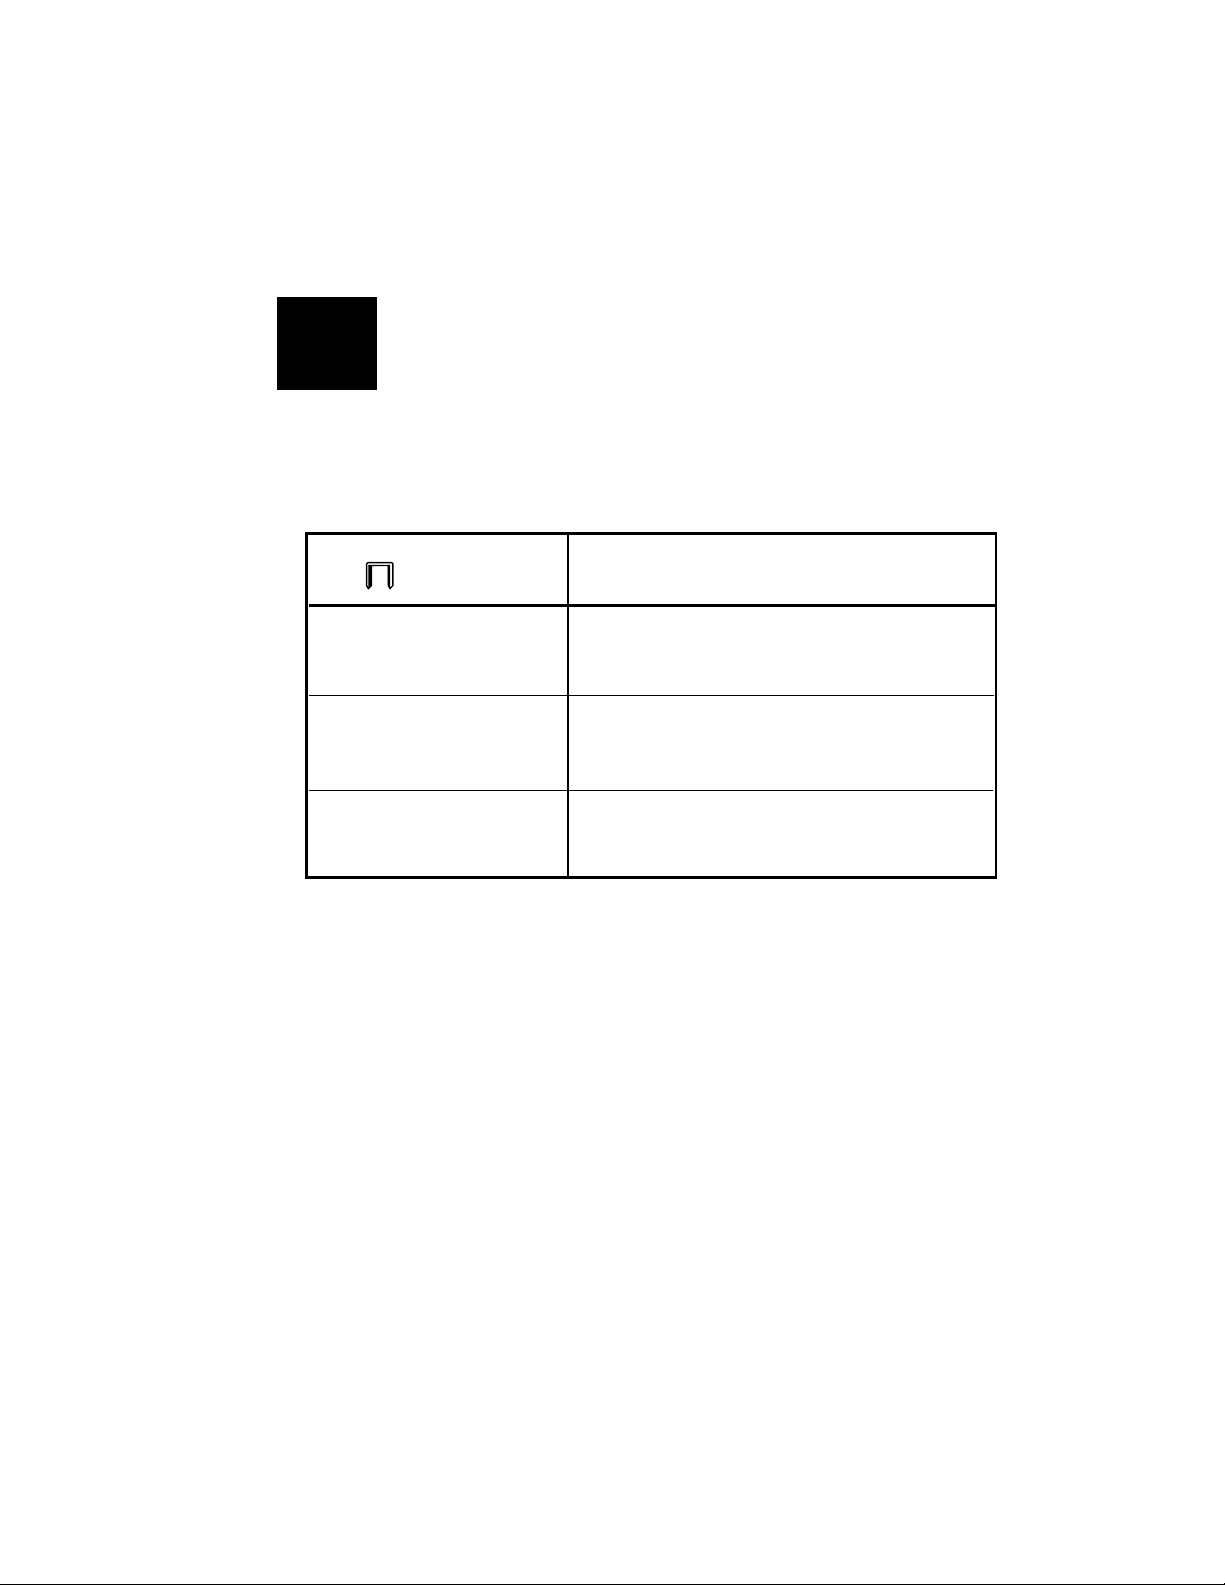
APLICACIONES COMUNES SEGUN LOS
TAMAÑOS DE GRAPAS:
1/4 pulg (6,36 mm) Exhibidores, persianas, mosquiteros de
ventanas, cortinas, empapelados, tapicerías
livianas, plásticos, decoraciones.
5/16 pulg (7,93 mm) Aislamientos, tapicerías, burletes, decoraciones de
pared, artesanías, cornisas, casi cuero.
3/8 pulg (9 mm) Lonas, malla de alambre, tapicerías, cableados de
bajo voltage, tablero de espuma, cualquier material
de 1/4” de espesor, papel (20 hasta 40 hojas).

La engrapadora EASYSHOT tiene muchas otras características útiles, cada una diseñada para hacer el engrapado
más fácil y cómodo (fig. 4).
A. Ventanilla indicadora de grapas restantes– Utilice la ventanilla indicadora de grapas restantes,
ubicada en el lado izquierdo de la engrapadora, para saber cuándo es hora de cargar más grapas.
BAgujero para el dedox– Permite un agarre seguro
C. Botón para abrir el carril– Carril de una pieza fácil de usar
3. Cómo desatascar la engrapadora
En caso de atasco de grapas, asegúrese de que la parte de abajo de la engrapadora apunte alejada de sí mismo y de
otras personas antes de seguir estas instrucciones:
ADVERTENCIA: SIEMPRE LEVE PROTECCION PARA LA VISTA.
PRECAUCION: LAS GRAPAS ATASCADAS PUEDEN SALIR DISPARADAS AL ABRIR
EL CARRIL.
i) Voltee la engrapadora de lado apuntándola alejada de sí mismo y de otras personas (fig.3).
ii) Suelte el carril cuidadosamente apretando los botones y empujando hacia afuera (fig.3).
iii) Deslice el carril hacia afuera (fig.3a) y saque las grapas restantes.
iv) Vuelva a cargar la engrapadora como se describe el la sección 2.
NOTA: El movimento del carril puede ser menos suave de lo normal debido a
un atasco.
4. Utilizando el accesorio de sobremesa
La pistola grapadora EasyShot de trabajo liviano tiene un accesorio de sobremesa el cual la convierte fácilmente en
una engrapadora de escritorio capaz de engrapar hasta 40 hojas de papel!
Para asegurar:
i) Localice en cualquiera de los lados de la pistola engrapadora una pequeña muesca rectangular y circular al
lado del botón del riel de la grapa (Fig. 5).
ii) Con la salida de grapas apuntando lejos de usted y de otros, sujete la pistola por el cuerpo (no la sujete por
la empuñadura).
iii) Empezando por un lado, encaje el resalto circular del accesorio de sobremesa en la muesca circular de la pis
tola (Fig. 6); luego ajuste el otro lado en su lugar.
iv) Coloque el accesorio y la pistola a nivel sobre el escritorio. Ponga los papeles que va a engrapar entre el
accesorio de sobremesa y la salida de grapas de la pistola; presione hacia abajo en la parte
delantera de la empuñadura usando la fuerza de su brazo (Fig.
7) Nota: Cuando recargue grapas, retire antes el accesorio de sobremesa.
Almacenamiento de su EASYSHOTTM
Cuando termine de utilizar su engrapadora EASYSHOT, extraiga las grapas sobrantes antes de guardar la
engrapadora. Guárdela siempre en un sitio seco y fuera del alcance de los niños.
IMPORTANTE
Para garantizar la seguridad y confiabilidad, todos los arreglos, mantenimientos y otros ajustes deben realizarse por
personas calificadas de un centro de servicio de PowerShot Tool Co.. Esta herramienta no tiene ninguna pieza
reparable.

ADVERTENCIA: PARA RECUCIR AL MIMINO LAS LESIONES A LOS
OJOS, SIEMPRE LLEVE PROTECCION PARA LA VISTA.
Cuando use herramientas mecánicas, siempre debe seguir las
precauciones básicas de seguridad para reducir el riesgo de lesiones
personales, entres ellas:
LEA TODAS LAS INSTRUCCIONES
1. ESTE CONSCIENTE DEL PUNTO DE SALIDA DE LAS GRAPAS. El diseño único de
acción progresiva de la engrapadora EASYSHOTTM pone la parte “alta” del mango
al frente. Asegúrese de que esta herramienta esté en la posición correcta en su
mano antes de usarla.
2. APUNTE LA ENGRAPADORA ALEJADA DE SI MISMO Y DE LOS DEMAS
en todo momento y sobre todo cuando abra la engrapadora para sacar las grapas
atascadas. Cuando abra el carril, las grapas atascadas se pueden disparar
inesperadamente.
3. UBIQUE EL PUNTO DE SALIDA DE LAS GRAPAS FIRMEMENTE CONTRA LA
SUPERFICIE A ENGRAPAR. Las grapas disparadas “al aire” pueden causar
lesiones graves.
4. SIEMPRE USE EL TAMAÑO APROPIADO DE GRAPAS. Este producto sólo acepta
grapas de alambre para aplicaciones livianas de 0,03 pulg (0,76 mm). No intente
usar grapas reforzadas de 0,05 pulg (1,27 mm).
5. MANTENGA LIMPIA EL AREA DE TRABAJO. Las áreas y los bancos de trabajo
desordenados facilitan las lesiones.
6. CONSIDERE EL AMBIENTE DE TRABAJO. No exponga la herramienta a la lluvia.
Mantenga la zona de trabajo bien iluminada.
7. MANTENGA ALEJADOS A LOS NIÑOS. Todos los visitantes deben mantenerse
lejos del área de trabajo. No permita que los visitantes toquen la herramienta.
8. GUARDE LA HERRAMIENTA DESPUES DE USARLA. Después de utilizar las
herramientas, éstas se deben guardar en un sitio seco, bajo llave o fuera del
alcance de los niños.
9. TRABAJE COMODAMENTE. Siempre mantenga su equilibrio y los pies bien
apoyados.
10. MANTENGASE ALERTA. Ponga atención a lo que hace. Use el sentido común. No
use la herramienta cuando esté cansado.
11. SEA PRECAVIDO. NO ENGRAPE EN CABLES ELECTRICOS especialmente los que
no están a la vista.
GUARDE ESTAS INSTRUCCIONES PARA REFERENCIA FUTURA
IMPORTANTES INSTRUCCIONES DE SEGURIDAD

STAPLE
EXIT 4
11a
STAPLE
EXIT
3
3a
STAPLE
EXIT
2
B
6
Mem
o
To: PowerShot Tool Co.
From: Marie Power
Date: September 12, 200
0
7
Muesca circular
5
Resalto circular
Renfoncement
circulaire
Saillie circulaire

UTILISATION DE L’AGRAFEUSE EASYSHOTTM POWERSHOT TOOL CO.
POWERSHOT TOOL CO. vous offre un nouveau concept d’agrafeuses. La pression est appliquée de
façon constante là où c’est nécessaire à : vers l’avant, à la sortie des agrafes. Cette agrafeuse convient
à de multiples applications pour des travaux la maison et au bureau. Pour profiter d’un usage maxi-
mum de votre agrafeuse, il est conseillé de lire attentivement les instructions suivantes.
GUIDE DE SÉLECTION DES AGRAFES EASYSHOTTM
Pour une meilleure efficacité de l’agrafeuse EASYSHOT, utiliser des agrafes pour petits travaux de marque
EASYSHOT offertes en deux longueurs : 1/4 po et 5/16 po (6,36 mm et 7,93 mm). L’agrafeuse EASYSHOT
accepte également des agrafes pour petits travaux de marques différentes comme la marque Arrow®JT-21®
et T-27TM* et Stanley®TR45TM**
1. Chargement des agrafes
Faire fonctionner le levier de l’agrafeuse pour s’assurer qu’aucune agrafe n’est restée coincée lors d’une utilisation
antérieure.
MISE EN GARDE : SI UNE AGRAFE EST COINCÉE, OUVRIR LE CHARGEUR EN ÉVITANT
DE DIRIGER L’AGRAFEUSE VERS SOI OU VERS TOUT AUTRE PERSONNE. L’AGRAFE
COINCÉE PEUT ÊTRE PROJETÉE AVEC FORCE AU MOMENT DE L’OUVERTURE DU
CHARGEUR
i) Tourner l’agrafeuse, poignée vers le bas, en la dirigeant loin de soi.
ii) Saisir le chargeur par les boutons en appuyant pour ouvrir et faire glisser vers l’arrière, comme l’indique la
flèche dans la figure 1.
iii) Introduire les agrafes, pointes vers le haut (fig.1a).
L’agrafeuse peut maintenant être utilisée.
2. Utilisation de l’agrafeuse EasyShot TM
La conception exclusive pression constante et la forme ergonomique de l’agrafeuse EASYSHOT permettent un travail
facile et précis. Saisir l’agrafeuse par la poignée, en évitant de la diriger vers soi (fig.2). Lorsqu’elle est bien
d’aplomb sur la surface de travail, exercer une pression constante vers l’avant. Pour obtenir un maximum d’efficacité,
il est conseillé d’utiliser la force du bras en appuyant la main sur l’avant de la poignée plutôt que de simplement la
serrer.
*Arrow®et JT-21® et T-27TM sont des marques déposées d’ Arrow Fastener Company.
F
APPLICATIONS COURANTES SELON LA
LONGUEUR DES AGRAFES :
1/4 po (6,36 mm) Affiches, stores, moustiquaires, rideaux, papiers
protecteurs, tissus, pellicules de plastique, déco
rations.
5/16 po (7,93 mm) Isolation, capitonnage, calfeutrage, décorations
murales, bricolage, recouvrement de corniches,
similicuir.
3/8 po (9 mm) Toile, treillis métallique, capitonnage, fils à faible
tension, planche couvrante,tout matériau de 1/4"
d'épaisseur, papier (de 20 à 40 feuilles)

Pour des travaux en plan vertical, l’emplacement pour l’index assurer un meilleur appui.
EASYSHOT possède bien d’autres caractéristiques, toutes ayant été conçues pour permettre un agrafage facile et
plus confortable (fig.4).
A. Indicateur d’agrafes– Utiliser l’indicateur d’agrafes, du côté gauche de l’agrafeuse afin de déterminer le
moment approprié pour recharger
BEmplacement pour l’index– Permet une prise sure
C. Dispositif de fermeture du chargeur– Chargeur d’agrafes facile d’utilisation et en une pièce
3. Déblocage du chargeur
Il est peu probable qu’une agrafe se coince, mais si cela se produit, éviter de diriger l’agrafeuse vers soi ou
quelqu’un d’autre et suivre les instructions ci-dessous :
AVERTISSEMENT : TOUJOURS PORTER DES LUNETTES DE SÉCURITÉ.
MISE EN GARDE : L’AGRAFE COINCÉE PEUT ÊTRE PROJETÉE AVEC FORCE AU MOMENT
DE L’OUVERTURE DU CHARGEUR.
i) Tourner l’agrafeuse en évitant de la diriger vers soi ou vers quelqu’un d’autre (fig. 3).
ii) Ouvrir le chargeur en poussant le dispositif de fermeture vers le haut, puis en le faisant glisser vers l’arrière
(fig. 3).
iii) Retirer le chargeur (fig. 3a) et enlever les agrafes qui restent à l’intérieur.
iv) Recharger l’agrafeuse de la façon décrite à la section 2.
NOTA : Une agrafe coincée peut gêner le bon fonctionnement du chargeur.
4. Avec l'accessoire pour bureau
Le pistolet agrafeur léger EasyShot est doté d'un accessoire pour bureau qui permet de le transformer en une
agrafeuse de bureau capable d'assembler jusqu'à 40 feuilles de papier!
Pour l'installer :
i) Repérez, sur un des côtés du pistolet agrafeur, un petit renfoncement rectangulaire et circulaire qui se trouve
près du bouton d'ouverture magasin à agrafes (Fig. 5)..
ii) Attrapez le pistolet par la partie principale du corps (pas par la poignée), le bec de l'agrafeuse dirigé loin de
vous et des autres personnes.
iii) En commençant par un côté, insérez la saillie circulaire de l'accessoire pour bureau dans le renfoncement cir
culaire du pistolet (Fig. 6), puis enfoncez l'autre côté.
iv) Mettez l'accessoire et l'agrafeuse de niveau sur le bureau. Placez les feuilles de papier à agrafer entre l'acces
soire pour bureau et le bec du pistolet, et appuyez sur l'avant de la poignée à la force du bras (Fig.
7)
NOTE : Pour recharger l'agrafeuse, ôtez d'abord l'accessoire pour bureau.
Rangement de l’agrafeuse EASYSHOTTM
Après utilisation de l’agrafeuse EASYSHOT, vider le chargeur avant de la ranger.
Toujours ranger dans un endroit sec et hors de portée des enfants.
SERVICE À LA CLIENTÈLE
Pour toute question relative au fonctionnement ou aux applications de ce produit, priére de contacter :
PowerShot Tool Co. Inc.
525 Stafford-Umberger Drive
Wytheville, Virginia 24382
www.PowerShot-Tool.com
IMPORTANT
Pour que ce produit soit sûr et fiable, les réparations, l’entretien et les réglages doivent être effectués dans des cen-
tres de service PowerShot Tool Co.. Cet outil ne comporte aucun composant pouvant être réparé par le consomma-

AVERTISSEMENT : POUR RÉDUIRE LES RISQUES DE BLESSURE AUX
YEUX, TOUJOURS PORTER DES LUNETTES DE SÉCURITÉ. Certaines
précautions élémentaires sont àprendre pour l’utilisation d’outils
mécaniques afin de réduire les risques de blessure. En voici une liste :
BIEN LIRE TOUTES LES INSTRUCTIONS
1. REPÉRER L’ORIFICE DE SORTIE DES AGRAFES. Sur cette agrafeuse EasyShot de conception
unique, la partie “surélevée” de la poignée correspond à l’avant. S’assurer de tenir l’outil dans le bons
sens avant de l’utiliser.
2. ÉVITER DE DIRIGER L’AGRAFEUSE VERS SOI OU VERS QUELQU’UN D’AUTRE en tout
temps, en particulier lors de l’ouverture du chargeur pour débloquer une agrafe coincée. L’agrafe coincée
peut être projetée avec force lors de l’ouverture du chargeur.
3. NE PAS ACTIONNER L’AGRAFEUSE SI L’ORIFICE DE SORTIE N’EST PAS SOLIDEMENT
APPUYÉCONTRE LA SURFACE DE TRAVAIL. Les agrafes projetées “en l’air” peuvent provoquer
des blessures graves.
4. TOUJOURS UTILISER LES AGRAFES APPROPRIÉES. Ce produit fonctionne uniquement avec
des agrafes métalliques pour petits travaux de calibre 0,03 po (0,76 mm). Ne pas utiliser d’agrafes pour
gros travaux de 0,05 po (1,27 mm), d’agrafes de bureau ou d’agrafes métalliques avec ce produit.
5. BIEN DÉGAGER LE SECTEUR DE TRAVAIL. Les zones et les établis encombrés présentent des
risques de blessures .
6. TENIR COMPTE DU MILIEU DE TRAVAIL. Ne pas exposer l’outil à la pluie. Bien éclairer le zone de
travail.
7. ÉLOIGNER LES ENFANTS. Éloigner les visiteurs de la zone de travail. Éviter que les visiteurs
touchent l’outil.
8. RANGER LES OUTILS QUI NE SERVENT PAS. Les outils doivent être rangés dans un endroit sec,
préférablement élevé ou fermé à clé – hors de portée des enfants.
9. ÉVITER DE TRAVAILLER EN DÉSÉQUILIBRE. Toujours s’assurer de ne pas perndre pied et de
garder l’équilibre.
10. TOUJOURS ÊTRE VIGILANT. Faire attention et faire preuve de bon sens. Ne pas utiliser l’outil
lorsque vous êtes fatigué.
11. PRENDRE GARDE DE NE PAS ENFONCER D’AGRAFES DANS DES FILS ÉLECTRIQUES
en particulier ceux qui peuvent être dissimulés.
CONSERVER CES DIRECTIVES DE SÉCURITÉPOUR FUTURE UTILISATION
IMPORTANTES DIRECTIVES DE SÉCURITÉ
Table of contents
Languages:
Popular Power Tools manuals by other brands

Hytorc
Hytorc BTM-0250-DOC Operation manual

Beta
Beta 599 DGT-A/20 Instructions for use

Makita
Makita JN1601 instruction manual

Gesipa
Gesipa Taurus 1-4 Operating manual with spare parts list

Black & Decker
Black & Decker KC9006 manual

WAGNER
WAGNER FURNO F100 Translation of the original operating instructions