OPERATING THE BLUETOOTH TRANSMITTER
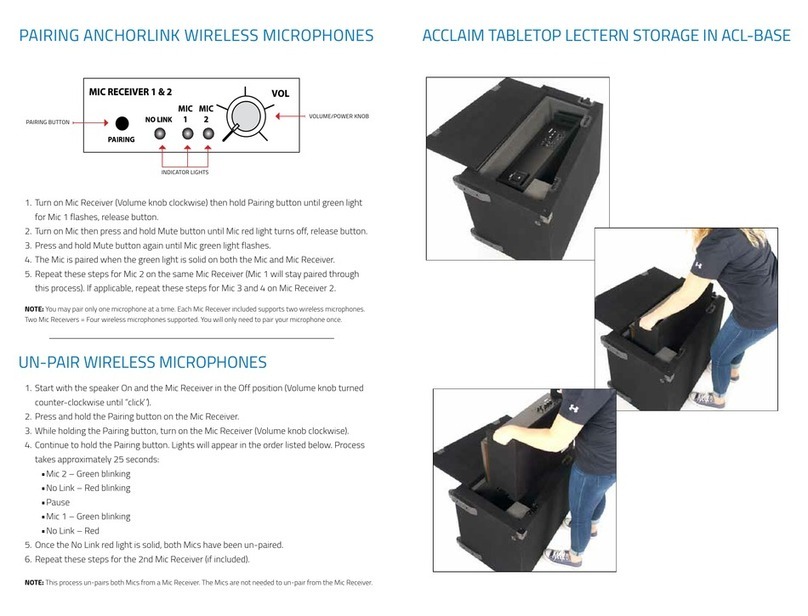
PAIRING ANCHORLINK WIRELESS MICROPHONES
PAIRING BUTTON
INDICATOR LIGHT
VOLUME/POWER KNOB
PAIRING
VOLUME
BATTERY POWERED SOUND SYSTEM UNPOWERED COMPANION
BIGFOOT & BEACON Connect speaker cable
(EX-50PPS)
from the
LINE OUT on the first powered sound system
to the LINE IN on the other powered system.
Set volume level of the second system to
maximum, this gives full volume control to the
first or primary sound system.
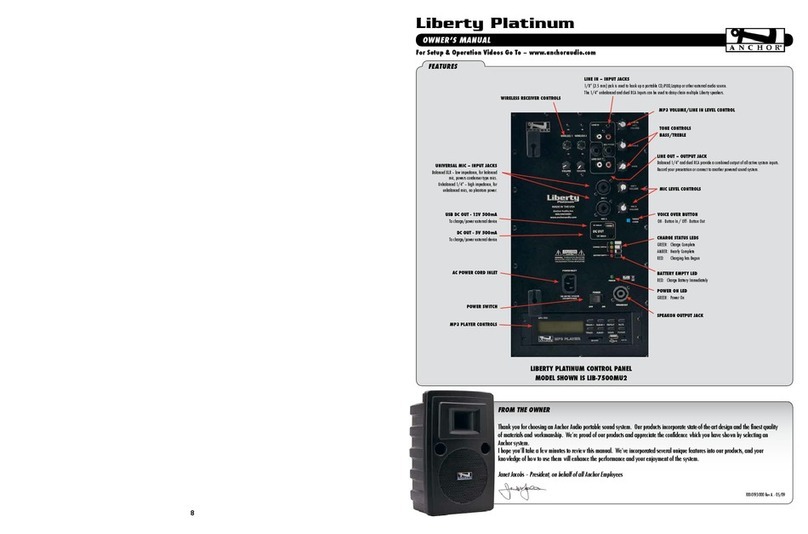
LIBERTY & GO GETTER Connect speaker cable
(EX-50PPS)
from the
LINE OUT on the first powered sound system
to the LINE IN on the other powered system.
Set volume level of the second system to
maximum, this gives full volume control to the
first or primary sound system.
Connect speaker cable
(SC-50NL)
to the
SPEAKER OUT jack on the back of the powered
Liberty or Go Getter sound system. Connect
the other end of the jack to the back of an
unpowered companion speaker. AC power is not
required for an unpowered companion speaker.
MEGAVOX Connect speaker cable
(SC-50)
from the LINE
OUT on the first powered MegaVox to the
LINE IN on the second powered MegaVox.
Set volume level of the second system to
maximum, this gives full volume control to the
first or primary PA system.
Connect speaker cable
(SC-50)
to the SPEAKER
OUT jack on the back of a powered MegaVox
PA system. Connect the other end of the jack to
the back of an unpowered companion speaker.
AC power is not required for an unpowered
companion speaker.
CONNECTING MULTIPLE SOUND SYSTEMS - WIRED
CONNECTING ANCHOR AIR WIRELESS COMPANION SPEAKER
1. Connect provided external antennas to main unit and AIR companion unit.
2. Power on main unit and AIR companion.
3. Verify the AIR companion speaker is in AIR MODE.
4. On main unit, push AIR Companion Transmitter POWER button to turn on AIR transmitter.
On AIR companion, push AIR Companion Receiver POWER button to turn on AIR receiver.
5. Adjust volume knob on back panel as needed.
1. Using a pointed edge tool, hold SET button for 2 seconds. Digital display will blink.
2. Press UP or DOWN to select desired frequency.
3. To confirm frequency selection, press SET or wait 10 seconds for display to stop blinking
1. Power off main unit and AIR companion speaker.
2. On the AIR companion speaker, move toggle switch to WIRED MODE.
3. Follow instructions below to connect speakers using a wired connection.
1. Follow instructions to set up AIR Companion Transmitter
2. Install 2 AA 1.5V batteries in Assistive Listening belt pack (ALB-9000)
3. Straighten belt pack antennas for maximum reception
4. Plug in headphones to belt pack
5. Power on belt pack and adjust volume as needed.
Connecting Anchor AIR Systems with Assistive Listening Belt Pack Receivers
NOTE: Verify both AIR Companion Transmitter and AIR Companion Receiver are synchronized to the same channel.
The default frequency setting is 902.00. This can be changed as needed.
Changing Frequencies on the AIR Companion Transmitter and AIR Companion Receiver
Connecting Anchor AIR Companion Speaker Via Wired Connection
NOTE: Verify both AIR Companion Transmitter and ALB-9000 are synchronized to the same channel. The default
frequency setting is 902.00. This can be changed as needed. Follow instructions above in Changing Frequencies.
1. Turn on Mic Receiver (Volume knob clockwise) then hold Pairing button until green light for Mic 1 flashes, release button.
2. Turn on Mic then press and hold Mute button until Mic red light turns off, release button.
3. Press and hold Mute button again until Mic green light flashes.
4. The Mic is paired when the green light is solid on both the Mic and Mic Receiver.
5. Repeat these steps for Mic 2 on the same Mic Receiver (Mic 1 will stay paired through this process). If applicable, repeat
these steps for Mic 3 and 4 on Mic Receiver 2.
NOTE: You may pair only one microphone at a time. Each Mic Receiver included supports two wireless microphones.
Two Mic Receivers = Four wireless microphones supported. You will only need to pair your microphone once.
Un-Pair Wireless Microphones
1. Start with the speaker On and the Mic Receiver in the Off position (Volume knob turned counter-clockwise until “click”).
2. Press and hold the Pairing button on the Mic Receiver.
3. While holding the Pairing button, turn on the Mic Receiver (Volume knob clockwise).
4. Continue to hold the Pairing button. Lights will appear in the order listed below. Process takes approximately 25 seconds:
• Mic 2 – Green blinking
• No Link – Red blinking
• Pause
• Mic 1 – Green blinking
• No Link – Red
5. Once the No Link red light is solid, both Mics have been un-paired.
6. Repeat these steps for the 2nd Mic Receiver (if included).
VOLUME/POWER KNOB
PAIRING BUTTON
INDICATOR LIGHTS
1. Turn on the Bluetooth using the volume knob (it will make a boot up noise).
2. Press the pairing button and the blue LED will blink. Bluetooth will enter sleep mode
after 90 seconds if idle and unpaired.
3. If discoverable during pairing mode, choose ‘Anchor Audio’ from selection list.
4. When the device has successfully connected to the Bluetooth, the Bluetooth module
will beep to signify connection and the blue LED will become solid.
5. Now you can play audio from your Bluetooth device to the Anchor Audio portable
sound system. You can adjust volume by using the Bluetooth module’s knob, as well
as the volume control on your device.
NOTE: If a previously paired device is in range and discoverable, the unit should automatically make a connection,
however, this may depend on your individual device.
NOTE: This process un-pairs both Mics from a Mic Receiver. The Mics are not needed to un-pair from the Mic Receiver.
