AND AD-8526 User manual

1WMPD4001294C
AD-8526 イーサネット・コンバータ 取扱説明書
計量機器のRS-232C出力をコンピュータのイーサネット(LAN)ポートに接続するコンバータです。
AD-8526を利用することで、LANポートと計量機器のRS-232Cポートを中継して、ネットワークを利用した
計量データの管理ができます。
梱包内容と名称
※通信ケーブルは、注文時のご指定により 下記のケーブルのみが付属されている場合があります:
Din 7 ピン/D-sub 9 ピン(AX-KO1786-200)
※ご指定のない場合は、D-sub 25 ピン/D-sub 9 ピ ン( AX-KO1710-200)および D-sub 9 ピン/D-sub 9 ピ ン( AX-KO2466-200)
の2本が付属しています。
仕様
1.一般仕様 3.RS-232Cインタフェース
動作温度範囲 -10℃ ~+40℃ コネクタ D-Sub9ピン・オス
電源 ACアダプタ(
50/60Hz 100V +10V、 -15V
)伝送形式 調歩同期式、双方向通信
外形寸法 113(W)×60(D)×38(H)mm 信号形式 ボーレート :
600、1200、2400
※
、4800、9600、19200bps
本体重量 約250g データビット :7ビット※、または8ビット
2.イーサネットインタフェース パリティ :EVEN※、ODD、NONE
コネクタ RJ45 ストップビット :1ビット※、または2ビット
プロトコル TCP/IP ※出荷時設定
ケーブルの適合機種
AD-8526と接続するために必要となるもの
適合機種 計量機器側のインタフェースオプション 通信ケーブル(長さ約 2
m)
GX
、
GF
、
GX-K
、
GF-K
、
GP
、
GR
、
MC
不要(D-sub 25 ピン、標準付属) AX-KO1710-200
EK-i
、
EW-i
、
FC-i
、
FC-Si
、
GH
、
HR-i
不要(D-sub 9 ピン、標準付属) AX-KO2466-200
AD-4212C
不要(D-sub 9 ピン、標準付属) AD-4212C 標準付属
HV-G
、
HV-WP
、
HW-G
、
HW-WP
不要(Din 7 ピン、標準付属) AX-KO1786-200
FG
OP-03 (Din 7 ピン) AX-KO1786-200
FG-L
、
FG-M
OP-23 (Din 8 ピン) AX-KO1786-200
※最新情報はA&Dホームページを参照して下さい。
計量機器とコンピュータとの接続
注意
AD-8526を既存のネットワークに接続する場合、ネットワーク管理者に相談してください。
計量機器が原因でネットワークに障害が発生する可能性があります。また、問題が発生しても当社では一切の責任を負いかねます。
使用するACアダプタを間違えないために、「識別シール」をACアダプタとコードの終端付近に貼り付けてください。
計量機器の設定は一台ずつ行ってください。出荷時は同じIPアドレス(172.16.100.2)に設定されています。
IPアドレスを重複させないでください。
IPアドレスをリセットすることはできません。(出荷時設定に戻せません)
IPアドレスを入力するときは、IPアドレス記載シールに記録することを
お勧めします。
準備
①設定の手順「WinCT-Plus 取扱説明書」
②IP アドレス設定ソフト「Device Installer」
③データ収集ソフトウェア「WinCT-Plus」を弊社ホームページより
(https://www.aandd.co.jp/support/soft_download/weighing.html)
ダウンロードしてください。
手順 1 付属のACアダプタをAD-8526に差込みます。
手順 2 コンピュータとAD-8526をクロスLANケーブルで直接接続
するか、またはハブを介してストレートケーブルで接続します。
手順 3 コンピュータとAD-8526のIPアドレスとサブネットマスク
を設定します。
設定方法は「WinCT-Plus 取扱説明書」を参照してください。
異なる手順で設定を行うと通信できなくなる場合があります。
手順 4 設定したIPアドレスを「IPアドレス記載シール」に記入し、
AD-8526(および、必要に応じて計量機器)に貼付して
ください。計量機器を識別しやすくなります。
手順 5 データ収集ソフトウェア「WinCT-Plus」をコンピュータにインストール
します。インストール方法は「WinCT-Plus 取扱説明書」を 参 照 してください。
手順 6計量機器のRS-232CとAD-8526を付属のRS-232C
ケーブルで接続します。
データ通信ソフトウェアの概要
データ収集ソフトウェア「RsMulti」を起動します。「スタート」「プログラム」「A&D WinCT-Plus」「RsMulti」。
「RsMulti」の取扱方法は、「A&D WinCT-Plus」「取扱説明書」を参照してください。
1台のコンピュータでLANまたはRS-232Cに接続した複数の計量器のデータを収集できます。
コンピュータのコマンドにより計量器をコントロールできます。
計量器から転送されたデータを収集できます。(例)天びんの PRINT キー押してデータを出力し、収集する。
記録したデータを Excel で開くことができます。
(Microsoft 社製 Excel を事前にインストールする必要があります。)
設定例 「RsMulti」の画面例
2台の天びんを接続する場合の設定例。
IPアドレス
サブネットマスク
コンピュータ
172.16.100.1
255.255.0.0GX-600
172.16.100.2
GP-30K
172.16.100.3
GX-600
GP-30K
GX-600
GP-30K
+0182.252
+0182.253
+0182.955
+0182.964
+0182.965
+0186.676
+0182.251
+0182.251
+0182.965
+0182.265
+0182.252
+0182.239
+019218.1
+019218.2
+019218.2
+019289.8
+019218.2
+019218.4
+019218.0
+019218.0
172.16.100.1 172.16.100.2 172.16.100.3
GX-600 GP-30K
コンピュータ
ハブ
ハブ
MAC アドレス
ACアダプタ識別シール
貼付位置(例)
IPアドレス記載シール(5枚)
設定したIPアドレスを記入し
計量機器
に貼付けてください。
IPアドレス保護シール(5枚)
貼付したIPアドレス記載シール
の上に
貼付けてください。
RS-232Cケーブル
(長さ約2m・2
本)※
AD-8526
イーサネット・コンバータ
ACアダプタ
AX-TB248
ACアダプタ識別シール
ACアダプタとコードの終
端付近に貼付けてください。
手順 2
AD-8526
手順 2
AD-8526
手順 1
クロスLAN
ケーブル
ストレート
LANケーブル
手順 6
計量機器
設定用
コンピュータ例
RS-232C
ケーブル
ACアダプタ
1WMPD4001294C
AD-8526 Ethernet Converter Instruction Manual
The AD-8526 Ethernet Converter can connect the RS-232C interface of a weighing instrument to the
Ethernet (LAN) port of a computer that is not equipped with an RS-232C interface. By using the
AD-8526, weight data from a weighing instrument can be managed with a computer connected to the
network. The weighing instrument can also be controlled by the connected computer.
Unpacking the AD-8526
Note: Only the following cable is included if specified when ordering:
DIN 7-pin to D-Sub 9-pin cable (AX-KO1786-200)
If not specified, the following two communication cables are included:
DIN 7-pin to D-Sub 9-pin cable (AX-KO1786-200), D-Sub 9-pin to D-Sub 9-pin cable (AX-KO2466-200)
Specification
1. Specification
3. RS-232C serial interface
Operating environment : -10°C to +40°C
Connector: D-Sub 9-pin male
AC adapter:
Confirm that the adapter type is correct for
the local voltage and power receptacle type
Transmission form: Asynchronous, bi-directional
Data format
Baud rate:
600, 1200, 2400*, 4800,
9600, 19200bps
Power consumption:
Approx. 11VA
(
supplied to the AC adapter
)
Data bits: 7*or 8 bits
Dimensions: 113(W) x 60(D) x 38(H) mm
Parity: Even*, Odd, None
Net weight: Approximately 250g
Stop bits: 1 bit*or 2 bits
2. Ethernet interface
Connector: RJ45
*: Factory settings
Protocol: TCP/IP
Weighing Instrument Cables
Required AD-8526 Cable by Weighing Instrument
Weighing instrument
Interface option
Communications cable (
Length 2 m
)
GX, GF, GX-K, GF-K, GP, GR, HR,
MC
None (D-Sub 25-pin, standard accessory) AX-KO1710-200
EK-i, EW-i, FC-i, FC-S i, GH, HR-i
None (D-Sub 9-pin, standard accessory)
AX-KO2466-200
AD-4212C
None (D-Sub 9-pin, standard accessory)
AD4212C standard accessory
HV-G, HV-W P, H W-G, H W-WP
None (DIN 7-pin, standard accessory)
AX-KO1786-200
FG
OP-03 (DIN 7-pin)
AX-KO1786-200
FG-L, FG-M
OP-23 (DIN 8-pin)
AX-KO1786-200
Please refer to our website for the latest information.
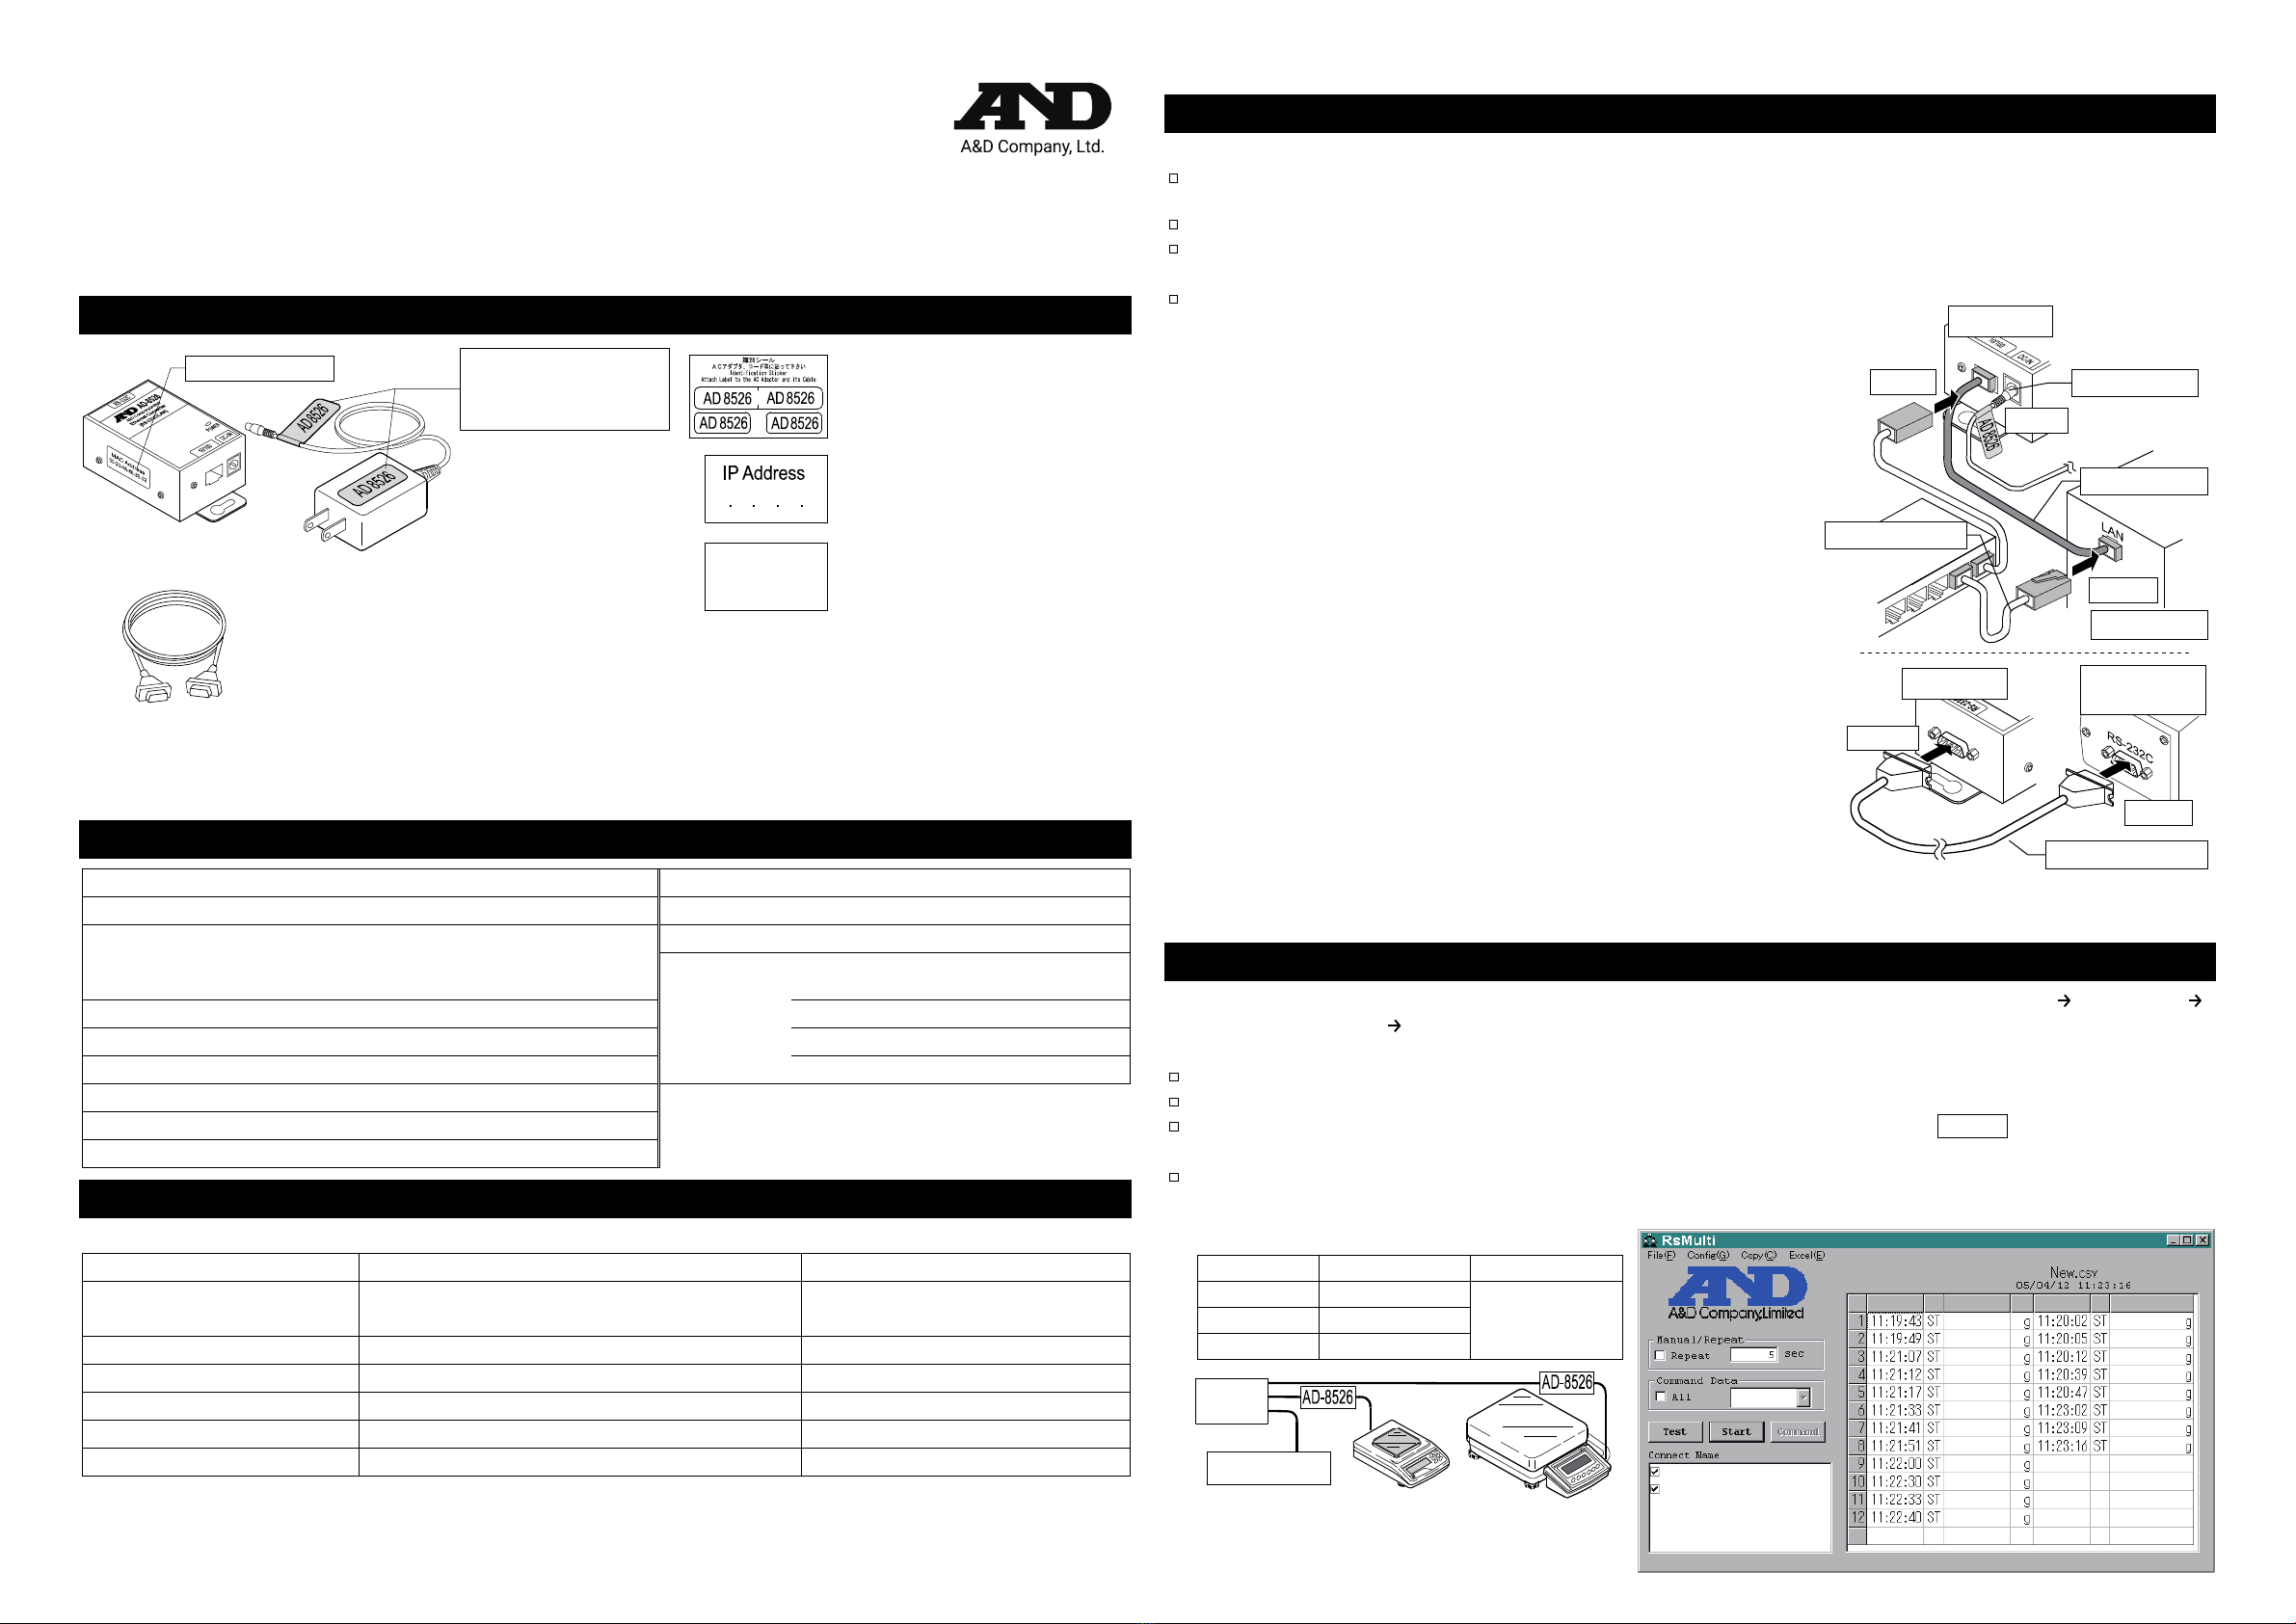
Connecting the Weighing Instrument to a Computer
Caution
Contact your network manager before connecting the AD-8526 to a network. The AD-8526 may
generate a network error. A&D assumes no responsibility for any errors that may be caused.
Affix the AC adapter labels to the AC adapter and the connector end of the cable.
Set the IP address and subnet mask to the AD-8526 one at a time.
The factory default IP address is 172.16.100.2. Do not duplicate an IP address.
The IP address cannot be returned to the factory setting.
We recommend that you write the IP address on the supplied label.
Preparation
Please download each software from A&D website
(https://www.aandd.jp/products/software/software.html)for below.
(1) Setting procedure “WinCT-Plus” instruction manual
(2) IP address setting software “Device Installer”
(3) Data acquisition software “WinCT-Plus”
Step 1 Connect the AC adapter to the AD-8526.
Step 2 Connect the AD-8526 and the computer with a cross
cable directly or connect them with a hub and straight
cables.
Step 3 Input the IP addresses and subnet masks of the AD-8526
and computer. For the setting procedure, refer to the
“WinCT-Plus” instruction manual.
Communication error may occur if set incorrectly.
Step 4 Write the IP address on the IP address label and affix it on
the AD-8526 (and the weighing instrument if necessary)
where you can see the address easily.
Step 5 Install the RsMulti data acquisition software to download the
“WinCT-Plus” instruction manual.PDF form A&D website.
(https://www.aandd.jp/products/software/software.html)
Step 6 Connect the accessory RS-232C cable between the RS-232C
interface of the weighing instrument and the AD-8526’s port.
Data Communication Software
The RSMulti data acquisition software can be launched on a Windows PC. Menu: [Start] [Program]
[A&D WinCT-Plus] [RsMulti]. Refer to the Manual PDF file in the A&D WinCT-Plus for details on the
operation.
This software can acquire data from multiple devices connected by LAN or RS-232C.
The software can control these devices with commands.
The software can acquire data transmitted from devices.
Example: When the
PRINT
key is pressed on the
balance, data is output and is acquired with the computer.
Stored data can be used with Excel. (Install Microsoft Excel before use.)
Example A sample window of RsMulti
Two balances are connected.
IP address
Subnet mask
Computer
172.16.100.1
255.255.0.0
GX-600
172.16.100.2
GP-30K
172.16.100.3
172.16.100.1 172.16.100.2 172.16.100.3
GX-600 GP-30K
GX-600
GP-30K
GX-600
GP-30K
+0182.252
+0182.253
+0182.955
+0182.964
+0182.965
+0186.676
+0182.251
+0182.251
+0182.965
+0182.265
+0182.252
+0182.239
+019218.1
+019218.2
+0192
18.2
+019289.8
+019218.2
+019218.4
+019218.0
+019218.0
Hub
Computer
Step 2
Computer
Step 2
RS-232C cable
Step 6
Step 6
AD-8526
Step1
Straight cable
Cross cable
Weighing
instrument
AD-8526
AC adapter
Note
Please confirm that
the AC adapter type
is correct for your
local voltage and
receptacle type.
IP address label (5 labels)
Write a preset IP address and
affix it on the weighing instrument.
AC adapter labels
Affix them to the AC adapter and
the connector end of the cable.
IP address protective cover
(5 labels)
Affix it on the IP address label.
RS-232C cable
(Length
: Approx. 2m. 2 pcs)
AC adapter
AD8526
Ethernet converter
MAC address
Positions to affix
AC adapter labels
(Example)
Other AND Media Converter manuals

Popular Media Converter manuals by other brands


Huidu Technology
Huidu Technology HDP501 user manual

Baumer
Baumer Hubner Berlin HOG 86 + DSL Mounting and operating instructions

SystemBase
SystemBase SWIFIALLV10 user manual

Assun
Assun AM-EN2412-T103 Series product manual

Siemens
Siemens SINAMICS DCM operating instructions

Buffalo
Buffalo AirStation WLI-TX4-G54HP user manual


