manuals.online logo
Brands
  1. Home
  2. •
  3. Brands
  4. •
  5. Anest Iwata
  6. •
  7. Water Heater
  8. •
  9. Anest Iwata PT.2 User manual

Anest Iwata PT.2 User manual

PT.2
Instruction Manual
February 2018
MAINTENANCE AND CLEANING
1. Turn off the air supply to the tank.
2. Relieve all air pressure in the tank by loosening air release valve until no air pressure remains.
3. Remove the lid from paint tank and empty remaining material.
4. Clean tank and parts which come into contact with paint with a suitable solvent.
5. Pour solvent into tank and replace lid.
6. Spray until clean solvent appears.
7. Repeat steps 3 and 4 as necessary.
OPERATION
1. Turn on the air supply and adjust air pressure to approximately 45 psi.
2. Turn the handle adjusting screw clockwise on the air regulator to increase material pressure.
NOTE: IT IS RECOMMENDED THAT MATERIAL PRESSURE BE KEPT AS LOW AS
POSSIBLE - NORMAL OPERATING PRESSURE SHOULD NOT EXCEED APPROX 15 PSI.
3. WARNING - Air pressure loads higher than design loads, or alterations to the
pressure tank can result in tank rupture or explosion. Do not make any changes to the
pressure tank. Do not weld, drill or otherwise tamper with the pressure tank.
4. A safety valve protects the tank from over pressurization. Prior to each use pull the ring on the
safety valve to check it operates freely and relieves air pressure. If it does not operate freely or
does not relieve air pressure it must be replaced. Do not discard or make adjustments to this valve.
5. Atomization air for the spray gun should be adjusted with the use of an air adjusting valve attached
to the air inlet of the spray gun.
6. Operate the spray gun according to the manufacturers recommendations..
7. To refill paint always relieve all air pressure in the tank by loosening air release valve Part 26,
until no air pressure remains in the container.
8. Unscrew the lid assembly and remove.
9. Pour material into the tank.
10. Replace lid assembly and tighten securely.
INSTALLATION
Follow the manufacturers recommendations for the mixing preparation of the material. Strain the mate-
rial using a fine mesh screen in order to prevent the entry of foreign matter and clogging of the passage-
ways.
1. Always relieve all air pressure in the tank by loosening air release valve Part 26, until no air
pressure remains in the container—the gauge will read ‘0”.
2. Unscrew the lid assembly and remove.
3. Pour material into the tank.
4. Replace lid assembly and tighten securely.
5. It is best for the air supply line to pass through a filter element to remove any dirt, water and oil.
Connect the air supply line to the air inlet fitting on the regulator.
6. Attach the atomizing air hose to the air outlet on the tank regulator. This is directly opposite the
air inlet fitting.
7. Connect the material hose to the fluid outlet fitting.
DESCRIPTION
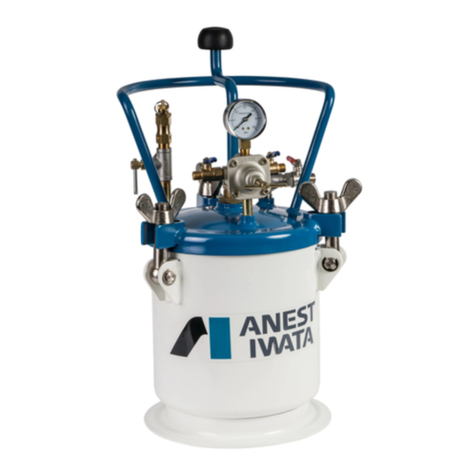
This 2 litre pressure tank provides pressurized material. This tank is equipped with an air regulator,
gauge, safety valve, release valve and fluid outlet.
This tank can be used for delivery of material other than paint.
It is not designed for use with highly abrasive, corrosive or rust inducing materials.
WARNING - DO NOT USE
ANY HALOGENATED HYDROCARBON SOLVENTS eg METHYL CHLORIDE
ANY INFLAMMABLE OR TOXIC PRODUCTS eg PETROL, KEROSENE
ANY HERBICIDES OR PESTICIDES
ANY RADIOACTIVE FLUID
PT.2 Parts Drawing
Item Part Number Description Item Part Number Description
01 PT2.01 Hook 22 Lock Screw
02 PT2.02 Nut 23 PT2.23 Adjusting Nut
03 PT2.03 Outlet Fitting 24 PT2.24 Adjusting Screw
04 PT2.04 Centre Post 25 PT2.25 Screw
05 PT2.05 Centre Post Nut
PT2.2
Regulator Set Complete -
No Gauge
Includes Parts 10 - 25
06 PT2.6
Pressure
Relief Valve
Includes
Parts 6 - 9
Adjusting Screw
07 Spring
08 Ball 26 Air Release Valve
09 Safety Valve Body 27 Cover
28 PT2.28 Gasket
10 Air Housing 29 Screw
11 PT2.11 Air Outlet 30 Stopper
12 PT2.2.2 Air Pressure Gauge 31 Spring
13 PT2.13 Air Inlet 32 Washer
14 Spring 33 Screw
15 Valve Stem 34 PT2.34 Tube
16 Valve Screw 35
17 Screw 36A PT2.36A Paint Outlet Screw
18 PT2.18 Washer 36B PT2.36B Lock
19 Screw
20 Spring
21 Washer
PT2.5
Check Valve
Complete
Includes
Parts 29 - 33
PT2.35 Cup
PT.2 Parts Listing
Troubleshooting
ANEST IWATA Australia Pty Ltd
33/ 71 Kurrajong Ave, Mt. Druitt 2770
Phone: 02 9853 2000, Fax: 02 9853 2090
Web: www.anest-iwata.com.au
email: info@anest-iwata.com.au

Other Anest Iwata Water Heater manuals

Anest Iwata PT.10 User manual

Anest Iwata

Anest Iwata PT.10 User manual

Anest Iwata PET-10 User manual

Anest Iwata

Anest Iwata PET-10 User manual

Popular Water Heater manuals by other brands

A.O. Smith GWV - 120 Installation and service manual

A.O. Smith

A.O. Smith GWV - 120 Installation and service manual

Bradford White RE2H50R10B-1NCWT Owner's Manual & Installation Instructions

Bradford White

Bradford White RE2H50R10B-1NCWT Owner's Manual & Installation Instructions

STIEBEL ELTRON SBS 800 W Operation and installation

STIEBEL ELTRON

STIEBEL ELTRON SBS 800 W Operation and installation

andrews OFS25 Installation guide, operation and service manual

andrews

andrews OFS25 Installation guide, operation and service manual

Paloma PH-6DN instruction manual

Paloma

Paloma PH-6DN instruction manual

iDM HYGIENIK 2.0 installation instructions

iDM

iDM HYGIENIK 2.0 installation instructions

Lochinvar HWHC 44-370 G CE Installation, commissioning, user & maintenance instructions

Lochinvar

Lochinvar HWHC 44-370 G CE Installation, commissioning, user & maintenance instructions

Haier Little Sea-ox FCD-JTSA50-III user manual

Haier

Haier Little Sea-ox FCD-JTSA50-III user manual

Webasto Thermo Top E installation instructions

Webasto

Webasto Thermo Top E installation instructions

A.O. Smith HSE-VAS-X user manual

A.O. Smith

A.O. Smith HSE-VAS-X user manual

Giant UG40-92TFTT-N2U Operation and installation manual

Giant

Giant UG40-92TFTT-N2U Operation and installation manual

Candy CTR10RS/E instruction manual

Candy

Candy CTR10RS/E instruction manual

Cordivari Puffer user manual

Cordivari

Cordivari Puffer user manual

RED-RING 7000 series Installation & user's instructions

RED-RING

RED-RING 7000 series Installation & user's instructions

Cooper & Hunter CH-HP3.5SWNK owner's manual

Cooper & Hunter

Cooper & Hunter CH-HP3.5SWNK owner's manual

Hyco Ara IN30 Product instruction manual

Hyco

Hyco Ara IN30 Product instruction manual

Solahart POWERPAK 10 kW owner's manual

Solahart

Solahart POWERPAK 10 kW owner's manual

Maxwell MSxxxC2T series Installation and instruction manual

Maxwell

Maxwell MSxxxC2T series Installation and instruction manual

manuals.online logo
manuals.online logoBrands
  • About & Mission
  • Contact us
  • Privacy Policy
  • Terms and Conditions

Copyright 2025 Manuals.Online. All Rights Reserved.