Angel Medical Systems Guardian Prog-003 Manual instruction

40 Christopher Way, Suite 201
Eatontown
, NJ 07724 (USA)
800 508
-5206
www.angel-med.com
AngelMed Guardian®
Programmer
Model Prog-003
Setup & Operations Guide
June 2018
P/N 0204-2100-080#P10 Rev D
Fold Line


AngelMed, AngelMed Guardian, and Angel Medical Systems are
trademarks or registered trademarks of Angel Medical Systems, Inc.
The AngelMed Guardian system is protected by U.S. patents. For more
information, please see the Help/About page on the AngelMed Guardian
Programmer.
© 2005-2018 Angel Medical Systems, Inc., All Rights Reserved


Programmer Setup and Operations Guide i
Contents
1Introduction 1
Programmer Features and Controls 4
2Setup 8
Unpack the Programmer 8
Charge the Programmer Batteries 8
Connect the EXD to the EXD Cable 9
Connect the EXD Cable to the Programmer 11
Deploy the Stand 12
Attach Accessories as Needed 12
3Programmer Operations 13
Starting the Programmer 14
Shutting Down the Programmer 15
Using the Stylus and On-Screen Keyboard 16
Checking the Battery State-of-Charge 19
Recharging the Batteries 20
Storing the Programmer 21
System Maintenance 21
4Troubleshooting 22
5Service and Support 24
Service 24
Technical Support 24
6Specifications 25
Electrical Requirements 25
Environmental Specifications 25
Physical Specifications 25

Contents
ii Programmer Setup and Operations Guide
Programmer Screen 26
Battery 26
Telemetry 27
AExplanations of Label Symbols 28
BWarnings, Notes, and Safety
Instructions 30
CCompliance 33
FCC Compliance 33
Electromagnetic Compatibility 34
Disposal 41
Components and Accessories 41

Programmer Setup and Operations Guide 1
1 Introduction
The Model Prog-003 Programmer is a compact and portable device
that allows you to program and retrieve patient data from an
AngelMed Guardian IMD. The Programmer comes equipped with:
♦An External Device (EXD) for communicating with a patient’s
IMD
♦A stylus and touchscreen for selecting programming options
♦An integrated stand to provide a convenient viewing angle
♦Two USB flash drives (not shown) for backing-up patient data
♦Two batteries and AC adapter (not shown) for operating the
Programmer either with or without an AC line source
Stylus
Stand
EXD
Batteries
Touchscreen

Introduction
2Programmer Setup and Operations Guide
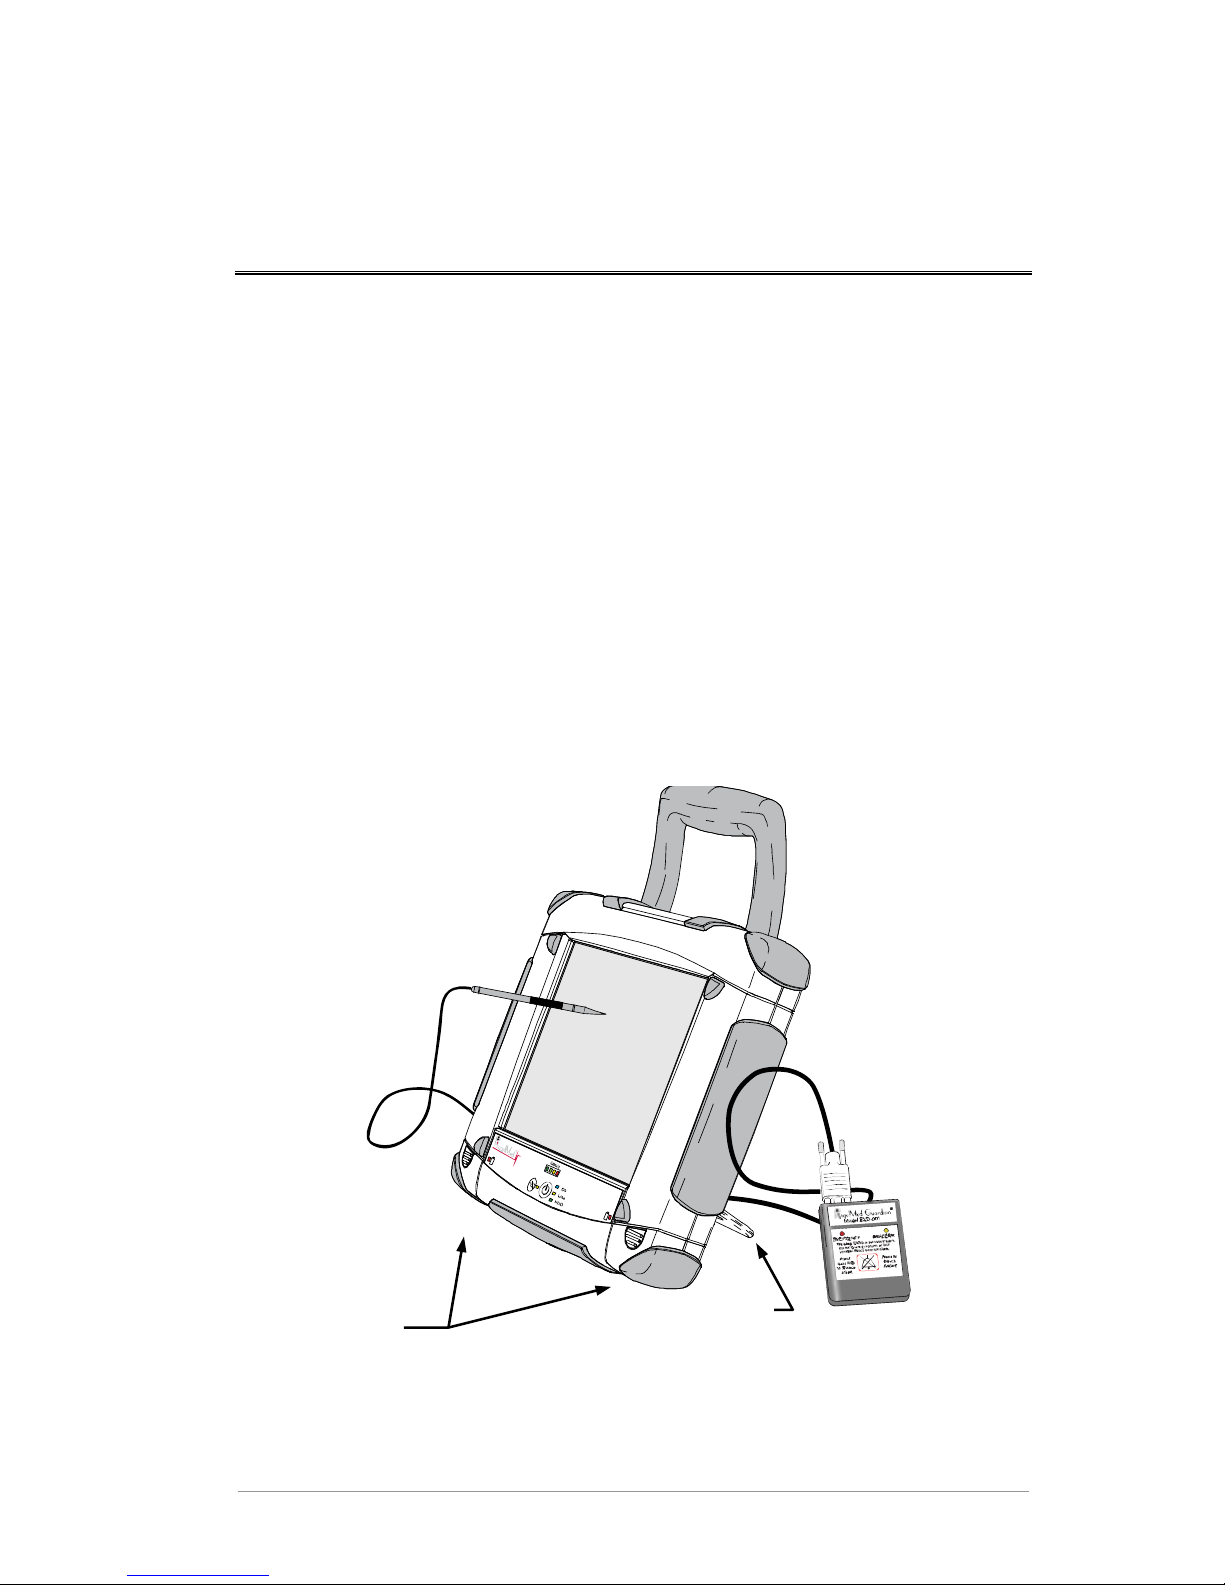
AC Operation
You can operate the Programmer indefinitely from standard AC line
current by using the supplied AC adapter. The AC adapter can
simultaneously power the Programmer and recharge the batteries.
Warning:
Do not use any AC adapter other than the one supplied with your
Programmer. Use of another adapter can damage the Programmer
and result in personal injury or property damage.
Battery Operation
The Programmer comes equipped with two batteries. The batteries
are hot swappable, meaning that they can be removed and re-inserted
even when the Programmer is operating.
The Programmer can operate in battery mode for up to 2 hours
depending on the charge and condition of the batteries. You can
operate the Programmer with only one battery; however, doing so
reduces the time that the Programmer can run in battery mode. To
operate the Programmer for longer time periods, plug-in the AC
adapter.
Indicator lights on the Programmer front panel provide constant
feedback on the state of the battery charge. For additional
information on the batteries and the battery indicators, see:
♦Front Panel Controls and Indicators on page 5
♦Checking the Battery State-of-Charge on page 19
♦Recharging the Batteries on page 20

Introduction
Programmer Setup and Operations Guide 3
USB Flash Drive
The Programmer is supplied with two USB flash drives: A and B.
Only one flash drive is in use at a given time. Keep the other at a
nearby location for disaster recovery purposes.
The flash drives are used only to back-up and restore Programmer
data as discussed in the AngelMed Guardian Programmer
Application User’s Manual.You do not need to plug-in the flash
drive for routine Programmer operation, such as retrieving and
analyzing IMD data or IMD programming.
Caution:
Do not use generic USB flash drives or the flash drive of another
Programmer. A Programmer can only use the flash drive it was
shipped with or its replacement from Angel Medical Systems.
Optional Keyboard and Mouse
Although the Programmer is designed to be operated using the
touchscreen and stylus, an optional keyboard and mouse are also
available and can be obtained from your AngelMed representative.

Introduction
4Programmer Setup and Operations Guide
Programmer Features and Controls
The Programmer is equipped with the following key features.
1
2
3
3
7
44
6
8
5
1. Power switch
and front panel
To control and monitor the Programmer
2. EXD and cable
For communicating with patients’ IMDs
3. Touchscreen
and stylus
For selecting program options
4. Batteries For operating the Programmer in battery
mode
5. Connector
panel
For connecting the EXD, flash drive, and
AC adapter
6. Handle
To carry the Programmer
7. Stand
To keep the Programmer upright
8. Magnetic stylus
storage area
To hold the stylus when not in use
9. AC adapter
(not shown)
To recharge the batteries and operate the
Programmer from an AC line source

Introduction
Programmer Setup and Operations Guide 5
Front Panel Controls and Indicators
The front panel contains the power switch as well as indicators that
allow you to monitor primary Programmer functions including
battery charge.
Power On/Off – Press this button for about 1 second
to start the Programmer
Touchscreen On/Off – Press to temporarily disable the
Programmer touchscreen. Press again to enable it.
When lit, the yellow LED indicates that the
touchscreen is disabled.

Introduction
6Programmer Setup and Operations Guide
Left/right Battery Low – Recharge by connecting the
AC adapter to the Programmer or replace the battery.
♦
Lights when the capacity of the corresponding
battery drops below 10%
♦
Flashes when the capacity drops below 5%
If the indicator starts to flash, plug-in the AC adapter
as soon as possible to avoid automatic battery
shutdown and possible Programmer shutdown. For
more information, see Automatic Battery Shutdown on
page 20.
Total Battery Capacity – Displays the available
battery capacity in 25% increments, with red
indicating approximately 0-25% capacity.
This indicator is lit at all times except when the
Programmer is both powered-off and in battery mode.
Power indicator – means the Programmer is powered-
on.
Line mode indicator – means the Programmer is
receiving power from its AC adapter.
This indicator:
♦
flashes when the batteries are charging
♦
is solidly lit during line mode when no batteries are
inserted or when all batteries are fully charged
Hard Disk Drive access indicator – lights on every
read/write access to the Programmer’s hard disk drive

Introduction
Programmer Setup and Operations Guide 7
Connector Panel
The connector panel is located on the back of the Programmer. It
contains connectors for the Programmer EXD cable, AC adapter
cable, and flash drive.
Serial port – Connect the EXD cable to this connector
and secure it using the thumb screws.
Power In port – Connect the AC adapter to this port
when you want to charge the batteries and/or run the
Programmer in line mode.
USB ports – Connect the flash drive to either port
when you want to back up the Programmer. You can
also use either port to connect the optional keyboard.
Do not use. (The optional keyboard/mouse connects to
a USB port.)
EXD Cable
AC Adapter Cable
Flash
Drive

8Programmer Setup and Operations Guide
2 Setup
Use the following steps to set-up the Programmer.
Unpack the Programmer
1. Unpack the Programmer and any accessories from their shipping
boxes.
2. Ensure that you have all the components and articles that have
been specified on the packing list(s).
Contact your AngelMed representative if any items are missing.
Charge the Programmer Batteries
When the Programmer is shipped to your site, its batteries are not
fully charged. We recommend charging them now, so that you can
use the Programmer without having to plug it into an AC line outlet.
Caution:
If you do not intend to use the Programmer for 6 months or
more, do not charge the batteries at this time. Storing
completely charged batteries for long time periods (≈6 mo);
can degrade battery life.
To charge the Programmer batteries:
1. Ensure both batteries are fully inserted into the Programmer.
2. Plug the AC Line cord into the receptacle on the AC Adapter.

Setup
Programmer Setup and Operations Guide 9
3. Plug the other end of the AC line cord into the wall outlet.
4. Plug the DC power cord of the AC adapter into the
Programmer’s Power In port ( ) as shown in the following
figure.
5. Leave the Programmer plugged in until it is fully charged as
indicated by the Capacity indicator on the front panel.
Connect the EXD to the EXD Cable
1. Check the EXD battery compartment and, if necessary, insert the
custom EXD battery.
Caution:
The EXD uses a custom battery supplied by Angel Medical
Systems. Use of any other battery may damage the EXD or
cause it to fail. Although “AA” sized batteries will fit in the
battery compartment, only the battery supplied by Angel
Medical Systems allows proper functioning of the EXD.

Setup
10 Programmer Setup and Operations Guide
2. Connect the EXD to the Programmer’s EXD cable. Use the two
thumb screws on the EXD cable to secure it to the EXD.
Caution:
Always secure the EXD to the cable using the thumb screws.
Failure to do so can allow the EXD cable to become
disconnected during a communication session with the IMD.
Thumb
Screws (2)

Setup
Programmer Setup and Operations Guide 11
Connect the EXD Cable to the Programmer
1. Connect the EXD cable to the Programmer serial port ( ),
which is located on the back of the Programmer.
2. Secure the cable connection by tightening the thumb screws.
Caution:
Always secure the EXD cable to the Programmer using the
thumb screws. Failure to do so can allow the EXD cable to
become disconnected during a communication session with the
IMD.
To disconnect the EXD cable from the Programmer:
♦Loosen the thumb screws on the EXD connector and pull the
connector from the serial port.
EXD
Cable
Serial
Port
Thumb
Screws

Setup
12 Programmer Setup and Operations Guide
Deploy the Stand
To support the Programmer at a
convenient viewing angle, lower the
stand and place the Programmer on
a flat, horizontal surface.
Attach Accessories as Needed
Attach the following accessories as the need arises:
♦AC adapter – to recharge the batteries and operate Programmer in
line mode
♦Flash drive – to back-up or restore the Programmer data
♦Optional keyboard/mouse – to operate the Programmer using a
standard keyboard and mouse
Note:
When using the optional keyboard and mouse, plug the
keyboard into either USB port on the Programmer and the
mouse into the USB port on the keyboard.
Flash Drive
Keyboard/mouse
AC Adapter

Programmer Setup and Operations Guide 13
3 Programmer Operations
This section describes how to perform the most common
Programmer activities, such as:
♦Starting the Programmer
♦Shutting Down the Programmer
♦Using the Stylus and On-Screen Keyboard
♦Checking the Battery State-of-Charge
♦Recharging the Batteries
♦Storing the Programmer
♦System Maintenance

Programmer Operations
14 Programmer Setup and Operations Guide
Starting the Programmer
To start the Programmer:
1. Verify that at least one charged battery is installed or plug the
AC Adapter into the Programmer. (If you use the AC adapter be
sure that it is plugged into a wall outlet.)
2. Start-up the Programmer by pressing the Power button on the
front of the Programmer for about 1 second.
The Programmer responds by lighting the On indicator.
3. The Programmer displays the Main Programmer window from
which you will perform all of your Programmer-related
activities.
For information on performing Programmer-related tasks such as
programming an IMD or retrieving patient IMD data, see the
AngelMed Guardian Programmer Application User’s Manual on
your AngelMed Guardian User Documentation CD or consult
the Programmer online Help.
Table of contents