manuals.online logo
Brands
  1. Home
  2. •
  3. Brands
  4. •
  5. Angelo Decor
  6. •
  7. Water Pump
  8. •
  9. Angelo Decor Pond Building Series User manual

Angelo Decor Pond Building Series User manual

For more information, please visit our web site:
www.angelodecor.com
To contact us regarding this unit, your options include:
customersupport@angelodecor.com | Phone: (780) 453 - 6646 | Fax: (780) 453- 6620
Angelo Décor International Inc. | 15840 –118th Avenue | Edmonton, AB |T5V 1C4
AD41250 and AD42505
1.25” to 1”
Female
reducer
Gasket
1.5” to 1.25”
Female
reducer
Gasket
01.
02.
04.
05.
Cap
1.5”
OD
Gasket
Cap
¾”
1”
1.25”
1.5”
Gasket
JNB Eco Pump Instructions V3 01.06.2014
O ring
1/5” to 1” Female reducer
O ring
1
4
COMPATIBLE ACCESSORIES
These “Eco” Pumps are designed for compatibility with the specific water feature
accessories and filtration components listed on each package. Used properly, they
provide decorative visual effects and help create a healthy pond environment.
While they are compatible with other brands and home-made components, they
SHOULD NOT BE MODIFIED IN ANY WAY to connect to other accessories.
1. Waterfall Weir 16” –AD46555
The easy way to add a waterfall basin, which includes
Mechanical and Biological Filtration to your system.
Requires a minimum of 80% of flow from the 1250gph pump,
Or minimum 50% of the 2500gph pump for proper effect.
2. Filters
The 1250gph is compatible with the Biological Pressure
Filter 1000 (AD46216) if less than 75% of flow is diverted to
the unit. The 1250gph is also compatible with the Filter Box
1500 (AD46500). The 2000 gallon pressure filter is
compatible with both pumps.
3. Universal Nozzle Kit –AD42136
Designed especially for this series of pump, includes a
2-way diverter for powering the nozzle feature and either a
waterfall, spouting statue, external filtration or UV clarifier
components.
4. UV Clarifiers
The 9 watt UV Clarifier (AD46530), used as a secondary feature,
or a more powerful 18 watt unit, help contribute to
a clear, clean pond environment.
LIMITED WARRANTY
This pump is warranted to the original user against defective materials and workmanship for a period of 12
months from date of purchase for the motor, impeller, and mechanical components. Connections and plastic
components carry a 90 day warranty. Our limited warranty does not cover any costs associated with the
installation or removal of products subject to warranty claims or the cost of return of the pump. The warranty
will commence from the date of purchase. Replacement liability is limited to any part or parts of the unit which
have failed due to defective material or workmanship. Proof of purchase is required for all claims against the
limited warranty. This warranty does not extend to damage of the product or part resulting from accident,
misuse, alteration, neglect, abuse, improper installation or normal wear and tear to the product(s). This limited
warranty extends only to the original user of the product.
1250 / 2500GPH POND WATERFALL PUMP
COMPONENTS
01. PVC Output (2)
02. Multi Size Tubing
Outputs (2)
Note: 2 of each outputs are
included if using pump for
in-line operation
03. Female Adapters
For Installing 1”Fountain
Nozzle Accessories
04. Pre-Filter Housing
05. Pump Body
1.5” Threaded Input and
Output
IMPORTANT USE AND CARE ADVICE BEFORE YOU BEGIN:
These “Eco Series” pumps are designed for use in “clean water applications”if you are using only
the supplied pre-filter housing. They are compatible with both fresh and salt water.
This series of pump is designed to provide the circulation necessary to maintain a healthy pond
environment using the lowest possible energy use. Used properly, they operate compatible filtration
components and water features at the stated performance levels outlined on the product package.
Dramatic, High-Lift water features require a secondary pump (Ideally our Pro-Grade Series) that
consumes more energy to produce the desired effect. Using in conjunction with a timer or remote
control, only when the dramatic affect is desired, will reduce unnecessary energy use and cost.
Connecting the Eco Pump to a separate filter (Ideally a Pond Building Series Item) is highly
recommended. They include both mechanical and biological components that will protect your pump
while improving water quality.
This pump has a solids handling capacity of up to 6mm, and is ideally suited to use in conjunction with
either an integrated skimmer or waterfall weir filter. A pressurized filter (with or without UV clarifiers) that
can be located in an external location is also a good choice.
Using this series of pump in an outdoor functional pond environment without proper filtration will cause
increased maintenance and could result in pump failure due to a build-up of dirt and debris.
This type of improper pump care is not covered under warranty.
For maximum satisfaction with your project, as well as the overall balance and health of your pond, we
suggest choosing a filter that slightly exceeds your current pond plan as most consumers will upgrade
features, fish, and plants during the life cycle of your project.
03.
3
2
WARNINGS: SAFETY AND ELECTRICAL CONNECTIONS
The pump is supplied with 6M (AD41250) OR 8M (AD42505) of 3 core electrical cable which is
permanently connected and sealed to the motor. This cable cannot be replaced. If the cable is
damaged the pump should be discarded.
Do not modify this cable, or any electrical component, for any reason.
1. Only use power supply with properly rated voltage and frequency as stated on the pump.
2. Create a “drip loop”, with part of power cord below the level of the connected receptacle.
3. Pump must be connected to an approved ground fault circuit interrupter (GFCI) receptacle.
4. Always unplug or disconnect all appliances from the electrical supply before putting hands
in the water, while equipment is being installed, repaired, maintained or handled.
5. Do not use the electrical cable to lift the pump as this may cause damage to the cord.
6. Do not operate or leave the pump in freezing conditions.
7. Do not allow the pump to run dry. The pump must always be fully submerged.
8. Do not use pump for ANY heated or flammable liquids
9. Do not use in water that exceeds 40
°
C
ASSEMBLY ADVICE
1. Maximum performance is achieved, and pump works best when used with largest
outputs and tubing sizes available. Restricting water flow with small accessories
will reduce the performance specifications indicated on the package.
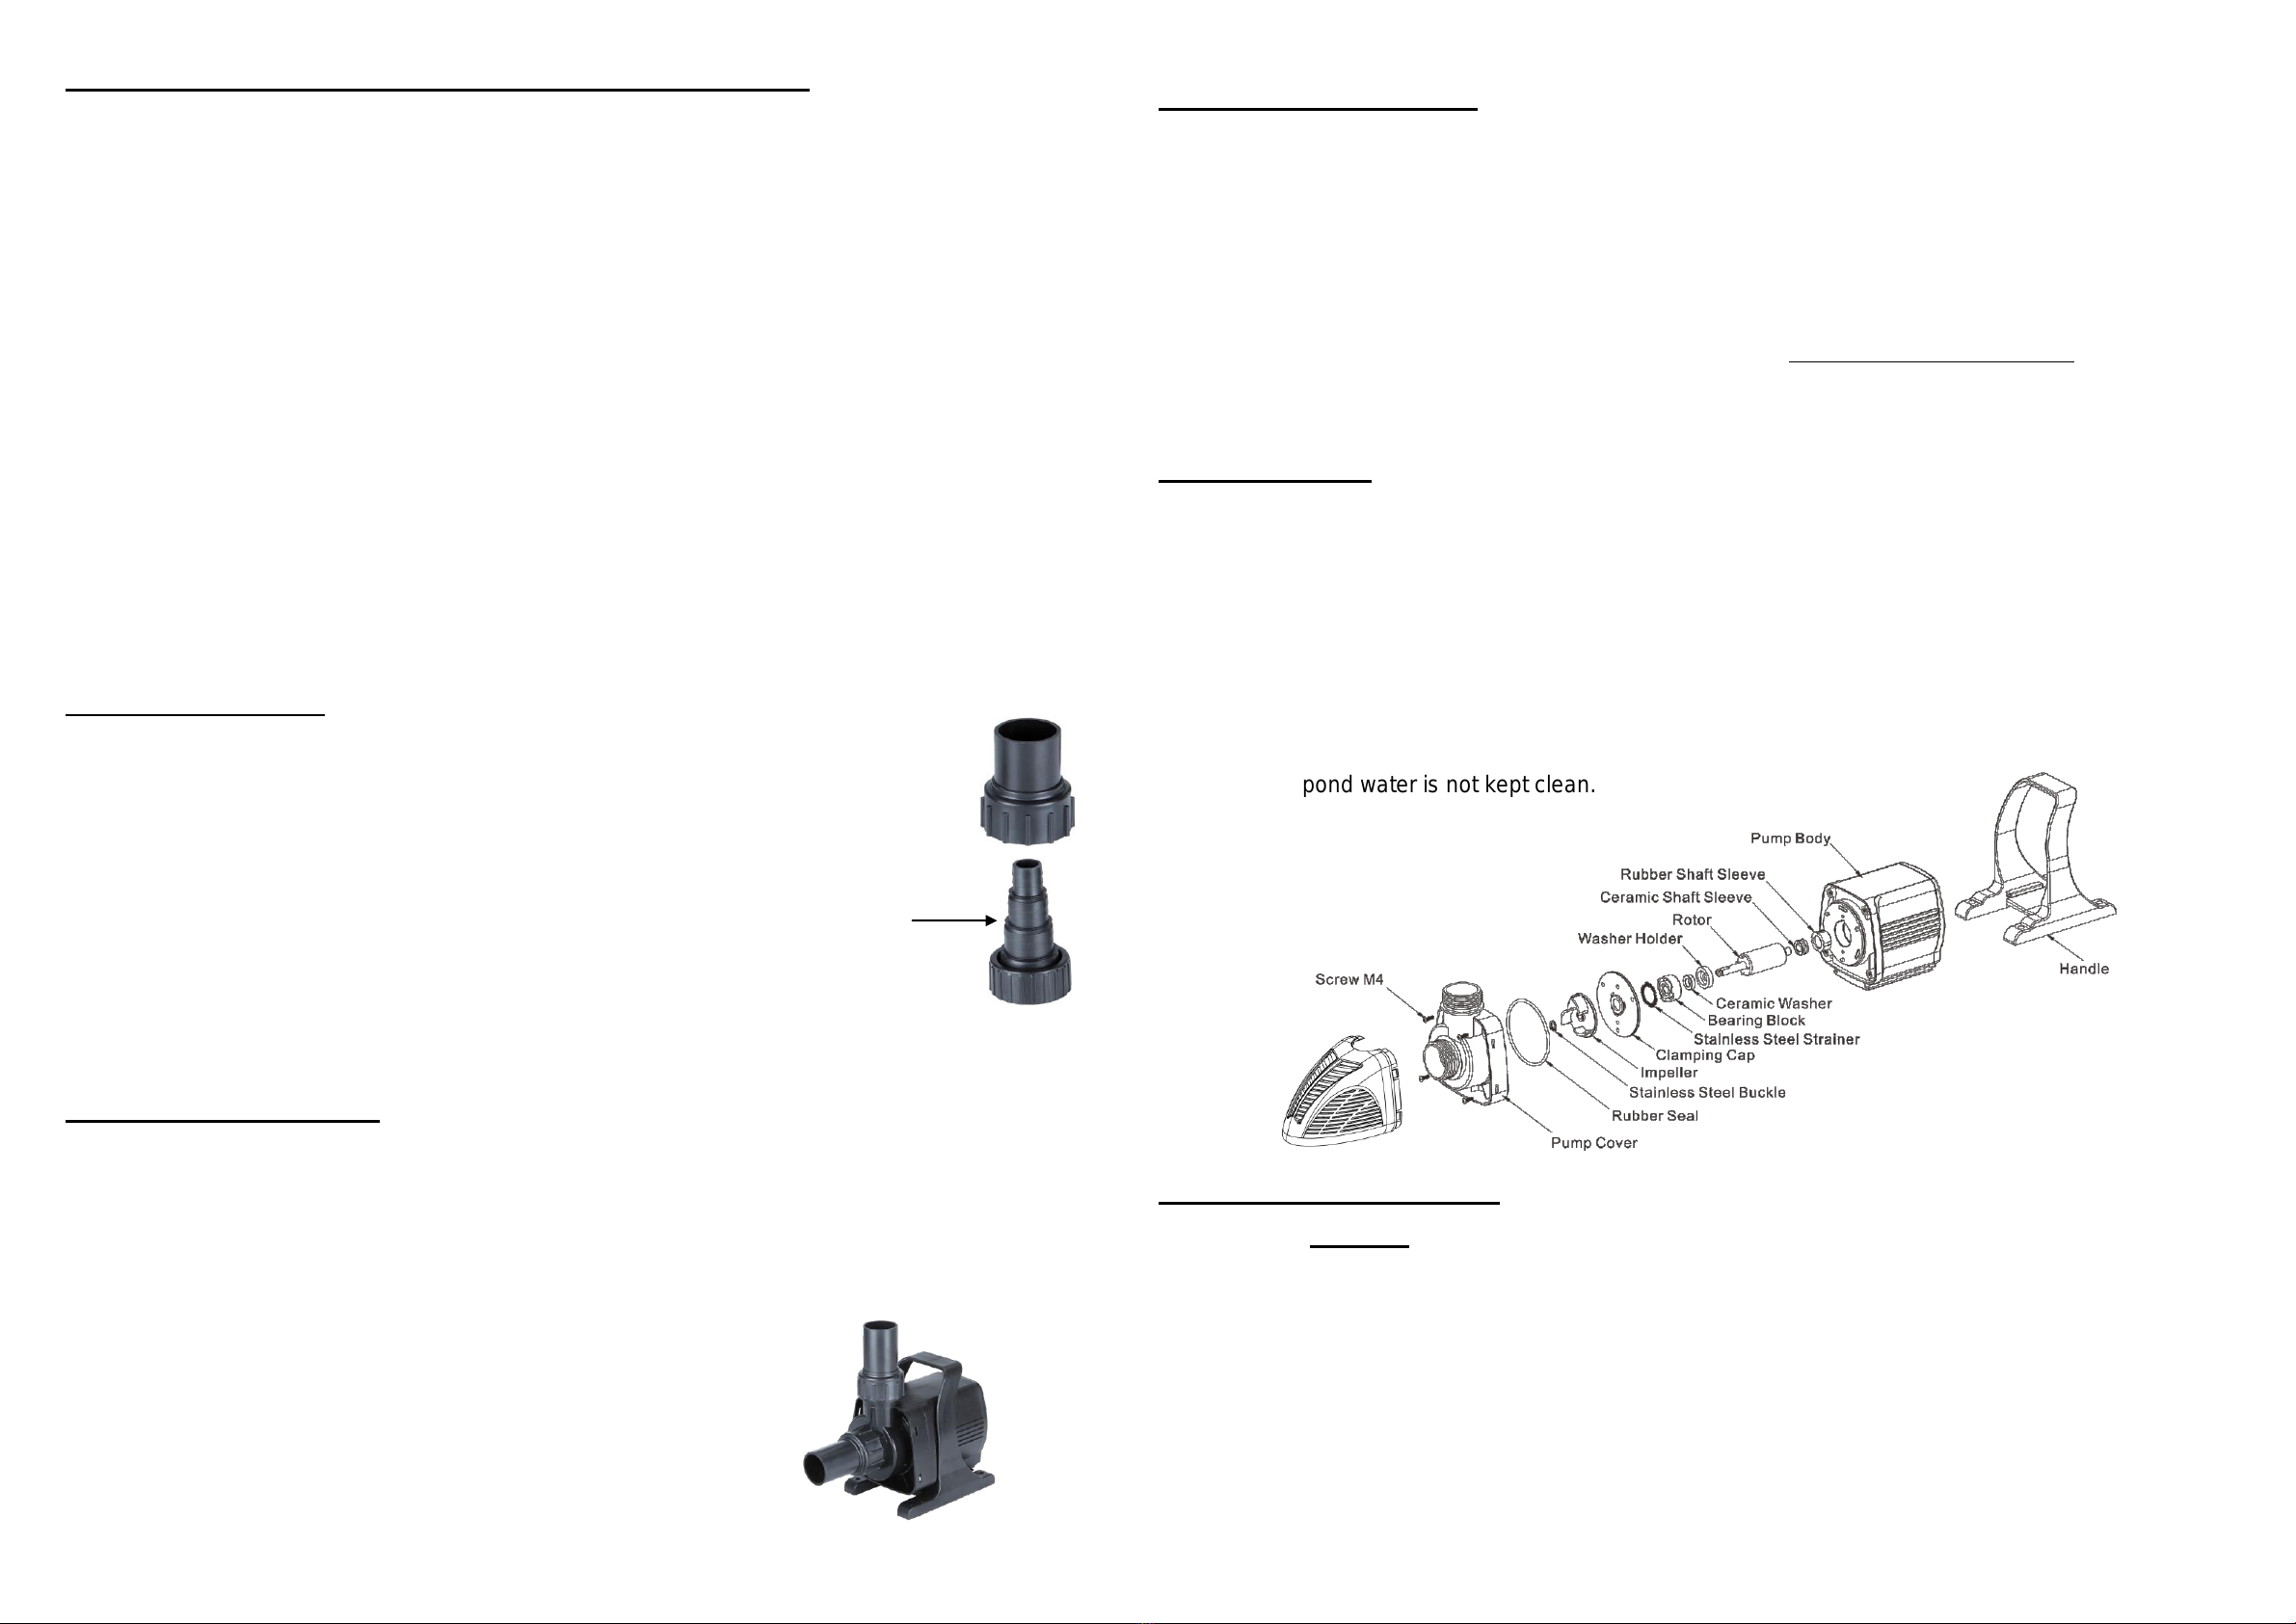
2. When using the Multi-Sized barbed output, cut the smaller sizes
that are smaller than your tubing size off with a hacksaw.
This will help maximize flow.
3. On threaded connections, adding Teflon tape is recommended to get a perfect seal.
INSTALLATION IN POND
1. Prime the pump by submersing in a containerof waterand connect to powerto test run theunit.
2. Place your pump on top of a flat brick or stone approximately 1” –4” from the bottom of your
pond to help prevent debris from interfering with the pump’s performance.
3. Make sure the cable is securely routed to the GFCI electrical supply and is protected against
abrasion and damage from rocks, sharp objects, or pond features and accessories.
4. If using in an “In-line” application, OUTSIDE OF THE POND,
pump must be positioned below the pond water level.
Installing above the water line would require additional plumbing
such as a check valves installed to prevent water from exiting
the pump, and running dry. This would severely affect
performance and cause harm to the pump.
OPERATIONAL ADVICE
1. When using this pump to operate multiple features, calculate the flow to each component
to allow the use of items like UV and Pressure filters that operate at a lower flow rate.
2. Monitor all connections and accessories for at least the first hour of initial operation to
insure against any leaking or water loss.
3. Regularly check that power plugs are secure, and power supply is not showing signs
of overheating or power leakage. Safeguard against pond water leakage to these connections.
4. Do not operate this pump below 40
°
F (4
°
C), otherwise freezing damage may occur.
If temperature is likely to fall below 0
°
C remove the pump from the pond, ensure all water
is removed from the pump and the unit is completely dry and stored in a frost-free place.
MAINTENANCE
Regular maintenance must be performed to keep your pump running properly.
Always disconnect the pump from the electrical supply before handling.
Inspect the cord for any damage or deformation from heat or other sources.
Check the water level daily to ensure the pump remains fully submerged.
Clean the pump exterior, especially the pre-filer housing, regularly to remove debris, and
prevent mineral deposits and contamination.
In clean water conditions, disassemble the unit at least once per season to clean any build-up of
debris or mineral deposits inside the impeller and rotor assembly. More frequent cleaning is
required if pond water is not kept clean.
TROUBLESHOOTING TIPS
REMEMBER: ALWAYS DISCONNECT THE PUMP AND ANY ACCESSORIES FROM
THE ELECTRICAL SUPPLY BEFORE HANDLING.
If the pump appears to operate, but there is low or irregular water flow:
Make sure the pump is fully submerged.
Check the tubing for kinks or obstructions. Ensure pump outlet is clear of objects.
Check water inlet for any obstructions.
If the pump does not operate, and there is no water flow:
Make sure power cord is securely plugged into a tested and stable working power supply
Remove front cover and impeller cover to access rotor area.
Rotate the rotor to ensure it is not broken or jammed. Remove the rotor to check it is
free from any debris. Rinse the cover and re-assemble.

This manual suits for next models

2

Other Angelo Decor Water Pump manuals

Angelo Decor Sensible Solar AD40120 User manual

Angelo Decor

Angelo Decor Sensible Solar AD40120 User manual

Angelo Decor Pond Building AD40402 User manual

Angelo Decor

Angelo Decor Pond Building AD40402 User manual

Angelo Decor TP-180 User manual

Angelo Decor

Angelo Decor TP-180 User manual

Angelo Decor AD40035 User manual

Angelo Decor

Angelo Decor AD40035 User manual

Angelo Decor AD40251 User manual

Angelo Decor

Angelo Decor AD40251 User manual

Angelo Decor Pond Building AD40101 User manual

Angelo Decor

Angelo Decor Pond Building AD40101 User manual

Angelo Decor Pond Building AD41500 User manual

Angelo Decor

Angelo Decor Pond Building AD41500 User manual

Angelo Decor P006B User manual

Angelo Decor

Angelo Decor P006B User manual

Angelo Decor Pond Building AD42500 User manual

Angelo Decor

Angelo Decor Pond Building AD42500 User manual

Popular Water Pump manuals by other brands

DIPRA SPID'O CDW-400-STORM Original operating instructions

DIPRA

DIPRA SPID'O CDW-400-STORM Original operating instructions

Endress EMP 205 manual

Endress

Endress EMP 205 manual

Intex Quick-Fill AP621 owner's manual

Intex

Intex Quick-Fill AP621 owner's manual

Larius GHIBLI 24:1 DE Operating and maintenance instruction

Larius

Larius GHIBLI 24:1 DE Operating and maintenance instruction

DuraMAC 5025PTSP owner's manual

DuraMAC

DuraMAC 5025PTSP owner's manual

GORMAN-RUPP PUMPS VS4A60-B Installation, operation, and maintenance manual with parts list

GORMAN-RUPP PUMPS

GORMAN-RUPP PUMPS VS4A60-B Installation, operation, and maintenance manual with parts list

Go Fermentor GOpump operating manual

Go Fermentor

Go Fermentor GOpump operating manual

Calpeda GX ZERO operating instructions

Calpeda

Calpeda GX ZERO operating instructions

Clarke CPCDP500 Operation & maintenance instructions

Clarke

Clarke CPCDP500 Operation & maintenance instructions

Grundfos Sololift2 Service instructions

Grundfos

Grundfos Sololift2 Service instructions

VAKI Fish Pump 8" user manual

VAKI

VAKI Fish Pump 8" user manual

Samoa Larius GHIBLI 10:1 Operating and maintenance manual

Samoa

Samoa Larius GHIBLI 10:1 Operating and maintenance manual

Hayward MaxFlo VS 2300 Series owner's manual

Hayward

Hayward MaxFlo VS 2300 Series owner's manual

Bosch Rexroth 32 Series Repair instructions

Bosch

Bosch Rexroth 32 Series Repair instructions

Atlas Copco AWC160 instruction manual

Atlas Copco

Atlas Copco AWC160 instruction manual

Barnes BP25 Series Installation and operation manual

Barnes

Barnes BP25 Series Installation and operation manual

HARVARD MA1 70-2208 user manual

HARVARD

HARVARD MA1 70-2208 user manual

NAVTEK NRP6Di user manual

NAVTEK

NAVTEK NRP6Di user manual

manuals.online logo
manuals.online logoBrands
  • About & Mission
  • Contact us
  • Privacy Policy
  • Terms and Conditions

Copyright 2025 Manuals.Online. All Rights Reserved.