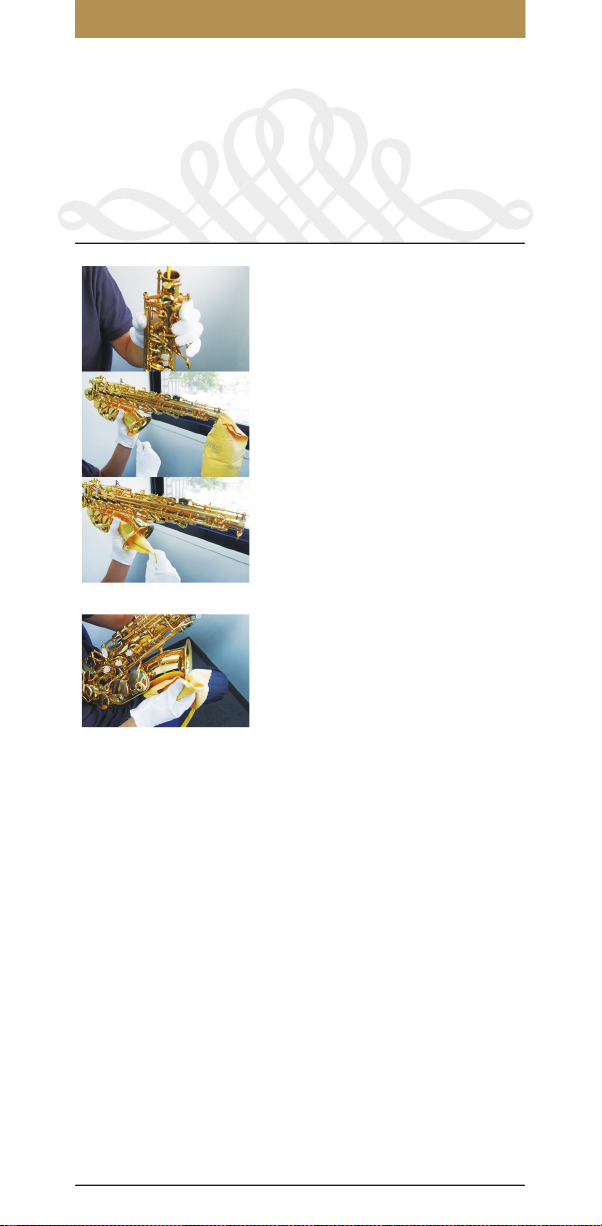
Antigua Soprano User manual

Saxophone
Owner’s
Manual

1
English 02
Español 16
繁體中文 30
Deutsch 09
日本語 23
简体中文 37

2
Content
Saxophone types
Saxophone nomenclature
Assembly
Disassembly
Maintenance
Caution
3
4
5
6
7
8

3
Saxophone
Types Saxophone
nomenclature
Soprano Saxophone
Alto Saxophone
Tenor Saxophone
Baritone Saxophone

4
Saxophone
nomenclature
Octave key
Neck screw
Body
Neck
Bell
Key guard
Key cup
Bow
Mouthpiece
Ligature

5
Assembly
1Apply a liberal amount of cork
grease to the neck cork and rub it
in with your fingers.
2Put your mouthpiece on the neck
by twisting gently. Leave approximately
1/4 of the cork exposed.
3Insert neck base into the body
section then tighten the neck
screw.
5Wear the Antigua saxophone strap
around your neck and hook the
strap onto the strap ring on the
back of the instrument. Adjust the
strap length so you can reach your
mouthpiece comfortably.
4Moisten your reed in water or in your
mouth. Secure the moistened reed
to the mouthpiece with the ligature
by gently sliding it on from the top.
Align the reed tip with the end of
the mouthpiece. Tighten the ligature
screws to hold in place but avoid
over- tightening them.

6
Disassembly
1Unhook saxophone from the neck strap.
2Loosen the neck screw and remove the neck from the
body section.
3Separate the mouthpiece from the neck by twisting
gently.
4Loosen the ligature screw and remove the reed. Place the
reed in a safe place to allow it dry.
5Put the mouthpiece cap back on your mouthpiece for
protection.
6Remember to put the end plug (black plastic plug) back
on the top of the body section. This will help protect the
octave key when the instrument is in the case.

7
Maintenance
1Each time you finish playing your
horn, place the cleaning swab into
the bell of the saxophone and take
it out from the top to remove the
moisture from your instrument.
Remember to keep the cleaning
swab clean and dry.
2Use a clean, soft cloth to wipe
off any fingerprints and other
smudges from the surface of your
instrument.

8
Caution
1To avoid damaging the key mechanisms, do not exert
excessive pressure on them during assembly and
disassembly.
2Always place your saxophone in a safe place such as
your instrument case or a suitable instrument stand. Do
not place the instrument somewhere unstable which
may cause the instrument to fall or drop easily.
3Never attempt to clean your pads.
4Always use a soft cloth for cleaning your sax. Do not
apply polishing liquids to the instrument’s surface. Use
of these polishes may harm the keys and the pads.
5Do not allow the instrument to be exposed to extreme
temperatures or humidity.
6Never attempt to repair the saxophone yourself. For
adjustments or repair, take your instrument to your
Dealer or a qualified technician.

9
Saxofon Typen
Aufbau eines Saxofons
Montage
Demontage
Wartung
Vorsicht
10
11
12
13
14
15
Inhalt

10
Sopran-Saxofon
Alt-Saxofon
Tenor-Saxofon
Bariton-Saxofon
Saxofon
Typen

11
Aufbau eines
Saxofons
Oktavklappe
S-Bogenschraube
Korpus
S-Bogen
Becher
Klappenschutz
Klappe
Knie
Mundstück
Blattschraube

12
Montage
1Fetten Sie den Kork des S-Bogens
mit Korkfett.
2Verbinden Sie durch vorsichtiges
Drehen das Mundstück mit dem
S-Bogen. Lassen Sie ca. 1/4 des
Korks sichtbar.
3Stecken Sie den Unterteil vom
S-Bogen auf das Korpus, ziehen
Sie dann die S-Bogenschraube
handfest an.
5Legen Sie den Antigua Saxofongurt
um den Hals und haken Sie den
Gurt in den Gurtring auf der
Rückseite des Instrumentes ein.
Stellen Sie die Gurtlänge so ein,
dass das Mundstück nicht auf
der Unterlippe aufliegt und bei
normaler Kopfhaltung nicht über
den Mund zeigt.
6Legen Sie Ihren linken Daumen an
die Daumenauflage und den rechten
Daumen unter den Daumenhalter.
Sie können jetzt das Instrument
einstellen und gleich spielen.
4Befeuchten Sie Ihr neues Blatt
mehrere Minuten lang mit Wasser
oder in Ihrem Mund. Befestigen
Sie das angefeuchtete Blatt auf der
Oberseite des Mundstücks und
sichern Sie es mit der Blattschraube.
Achten Sie darauf, dass Mundstück
und Blatt bündig abschließen. Ziehen
Sie die Blattschraube handfest an.

13
Demontage
1Entfernen Sie zuerst den Saxofongurt vom Instrument.
2Lösen Sie die S-Bogenschraube und entfernen Sie den
S-Bogen vom Korpus.
3Trennen Sie das Mundstück vom S-Bogen durch
vorsichtiges Drehen.
4Lösen Sie die Blattschraube und entfernen Sie das Blatt.
Bitte lagern Sie das Blatt sicher und trocken.
5Denken Sie daran, den Herzschoner (schwarzer
Kunststoffstecker) zurück auf den Korpus zu stecken.
Er dient zum Schutz der Oktavmechanik, wenn das
Instrument im Etui verstaut ist.

14
Wartung
1Ziehen Sie den Durchziehwischer
mehrmals durch Becher und
Korpus (Wichtig: Führen Sie den
Durchziehwischer durch den
Becher ein.). Wiederholen Sie den
Vorgang auch mit dem S-Bogen.
Achten Sie darauf, Korpus und
S-Bogen gründlich zu reinigen
und zu trocknen. Halten Sie den
Durchziehwischer immer sauber
und trocknen Sie ihn nach jedem
Gebrauch.
2Verwenden Sie ein Poliertuch, um
Schmutz und Fingerabdrücke
von der Oberfläche Ihres
Instrumentes vorsichtig zu
entfernen.
4Entfernen Sie Feuchtigkeit und Ablagerungen regelmäßig
von Ihrem Mundstück. Reinigen Sie dazu nach dem
Spielen das Mundstück mit der Bürste und spülen Sie es
mit warmen Wasser.
3Mit Hilfe eines Reinigungspapieres
können Sie die Feuchtigkeit
zwischen Klappe und Tonloch
leicht entfernen. Legen Sie dazu
das Reinigungspapier zwischen
Klappe und Tonloch. Öffnen
und Schließen Sie die Klappe
solange, bis keine Feuchtigkeit
mehr auf dem Reinigungspapier
zurückbleibt. Entfernen Sie
schließlich das Reinigungspapier.

15
Vorsicht
1Um eine Beschädigung der Klappenmechanik zu
vermeiden, üben Sie keinen übermäßigen Druck auf die
Klappen während der Montage und Demontage aus.
2Verstauen Sie das Saxofon an einem sicheren Ort, am
besten in einer Instrumententasche oder auf einem
Instrumentenständer. Legen Sie das Instrument nur auf
geraden, stabilen Flächen ab, um ein Herunterfallen zu
vermeiden.
3Verwenden Sie bei der Reinigung der Polster keine
rauen Materialien, um die Lebensdauer der Polster zu
verlängern.
4Verwenden Sie keine Polituren für die Pflege Ihres
Instrumentes, um Schäden an der Oberfläche zu
vermeiden.
5Setzen Sie das Instrument keinen extremen
Temperaturen oder hoher Luftfeuchtigkeit aus.
6Lassen Sie Ihr Saxofon nur von erfahrenen und
qualifizierten Instrumentenbauern und Fachhändlern
einstellen oder reparieren.

16
Contenido
Tipos de saxofón
Nomenclatura de las Partes del Saxofón
Montaje
Desmontaje
Mantenimiento
Precauciones
17
18
19
20
21
22

17
Tipos de
Saxofón
Saxofón Soprano
Saxofón Alto
Saxofón Tenor
Saxofón Barítono

18
Nomenclatura de las
Partes del Saxofón
Llave de
octava alta
Tornillo de bocal
Cuerpo
Bocal
Campana
Guarda de llave
Copa de llave
Culata
Boquilla
Ligadura

19
Montaje
1Aplique una cantidad abundante
de aceite de corcho en el corcho
del bocal.
2Conecte la boquilla y el bocal
girando suavemente. Deje
aproximadamente 1/4 del corcho
expuesto.
3Inserte la base del bocal en
la sección del cuerpo y a
continuación apriete el tornillo del
bocal.
5Colóquese la correa del saxofón
Antigua alrededor de su cuello y
enganche la correa en el aro de
la correa de la parte trasera del
instrumento. Ajuste la longitud de
la correa de modo que la boquilla
se ajuste a la boca cómodamente.
6Coloque su pulgar izquierdo en
el apoyadedo y coloque su pulgar
derecho debajo del gancho de pulgar.
¡Después de acondicionar y afinar
el instrumento, podrá entonces
disfrutar de su instrumento!
4Humedezca primero la nueva caña por
varios minutos en agua o en la boca.
Fije la caña humedecida a la boquilla
por debajo de la ligadura de la parte
superior. Coloque la punta de la caña
alineada al extremo de la boquilla.
Apriete los tornillos de la ligadura y
evite apretar demasiado los tornillos
de la misma.
This manual suits for next models
3
Table of contents
Languages:
Other Antigua Musical Instrument manuals