Aobosi SL-405 User manual

STOVE FAN
OFENVENTILATOR
VENTILATEUR DE POÊLE
VENTILATORE DELLA STUFA
VENTILADOR DE LA ESTUFA
USER MANUAL
BEDIENUNGSANLEITUNG
MANUEL UTILISATEUR
MANUALE UTENTE
MANUAL DE USUARIO
SL-405
PLEASE READ INSTRUCTIONS CAREFULLY BEFORE ASSEMBLY
RETAIN THIS MANUAL FOR FUTURE REFERENCE

INTRODUCTION………………………………………………………….
SPECIFICATIONS………………………………………………………..
INSTALLATION…………………………………………………..............
SAFETY………………………………………………….........................
OPERATION…………………………………………………..................
REFERENCES FOR THE STOVES……………………………….......
CARE& MAINTENANCE………………………………………………..
PROBLEM SOLVING…………………………………………………....
WARRANTY…………………………………………………..................
EINLEITUNG………………………………………………………..........
TECHNISCHE DATEN………………………………………………......
INSTALLATION………………………………………………………......
SICHERHEITSANWEISUNGEN……………………………...............
BEDIENUNG……………………………………………………….........
REFERENZEN FÜR DIE OFEN………………………………............
REINIGUNG UND WARTUNG…………………………………………
STÖRUNGSSUCHE………………………………………………….....
GARANTIE…………………………………………………....................
English CONTENT
Deutsch INHALT
INTRODUCTION…………………………………………......................
SPÉCIFICATIONS…………………………………………....................
INSTALLATION………………………………………….........................
SÉCURITÉ…………………………………………................................
OPÉRATION………………………………………….............................
RÉFÉRENCES POUR LES POÊLES……………………………….....
SOINS ET ENTRETIEN…………………………………………............
RÉSOLUTION DE PROBLÈME…………………………………………
GARANTIE…………………………………………................................
Français CONTENU
4
4
4
4
5
6
6
7
8
9
9
9
9
10
11
11
11
12
13
13
13
13
14
15
15
16
17

INTRODUZIONE………………………………………….................
SPECIFICHE…………………………………………......................
INSTALLAZIONE…………………………………………................
SICUREZZA………………………………………….......................
FUNZIONAMENTO…………………………………………............
RIFERIMENTO PER LA STUFA………………………..................
CURA & MANUTENZIONE………………………………………....
RISOLUZIONE DEI PROBLEMI………………………………...…
GARANZIA………………………………………….........................
INTRODUCCIÓN…………………………………………................
ESPECIFICACIONES………………………………………….........
INSTALACIÓN …………………………………………...................
SEGURIDAD…………………………………………......................
OPERACIÓN ………………………………………….....................
REFERENCIAS PARA LAS ESTUFAS…………………………….
CUIDADO & MANTENIMIENTO……………………………………
SOLUCIÓN DE PROBLEMAS ……………………………………..
GARANTÍA…………………………………………..........................
Italiano CONTENUTI
Español CONTENIDO
18
18
18
18
19
20
20
21
21
22
22
22
22
23
24
24
25
25

INTRODUCTION
SPECIFICATIONS
SAFETY
INSTALLATION
Thank you for buying our products. All our products have
been designed and manufactured to provide a long, reliable service.
The stove fan uses Seebeck Technology to harness heat that generates electricity
which powers the fan. Warm air is pushed into the room rather than simply rising
to the ceiling or being trapped around the stove. This improves the effectiveness
of the stove, maximizing heat distribution around the room and thereby ensuring
fuel efficiency.
The fan is designed to be used on freestanding stoves with normal surface
temperatures of 50°C-300°C.Temperatures above 300°C
may damage your fan. Relocate your fan to a cooler spot on your stove if the
surface temperature exceeds 300°C.
Description: STOVE FAN
Model No.: SL-405
Overall height: 16.5cm
Overall width: 16.0cm
Overall Depth:11.99cm
Base dimensions: 12.0cm
Net weight: 0.47Kg
OPTIMAL RUNNING TEMPERATURE: 50-300℃
CFM:140
Stoves and fires can get HOT; your heat powered stove fan will get hot.
●Keep the stove and fan away from people or animals.
●Do not place the fan on a delicate surface.
●Do not cause obstruction to the fan blades.
CAUTION: The fan blades, whilst not dangerous, may cause discomfort or
harm if fingers are inserted into moving rotating blades. If moving the fan,
the base may be very hot, so please ware heat-proof gloves.
Your fan will arrive almost fully assembled. You simply just have to attach the fan blade
which should only take a couple of minutes. Place the fan blade onto the front of the unit. You
will find it fits quite snugly on to the front of the unit, in some cases a small amount of
pressure may need to be applied. Rotate the blades until the screw holes are aligned. Screw in
the four provided screws into the holes. Your fan is now ready to be used.
4

OPERATION
Carefully remove the product from its packaging and, before placing your
fan on the stove, check the blades freely rotate.
Place your stove fan as close to the rear of the stove and to the side of flue
pipe as possible.
●Never laid the product flat on its back.
●Never place the fan directly in front of the flue pipe.
There is a bi-metallic safety device in the base of the fan.
If the surface temperature rises above around 250℃the safety device gently
elevates the front of the fan to protect the TEG and motor. The fan will lower
to normal as the surface temperature reduces.
The fan will start automatically when the surface temperature under the fan
reaches around 50℃. The speed of the fan increases as the temperature
rises to a maximum of around 230℃.
We recommend the use of a Stove Thermometer to maximize the efficient
operation of your stove.
5

REFERENCES FOR THE STOVES
CARE& MAINTENANCE
Most important : the surface temperature on the location placed the stove fan
shall be more than 50℃,the stove fan needs the heat to generate electricity to turn it.
Not suitable for...
Wherein ,these stoves comprised a thermal-protection inter layer to lower the surface
temperature on the top of the stoves ,the temperature was less than 50℃,the stove
fan cannot achieve the heat from the stoves very well, so it won’t work.
Your stove fan is manufactured using high grade components and resilient anodized
aluminum. The fan does not require maintenance in typical use.
When you clean the fan, use a damp clean cloth.
We recommend that you keep the box. You can use this for storage when not in
use and it will make it easier if you need to return the fan under warranty or for refurbishment.
Ideal for...
6

PROBLEM SOLVING
If the goods have arrived in a damaged condition please contact your supplier.
In the unlikely event that parts are missing or the products in not working as described, please
contact us so that we may deal with your problem swiftly and minimize delays.
If the fan appears to be vibrating, this may be due to the blades becoming out of alignment.
When the fan is cool, slowly rotate the blades while observing the gap between the tip
of each blade and the top. If one or more of the blades is out of alignment they may
be gently adjusted by holding the blades whilst applying slight pressure to the
misaligned blades. Check and repeat as required.
For more problems solving and tips please contact with our sales representative.
The device meets the requirements of Regulation 2014/30/EU as well as the
applicable standards EN55014-1:2006+A1:2009+A2:2011, EN55014-2:2015.
This marking indicates that this product should not be disposed with other household wastes
throughout the EU. To prevent possible harm to the environment or human health from uncontrolled
waste disposal, recycle it responsibly to promote the sustainable reuse of material resources.
To return your used device, please use the return and collection systems or contact the retailer
where the product was purchased. They can take this product for environmental safe recycling.
Manufacturer:
Suzhou Sanli Electric Motor Co., Ltd
Add.: No. 955 Hean Road, Wuzhong district, Suzhou China
Coorpration/Customer Support:
C/O E Gate Germany GmbH Marzahner Str. 34 D-13053 Berlin Germany
7

Warranty
Thank you for purchasing our product, which has been made to
meet high quality standards. The manufacturer's warranty covers
the product for a period of 12 months from the date of purchase
against manufacturing faults.
All Aobosi warranties are automatically kept track of in our system,
so there is no need to register your product.
For 6month extra free of charge warranty, please register at website
www.iaobosi.com or fill in and take picture of bellow Warranty Card
Due to continuous product improvement, we reserve the right to
change the product specification without prior notice.
8

Einleitung
Vielen Dank für den Kauf unserer Produkte. Alle unsere Produkte wurden
entworfen und hergestellt, um einen langen, zuverlässigen Service zu bieten.
Der Ofenventilator nutzt die Seebeck Technologie und nutzt die Hitze, die Elektrizität erzeugt, um
den Ventilator anzutreiben. Warme Luft wird in den Raum geschoben, anstatt einfach an die
Decke zu steigen oder rund um den Herd gefangen zu sein. Dies verbessert die Wirksamkeit des
Ofens, maximiert die Wärmeverteilung im den Raum und sorgt so für die Kraftstoffeffizienz.
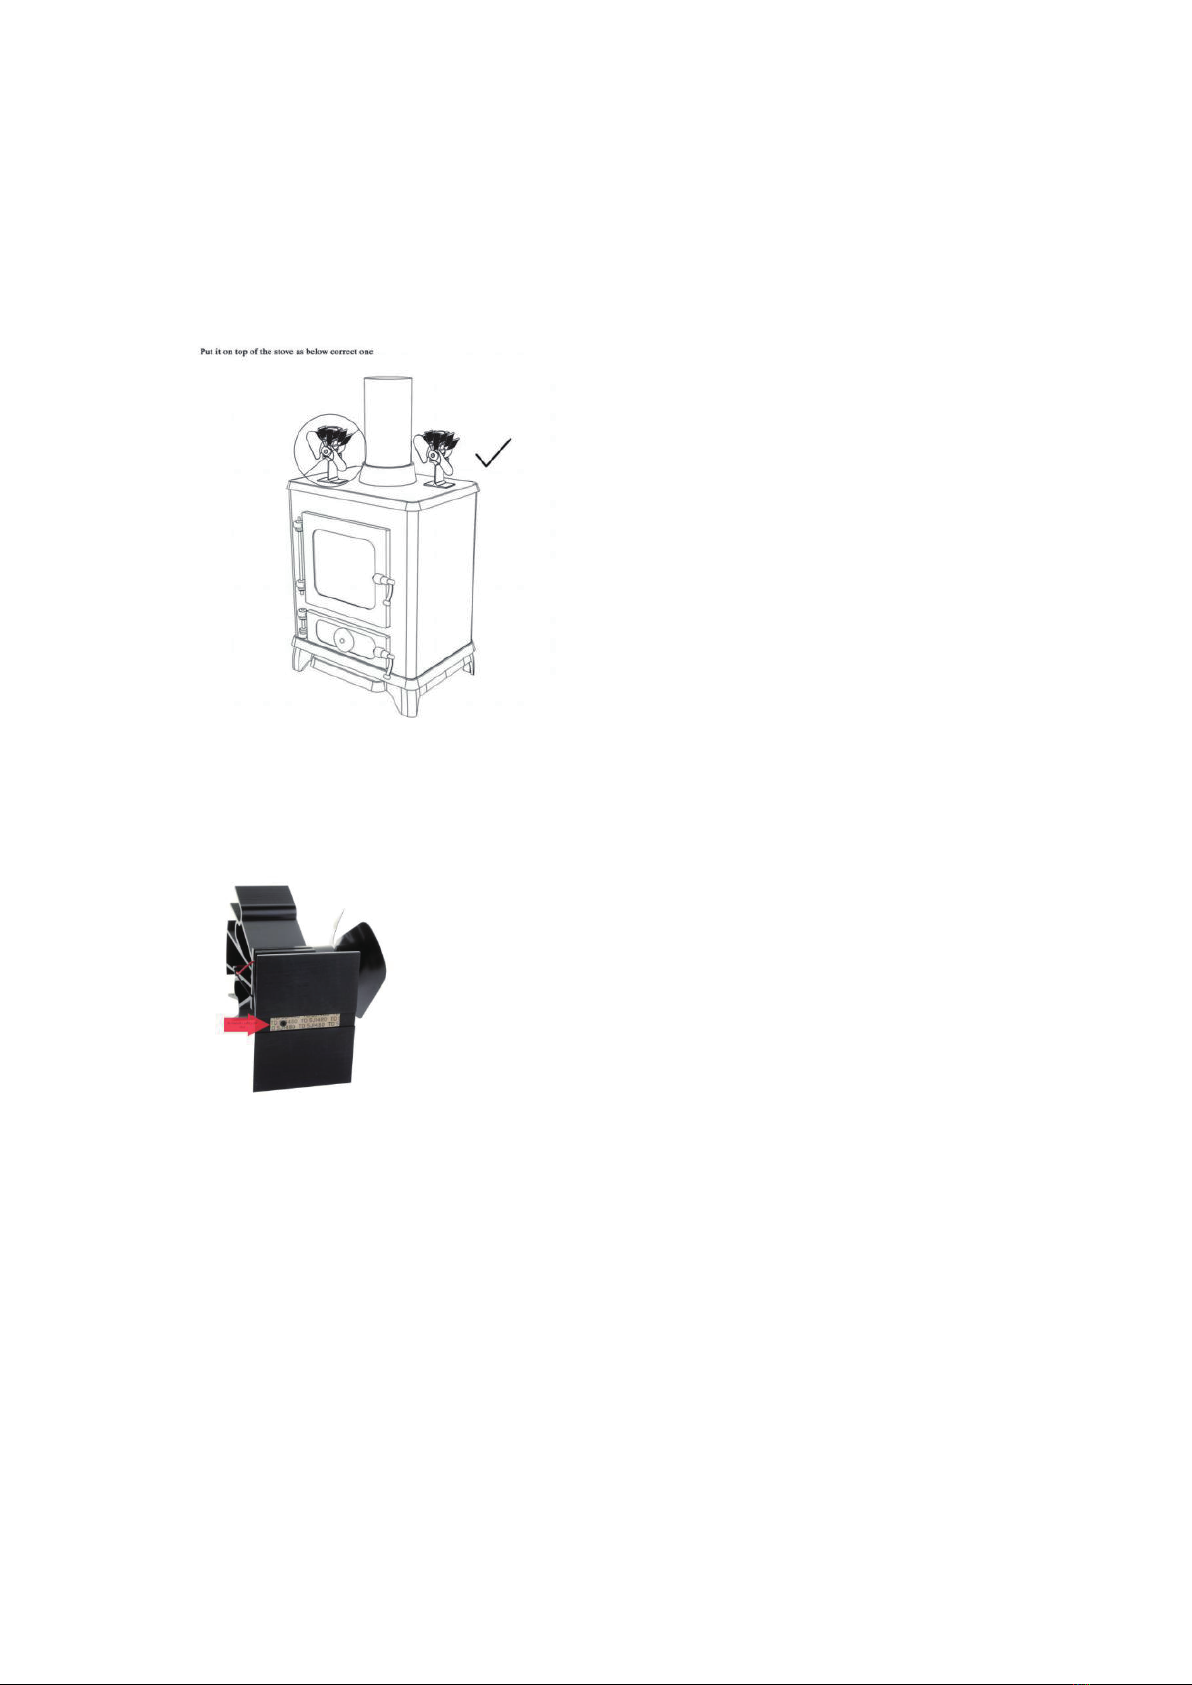
Der Herdventilator ist für den Einsatz auf freistehenden Öfen mit einer normalen
Oberflächentemperatur zwischen 50 Grad und 300 Grad Celsius ausgelegt. Entfernen Sie den
Ventilator vom Herd, wenn die Temperatur 300°C übersteigt.
Technische Daten
Beschreibung:OFENVENTILATOR
Modell Nr.: SL-405
Gesamthöhe: 16.5cm
Gesamtbreite: 16,0cm
Gesamttiefe: 11.99 cm
Abmessung des Standfußes: 12.0cm
Nettogewicht: 0,47kg
OPTIMALE BETRIEBSTEMPERATUR: 50–300°C
Luftumwälzung: 140 Kubikfuß pro Minute
INSTALLATION
Ihr Ventilator kommt fast komplett montiert. Sie müssen einfach nur die Lüfterklinge
anbringen, was nur ein paar Minuten dauern sollte. Legen Sie die Lüfterschaufel auf die
Vorderseite des Gerätes. Sie werden feststellen, dass es ganz bequem auf die Vorderseite des
Gerätes passt, in manchen Fällen kann ein geringer Druckbedarf angewendet werden. Drehen
Sie die Klingen, bis die Schraubenlöcher ausgerichtet sind. Schrauben Sie die vier
mitgelieferten Schrauben in die Löcher ein. Ihr Ventilator ist nun bereit, benutzt zu werden.
Sicherheitsanweisungen
Öfen und Feuer können heiß werden; Ihr durch Wärme angetriebener Ofenventilator wird heiß.
● Halten Sie den Herd und den Ventilator von Menschen oder Tieren fern.
● Stellen Sie den Lüfter nicht auf eine empfindliche Oberfläche.
● Blockieren Sie nicht die Lüfterflügel.
Vorsicht : Fassen Sie niemals den Standfuß des Ofenventilators an, und stellen Sie den
Ofenventilator nicht auf eine ungeschützte Fläche, wenn er heiß ist. Benutzen Sie immer den
ausziehbaren Handgriff, wenn Sie den Ofenventilator bewegen oder tragen, oder tragen Sie
hitzebeständige Handschuhe.
9

Stellen Sie es wie unten angegeben auf den Herd
Bedienung
Entfernen Sie das Produkt vorsichtig aus der Verpackung und überprüfen Sie, bevor Sie
den Ventilator auf den Herd stellen.
Legen Sie den Herdfächer so nah wie möglich an die Rückseite des Ofens und an die
Seite des Rauchrohres
●Niemals das Produkt flach auf den Rücken legen.
●Stellen Sie den Lüfter niemals direkt vor das Rauchrohr.
Es gibt eine bi-metallische Sicherheitseinrichtung in der Basis des
Wenn die Oberflächentemperatur über etwa 250 ℃steigt, hebt die Sicherheitseinrichtung
vorsichtig die Vorderseite des Lüfters auf, um den TEG und den Motor zu schützen. Der
Ventilator sinkt auf normal, wenn sich die Oberflächentemperatur verringert.
Der Lüfter startet automatisch, wenn die Oberflächentemperatur unterhalb des Ventilators
etwa 50 ℃erreicht. Die Geschwindigkeit des Ventilators steigt, wenn die
Temperatur auf ein Maximum von etwa 230 ℃ansteigt.
Wir empfehlen die Verwendung eines Herd-Thermometers, um den effizienten Betrieb
Ihres Ofens zu maximieren.
Ventilators.
10

Betriebstemperaturbereich
50 ~ 345 ℃
REFERENZEN FÜR DIE OFEN
Ideal für...
Am wichtigsten: Die Oberflächentemperatur an der Stelle, die die Herd-Ventilator wird
mehr als 50 ℃, die Herd-Ventilator benötigt die Hitze, um Strom zu erzeugen, um es zu
drehen.
Nicht geeignet für...
Bitte beachten:
Reinigung und Wartung
Diese Öfen sind mit einer thermisch schützenden Zwischenschicht ummantelt,
um die Oberflächentemperatur auf der Oberseite der Öfen zu senken. Dadurch beträgt die
Temperatur weniger als 50 ℃, der Ofenventilator kann die Hitze der Öfen nicht sehr gut
aufnehmen und so nicht arbeiten.
Ihr Herdventilator wird aus hochwertigen Komponenten und elastisch eloxiertem Aluminium
gefertigt. Mit einem leicht feuchten Tuch abwischen..
Wir empfehlen Ihnen, die Box zu behalten. Sie können diese für die Lagerung verwenden, wenn
der Ventilator nicht in Gebrauch ist, und es macht es einfacher, wenn Sie den Lüfter im
Garantiefall oder zur Aufbereitung zurückgeben müssen.
Störungssuche
Wenn die Ware in einem beschädigten Zustand angekommen ist, kontaktieren Sie uns bitte.
In dem unwahrscheinlichen Fall, dass Teile fehlen oder die Produkte nicht wie beschrieben
funktionieren, kontaktieren Sie uns bitte, damit wir Ihr Problem schnell behandeln und
Verzögerungen minimieren können.
Wenn der Lüfter zu vibrieren scheint, kann dies daran liegen, dass die Blätter nicht mehr richtig
ausgerichtet werden. Wenn der Lüfter kühl ist, drehen Sie langsam die Klingen, während Sie den
Abstand zwischen der Spitze jedes Blattes und der Oberseite beobachten. Wenn eine oder mehrere
der Klingen außerhalb der Ausrichtung sind, können sie sanft eingestellt werden, indem die
Klingen gehalten werden, während ein leichter Druck auf die fehl ausgerichteten Klingen
aufgebracht wird. Nach Bedarf prüfen und wiederholen.
Für weitere Problemlösungen und Tipps kontaktieren Sie bitte unsere Vertriebsmitarbeiter.
11

Garantie
Vielen Dank für den Kauf unseres Produkts, das nach hohen Qual -
itätsstandards hergestellt wurde. Die Herstellergarantie umfasst das
Produkt für einen Zeitraum von 12 Monaten ab Kaufdatum gegen
Herstellungsfehler.
Alle Aobosi-Garantien werden automatisch in unserem System
gespeichert, so dass Sie Ihr Produkt nicht registrieren müssen.
Für eine 6-monatige zusätzliche kostenlose Garantie registrieren
Sie sich bitte auf der Website www.iaobosi.com oder füllen Sie das
untenstehende Foto aus und machen Sie ein Foto von der Garan -
Aufgrund der ständigen Produktverbesserung behalten wir uns das
Recht vor, die Produktspezifikation ohne vorherige Ankündigung zu
ändern.
12

INTRODUCTION
Merci d'avoir acheté nos produits. Tous nos produits ont été conçus et fabriqués
pour fournir un service long et fiable.
Le ventilateur pour poêle utilise la technologie Seebeck pour exploiter la chaleur qui
génère de l’électricité qui alimente le ventilateur. L'air chaud est poussé dans la pièce au
lieu de simplement monter au plafond ou d'être coincé autour du poêle. Cela améliore
l'efficacité du poêle, maximisant la distribution de chaleur dans la pièce et garantissant
ainsi le rendement énergétique.
Le ventilateur est conçu pour être utilisé sur les poêles autoportants avec des
températures de surface normales de 50°C à 300°C. Des températures supérieures à
300°C peuvent endommager votre ventilateur. Déplacez votre ventilateur dans un
endroit plus frais de votre poêle si la température de la surface dépasse 300°C
SPÉCIFICATIONS
Hau
La description:Ventilateur de poêle
Numéro de modèle:SL-405
teur totale: 16.5cm
Largeur totale: 16.0cm
Profondeur totale: 11.99cm
Dimensions de la base: 12.0cm
Poids net: 0.47Kg
TEMPÉRATURE OPTIMALE DE FONCTIONNEMENT: 50-300 ° C
CFM: 140
INSTALLATION
Votre ventilateur arrivera presque complètement assemblé. Il vous suffit simplement de
fixer la pale du ventilateur, ce qui ne devrait prendre que quelques minutes. Placez la pale
du ventilateur sur le devant de l'appareil. Vous constaterez qu'il s'adapte parfaitement au
devant de l'appareil. Dans certains cas, il peut être nécessaire d'appliquer une petite
quantité de pression. Faites pivoter les pales du ventilateur jusqu'à ce que les trous de vis
soient alignés. Vissez les quatre vis fournies dans les trous. Votre ventilateur est
maintenant prêt à être utilisé.
SÉCURITÉ
Les poêles et les incendies peuvent devenir chauds; votre ventilateur de poêle alimenté
par la chaleur deviendra chaud.
13

Mettez-le sur le poêle comme ci-dessous correct
●Gardez le poêle et le ventilateur à l'écart des personnes et des animaux.
●Ne placez pas le ventilateur sur une surface délicate.
●N'obstruez pas les pales du ventilateur.
MISE EN GARDE: Les pales du ventilateur, bien que non dangereuses, peuvent causer
de l'inconfort ou des blessures si vous insérez vos doigts dans les pales en rotation. Si
vous déplacez le ventilateur, la base peut être très chaude, veuillez donc porter des gants
résistant à la chaleur.
OPÉRATION
Retirez soigneusement le produit de son emballage et, avant de placer votre ventilateur
sur le poêle, vérifiez que ses pales tournent librement.
Placez votre ventilateur de poêle aussi près de l'arrière du poêle et du côté du conduit de
fumée que possible.
●Ne posez jamais le produit à plat sur le dos.
●Ne placez jamais le ventilateur directement devant le conduit de fumée.
Il y a un dispositif de sécurité bimétallique à la base du ventilateur.
Si la température de la surface dépasse 250℃, le dispositif de sécurité élève doucement
le devant du ventilateur pour protéger le TEG et le moteur. Le ventilateur s'abaissera
normalement à mesure que la température de la surface diminuera.
14

Plage de température de fonc�onnement
50 ~ 345℃
Le ventilateur démarre automatiquement lorsque la température de la surface sous le
ventilateur atteint environ 50℃. La vitesse du ventilateur augmente lorsque la
température atteint un maximum d'environ 230℃.
Nous recommandons l’utilisation d’un thermomètre de poêle pour optimiser le
fonctionnement efficace de votre poêle.
RÉFÉRENCES POUR LES POÊLES
Idéal pour...
Le plus important: la température de surface à l’emplacement du ventilateur de poêle doit
être plus de 50℃, le ventilateur de poêle a besoin de la chaleur pour générer de l'électricité
pour le faire tourner.
Pas adapté pour...
Dans lequel ces poêles comprenaient une couche intermédiaire de protection thermique pour
abaisser la température de surface sur le dessus des poêles, la température était inférieure à
50 ℃, le ventilateur de poêle ne peut pas atteindre très bien la chaleur des poêles, donc il ne
fonctionnera pas.
SOINS ET ENTRETIEN
Votre ventilateur de poêle est fabriqué avec des composants de haute qualité et en aluminium
anodisé résilient.
15

Le ventilateur ne nécessite pas de maintenance dans des conditions d'utilisation
normales. Lorsque vous nettoyez le ventilateur, utilisez un chiffon propre et humide.
Nous vous recommandons de garder la boîte. Vous pouvez l'utiliser pour le stockage
lorsque vous ne l'utilisez pas. Cela facilitera le retour du ventilateur sous garantie ou pour
une remise à neuf.
RÉSOLUTION DE PROBLÈME
Si les marchandises sont arrivées dans un état endommagé, veuillez contacter votre
fournisseur.
Dans le cas peu probable où des pièces manquent ou que les produits ne fonctionnent
pas comme décrit, contactez-nous afin que nous puissions régler votre problème
rapidement et minimiser les retards.
Si le ventilateur semble vibrer, cela peut être dû au désalignement des pales. Lorsque le
ventilateur est froid, faites pivoter lentement les pales tout en observant l'écart entre
l'extrémité de chaque pale et le haut. Si une ou plusieurs pales ne sont pas alignées, vous
pouvez les régler doucement en les maintenant tout en appliquant une légère pression
sur les pales mal alignées. Vérifiez et répétez au besoin.
Pour plus de problèmes et de conseils, veuillez contacter notre représentant des ventes.
16

Garantie
Merci d'avoir acheté notre produit, qui a été conçu pour répondre à
des normes de qualité élevées. La garantie du fabricant couvre le
produit pour une période de 12 mois à compter de la date d'achat
contre les défauts de fabrication.
Toutes les garanties d'Aobosi sont automatiquement enregistrées
dans notre système, il n'est donc pas nécessaire d'enregistrer votre
produit.
Pour une garantie supplémentaire gratuite de 6 mois, veuillez vous
inscrire sur le site Web www.iaobosi.com ou remplir et prendre en
En raison de l'amélioration continue des produits, nous nous réser -
vons le droit de modifier les spécifications du produit sans préavis.
17

INTRODUZIONE
Grazie per aver acquistato i nostri prodotti. Tutti i nostri prodotti sono progettati e
fabbricati a fornire un servizio lungo e affidabile.
Il ventilatore della stufa utilizza la Tecnologia Seebeck a sfruttare il calore che genera
l’elettrica che alimenta il ventilatore. L’aria calda è spinta alla stanza invece di salire
semplicemente al soffitto o stare intrappolata intorno alla stufa. Questo migliora l’efficacia
della stufa, massimizza la distribuzione del calore nella stanza e al fine di garantire
l’efficienza del carburante.
Il ventilatore è progettato per essere usato su stufe indipendenti con temperature
superficiali normali di 50°C-300°C . Le temperature superiori a 300°C potrebbero
danneggiare il ventilatore. Riposizionare il ventilatore in un posto più
fresco sulla stufa se la temperatura della superficie supera 300°C .
SPECIFICHE
Alte
Descrizione:Ventilatore della stufa
Modello numero:SL-405
zza totale: 16,5cm
Larghezza totale: 16,0cm
Profondità totale:11,99 cm
Dimensioni di base: 12,0cm
Peso netto: 0,47Kg
TEMPERATURA DI FUNZIONAMENTO OTTIMALE: 50-300°C
CFM: 140
INSTALLAZIONE
Il ventilatore arriverà quasi completamente assemblato. Devi semplicemente attaccare la
pala del ventilatore che richiederebbe solo pochi minuti. Posizionare la pala del ventilatore
sulla parte anteriore dell’unità. Troverai che si adatta comodamente alla parte anteriore
dell’unità, in alcuni casi una piccola quantità di pressione dovrebbe essere applicata.
Ruotare la pala fino a quando i fori delle viti sono allineati. Avvitare le quattro viti fornite nei
fori. Ora il ventilatore è pronto per essere utilizzato.
SICUREZZA
Le stufe e il fuoco possono diventare CALDI; il ventilatore della stufa alimentato al calore
diventa caldo.
●Tenere la stufa e il ventilatore lontani dalle persone e dagli animali.
●Non posizionare il ventilatore su una superficie delicata.
●Non causare l’ostruzione alle pale del ventilatore.
ATTENZIONE:
Le pale del ventilatore, sebbene non pericolose, potrebbero causare il disagio o il danno
se le dita siano inserite nelle lame rotanti in movimento. In caso di movimento del
ventilatore, la base potrebbe essere caldissima, si prega di indossare i guanti resistenti al
18

Mettilo sopra il fornello come di seguito corretto
calore.
FUNZIONAMENTO
Rimuovere con attenzione il prodotto dalla confezione e, prima di posizionare il ventilatore
sulla stufa, controllare se le pale ruotino liberamente.
Posizionare il ventilatore della stufa il più vicino possibile alla parte posteriore della stufa e
al lato della canna fumaria.
●Non appoggiare mai il prodotto sul retro.
●Non posizionare il ventilatore mai direttamente davanti alla canna fumaria.
C’è un dispositivo di sicurezza bi-metallico nella base del ventilatore.
Se la temperatura della superficie aumenta superiore a circa 250℃, il dispositivo di
sicurezza eleva delicatamente la parte anteriore del ventilatore per proteggere il TEG e il
motore. Il ventilatore ritorna allo stato normale quando la temperatura della superficie è
ridotta.
Il ventilatore si accende automaticamente quando la temperatura della superficie sotto il
ventilatore raggiunge circa 50℃. La velocità del ventilatore aumenta quando la
temperatura aumenta al massimo di circa 230℃.
Suggeriamo l’uso di un termometro per massimizzare il funzionamento efficiente della
stufa.
19

RIFERIMENTO PER LA STUFA
Ideale per...
Intervallo di temperatura operativa
50 ~ 345 ℃
Il più importante: la temperatura della superficie sulla posizione del ventilatore
della stufa deve essere superiore a 50℃, il ventilatore della stufa richiede il calore
per generare l’elettricità per il funzionamento.
Non adatto per...
Perciò queste stufe includono uno strato intermedio di protezione termica per abbassare
la temperatura della superficie sulla parte superiore delle stufe, la temperatura è inferiore
a 50℃, il ventilatore della stufa non può raggiungere il calore dalle stufe molto bene,
quindi non potrebbe funzionare.
CURA & MANUTENZIONE
Il ventilatore della stufa è fabbricato usando componenti di alta qualità e alluminio
anodizzato resiliente.
Il ventilatore non richiede la manutenzione nell’uso tipico. Per la pulizia del ventilatore, si
deve usare un panno pulito e umido.
Ti consigliamo di tenere la scatola. Puoi usarla per la conservazione quando non è in uso
e renderebbe più facile se dovresti ritornare il ventilatore in garanzia o per il
rinnovamento.
20
Table of contents
Languages:
Other Aobosi Fan manuals
Popular Fan manuals by other brands

Cornell
Cornell CFN-T122GY user manual

NuTone
NuTone RF-49 Series installation instructions

enervent
enervent Salla eWind Operating and maintenance instructions

Panasonic
Panasonic FV-08VRE1 Service manual

Allen + Roth
Allen + Roth L1405 instruction manual

Clarke
Clarke CDF20HV-P Operating & maintenance instructions