Aonvision Technology DTB-107 EU User manual

User Manual

1. Introduction 1
2. Panel Illustration 2
3. Cable Connection 3
4. Turn on the power 5
5. Remote Control 6
6. OSD Menu Operation 7
6.1 Setup Channels 7
6.2 Box Installation 10
6.3 Advanced Options 13
6.4 EPG 15
Index
User Manual

1
This is a DTV-400VGA for free-to-air (FTA) terrestrial
digital TV broadcasting. You can enjoy the DVD quality
video and audio for free. It supports Teletext, 8-day
Electronic Program Guide (EPG) and DVB subtitle.
Through the EPG, you can set up to 10 program timers
to remind you the important programs.
Power Adapter (12VDC/A) x 1 Remote Control (with battery) x 1
VGA cable x 1
User’s Manual x 1
1. IntroductionIntroduction
3.5mm Stereo Cable x 1
AV Cable (Yellow, White, Red) x 1
Introduction
Accessories

2
2. Panel IllustrationPanel Illustration
Buttons
Front Panel
Rear Panel
12V DCDiagnostic VGA Out VGA In
S-Video Out
Power On OffOff
Channel Down UpUp
L-Audio-R Out
In – Antenna – Out Out– Audio – In
Composite CVBS Out
NOTE: “DIAG” is for diagnostic only, please DO NOT use it as USB port.

3
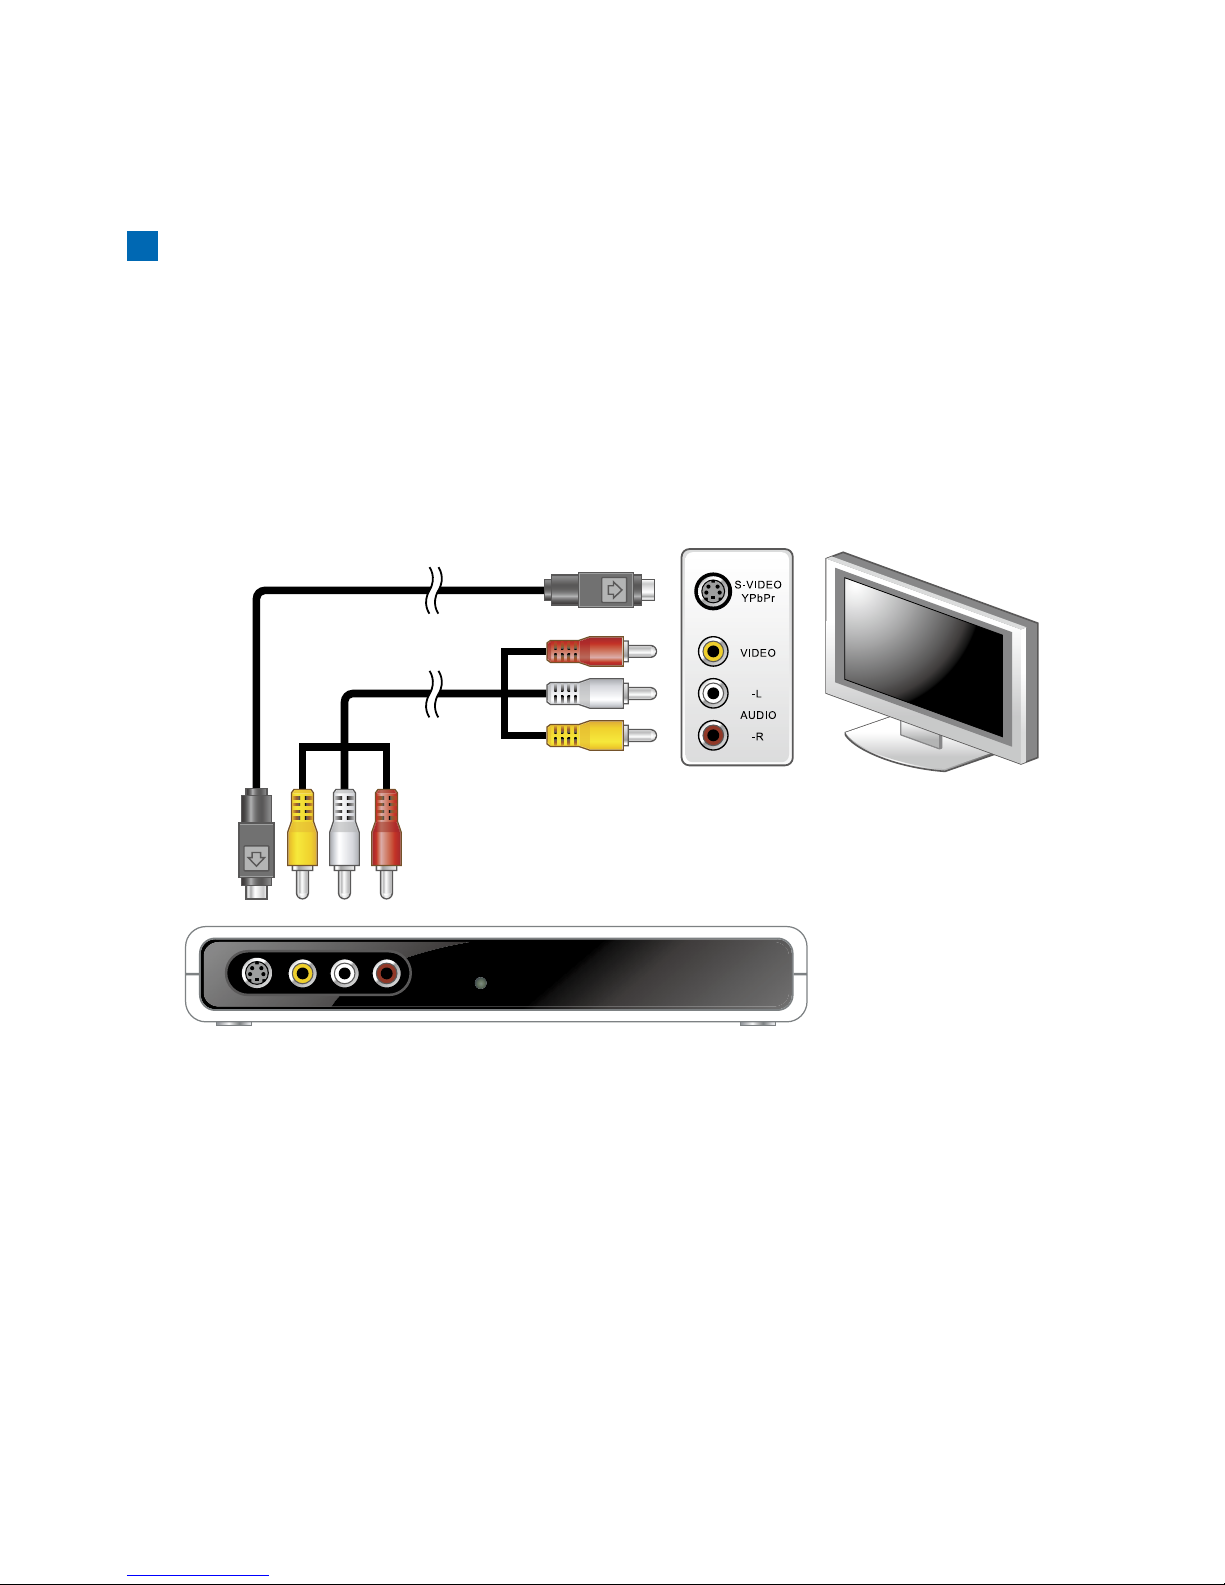
3. Cable ConnectionCable Connection
Antenna Connection
PC Connection
Connect the antenna output to “ANT IN”.
You can use the “ANT OUT” port to provide DVB-T signal to another DVB-T receiver box.
1.
2.
This conguration will turn your PC monitor into a high performance TV while you are not using PC�.
Use the VGA cable to connect the box “VGA OUT” and PC monitor VGA input.
Use the VGA cable to connect box “VGA IN” and PC VGA out.
Use 3.5mm Stereo cable to connect box “AUDIO IN” (Blue jack) and PC Audio out.
Use 3.5mm Stereo cable to connect box “AUDIO OUT” (Green jack) and Speaker.
1.
2.
3.
4.
DTV-400VGA can provide VGA, S-Video and composite outputs to PC monitor, TV and VCR. It can
also pass through PC signal (VGA and audio) when box is in standby mode. Following diagrams
describe different connection congurations�

4
TV Connection
This connection provides digital terrestrial TV program to your TV via AV or S-Video sources.
Use the AV cable (Yellow plug) to connect box Composite output (Yellow jack at front panel) and
TV AV input.
Or, use the S-Video cable to connect box S-Video output (Black mini DIN jack at front panel) and
TV S-Video input.
Use the AV cable (White and Red plugs) to connect box L-Audio-R output (White and Red jacks
at front panel) and TV audio input for AV or S-Video source.
1.
2.
3.

5
4. Turn on the powerTurn on the power
After the cable connection for antenna and PC/TV is completed at previous section, you are ready to
turn on the power by plugging the power adapter to the “12V DC IN” jack.
When power on, box will go to standby mode and the RED LED at front panel is turned on.
You can use the remote “POWER” key or the “POWER” button on the top cover to start the
operation (GREEN LED is on).
NOTE:
When box is powered on and stay at standby mode, it will re-direct the PC video and audio to
monitor and speaker. After the operation, the DVB-T video and audio will be sent out.
The receiver will start to search all frequencies to look for available TV and Radio channels when
the 1st time operation is started.
1.
2.

6
Auto scan channels
5. Remote ControlRemote Control
Select TV / Radio programs
Show channel / program informationinformation
SCAN
TV/RADIO
INFO
Power On or StandbyPOWER
Numeric keys0~9
Channel up / downCH +/-
Volume adjustmentVOL +/-
Go to previous channelRECALL
MuteMUTE
1. List favorite channels
2. Function keys
RED
GREEN
YELLOW
BLUE
Up or CH+
Down or CH-
Left or VOL-
Right or VOL+
Select or ConrmOK
Select audio stereo / LEFT / RIGHT channelchannelAUDIO
Electronic program guideEPG
Select audio languageSAP
Select subtitleSUB
Turn on/off TeletextTEXT
Select VGA resolutionRES
No functionAPP
List all available channelsLIST
Exit menu or Go to upper level menulevel menuEXIT
Turn on OSD main menuMENU

7
6. OSD Menu OperationOSD Menu Operation
6.1 Setup ChannelsSetup Channels
Auto Search
Scan all available channels according the “Country”
setting in “Box Installation”.

8
Edit Favorite Channels
Manual Search
Enter the channel number to search all the
broadcast programs in that frequency.
If “User dened” is selected, a specic frequency
(KHz) and bandwidth (6/7/8MHz) can be entered to
search programs.
There are four favorite groups – RED, GREEN,
YELLOW, BLUE.
You can use the four color keys from remote to
add/delete a channel from a favorite group.
When OSD menu is off, you can use the four color
keys from remote to list channels in a favorite
group.

9
Available Channels
Favorite Channels
List all found channels. You may see the channel
signal power level and signal quality here.
List favorite channels.
Reorder Channels
This is to change the channel sequence. Use the
remote direction keypad (LEFT/RIGHT/UP/DOWN)
to select the channel, press OK keypad to conrm
selection, then use the direction keypads to select
the new position and press OK to insert.
Press the RED key will restore the sequence.

10
6.2 Box InstallationBox Installation
Country
Audio Mode
There are 28-country and one universal frequency
plans to choose a suitable frequency plan and
bandwidth. Auto scan will search the channels
based on this setting.
Select the audio channel – Stereo/Mono-L/Mono-R.
AUDIO in remote control does the same thing.

11
Language Setup
Select the OSD Menu Language – English,
Deutchschland, Italiano, Français and Español.
The Audio Language option will play the preferred
speech when it is available.
Video Mode
Select the video output Aspect Ratio according the
TV aspect ratio.
You can choose the VGA resolution from VGA (640x480), SVGA (800x600), XGA (1024x768) and SXGA (1280x1024).
For VGA output, you also can adjust the VGA color through brightness, contrast and saturation options.
•
•
Letter box on a
4:3 TV
If the video is 16:9 aspect ratio, this mode will show all video and maintain the aspect ration
in a normal 4:3 TV. The top and bottom of the screen will be blank.
Pan and scan on a
4:3 TV
If the video is 16:9 aspect ratio, the video will ll the screen and maintain the aspect ration in
a normal 4:3 TV. The left and right part of the video will be cut.
Ignore on a
4:3 TV
If the video is 16:9 aspect ratio, the video will ll the screen in a normal 4:3 TV but lost the
original aspect ratio.
Letter box on a
16:9 TV
If the video is 4:3 aspect ratio, this mode will show all video and maintain the aspect ration in
a wide screen 16:9 TV. The left and right of the screen will be blank.
Pan and scan on a
16:9TV
If the video is 4:3 aspect ratio, the video will ll the screen and maintain the aspect ration in a
wide screen 16:9 TV. The top and bottom part of the video will be cut.
Ignore on a
16:9 TV
If the video is 4:3 aspect ratio, the video will ll the screen in a wide screen 16:9 TV but lost
the aspect ratio.

12
Time Zone
There are three ways to select the time zone::
Auto – The time zone is decided via the
service provider. This is the default setting.
Receiver will extract the time offset from the
received digital stream.
Manual – User may select the time zone
(Country) and daylight saving time (D.S.T.) if
service provider does not provide the data or it
is wrong.
User Dened – Like the Manual setting but to
enter the time offset directly.
1.
2.
3.
Reset to Default
Set the box to factory default.
All the channel list, password, favorite channels will
be cleared.
Switch the box to standby and turn on the power,
box will scan all channels again.

13
Parental Lock
Activate Parental Lock – Enable password control.
Change Password – Change password. Empty password will delete password and disable the
parental lock function.
Lock Channels – Enter the password to go to the channel list. Select the channel you want to be
protected by password.
Cancel Parental Lock – Disable password control.
■
■
■
■
6.3 Advanced OptionsAdvanced Options

14
Delete by Network Name
This is to delete a network frequency from the
list. All the programs from that frequency will be
removed. System will search the network every
4:30AM in the background when box is in standby
mode.
System Information
Show the box HW and SW revision.
Delete by Program Name
Delete a program from available channel program
list.

15
Schedule EPG
6.4 EPG
Use the EPG key from remote control can display the Electronic Program Guide (EPG).
There are two presentation modes for the EPG. In EPG, there are 10 program timers to provide
reminder when a program is coming. Move the focus to a program and press “OK”, you can see more
detailed program description.
Daily EPG
This mode gives a matrix of channels and program
events. You can easily browse all the programs
around a specic time among all the channels�
Press the RED button from the remote control,
you can switch between Schedule and Daily EPG
modes. Daily mode provides program list for a
channel. Use the LEFT/RIGHT buttons to change
date.

16
EPG Program Reservation
There are 10 program timers to bring up reminder
for a reserved program. 20 seconds before the
start of the reserved program, a pop-up window
will remind viewer. If no further instruction, box will
switch to the reserved program. Each timer has 3
modes – Once, Daily, Weekly.

Memo

TEL: 886-3-666-1586 FAX: 886-3-666-1585
2F, No. 58, Park 2nd Ave., Science-Based Industrial Park,
Hsinchu, 300 Taiwan, R.O.C.
www.aonvision.com
Table of contents
Other Aonvision Technology TV Receiver manuals