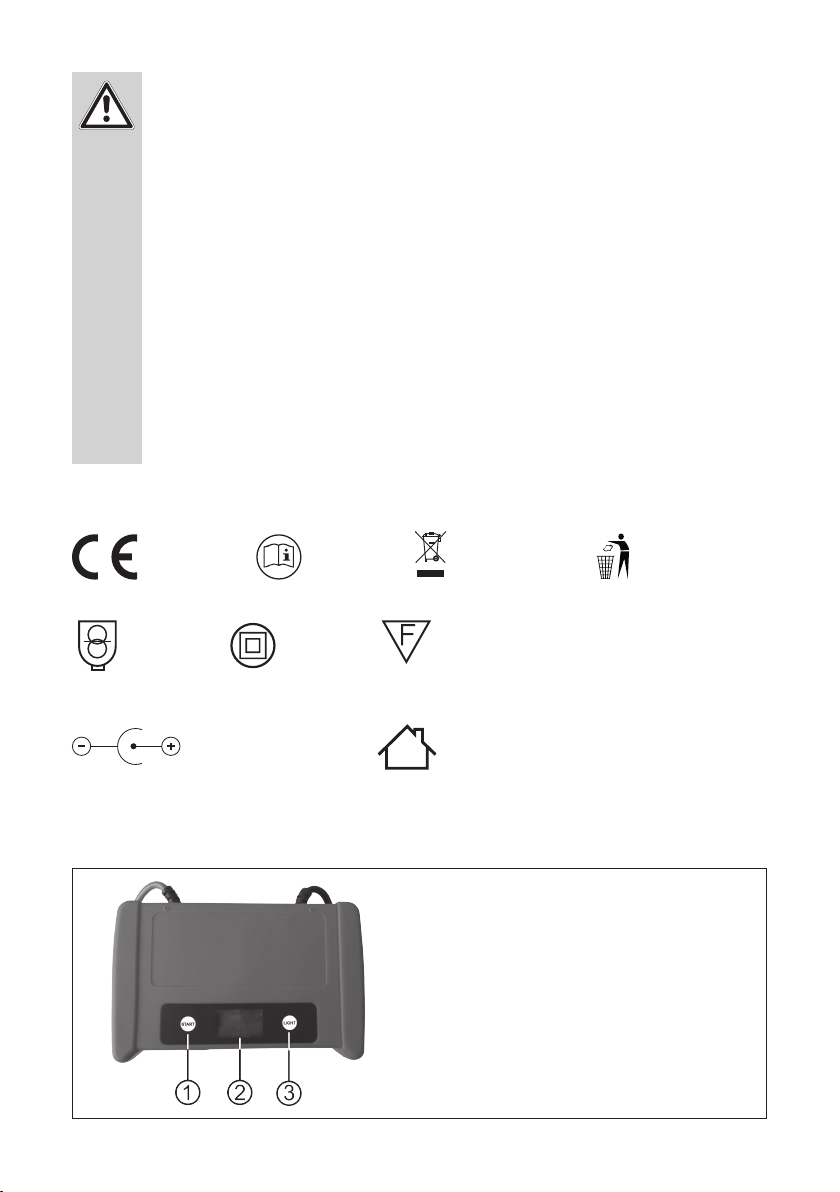
APA 16558 User manual

Art.-Nr.: 16558
Lithium Powerpack mit Starthilfe 600 A
Bedienungsanleitung . . . . . . . . . . . . . . . . . . . . . 2
Art. No. 16558
Lithium power pack with starting aid 600 A
Operating instructions . . . . . . . . . . . . . . . . . . . . . 9
Réf. art. 16558
Bloc d’alimentation au lithium avec aide
au démarrage 600 A
Manuel de l‘opérateur . . . . . . . . . . . . . . . . . . . . . 15
Cod. art. 16558
Lithium Powerpack con avviamento di
emergenza 600 A
Istruzioni per l‘uso . . . . . . . . . . . . . . . . . . . . . 29
Art.nr. 16558
Lithium powerpack met starthulp 600 A
Gebruiksaanwijzing . . . . . . . . . . . . . . . . . . . . . 22

2
WARNUNG
Lesen Sie die Bedienungsanleitung vor Inbetriebnahme sorgfältig durch und beachten Sie alle Si-
cherheitshinweise! Nichtbeachtung kann zu Personenschäden, Schäden am Gerät oder Ihrem Ei-
gentum führen! Bewahren Sie die Originalverpackung, den Kaufbeleg sowie diese Anleitung zum
späterenNachschlagenauf! BeiderWeitergabe desProduktsgebenSie auchdiese Anleitungweiter.
Prüfen Sie vor Inbetriebnahme den Inhalt der Verpackung auf Unversehrtheit und Vollständigkeit!
LithiumPowerpack mit Starthilfe 600 A
INHALT
1. BESTIMMUNGSGEMÄSSER GEBRAUCH
Das APA Lithium Powerpack mit Starthilfe 600A ermöglicht es Fahrzeuge mit schwacher oder leerer Fahrzeugbatterie, mit Strom
zu versorgen und zu starten – durch die automatische Aufheiz-Funktion PRE-HEAT sogar bei sehr kalten Umgebungsbedingungen.
Zusätzlich benden sich am Gerät 2 USB-Anschlüsse mit deren Hilfe Akkus von Mobiltelefonen oder Navigationssystemen
aufgeladen werden können. Eine Ultra-Bright LED-Leuchte erleichtert den Starthilfevorgang bei Dunkelheit oder dient als
Warnleuchte im Blink-Modus. Mit einer Akkuladung können je nach Zustand der Batterie und je nach Fahrzeug bis zu
10 Starthilfevorgänge durchführt werden.
Mit Hilfe des 12V-Ausgangs können die Daten des Bordcomputers während eines Batteriewechsels gesichert werden.
Dieses Gerät ist nicht dafür bestimmt, durch Kinder und Personen mit eingeschränkten geistigen Fähigkeiten oder ohne
erforderliches Fachwissen benutzt zu werden. Kinder sind von dem Gerät fernzuhalten.
Das Gerät ist nicht für den gewerblichen Einsatz bestimmt.
Zum bestimmungsgemäßem Gebrauch gehört auch die Beachtung aller Informationen in dieser Anleitung,
insbesondere die Beachtung der Sicherheitshinweise. Jede andere Verwendung gilt als nicht bestimmungsgemäß und kann zu
Sach- oder Personenschäden führen. Die EAL GmbH übernimmt keine Haftung für Schäden, die durch nicht bestimmungsge-
mäßen Gebrauch entstehen.
1. BESTIMMUNGSGEMÄSSER GEBRAUCH 2
2. LIEFERUMFANG 3
3. SPEZIFIKATIONEN 3
4. SICHERHEITSHINWEISE 3
5. SYMBOLERKLÄRUNG 4
6. BEDIENUNGSANLEITUNG 4
6.1 ÜBERSICHT 4
6.2 LADEN DER INTERNEN BATTERIE 6
6.2.1LADEN MIT DEM STECKERLADEGERÄT 6
6.2.2LADEN MIT DEM KFZLADEKABEL 6
6.3 STARTHILFE 7
6.3.1VORBEREITUNG 7
6.3.2ANSCHLIESSEN DES POWERPACKS FAHRZEUGE MIT NEGATIVER MASSE 7
6.3.3 STARTVERSUCH 7
6.3.4 EXPERTENMODUS 7
6.3.5ENTFERNEN DES POWERPACKS 7
6.4 EINSATZ ALS 12V SPANNUNGSQUELLE 7
6.5 EINSATZ ALS USBLADEGERÄT 8
6.6 LEDLEUCHTE 8
7.WARTUNG UND PFLEGE 8
7.1 WARTUNG 8
7.1.1ERSETZEN DER SICHERUNG IM KFZLADEKABEL 8
7.2 PFLEGE 8
8.HINWEISE ZUM UMWELTSCHUTZ 8
9. KONTAKTINFORMATIONEN 8

3
3. SPEZIFIKATIONEN
Steckerladegerät:
Eingang: 220 – 240V AC, 50/60 Hz
Ausgang: 12V DC, 1 A
Kabellänge: 1,80 m
Kfz-Ladekabel:
Sicherung: ink, 12 A, 250 V, Ø6 x 30 mm
Kabellänge: 1,10 m
Lithium-Powerpack:
Batterietyp: LiFePo – Lithium-Eisen-Posphat
Kapazität: 12000 mAh (4 Zellen, je 3000 mAh)
Starthilfe: geeignet für Motoren bis 3000 ccm Hubraum
Max. Dauerstrom/Spitzenstrom: 300 A / 600 A
Länge Starthilfekabel: 0,22 m
Einschalttemperatur für automatisches
Aufwärmen (PRE HEAT): > 0 °C (> 32 °F)
Ausgänge: 1 x USB, 5V, 2 A
12V DC, 8 A
Schutzeinrichtungen: Überhitzungsschutz, Überladungsschutz, Kurzschluß,Verpolung
Zulässige Luftfeuchtigkeit: rel. 20 % - 90 %
Zulässiger Umgebungstemperaturbereich
während der Benutzung: -20 °C bis + 45°C (-4 bis 113 °F)
Zulässiger Umgebungstemperaturbereich
während der Lagerung: 0 °C bis + 45°C (32 bis 113 °F)
Dimensionen: 150 x 200 x 60 [mm]
Gewicht: 980 kg
Beleuchtung: Ultra-Bright-LED
2. LIEFERUMFANG
• 1x Lithium-Powerpack • 1x Steckerladegerät
• 1 x Anleitung • 1 x12V Kfz-Ladekabel
• Das Warndreieck kennzeichnet alle für die Sicherheit wichtigen Anweisungen. Befolgen Sie diese immer,
anderenfalls könnten Sie sich verletzen oder das Gerät könnte beschädigt werden.
• Kinder dürfen nicht mit dem Gerät spielen
• Reinigung und Benutzerwartung dürfen nicht von Kindern ohne Beaufsichtigung durchgeführt werden
• Lassen Sie das Verpackungsmaterial nicht achtlos liegen. Dieses kann für Kinder zu einem gefährlichen
Spielzeug werden!
• Benutzen Sie dieses Produkt nur für die dafür vorgesehene Verwendung!
• Manipulieren oder zerlegen Sie das Gerät nicht!
• Verwenden Sie zu Ihrer eigenen Sicherheit ausschließlich Zubehör oder Ersatzteile, die in der Anleitung
angegeben sind, oder derenVerwendung durch den Hersteller empfohlen wird!
• Achtung: Gerät nicht unbeobachtet laden! Feuerfeste Unterlage, kein brennbares Material im Abstand von
1m.
• Wenn Sie mit dem Umgang am elektrischen System Ihres Fahrzeugs nicht vertraut sind oder Sie sich nicht
zutrauen den Starthilfevorgang selbständig durchzuführen, sollten Sie das Gerät nicht in Betrieb nehmen.
Ziehen Sie stattdessen professionelle Hilfe zu Rate, fragen Sie Ihren Fahrzeughersteller oder beauftragen Sie
einen Pannenservice.
4. SICHERHEITSHINWEISE

4
5. SYMBOLERKLÄRUNG
1 START-Taste
2 LCD-Display
3 Schalter für LED-Leuchte
entspricht den
EG-Richtlinien
Gebrauchs-
anleitung lesen
gekennzeichnetes
Elektroprodukt darf
nicht in den Hausmüll
geworfen werden
erinnert Verbraucher
daran, Produkte und
Verpackungen
umweltschonend zu
entsorgen.
Sicherheitstrans-
formator -
kurzschlussfest.
Polung des Nieder-
spannugssteckers
Schutzisoliertes
Gehäuse
(Schutzklasse II).
Leuchten, die direkt auf brennbarem Untergrund befestigt
werden können, wenn die Entzündungstemperatur im
Normalbetrieb 130° C und im Fehlerfall 180° C für weniger
als 15 Minuten nicht überschritten wird.
Geräte mit diesem Zeichen dürfen
nur im Haus (trockene Umgebung)
betrieben werden
• Lesen Sie die Bedienungsanleitung Ihres Fahrzeugs!
• Bei einigen Fahrzeugtypen sind möglicherweise besondere Vorkehrungen notwendig, bevor dem
Fahrzeug Starthilfe gegeben werden kann (z.B. Sicherungen, die entfernt werden müssen oder bestimmte
Sicherheitsvorkehrungen, die getroen werden müssen). Bei manchen Fahrzeugtypen bendet sich die
Batterie im Koerraum. Bei solchen Fahrzeugen nden Sie oftmals spezielle Starthilfe-Anschlüsse im
Motorraum vor.
• Dieses Starthilfe-System ist nur für den Betrieb an 12 V Systemen vorgesehen. Versuchen Sie UNTER
KEINEN UMSTÄNDEN das Gerät an 6 V, 24 V oder zu einem anderen als dem vorgesehenen Zweck zu
benutzen. Das Nichtbefolgen dieser Anweisung kann schwerwiegende Folgen für Gegenstände und
Personen zur Folge haben.
• Berühren oder verbinden Sie niemals die rote und die schwarze Anschlussklemme miteinander.
Dies könnte gefährliche Funkenbildung, elektrische Blitze (Überschläge) oder sogar Explosionen
verursachen.
• Benutzen Sie das Gerät nur in trockener Umgebung und halten Sie es stets trocken und sauber. Benutzen Sie
es nicht in der Nähe von oenem Licht oder in explosiver Umgebung (wie zum Beispiel in der Nähe brennbarer
Gase und Flüssigkeiten oder feinem Staub). Beendigen Sie umgehend jegliche Benutzung, wenn abnormes
Verhalten auftritt (Überhitzung, Austreten von Rauch oder Flüssigkeit)
• ACHTUNG: Legen Sie nach jedem erfolglosen Starthilfe-Versuch eine Pause von mindestens 5 Minuten
ein, um ein Überhitzen des Geräts zu vermeiden.
6. BEDIENUNGSANLEITUNG
6.1 ÜBERSICHT

5
4 Ladebuchse
5 USB-Ausgang, 2 A
6 12V-Ausgang
7 Minus (-) Polzange
8 Plus (+) Polzange
9 LED-Leuchte
10 ACHTUNG Fehleranzeige
11 Anzeige Batteriespannung (intern)
12 Ladezustandsanzeige
13 Bereitschaftsanzeige
14 Aufwärmen
15 Anzeige Batteriespannung (Fahrzeug)
16 Überhitzung
ACHTUNG (11)
Dieses Symbol leuchtet bei Fehlern, Kurzschluss oder Verpolung auf. Trennen Sie sofort die
Verbindungen und prüfen Sie alles genau.
Batteriespannung, intern (12)
Zeigt die Spannung der internen Batterie des Starthilfegeräts an.
LCD DISPLAY

6
Überhitzung (17)
Das Gerät ist überhitzt. Schalten Sie das Gerät aus und lassen Sie es abkühlen.
Eine Überhitzung kann erfolgen, wenn das Gerät bei hohen Außentemperaturen
(> 65 °C bzw. 149 °F) oder mehrfach in kurzem Abstand benutzt wird.
ACHTUNG: Laden Sie das Powerpack nur während der Fahrt, oder wenn der Motor läuft,
sonst besteht die Gefahr, dass die Starterbatterie Ihres Fahrzeugs entladen wird.
Nach ca. 30 Sekunden, nachdem Sie das Ladekabel vom Powerpack abgezogen haben, schaltet sich das Gerät aus.
Lebensdauer der Batterie
Laden Sie die Batterie des Starthilfegeräts nach jeder Benutzung (Starthilfe) auf - dies wird die Lebensdauer
Ihrer Batterie verlängern. Permanentes Laden und häuge vollständige Entladung gilt es zu vermeiden, da dies
die Lebensdauer Ihrer Batterie verkürzt.
6.2 LADEN DER INTERNEN BATTERIE
Vor der ersten Inbetriebnahme:
Das Gerät wird teilgeladen ausgeliefert. Nach dem Kauf bzw. vor der ersten Benutzung laden Sie das Gerät
vollständig auf. Benutzen Sie dazu ausschließlich das mitgelieferte Ladegerät oder das Kfz-Ladekabel.
BEREITSCHAFT (14)
Das Erscheinen dieses Symbols signalisiert die Betriebsbereitschaft. Sie können Ihr Fahrzeug
jetzt starten.
Aufwärmen (Logo blinkt) (14)
Bei niedrigen Umgebungstemperaturen unter 0°C (32°F) ist ein automatisches Erwärmen des
Starthilfe-Geräts erforderlich (Heizdauer bis zu 5 Minuten). HINWEIS: Bei Temperaturen unter
-20°C (-4°F) ist die PRE-HEAT Funktion nicht ausreichend, um das Gerät auf die notwendige
Betriebstemperatur zu bringen. Diese Funktion kann nicht ausgewählt werden, sie wird auto-
matisch, abhängig von der Umgebungstemperatur, eingeschaltet.
Ladezustandsanzeige (13)
Symbolisiert den Ladezustand der internen Batterie des Starthilfegeräts. Um einem Fahrzeug
Starthilfe geben zu können sollte die Anzeige mindestens 3 Ladebalken anzeigen (12,8 Volt).
Während des Ladens bauen sich die Ladebalken von unten nach oben auf. Eine blinkende An-
zeige signalisiert eine leere Batterie und ein erforderliches Auaden.
6.2.2LADEN MIT DEM KFZLADEKABEL
Verbinden Sie das Ladegerät mit dem 12 V Eingang, INPUT (Position 4 in der Übersicht), des Powerpacks. Danach stecken Sie
den 12 V-Kfz-Stecker in die Bordsteckdose Ihres Fahrzeugs. Das Powerpack schaltet sich ein, zu erkennen an der Aktivierung
der Displaybeleuchtung und am Signalton. Der Ladevorgang ist abgeschlossen, wenn alle 5 Ladebalken permanent leuchten.
Nach dem Ladevorgang ziehen Sie zuerst den 12 V – Stecker aus der 12 V – Steckdose Ihres Fahrzeugs und danach den
Hohlstecker aus der Ladebuchse des Power Packs.
6.2.1LADEN MIT DEM STECKERLADEGERÄT
Verbinden Sie das Ladegerät mit dem 12V Eingang, INPUT (Position 4 in der Übersicht), des Powerpacks. Danach stecken Sie das
Ladegerät in eine Steckdose. Das Powerpack schaltet sich ein, zu erkennen an der Aktivierung der Displaybeleuchtung und am
Signalton. Der Ladevorgang ist abgeschlossen, wenn alle 5 Ladebalken permanent leuchten. Nach dem Ladevorgang ziehen Sie
zuerst das Stecker-Ladegerät aus der Steckdose, danach ziehen Sie den Hohlstecker aus der Ladebuchse des Powerpacks. Nach
ca. 30 Sekunden, nachdem Sie das Ladekabel vom Powerpack abgezogen haben, schaltet sich das Gerät aus.

7
6.3 STARTHILFE
6.3.1 VORBEREITUNG
Entfernen Sie alle an das Power Pack angeschlossenen Geräte, von der 12 V Ausgangsbuchse (Position 7 in der Übersicht) und
von den USB Anschlüssen (Positionen 5 und 6 in der Übersicht).
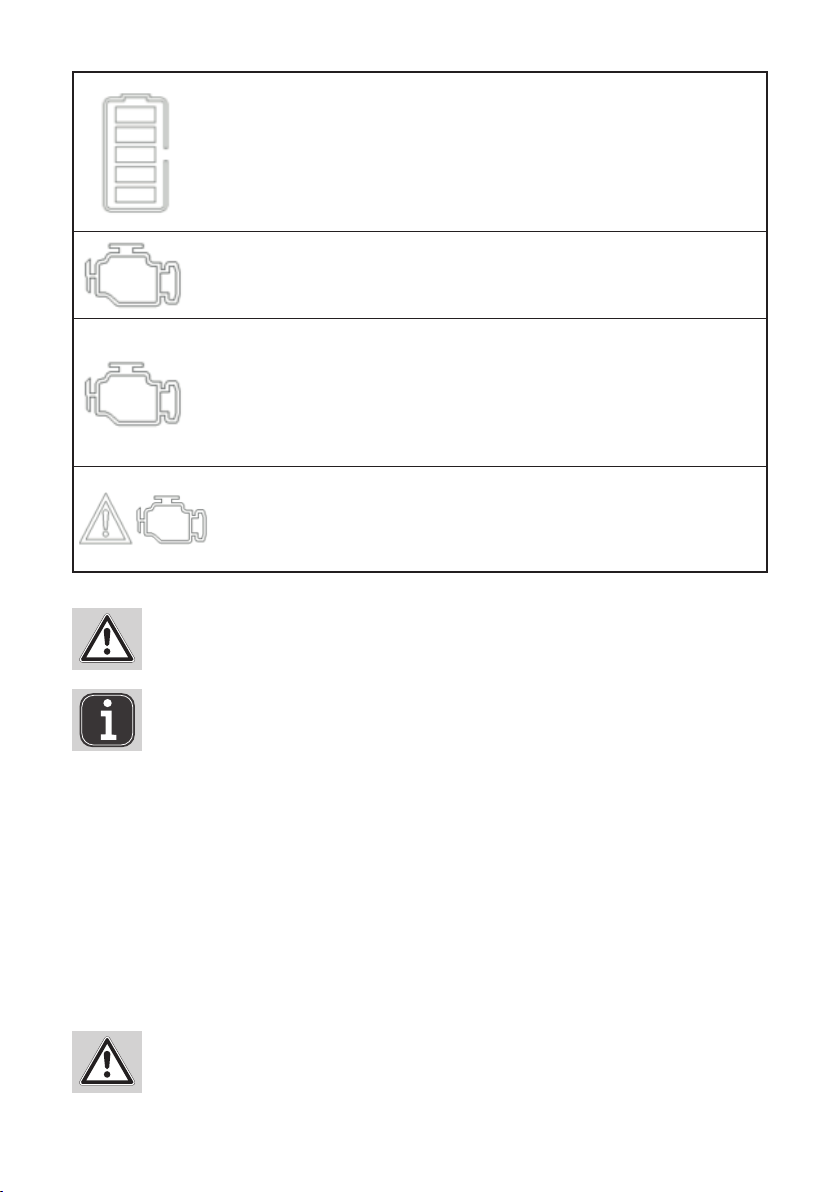
Stellen Sie sicher, dass das Power Pack ausreichend aufgeladen ist, mindestens 3 Ladebalken in der Ladezustandsanzeige
(Position 13 in der Übersicht).
Lesen Sie die Bedienungsanleitung Ihres Fahrzeugs!
Bei einigen Fahrzeugen sind möglicherweise besondere Maßnahmen notwendig, bevor dem Fahrzeug Start-
hilfe gegeben werden darf (z.B. Sicherungen, die entfernt werden müssen oder bestimmte Sicherheitsvorkeh-
rungen). Bei manchen Fahrzeugen bendet sich die Batterie im Koerraum, dafür nden Sie oftmals spezielle
Starthilfe-Anschlüsse im Motorraum vor.
Nur mit erhöhter Vorsicht von Fachkräften zu benutzen!
ACHTUNG: Der Kurzschluss-Schutz und das automatische Abschalten beim Trennen der Verbindung
werden hierdurch deaktiviert!
Entfernen Sie etwaigen Rost bzw. Oxid-Schichten oder Schmutz von den Polzangen und den Batteriepolen.
Ist die Fahrzeugbatterie vollständig entladen (Spannung unter 3V) kann das Gerät die Batterie nicht erkennen und das
Fahrzeug nicht fremdstarten. Durch Drücken der START-Taste für 5 Sekunden (Ablauf eines Countdowns) und daraufhin noch-
maliges Drücken der START-Taste, kann für diesen Fall der EXPERTEN-MODUS aktiviert werden: Das Gerät verhält sich nun wie
ein Li-Ionen-Akku und es liegen direkt 12 V bei max. 300 A an den Klemmen an (für Starthilfe)
Um den Expertenmodus zu verlassen drücken Sie nochmals die START-Taste. Das Bereitschaftssymbol erlischt. Nach ca.
30 Sekunden schaltet sich das Gerät aus.
6.3.4 EXPERTENMODUS
6.3.5ENTFERNEN DES POWERPACKS
Entfernen Sie zuerst die schwarze (-) Polzange und befestigen Sie die Polzange an der dafür vorgesehenen Halterung an der
Unterseite des Geräts. Danach entfernen Sie die rote (+) Polzange und befestigen Sie die Polzange an der dafür vorgesehenen
Halterung. Halten Sie diese Reihenfolge immer ein.
Nach ca. 30 Sekunden, nachdem Sie das Ladekabel von der Batterie getrennt haben, schaltet sich das Gerät aus.
Laden Sie das Power Pack wieder auf.
Achtung: Gerät nicht unbeobachtet laden! Feuerfeste Unterlage, kein brennbares Material im Abstand von 1m.
6.3.3 STARTVERSUCH
Starten Sie den Motor. Lassen Sie den Anlasser nicht länger als 6 Sekunden arbeiten. Der Akku des Power Packs ist für längere
Startversuche nicht geeignet. Machen Sie zwischen zwei Startversuchen immer eine Pause von mindestens 5 min. Wenn der
Motor nach mehreren Versuchen nicht anspringt, brechen Sie die Starthilfe ab und suchen die Ursachen für den Defekt.
6.3.2ANSCHLIESSEN DES POWERPACKS FAHRZEUGE MIT NEGATIVER MASSE
Schalten Sie die Zündung und alle elektrischen Verbraucher (Radio, Beleuchtung, Heckscheibenheizung, Sitzheizung etc.) an
Ihrem Fahrzeug aus. Ziehen Sie die Parkbremse an. Schließen Sie zuerst die rote (+) Polzange (Position 9 in der Übersicht) an
den Pluspol Ihrer Fahrzeugbatterie an. Die schwarze (-) Polzange (Position 8 in der Übersicht) schließen Sie so weit wie möglich
von der Batterie entfernt am Motorblock oder am Chassis (keine lackiertenTeile) an.
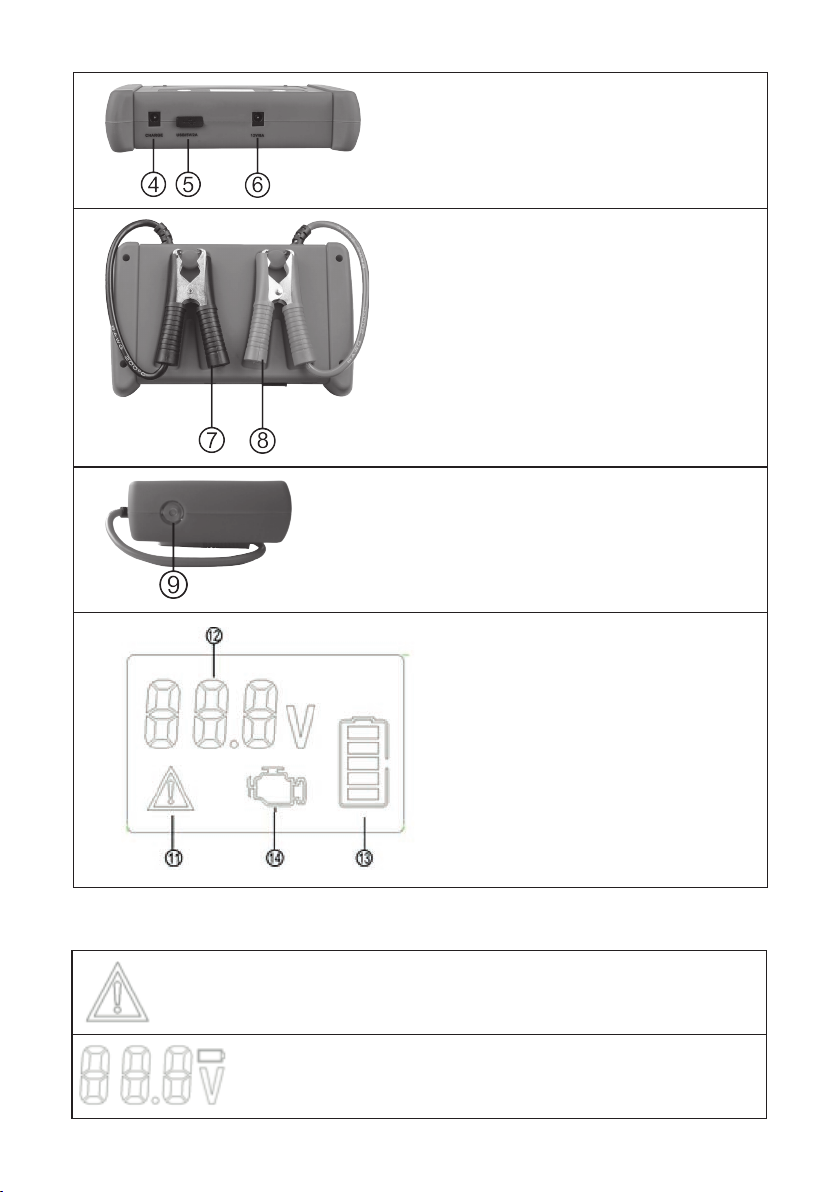
Beobachten Sie, ob das ACHTUNG - Symbol (Position 11 in der Übersicht) aueuchtet. Falls kein Fehler angezeigt wird, drücken
Sie jetzt die START-Taste (Position 1 in der Übersicht) (bei jedem Startvorgang erneut notwendig) und warten Sie bis das Gerät
BEREITSCHAFT (Position 14 in der Übersicht) signalisiert.
6.4 EINSATZ ALS 12 V SPANNUNGSQUELLE
DasPowerpackkannals 12V-Gleichspannungsquellefür die Puerungder Bordcomputerdaten währendeines Batteriewechsels
benutzt werden.
Die Nutzung dieser Funktion ist nur bei Fahrzeugen möglich, bei denen die 12 V-Bordsteckdose nicht über die
Zündung geschaltet ist. Lesen Sie dazu im Handbuch Ihres Fahrzeugs nach oder fragen Sie Ihre Fachwerkstatt.

8
Machen Sie als erstes den Zugang zur Autobatterie frei, z. B. Önen der Motorhaube o. ä. Um das Powerpack als Puerbatterie zu
nutzen, schalten Sie alle (!) elektrischen Verbraucher (Radio, Beleuchtung, Standheizung Innenbeleuchtung etc.) aus. Stellen
Sie den Motor ab und schalten Sie die Zündung aus. Ziehen Sie den Zündschlüssel ab. Stecken Sie den Hohlstecker des Kfz-La-
dekabels in die 12 V-Ausgangsbuchse (Position 7 in der Übersicht) des Powerpacks. Den 12 V-Kfz-Stecker stecken Sie in die
Bordsteckdose Ihres Fahrzeugs. Drücken Sie die START-Taste. Jetzt können Sie den Batteriewechsel vornehmen. Wenn Sie die
neue Batterie in Ihrem Fahrzeug eingebaut und angeschlossen haben trennen Sie das Powerpack von der Bordsteckdose, indem
Sie zuerst den Stecker aus der Bordsteckdose und danach den Hohlstecker aus dem 12V-Ausgang ziehen.
Nach ca. 30 Sekunden, nachdem Sie das Ladekabel vom Powerpack abgezogen haben schaltet sich das Gerät aus.
9. KONTAKTINFORMATIONEN
EAL GmbH
Otto-Hausmann-Ring 107
42115Wuppertal, Deutschland
+49(0)202 42 92 83 0
+49 (0) 202 42 92 83 – 160
www.eal-vertrieb.com
8.HINWEISE ZUM UMWELTSCHUTZ
Entsorgen Sie Elektrogeräte nicht mit dem Hausmüll! Elektro- und Elektronik-Altgeräte müssen getrennt ge-
sammelt und einer umweltgerechtenWiederverwertung zugeführt werden. Über Entsorgungsmöglichkeiten für
Elektro- und Elektronik-Altgeräte informieren Sie sich bei Ihrer Gemeinde- oder Stadtverwaltung
7. WARTUNG UND PFLEGE
7.1 WARTUNG
Nach Gebrauch lagern Sie das Gerät vollständig aufgeladen an einem trockenen und gut belüfteten Ort, außerhalb der Reich-
weite von Kindern. Laden Sie das Gerät regelmäßig, aber spätestens alle 6-8 Monate auf, um es betriebsbereit zu halten und
eine hohe Batterielebensdauer zu gewährleisten. Lagern Sie das Gerät entsprechend den empfohlenen Umgebungsbedingun-
gen (0 °C – 45 °C) und schützen Sie es vor Feuchtigkeit, direkter Sonneneinstrahlung, Hitze und Verschmutzung.Blinken – Aus.
6.6 LEDLEUCHTE
Drücken Sie die Taste für die Beleuchtung (Position 3 in der Übersicht). Das Powerpack wird eingeschaltet. Durch weiteres
Drücken derTaste werden die Lichtfunktionen in folgender Reihenfolge durchgeschaltet: Dauerlicht – Blinken – Aus.
6.5 EINSATZ ALS USBLADEGERÄT
Das Powerpack kann dank seiner beiden USB-Anschlüsse als Ladegerät für Mobiltelefone, Smartphones, Tabletcomputer,
MP3-Playerund ähnlichenGerätengenutzt werden.Umein USB-Gerät aufzuladenverbinden Sie eszuerst mit dem zugehörigen
Ladekabel (nicht im Lieferumfang). Stecken Sie den USB-Stecker des Ladekabels in einen der beiden USB-Anschlüsse (Position
5 und 6 in der Übersicht). Starten Sie den Ladevorgang, indem Sie die START-Taste drücken.
Nach Abschluss des Ladevorgangs ziehen Sie den USB-Stecker aus dem Powerpack.
Nach ca. 30 Sekunden, nachdem Sie das USB-Kabel vom Powerpack abgezogen haben schaltet sich das Gerät aus.
7.1.1ERSETZEN DER SICHERUNG IM KFZLADEKABEL
Drehen Sie die Rändelmutter an der Spitze des 12 V Steckers entgegen dem Uhrzeigersinn bis sich diese vom Stecker löst und
nehmen Sie diese ab. Die Sicherung wird freigegeben und kann aus dem Stecker gezogen werden. Ersetzen Sie diese durch eine
neue Sicherung gleicher Stärke und schrauben Sie die Rändelmutter wieder in den Stecker.
Sicherung: ø 6 x 30 mm, F, 12 A, 250V
7.2 PFLEGE
Schalten Sie das Powerpack vor einer Reinigung aus. Reinigen Sie das Gehäuse des Powerpacks mit einem weichen trockenen
Tuch.Verwenden Sie keine scharfen oder lösemittelhaltigen Reiniger. Lassen Sie niemals Flüssigkeiten in das Innere des Gehäu-
ses gelangen.

9
Please read the operating instructions carefully prior to use and observe all safety instructions!
Not observing such may lead to personal injury, damage to the device or to your property! Store
the original packaging, the receipt and these instructions so that they may be consulted at a later
date! When passing on the product, also include these operating instructions. Check the contents of
package for integrity and completeness prior to use!
Lithium power pack with starting aid 600 A
CONTENTS
1.PROPER USE OF THE PRODUCT
The APA lithium power pack with starting aid 600A enables you to supply vehicles with weak or empty batteries with power and
to start them, and thanks to the automatic PRE-HEAT warming function, to do so even in cold ambient conditions.
Additionally, the device has 2 USB connections which can be used to charge batteries of mobile telephones or navigation sys-
tems. An ultra-bright LED light makes the starting aid process easier when it is dark, or can be used in ashing mode as a war-
ning light. A battery charge enables up to 10 starting aid processes to be carried out, depending on battery status and vehicle.
With the help of the 12V output, the data of the on-board computer can be backed up during a battery change.
This device is not designed to be used by children or persons with limited mental abilities or without experience and/or lack of
required specialist knowledge. Keep children away from the device. The device is not designated for commercial use.
Utilisation according to the intended purpose also includes the observation of all information in these operating instructions,
particularly the observation of safety instructions. Any other utilisation is considered to be counter to the intended purpose and
may result in material damage or personal injuries. EAL GmbH assumes no liability for damage resulting from improper use.
2. SCOPE OF DELIVERY
1 x Lithium power pack 1 x Plug charger
1 x Instructions 1 x 12V vehicle charging cable
1.PROPER USE OFTHE PRODUCT 9
2. SCOPE OF DELIVERY 9
3. SPECIFICATIONS 10
4. SAFETY PRECAUTIONS 10
5.EXPLANATION OF SYMBOLS 11
6. MANUAL 11
6.1 OVERVIEW 11
6.2 CHARGING THE INTERNAL BATTERY 12
6.2.1CHARGING USING THE PLUG CHARGER 12
6.2.2CHARGING USING THEVEHICLE CHARGING CABLE 13
6.3 STARTING AID 13
6.3.1 PREPARATION 13
6.3.2CONNECTING THE POWER PACK VEHICLESWITH NEGATIVE EARTH 13
6.3.3 ATTEMPTING TO START 13
6.3.4 EXPERT MODE 13
6.3.5REMOVING THE POWER PACK 13
6.4 USING AS A 12VVOLTAGE SUPPLY 14
6.5 USING AS A USB CHARGER 14
6.6 LED LIGHT 14
7. MAINTENANCE AND CARE 14
7.1 MAINTENANCE 14
7.1.1REPLACINGTHE FUSE INTHEVEHICLE CHARGING CABLE 14
7.2 CARE 14
8.NOTES REGARDING ENVIRONMENTAL PROTECTION 14
9. CONTACT INFORMATION 14

10
• The warning triangle labels all instructions important to safety. Always follow these, otherwise you could
injure yourself or damage the device.
• Children may not play with the device.
• Cleaning and user maintenance may not be carried out by children without supervision.
• Do not treat packaging material carelessly. It may become a dangerous plaything for a child!
• Only use this product for its designated purpose!
• Do not manipulate or disassemble the device!
• For your own safety, only use accessories and spare parts that are stated in these instructions or that are
recommended by the manufacturer!
• Caution: Do not leave the device unattended when charging! Use a re-resistance surface, do not allow
ammable materials within a distance of 1m.
• If you are not familiar with the electrical system of your vehicle, or are not condent enough to carry out
the starting aid process yourself, do not use the device. Instead, obtain professional aid, ask your vehicle
manufacturer or commission a breakdown service.
• Read the operating instructions for your vehicle!
• For some vehicle types, it is possible that special precautions must be implemented before using a starting
aid with the vehicle (e.g. fuses that must be removed, or certain safety precautions that must be taken). With
some vehicle types, the battery is located in the boot. With such vehicles, you will often nd starting aid
connections under the bonnet.
• This starting aid system is only intended for operation on 12V systems. DO NOT ATTEMPT to
use the device with 6V, 24V or for purpose other than the intended one. Not following these
instructions may have serious consequences for property and for people.
4. SAFETY PRECAUTIONS
3. SPECIFICATIONS
Plug charger:
Input: 220 – 240V AC, 50/60 Hz
Output: 12V DC, 1 A
Cable length: 1.80 m
Vehicle charging cable:
Fuse: Fast-blowing, 12 A, 250V, Ø6 x 30 mm
Cable length: 1.10 m
Lithium power pack:
Battery type: LiFePo – Lithium iron phosphate
Capacity: 12000 mAh (4 cells, each 3000 mAh)
Starting aid: Suitable for motors with up to 3000 ccm capacity
Max. continuous current/peak current: 300 A / 600 A
Length of starting aid cable: 0.22 m
Switch on temperature for automatic warming (PRE HEAT): > 0 °C (> 32 °F)
Outputs: 1 x USB, 5V, 2.0 A
12V DC, 8 A
Protective features: Overheating protection, overloading
protection, short-circuit protection, reverse voltage
protection
Relative humidity: relative 20 % - 90 %
Permitted ambient temperature rangeduring use: -20 °C to + 45°C (-4 to 113 °F)
Permitted ambient temperature range
during storage: 0 °C to + 45°C (32 to 113 °F)
Dimensions: 150 x 200 x 60 [mm]
Weight: 0.980 kg
Illumination: Ultra-bright LED

11
5.EXPLANATION OF SYMBOLS
complies with
EC directives
Read the
operating
instructions
labelled electrical
products may not be
disposed of in the
household waste
reminds consumers
to dispose of products
and packaging in an
environmentally friendly
manner.
• Never touch the red and black connector clips, never connect them together. This could result in
the formation of dangerous sparks, electrical ashes (sparkovers) or cause explosions.
• Only use the device in a dry environment and always keep it dry and clean. Do not use in the vicinity of naked
light or in an explosive environment (for example, in the vicinity of ammable gases and uids, or ne dust).
End all uses in the event of abnormal behaviour (overheating, escaping smoke or uid)
• CAUTION:Afterevery unsuccessfulattempttogivestarting aid,takea breakof atleast5 minutes
to avoid overheating the device.
Mains
transformer-
short-circuit
proof
Polarity of the plug
connector
Insulated
housing
(protection
class II)
Luminaires which can be mounted directly on a combustible
substrate if the ignition temperature is not exceeded for less
than 15 minutes during normal operation (130° C) or 180° C in
the event of a fault.
Devices with this symbol may only be
operated indoors (dry environment)
1 START button
2 LCD display
3 Switch for LED light
4 Charging socket
5 USB output, 2 A
6 12V output
7 Minus (-) pole callipers
8 Plus (+) pole callipers
6. MANUAL
6.1 OVERVIEW
9 LED light

12
CAUTION (11)
This symbol lights up in the event of errors, short-circuiting or incorrect terminal connections. Immedi-
ately disconnect the connections and check everything carefully.
BATTERY VOLTAGE, INTERNAL 12
Indicates the voltage of the internal battery of the starting aid.
READY-TO-USE (14)
This symbol signalises ready to use. You can now start your vehicle.
WARMING UP LOGO FLASHING 14
In the event of low ambient temperatures below 0°C (32°F), the automatic warming of the starting aid
is required (heating duration, up to 5 minutes). NOTE: In the event of temperatures below -20°C (-4°F)
the PRE-HEAT function is not sucient to bring the device to the necessary operating temperature.This
function cannot be selected, it will be activated automatically based on the ambient temperature.
CHARGING STATUS DISPLAY 13
Symbolises the charging status of the internal battery of the starting aid. In order to lend starting aid
to a vehicle, the display must show at least 3 bars of charge (12.8 Volt). During charging, the bars will
build from bottom to top. A ashing display signalises an empty battery and that charging is required.
10 CAUTION error display
11 Display battery voltage (internal)
12 Charge status display
13 Ready-to-use display
LCD DISPLAY
OVERHEATING LOGOS FLASH 11+14
The device has overheated. Switch the device o and allow it to cool down. Overheating may occur if the
device is used in high exterior temperatures (> 65 °C or 149 °F) or used multiple times within a short
period of time.
Battery lifetime
Charge the battery of the starting aid after each use (as starting aid), this will increase the lifetime of your
battery. Permanent charging and frequency complete discharges should be avoided since these will shorten the
lifetime of your battery.
6.2 CHARGING THE INTERNAL BATTERY
Prior to initial commissioning
The device is delivered in a partially charged state. After purchasing/prior to initial use, charge the device fully.To
do this, use only the supplied charger or the vehicle charging cable.
6.2.1 CHARGING USING THE PLUG CHARGER
Connect the charger using the 12 V input, INPUT (Position 4 in the overview), of the power pack. Then plug the charger into a
mains socket. The power pack switches itself on, this is indicated by the activation of the display illumination and the acoustic
signal.The charging process is complete when all 5 charging bars are permanently lit.
After charging, rst disconnect the plug charger from the mains socket, then disconnect the coaxial connector from the charging
socket of the power pack. The device will switch itself o approximately 30 seconds after you have disconnected the charging
cable from the power pack.

13
CAUTION: Only charge the power pack when driving or when the motor is running,
otherwise there is a risk that the starter battery of your vehicle may be discharged.
The device will switch itself o approximately 30 seconds after you have disconnected the charging cable from the power pack.
6.2.2 CHARGING USING THE VEHICLE CHARGING CABLE
Connect the charger using the 12 V input, INPUT (Position 4 in the overview), of the power pack. Then insert the 12 V vehicle
plug into the on-board socket of your vehicle. The power pack switches itself on, this is indicated by the activation of the display
illumination and the acoustic signal.The charging process is complete when all 5 charging bars are permanently lit.
After charging, rst disconnect the 12 V plug from the 12 V socket of your vehicle and then disconnect the coaxial connector from
the charging socket of the power pack.
6.3 STARTING AID
6.3.1 PREPARATION
Disconnect all devices connected to the power pack, both from the 12V outlet socket (Position 7 in the overview) and from the USB connec-
tions(Positions 5 and6in the overview).
Makesurethatthepowerpackissucientlycharged,withatleast3chargingbarsinthe chargingstatusdisplay(Position13intheoverview).
Read the operating instructions for your vehicle!
For some vehicles, it is possible that special precautions must be implemented before using a starting aid with the
vehicle (e.g. fuses that must be removed, or certain safety precautions that must be taken). With some vehicle types,
the battery is located in the boot, in this instance you will often nd starting aid connections under the bonnet.
Remove any rust or oxidation or dirt from the pole callipers and battery poles.
6.3.2 CONNECTING THE POWER PACK VEHICLES WITH NEGATIVE EARTH
Switch o the ignition and all electrical consumers of the vehicle (radio, lights, rear window heating, seat heating etc.). Apply
the parking brake. First connect the red (+) pole callipers (Position 9 in the overview) to the plus pole of your vehicle battery.
The black (-) pole callipers (Position 8 in the overview) is connected, as far as possible from the battery, to the motor block or
chassis (not to a painted part). Pay attention to see whether the CAUTION - symbol (Position 11 in the overview) lights up. If
no error is shown, now press the START button (Position 1 in the overview) (required for every start process) and wait until the
device signals it is READY (Position 14 in the overview).
Only to be used with additional care, and by specialists!
6.3.4 EXPERT MODE
6.3.3 ATTEMPTING TO START
Start the motor. Do not operate the starter for longer than 6 seconds. The battery of the power pack is not designed for longer
starting attempts. Pause for at least 5 minutes between two starting attempts. If the motor does not start after a number of
attempts, abort the process and investigate the cause of the defect.
If the vehicle battery has been completely discharged (voltage under 3V), the device is unable to recognise the battery and will
not start the vehicle. Pressing the START button for 5 seconds (wait out the countdown) and then pressing the START button, the
EXPERT MODE may be activated for this instance: The device will now act as a lithium ion battery and will have 12V and a max.
of 300 A at the terminals (for starting aid)
CAUTION: The short-circuiting protection and automatic deactivation on separation of the connec-
tion will be deactivated by this mode!
Press the START button again to exit expert mode.The ready symbol will go out. After approximately 30 seconds the device will
automatically power itself o.
6.3.5 REMOVING THE POWER PACK
First disconnect the black (-) pole callipers and secure the pole callipers to the intended mount on the underside of the device.
Then disconnect the red (+) pole callipers and secure the pole callipers to the intended mount. Always maintain this sequence.
The device will switch itself o approximately 30 seconds after you have disconnected the charging cable from the battery.

14
This function may only be used with vehicles in which the 12V on-board socket is not switched via the ignition.
To do this, read the manual of your vehicle or ask your specialist workshop.
First, clear access to the car battery, e. g. open the bonnet, or similar. In order to use the power pack as a buer battery, switch all
(!) electric consumers (radio, lights, heating, interior lighting etc.) o. Switch o the motor and turn o the ignition. Remove the
ignition key. Plug the coaxial connector of the vehicle charging cable into the 12V output socket (Position 7 in the overview) of the
power pack.The 12V vehicle plug is plugged into the on-board socket of your vehicle. Press the START button. Now you can change
the battery. Once you have installed the new battery in your vehicle and connected it, disconnect the power pack from the on-board
socket by rst disconnecting the plug from the on-board socket and then the coaxial connector from the 12V output.
The device will switch itself o approximately 30 seconds after you have disconnected the charging cable from the power pack.
6.4 USING AS A 12 V VOLTAGE SUPPLY
The power pack may be used as a source of 12V direct current for buering the on-board computer data during a battery change.
7.1.1 REPLACING THE FUSE IN THE VEHICLE CHARGING CABLE
Turn the knurled screw at the tip of the 12V connector anti-clockwise until it is released from the connector and it can be remo-
ved.The fuse is exposed and can be removed from the connector. Replace the fuse with another of the same strength and screw
the knurled screw back into the connector.
Fuse: ø 6 x 30 mm, F, 12 A, 250V
7.MAINTENANCE AND CARE
7.1 MAINTENANCE
After use, store the fully charged device in a dry and well ventilated location that is out of the reach of children. Charge the device
regularly, but at least every 6-8 months tomaintain it ready for use and ensure a high battery lifetime.Storethe device inaccordance
with the recommended ambient conditions (0 °C – 45 °C) and protect from damp, direct sunlight, heat and contamination.
6.6 LED LIGHT
Press the button for the illumination (Position 3 in the overview). The power pack is switched on. Pressing the button again
switches the lighting functions in the following order: Permanently on – Flashing – O.
6.5 USING AS A USB CHARGER
Thanks to the two USB connections, the power pack may also be used as a charger for mobile telephones, smartphones, tablets,
MP3 players and similar devices. In order to charge a USB device, rst connect with the associated charging cable (not included
in the scope of delivery). Plug the USB connector of the charging cable into one of the two USB outlets (Positions 5 and 6 in the
overview). Start the charging process by pressing the START button.
After completely the charging process, disconnect the USB connector from the power pack.
The device will switch itself o approximately 30 seconds after you have disconnected the USB cable from the power pack.
9. CONTACT INFORMATION
EAL GmbH
Otto-Hausmann-Ring 107
42115Wuppertal, Germany
+49(0)20242 92 830
+49 (0) 202 42 92 83 – 160
www.eal-vertrieb.com
8.NOTES REGARDING ENVIRONMENTAL PROTECTION
Do not dispose of electrical devices with household waste! Electrical and electronic scrap must be collected sepa-
rately and disposed of in an environmentally responsible manner for recycling. Please contact your community or
city administration regarding disposal options for electrical and electronic scrap.
7.2 CARE
Switch the power pack o before cleaning. Clean the housing of the power pack with a soft, dry cloth. Do not use any aggressive
cleaning agents or solvent-based cleaners. Never allow liquids to ingress into the housing.
Recharge the power pack.
Caution: Do not leave the device unattended when charging! Use a re-resistance surface, do not allow ammable materials
within a distance of 1m.

15
AVERTISSEMENT
Lisez attentivement la notice d‘utilisation avant la mise en service et respectez toutes les consignes
de sécurité ! Tout non-respect de ces consignes peut entraîner des dommages corporels, endommager
l‘appareil ou vos biens ! Conservez l‘emballage d‘origine, le justicatif d‘achat et la présente notice
pour vous y référer ultérieurement ! Si vous revendez ou remettez l‘appareil à des tiers, veuillez égale-
ment leur remettre cette notice d‘utilisation. Avant la mise en service, veuillez contrôler le contenu de
l‘emballage quant à l‘absence de dommages et vérier si toutes les pièces sont présentes !
Bloc d’alimentation au lithium avec aide au démarrage 600 A
SOMMAIRE
1. UTILISATION CONFORME
Le blocd’alimentation APA au lithium avecaide au démarrage 600 Apermet de charger ou de démarrerdes véhicules dont la batterie
est faible ou vide, même en cas de conditions ambiantes très froides grâce à la fonction de réchauage automatique PRE-HEAT.
L’appareil dispose également de 2 ports USB permettant de recharger les batteries de téléphones portables ou de systèmes de
navigation. Une lampe LED ultra lumineuse facilite le processus d’aide au démarrage ou sert de lampe d‘avertissement en mode
clignotement. Un chargement de batterie permet d’eectuer jusqu’à 10 processus d’aide au démarrage en fonction de l’état de la
batterie et selon le véhicule.
La sortie 12 V permet de sauvegarder les données du tableau de bord lors du remplacement de batterie. Cet appareil n‘est pas
destiné à être utilisé par des enfants ou des personnes aux capacités mentales limitées ou ne disposant pas de l‘expérience ou des
connaissances nécessaires. Les enfants doivent rester à distance de cet appareil.
L‘appareil n‘est pas destiné à une utilisation industrielle ou commerciale.
L‘utilisation conforme aux prescriptions implique également le respect de toutes les informations contenues dans cette notice d‘uti-
lisation, en particulier le respect des consignes de sécurité. Toute autre utilisation est considérée comme non conforme et peut
entraîner des dommages matériels ou corporels. La société EAL GmbH décline toute responsabilité en cas de dommages découlant
d’une utilisation non conforme à l’emploi prévu.
1. UTILISATION CONFORME 15
2. MATÉRIEL FOURNI 16
3. SPÉCIFICATIONS 16
4.CONSIGNES DE SÉCURITÉ 16
5.EXPLICATION DES SYMBOLES 17
6. NOTICE D‘UTILISATION 17
6.1 VUE D‘ENSEMBLE 17
6.2 CHARGEMENT DE LA BATTERIE INTERNE 19
6.2.1CHARGEMENT AVEC LE CHARGEUR À FICHE 19
6.2.2CHARGEMENT AVEC LE CÂBLE DE CHARGEMENT POUR L‘ALLUMECIGARE 19
6.3 AIDE AU DÉMARRAGE 19
6.3.1 PRÉPARATION 19
6.3.2RACCORDEMENT DU BLOC D’ALIMENTATION VÉHICULES AVEC MASSE NÉGATIVE 19
6.3.3TENTATIVE DE DÉMARRAGE 20
6.3.4 MODE EXPERT 20
6.3.5DÉBRANCHEMENT DU BLOC D’ALIMENTATION 20
6.4 UTILISATION ENTANT QUE SOURCE DETENSION DE 12V 20
6.5 UTILISATION ENTANT QUE CHARGEUR USB 20
6.6 LAMPE LED 21
7. MAINTENANCE ET ENTRETIEN 21
7.1 MAINTENANCE 21
7.1.1REMPLACEMENT DU FUSIBLE DU CÂBLE DE CHARGEUR AUTOMOBILE 21
7.2 ENTRETIEN 21
8.REMARQUES RELATIVES À LA PROTECTION DE L‘ENVIRONNEMENT 21
9. COORDONNÉES 21

16
• Le triangle d’avertissement indique toutes les instructions relatives à la sécurité. Respectez-les à tout moment car
vous risqueriez sinon de vous blesser ou l‘appareil risquerait d‘être endommagé.
• Les enfants ne doivent pas jouer avec l‘appareil
• Les tâches de nettoyage et d‘entretien à eectuer chez soi ne doivent pas être exécutées par des enfants qui ne
sont pas sous surveillance.
• Ne laissez pas traîner le matériel d‘emballage. Il pourrait devenir un jouet dangereux pour les enfants !
• N‘utilisez cet appareil qu‘aux ns pour lesquelles il a été prévu !
• Ne pas manipuler ni démonter l‘appareil !
• Pour votre propre sécurité, utilisez exclusivement les accessoires ou pièces de rechange qui sont indiqué(e)s dans
la notice d‘utilisation ou dont l‘utilisation est recommandée par le fabricant !
• Attention : Ne pas charger l’appareil sans surveillance ! Support réfractaire, pas de matériau inammable dans
un rayon de 1 m
• Si vous n’êtes pas familiarisé avec le système électrique de votre véhicule ou que vous préférez ne pas eectuer le
processus d’aide au démarrage par vous-même, ne mettez pas l’appareil en service. Il est préférable de demander
de l’aide professionnelle, de demander conseil à votre constructeur automobile ou de faire appel à un service de
dépannage.
• Lisez le mode d’emploi de votre véhicule !
4.CONSIGNES DE SÉCURITÉ
3. SPÉCIFICATIONS
Chargeur à che :
Entrée : 220 – 240V AC, 50/60 Hz
Sortie : 12V DC, 1 A
Longueur du câble : 1,80 m
Câble de chargeur automobile :
Fusible : rapide, 12 A, 250V, Ø6 x 30 mm
Longueur du câble : 1,10 m
Bloc d’alimentation au lithium :
Type de batterie : LiFePo – Lithium-Fer-Phosphate
Capacité : 12000 mAh (4 cellules, 3000 mAh chacune)
Aide au démarrage : Conçue pour les moteurs d’une cylindrée jusqu’à 300 ccm
Courant de pointe/courant continu max. : 300 A / 600 A
Longueur du câble d’aide au démarrage : 0,22 m
Température d’allumage pour le
réchauage automatique (PRE HEAT) : > 0 °C (> 32 °F)
Sorties : 1 x USB, 5V, 2,0 A
12V DC, 8 A
Dispositifs de sécurité : Protection anti-surchaue, protection anti-surcharge,
protection anti-court-circuit, mauvaise polarité
Humidité ambiante relative : rel. 20 % - 90 %
Plage de température ambiante admissible
Lors de l‘utilisation : -20 °C jusqu’à + 45°C (-4 jusqu’à 113 °F)
Plage de température ambiante admissible
Lors du stockage : 0 °C jusqu’à + 45°C (32 jusqu’à 113 °F)
Dimensions : 150 x 200 x 60 [mm]
Poids : 0,980 kg
Éclairage : Lumière LED ultra lumineuse
2. MATÉRIEL FOURNI
1 x Bloc d’alimentation au lithium 1 x Chargeur à che
1 x Notice 1 x Câble de chargeur automobile 12 V

17
5.EXPLICATION DES SYMBOLES
Correspond aux
directives de la CE Lire le mode
d‘emploi
Un produit électrique/
électronique marqué
avec ce symbole
ne doit pas être jeté
dans les ordures
ménagères.
rappelle aux
consommateurs qu‘ils
doivent éliminer
les produits et les
emballages d‘une
manière respectueuse
de l‘environnement.
• Certains véhicules peuvent nécessiter de prendre des mesures particulières avant de pouvoir procéder à l’aide au
démarrage (par ex. retirer les fusibles ou prendre des mesures de sécurité particulières). La batterie de certains
véhiculessetrouvedans lecoreetilya souventdesraccordsd’aideaudémarragespéciaux dansle compartiment
moteur.
• Ce système d’aide au démarrage est conçu exclusivement pour une utilisation avec des systèmes
de 12 V. N’essayez EN AUCUN CAS d’utiliser l’appareil avec une tension de 6 V, 24 V ou pour un autre
but que celui prévu. Le non-respect de ces instructions peut avoir de graves conséquences pour les
objets et les personnes.
• Ne jamais toucher ni connecter les pinces rouge et noir l’une à l’autre. Cela peut provoquer des
étincelles dangereuses, des éclairs électriques (décharges) ou même des explosions.
• Utilisez l’appareil uniquement dans un environnement sec et gardez-le toujours propre et sec. Ne l’utilisez
pas à proximité de ammes nues ou dans un environnement à risque d’explosion (par ex. à proximité de
gaz inammables, de liquides ou de poussières nes). Mettez immédiatement n à l’utilisation en cas de
comportement anormal (surchaue, fumée ou fuite)
• ATTENTION : Après chaque tentative d’aide au démarrage échouée, faites une pause de 5 minutes
pour éviter que l’appareil ne surchaue.
Transformateur sec-
teur - protégé contre
les court circuits.
Polarité de la che de chargement
Boîtier avec isola-
tion (classe de
protection II).
Appareils qui peuvent être
montés directement sur
un support combustible si
la température d‘allumage
n‘est pas dépassée pen-
dant moins de 15 minutes
en fonctionnement nor-
mal (130° C) ou 180° C en
cas de défaut.
Les appareils
portant ce symbole
ne peuvent être
utilisés qu‘à
l‘intérieur
(environnement
sec)
1Touche START
2 Écran LCD
3 Interrupteur de lampe LED
6. NOTICE D‘UTILISATION
6.1 VUE D‘ENSEMBLE
4 Connecteur de chargement
5 Sortie USB, 2 A
6 Sortie 12V

18
7 Pince crocodile négative (-)
8 Pince crocodile positive (+)
9 Lampe LED
ATTENTION (11)
Ce symbole s’allume en cas d’erreurs, de courts-circuits ou de mauvaise polarité Débranchez
immédiatement l’appareil et procédez à une vérication méticuleuse.
TENSION DE BATTERIE, INTERNE 12
Indique la tension de la batterie interne de l’appareil d’aide au démarrage.
DISPONIBILITÉ (14)
Lorsque ce symbole apparait, cela signie que l’appareil est opérationnel. Vous pouvez
maintenant démarrer votre véhicule.
RÉCHAUFFER LOGO CLIGNOTE 14
Lorsque la température ambiante est inférieure à 0 °C (32 °F), le réchauage automatique
de l’appareil d’aide au démarrage est nécessaire (durée de chauage jusqu’à 5 minutes).
REMARQUE : Lorsque la température est inférieure à -20°C (-4°F), la fonction PRE-HEAT ne
sut pas à chauer l’appareil jusqu’à la température de service nécessaire. Cette fonction
ne peut pas être sélectionnée. Elle est activée automatiquement, indépendamment de la
température ambiante.
INDICATEUR D’ÉTAT DE CHARGE 13
Représente le niveau de charge de la batterie interne de l’appareil d’aide au démarrage.
Pour pouvoir aider un véhicule à démarrer, l’écran doit acher au moins 3 barres de char-
gement (12,8 volts). Lors du chargement, les barres de chargement augmentent de bas en
haut. Si l’écran clignote, cela signie que la batterie est vide et qu’elle doit être rechargée.
10 Achage d’erreurs ATTENTION
11 Achage de tension de batterie (interne)
12 Indicateur d‘état de charge
13 Indicateur de disponibilité
ÉCRAN LCD

19
SURCHAUFFE LOGOS CLIGNOTENT 11+14
L’appareil est en surchaue. Éteignez l’appareil et laissez-le refroidir. Il peut y avoir une surchaue
si l’appareil est utilisé à hautes températures (> 65 °C, 149 °F) ou s‘il est utilisé plusieurs fois dans
un court intervalle de temps.
ATTENTION: Rechargez uniquement le bloc d‘alimentation pendant que vous roulez ou lorsque le
moteur est en marche pour éviter de décharger la batterie du démarreur de votre véhicule.
L’appareil s’éteint automatiquement 30 secondes après que le câble de chargement a été débranché du bloc d’alimentation
Durée de vie de la batterie: Chargez la batterie de l’appareil d’aide au démarrage après chaque utilisation
(aide au démarrage). Cela permet de prolonger la durée de vie de votre batterie. Évitez de recharger en per-
manence ou de complètement décharger l’appareil fréquemment car cela diminuera la durée de vie de votre
batterie.
6.2 CHARGEMENT DE LA BATTERIE INTERNE
Avant la première mise en service: L’appareil est livré partiellement chargé. Chargez complètement l’appareil
après l’achat ou avant la première utilisation. Pour cela, utilisez uniquement le câble de chargement ou le câble
de chargeur automobile fourni.
6.2.2CHARGEMENT AVEC LE CÂBLE DE CHARGEMENT POUR L‘ALLUMECIGARE
Connectez le chargeur à l’entrée 12 V, INPUT (position 4 dans la vue d’ensemble) du bloc d’alimentation. Branchez ensuite la
che de 12 V dans la prise 12 V du tableau de bord de votre véhicule. Le bloc d’alimentation s’allume, ce que vous remarquez à
l’activation de l’éclairage de l’écran et au signal sonore. Le processus de chargement est terminé lorsque les 5 barres de charge-
ment s’allument en continu.
Après le chargement, débranchez tout d‘abord la che de 12V de la prise de 12V de votre véhicule et débranchez ensuite la che
creuse de la douille de chargement du bloc d’alimentation.
6.2.1CHARGEMENT AVEC LE CHARGEUR À FICHE
Connectez le chargeur à l’entrée 12 V, INPUT (position 4 dans la vue d’ensemble) du bloc d’alimentation. Branchez ensuite le
chargeur dans une prise. Le bloc d’alimentation s’allume, ce que vous remarquez à l’activation de l’éclairage de l’écran et au
signal sonore. Le processus de chargement est terminé lorsque les 5 barres de chargement s’allument en continu. Après le char-
gement,retirezd‘abordle chargeurà chedela prise etretirezensuite lache du connecteurdechargementdu bloc d‘alimenta-
tion. L’appareil s’éteint automatiquement 30 secondes après que le câble de chargement a été débranché du bloc d’alimentation
6.3 AIDE AU DÉMARRAGE
6.3.1 PRÉPARATION
Débranchez tous les appareils raccordés au bloc d’alimentation par l‘intermédiaire de la prise de sortie de 12 V (position 7 dans
la vue d‘ensemble) et des ports USB (positions 5 et 6 dans la vue d‘ensemble).
Assurez-vous que le bloc d’alimentation soit susamment chargé, au moins 3 barres de chargement dans l’indicateur d’état de
charge (position 13 dans la vue d’ensemble).
Lisez le mode d’emploi de votre véhicule !
Certains véhicules peuvent nécessiter de prendre des mesures particulières avant de pouvoir procéder à l’aide au dé-
marrage (par ex. retirer les fusibles ou prendre des mesures de sécurité particulières). La batterie de certains véhicu-
les se trouve dans le core et il y a souvent des raccords d’aide au démarrage spéciaux dans le compartiment moteur.
Éliminez les éventuelles couches de rouille ou d’oxydation ou la saleté des pinces crocodiles et des pôles de la batterie.
6.3.2RACCORDEMENT DU BLOC D’ALIMENTATION VÉHICULES AVEC MASSE NÉGATIVE
Éteignez le contact et tous les appareils électriques (radio, lumière, chauage du pare-brise arrière, sièges chauants, etc.) de
votre véhicule. Serrez le frein à main. Raccordez d‘abord la pince crocodile rouge (+) (position 9 dans la vue d‘ensemble) au pôle
positif de la batterie de votre véhicule. Raccordez la pince crocodile noire (-) (position 8 dans la vue d‘ensemble) au bloc moteur
ou au châssis (pas sur des pièces peintes) le plus loin possible de la batterie.
Regardez si le symbole ATTENTION (position 11 dans la vue d’ensemble) s’allume. Si aucune erreur n’est achée, appuyez sur
la touche START (position 1 dans la vue d’ensemble) (nécessaire à chaque processus de démarrage) et attendez jusqu’à ce que
l’appareil ache DISPONIBILITÉ (position 14 dans la vue d’ensemble).

20
À utiliser uniquement avec beaucoup de précaution !
ATTENTION : La protection anti-court-circuit et l’arrêt automatique sont désactivés en cas de
débranchement !
Si la batterie du véhicule est complètement déchargée (tension inférieure à 3V), l’appareil ne peut pas reconnaître la batterie
et ne peut pas faire démarrer le véhicule. Dans ce cas, activez le MODE EXPERT. Pour cela, appuyez sur la touche START et main-
tenez-la enfoncée pendant 5 secondes (compte à rebours) et appuyez à nouveau sur la touche START. L’appareil fonctionne
alors comme une batterie li-ions et il y a directement une tension de 12 V à max. 300 A au niveau des bornes (pour l’aide au
démarrage).
Pour quitter le mode d’expert, appuyez à nouveau sur la touche START. Le symbole de disponibilité s’éteint.
L’appareil s’éteint automatiquement après 30 secondes.
6.3.4 MODE EXPERT
Cette fonction ne peut être utilisée que sur les véhicules dont la prise 12V du tableau de bord ne passe pas par le
contact.Veuillez lire à cet eet le manuel de votre véhicule ou vous adresser à votre garagiste. Cette fonction ne
peut être utilisée que sur les véhicules dont la prise 12V du tableau de bord ne passe pas par le contact.Veuillez
lire à cet eet le manuel de votre véhicule ou vous adresser à votre garagiste.
Commencez par rendre la batterie du véhicule accessible, par ex. en ouvrant le capot moteur. Pour utiliser le bloc d’alimentation
comme batterie tampon, éteignez tous (!) les appareils électriques (radio, lumière, sièges chauants, éclairage de l’habitac-
le, etc.). Arrêtez le moteur et coupez l’allumage. Retirez la clé de contact. Insérez la che d’alimentation (position 11 dans la
vue d‘ensemble) du câble de chargeur automobile dans la prise de sortie de 12 V (position 7 dans la vue d‘ensemble) du bloc
d’alimentation. Branchez la che 12 V dans le tableau de bord de votre véhicule. Appuyez sur la touche START. Vous pouvez
maintenant procéder au changement de batterie. Une fois que vous avez placé et branché la nouvelle batterie de votre véhicule,
débranchez le bloc d’alimentation de la prise du tableau de bord. Pour cela, retirez d’abord la che de la prise du tableau de bord
et ensuite la che de la sortie 12 V.
L’appareil s’éteint automatiquement 30 secondes après que le câble de chargement a été débranché du bloc d’alimentation.
6.3.3 TENTATIVE DE DÉMARRAGE
Démarrez le moteur. Ne laissez pas travailler le démarreur pendant plus de 6 secondes. La batterie du bloc d’alimentation ne
convient pas aux tentatives de démarrage de longue durée. Faites toujours une pause d‘au moins 5 minutes entre deux tentati-
ves de démarrage. Si le moteur ne démarre pas après plusieurs tentatives, arrêtez l‘aide au démarrage et recherchez les causes
du défaut.
6.3.5DÉBRANCHEMENT DU BLOC D’ALIMENTATION
Commencez par retirer la pince crocodile noire (-) et xez la pince crocodile au support prévu à cet eet en-dessous de l’appareil.
Retirez ensuite la pince crocodile rouge (+) et xez la pince crocodile au support prévu à cet eet. Respectez impérativement
cet ordre opérationnel. L’appareil s’éteint automatiquement 30 secondes après que le câble de chargement a été débranché de
la batterie. Rechargez le bloc d’alimentation.
Attention : Ne pas charger l’appareil sans surveillance ! Support réfractaire, pas de matériau inammable dans un rayon de 1 m
6.5 UTILISATION EN TANT QUE CHARGEUR USB
Grâce à ses deux ports USB, le bloc d’alimentation peut être utilisé pour charger des portables, des smartphones, des tablettes,
des baladeurs numériques, etc. Pour charger un appareil à USB, vous devrez tout d‘abord le relier au câble de chargement (non
fourni). Enchez la che USB du câble de chargement dans l‘un des deux ports USB (positions 5 et 6 dans la vue d‘ensemble).
Commencez le processus de chargement en appuyant sur la touche START.
Une fois le processus de chargement terminé, débranchez la che USB du bloc d’alimentation.
L’appareil s’éteint automatiquement 30 secondes après que le câble USB a été débranché du bloc d’alimentation.
6.4 UTILISATION EN TANT QUE SOURCE DE TENSION DE 12 V
Le bloc d’alimentation peut être utilisé comme source de tension continue de 12V pour sauvegarder les données du tableau de
bord lors d’un remplacement de batterie.
Other manuals for 16558
1
Table of contents
Languages:
Other APA Remote Starter manuals
Popular Remote Starter manuals by other brands

Toyota
Toyota 00016-32901 installation instructions

Costway
Costway EP24920US user manual

ADS
ADS FLASHLOGIC FLRSCH4 install guide

idatastart
idatastart COM-IDS(RS)-BM1-EN install guide

NOCO Genius
NOCO Genius Boost X GBX75 user manual

Directed Electronics
Directed Electronics READY REMOTE 24926 Owner's installation guide