APUP SPC-150 User manual

SPC-150
Air/Hydraulic Strut Spring Compressor
Operating Manual
ENGLISH

SAFETY CAUTIONS
-ONLY qualified mechanics/technicians should use this equipment.
-Do NOT overload or serious injury may result.
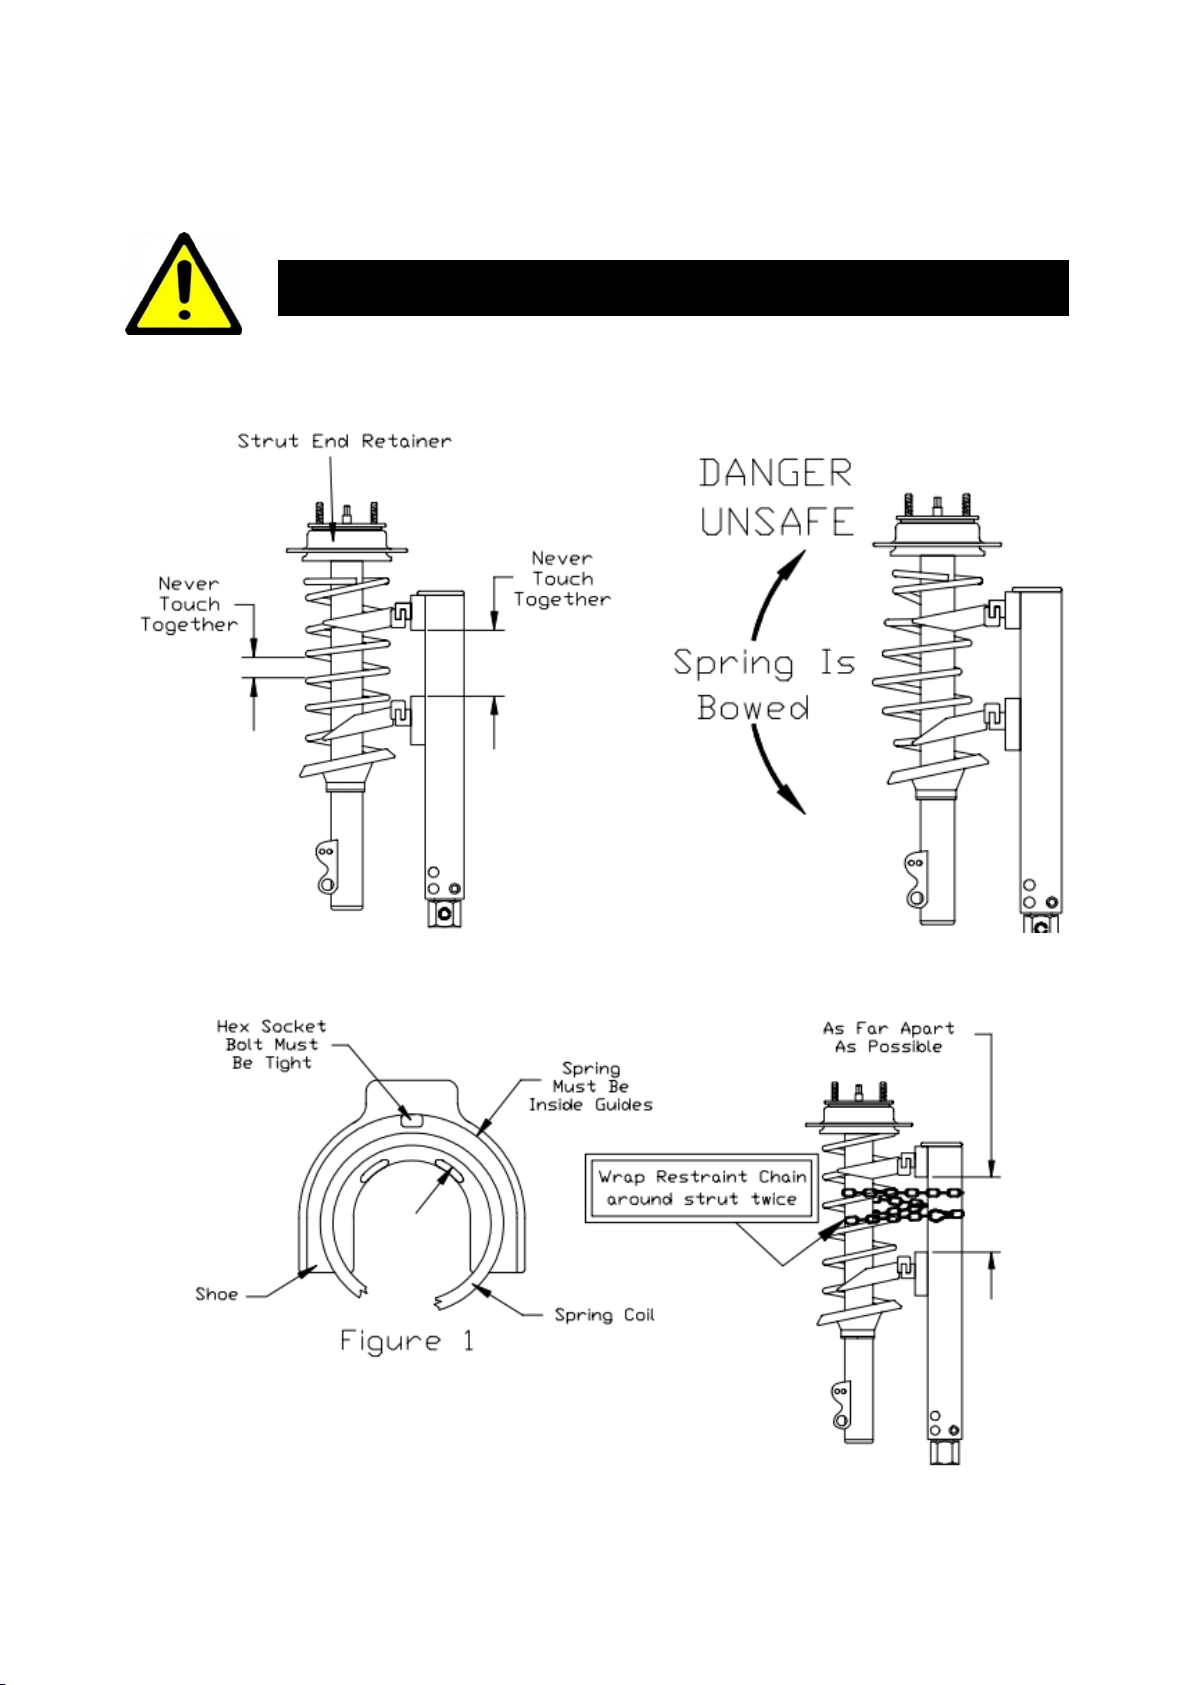
-Do NOT Compress spring until coils touch or bind.
-A compressed spring is VERY DANGEROUS.
-ALWAYS unload spring before removing from strut.
-Do NOT compress spring if it tends to bow.
-Do NOT drop spring compressor assembly.
-Compress spring only to remove or install strut.
-If the strut assembly is difficult to compress or the spring bows or tilts, release
tension immediately and REPOSITION the strut assembly.
-Keep fingers and hands clear of any moving parts.
-Do NOT make any modifications to this equipment.
-ALWAYS inspect before use. Do NOT use if components are damaged in any way,
or if the hydraulic ram is leaking.
-Make sure that your workpiece is centered-loaded and secure. DISTRIBUTE THE
LOAD EVENLY ACROSS THE ENTIRE SADDLE SURFACE.
-Be sure to REMOVE strut support plate from the bottom of the strut before compressing
springs. Strut support plate is only designed to hold heavy weight of strut TEMPORARILY.
- When not in use, store the hydraulic shop press in a dry location with the ram and
piston of the cylinder fully RETRACTED.
Before you begin, understand units’operation limit.

This unit is NOT designed for Heavy-Duty purpose. It is for light to medium-
duty only.
Technical Specifications
Max. Spring Compression Capacity
900kg (1,984 LBS)
Max. Spring Compression Range
25cm (10”)
Max. Spring Width
20cm (7.87”)
Max. Spring Width on Large Shoe
19.5cm (7.67”)
Recommended Pounding Pressure Limit
100~250kg (220~550 lb)
Recommended Spring Compress Distance
15cm (6”)
Hydraulic Oil Specification
AW-32
Net Weight (with safety cage)
82kg (179 lb)
Shipping Weight
97kg (212 lb)
Shipping Dimensions
590mm x 520mm x 1250mm
(23”x 20.5” x 49.2”)

1. Owner’s Responsibility
To maintain machine and user safety, the responsibility of the owner is to read and follow all
instructions on this manual.
A. Read and follow the safety instructions and keep this manual readily available for machine
operators.
B. Make sure all operators are properly trained; know how to safely and correctly operate the
unit.
C. Carefully inspect the unit on a regular.
D. Service and maintain the unit only with approved replacement parts.
E. Keep bystanders out of work area.
2. Receiving
The shipment should be inspected as soon as it is received. If any of the goods are shorted
or damaged, notify your supplier immediately.
The unit comes with a standard accessory kit as shown below.

3. Assembling Wheel Casters
4. Understand your adapters
Each shipment includes two (2) different types of sturt adapters. One is used for holding the
horseshoe mount and the other is used for holding the bottom of the strut.
Assemble two (2) wheel casters by using
provided bolts, washers and nuts.

5. Mount the strut correctly
Spring must FULLY nest on the adapter
to hold downward pressure.
Pay particular attention when selecting
the spring mount adapter. Strut spring
MUST fully nest on the adapter. If spring
mount adapter is too large, the strut can
be slipped or tilted due to a heavy
downward-travel pressure.
Secure the bottom of strut by
using provided two (2) adapter
pins as circled in red.

6. Spring Arms
Be sure to set spring arms center-aligned as shown on above pictures. It is
very important to set up correctly to distribute load/pressure as even as
possible.
Spring MUST be inside Guide and must be fully nested on horseshoe

Spring must be FULLY nested inside the claws of the spring clasp assemblies and
Spring Clasp Claw assemblies must be FULLY tightened by its two (2) fasteners. With
the strut assembly properly positioned, compress spring until the bottom coil of
spring is free of the lower spring seat. COMPRESS SPRING ONLY FAR ENOUGH TO
RELIEVE PRESSURE ON THE STRUT END RETAINER! Service or replace strut as
required. It is not necessary to release spring from strut assembly when servicing
strut only.

7. Restraint Chain & Safety Cage
ALWAYS Wrap Restraint Chain around the Spring Compressor and strut as shown
on below photos. Adjust the chain ends and close the safety shield cover

8-1. Compress Spring
Before compressing the spring, be sure to understand below figures

8-2. Compress Spring
After positioning the strut on correct adapter and with top spring arms secured, compress
spring either by hand-pump or by compressed-air from service shop.
COMPRESS SPRING ONLY FAR ENOUGH TO RELIEVE PRESSURE ON THE
STRUT END RETAINER. DO NOT OVER COMPRESS THE SPRING!
Check to make sure that the spring is safely secured and then start to compress the spring
coils. Gradually pump the hand-pump on the back of the unit or use compressed-air to start
the compression.
When all the pressure has been released, taking care to support the strut and spring assembly
when it becomes loose and withdraw the strut and release the spring from the strut end
retainer if required. Remove/replace spring, components as needed.
DO NOT use this strut spring compressor to compress springs which do
not fully nest inside the claws of the spring clasp assemblies. If a spring coil is only
partially captured within the claw of a clasp assembly, remove the strut spring
assembly from the strut spring compressor. This means that the application is not
compatible to this type of product.
LOCK

9. Support Plate
SPC-150S comes with built-in strut support plate. It is used for holding weight of the strut
TEMPORARILY when positioning the strut to the mount adapter.
CAUTION: Make sure to keep support plate AWAY from the bottom of strut assembly
before compressing spring. Otherwise, it will break the support plate and the rod apart
due to the direct downward travel pressure.
10. Universal Strut Holder (OPTIONAL ADAPTER)
Universal Strut Holder can be purchased separately. It is an alternative holder which is used
for clamping lower part (strut neck) of the strut assembly.

To clamp the strut assembly, position the strut as shown on above picture and turn
the large wheel-dial clockwise fully to secure the strut assembly.
10. Safety Cage (Optional)
If unit comes with a front safety cage, make sure to close the front cage door before
compressing for your safety. Do NOT stand in front of protective cage at all times.
This unit is manufactured under strict quality control in APUP’s factory in South Korea. If you
encounter any technical difficulty while using the unit, contact your distributor or retailer for
support. Manufacturer’s customer support is also available by writing us at apup@apup.co.kr
Table of contents
Popular Air Compressor manuals by other brands

Campbell Hausfeld
Campbell Hausfeld FP260000 Operating instructions and parts manual

Schulz
Schulz MSL 20 MAX quick start guide

JobSmart
JobSmart 3901726 Assembly & operating instructions

dellonda
dellonda DL14 quick start guide

Sullair
Sullair 125 Operators manual and parts lists

Sullair
Sullair LS-200 Operator's manual and parts list