AQ Bio AD3880 User manual

空氣殺菌淨化機
Air Defender
AD3880
使用說明書
User Manual

感謝閣下選擇AQ
AD3880空氣殺菌淨化機將為您帶來前所未有的清新空氣體驗,配以AQ健
康科技水使用,有效殺滅空氣中的病菌,降低室內含菌量,防止交叉感
染,同時分解甲醛,消除異味,例如:煙味、食物味、垃圾味等等。
噴霧有效範圍達200至1000呎空間,並可自行設定機器運作時間,適用於
家居環境、辦公室、醫院及學校等人多密集的室內空間作大範圍殺菌消毒。
在使用本設備前,請先細閱本使用說明書。
目錄
部件名稱
開始使用
操作/模式設定
- 切換噴霧模式和待機模式
- 間隔噴霧模式(Pause Time)
- 固定運作模式(Timer)
- 顯示屏日期及時間(Date & Clock)
- 睡眠模式
更換微孔霧化片
安全指引
保養及清潔
產品規格
AQ產品保養條款及細則
1
2
3
3
4
4
5
5
6
6
6
14

微孔霧化片
霧化口
電子顯示屏
設置鍵/退出鍵
部件名稱
注水口
掛牆防撞墊
掛牆螺絲孔
1
上/下調節鍵
確定鍵
電源開關鍵
揚聲器
電源線插孔
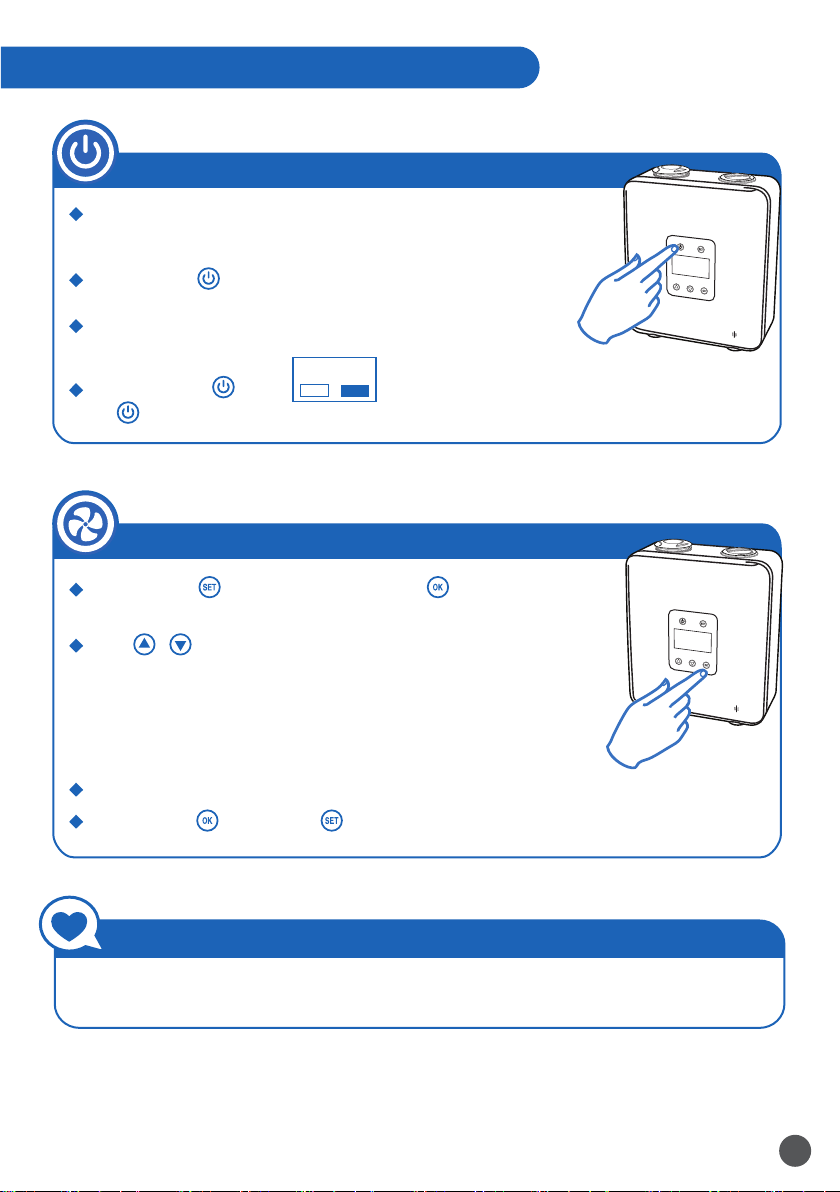
電源開關鍵:在主頁面按此鍵切換噴霧模式和待機
模式
設置鍵/退出鍵:在主頁面長按此鍵進入設定頁面;
在設定頁面中按此鍵退出當前頁面
上調節鍵:在設定頁面中按此鍵移動至上一選項或
上調當前設定值
下調節鍵:在設定頁面中按此鍵移動至下一選項或
下調當前設定值
確定鍵:在設定頁面中按此鍵確定當前選項,並進
入下一頁面或選項
1
12
345
2
3
4
5
按鍵介紹

開始使用
2
特別提示
‧ 添加補充液前請先關機及拔除電源線,以防操作不當引起漏電
2
1將空氣殺菌淨化機放置於水平桌面,逆時
針扭開注水口機蓋,通過注水口添加1500
毫升補充液,再順時針扭緊機蓋
如水位過低或缺水時,淨化機將會響起提
示音,請立即添加補充液,以免對淨化機
造成損害
注水口機蓋
首次使用或缺水時添加補充液

操作/模式設定
‧
‧
‧
‧
接駁電源以啟動淨化機,在此期間將播放動畫提示,進行初始化程
序並進入待機模式
於主頁面輕觸 ,進入噴霧模式
補充液自動從霧化口噴出,每次噴灑量約為0.5毫升。補充液揮發量
會受空氣濕度及含菌量的不同而有所影響
噴霧模式下輕觸 後,此 畫面將會彈出,再次輕
觸 ,將切換至待機模式並熄滅顯示屏
Power
ON OFF
3
間隔噴霧模式 Pause Time
切換噴霧模式和待機模式
設定每次噴灑的間隔時間
‧
‧
‧
‧
於主頁面長按 ,選擇「1. PauseTime」,按 ,進入間隔噴霧模式設
定頁面
輕觸 / 以調較每次噴霧的間隔時間
-「0 Min」代表無間斷長噴
-「1 Min」代表每隔1分鐘噴灑一次
-「2 Min」代表每隔2分鐘噴灑一次
-「3 Min」代表每隔3分鐘噴灑一次,如此類推
最長可調節至每15分鐘噴灑一次,所設定的間隔時間會於主頁面底部顯示
設定完畢,按 確定,並輕觸 返回主頁面
溫馨提示
如家人不幸生病,建議設定為「0 Min」,無間斷長噴,殺滅病菌,淨化環境,預防交叉感染,
加速痊癒

操作/模式設定
4
固定運作模式 Timer
顯示屏日期及時間 Date & Clock
‧於主頁面長按 ,選擇「2. Timer」,按 ,進入固定運作模式設定頁
面
設定工作週期 Week
‧
‧
‧
選擇「1. Week」,按 ,進入工作週期設定頁面
輕觸 / 以選擇週一至日,並按 調較「On/ Off」
-「On」代表運作
-「Off」代表不運作
設定完畢,輕觸 返回上一頁
設定工作時間 Daytime
‧
‧
‧
選擇「2. Daytime」,按 ,進入工作時間設定頁面,總共可設定2個工作時段
按 / 設定開始及完結時間,按 移至下一位置
設定完畢,輕觸 返回上一頁
‧
‧
於主頁面長按 ,選擇「3. Date&Clock」,按 ,進入日期及時間設定頁面
按 / 設定日期、星期及時間,按 移至下一位置,直至設定完畢
開啟/ 關閉固定運作模式 Timer Switch
‧
‧
‧
‧
選擇「3. Timer Switch」,按 ,進入開啟/ 關閉固定運作頁面
按 調較「On/ Off」
-「On」代表選擇根據已設定之時間運作,主頁面左上角會顯示「T」
-「Off」代表停止根據已設定之時間運作
設定完畢,輕觸 返回上一頁
在主頁面同時長按 及 開啟或關閉固定運作模式

特別提示
‧ 更換微孔霧化片前請先關機及拔除電源線,以免發生意外
將機器置於水平桌面,輕力向上拔起霧化口機蓋,順時針扭動
微孔霧化片以拆除
1
取出替換的微孔霧化片,手指請勿觸碰霧化片芯,以免造成損壞
2
更換微孔霧化片後,蓋上機蓋,再次接駁電源並啟動淨化機以檢
查霧化功能是否正常運作
4
若霧化功能未能正常運作,可能是微孔霧化片套入方向有誤或未
有扭緊,請重複以上步驟,確保已正確安裝
5
操作/模式設定
更換微孔霧化片
5
睡眠模式
‧
‧
‧
於主頁面長按 ,右上角會出現「S」,代表已開啟睡眠模式
睡眠模式開啟後,顯示屏將於30秒後自動熄滅,按 ,顯示屏會再次
亮起,並於30秒後自動熄滅
再次長按 關閉睡眠模式,右上角的「S」會消失,淨化機運作時,顯
示屏將不會熄滅
*注意:睡眠模式轉換需時,請耐心等候數秒
套入替換微孔霧化片時,必須注意霧化片
上 位置,再逆時針扭緊霧化片,直至霧
化片及機身上的三角形標誌對齊即可
3
CLOSE
OPEN
微孔霧化片

安全指引
15°
保養及清潔
產品規格
AD3880
20公分(長)x 9.9公分(闊)x 24.3公分(高)
5伏特(V)
200-1000平方呎
3瓦特(W)
1500毫升
機 型
尺 寸
電 壓
有效範圍
耗電量
最大容量
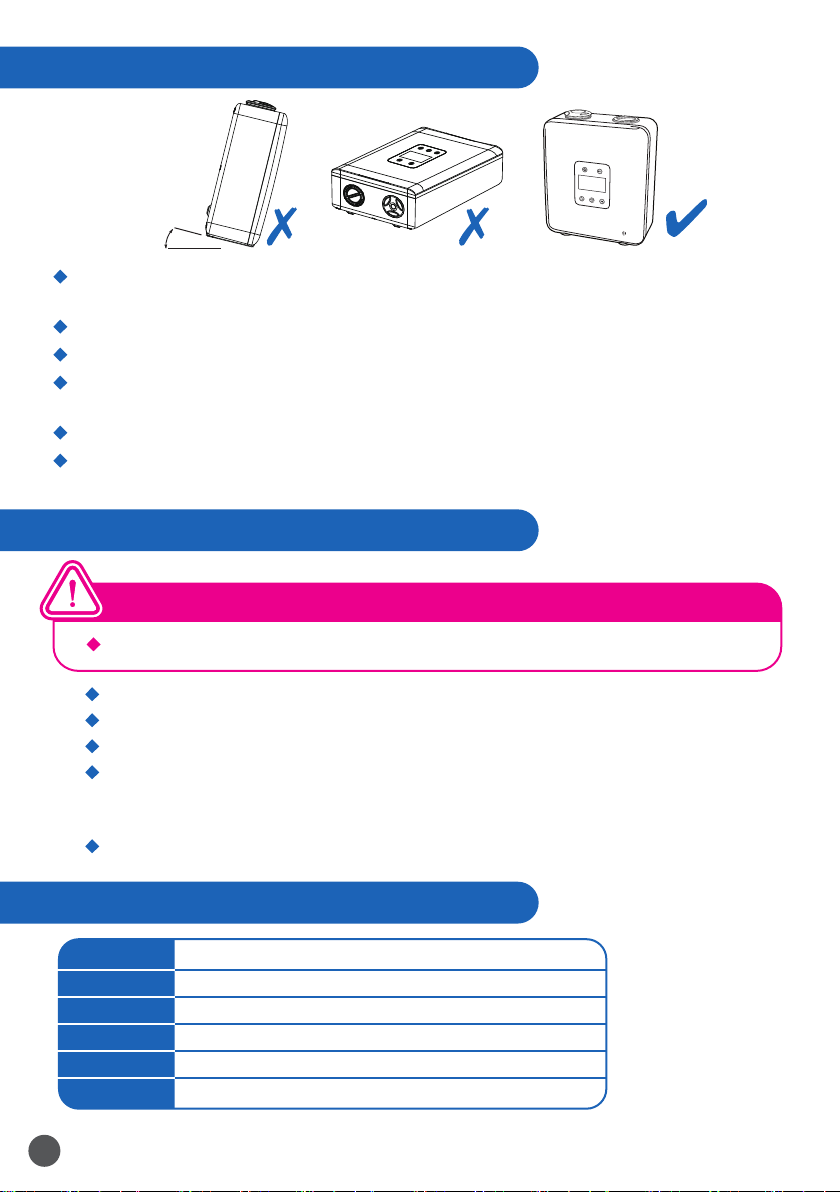
本設備是直立設計,添加補充液後,切勿放在任何傾斜面上操作或者搖晃機身,否則可能會導致液體
滲漏而令機件受損或引起漏電
在移動、清潔、添加補充液或進行任何維修前,請先關機再拔除電源線
本設備是專為AQ配方而設計,切勿注入其他液體,以免機件受損
請使用電源開關鍵操作本設備,切勿以拔出電源線或關閉電源的方式操作,以免損壞淨化機或引致異
常情況
本設備為精密裝置,切勿讓幼童私自操作或視為玩具
如發現滲漏、燒焦味或其他異常情況,必須立即關機和拔除電源線,並立即致電(+852) 3691 9991與客
戶服務中心聯絡,切勿自行拆開機身或進行任何維修
‧
‧
‧
‧
‧
‧
6
特別提示
‧ 清潔淨化機前請先關機及拔除電源線,以免發生意外
‧ 移動本設備時,必須緩慢及切勿傾側,建議先將機內之補充液倒出,避免液體滲漏
‧ 有需要時,可用微濕的毛巾清潔機身表面,再用亁布抹亁
‧ 建議每天用棉花棒沾熱水後輕力清潔微孔霧化片一次
‧ 建議每1至2個月清潔水箱一次。清潔時先把水箱內餘下的補充液倒出裝好,加入約50
至70度熱水至水箱半滿以上,放置15分鐘後倒掉熱水。再次加入熱水,持續噴霧15分鐘
後倒掉。待機身完全冷卻後才添加補充液繼續使用
‧ 切勿以清水沖洗本機或內部機件,以免機件受損

Thank you for choosing AQ.
The AD3880 Air Defender will bring you an unprecedented experience of
“healthy” indoor air quality. The Air Defender is designed to maximize the
effectiveness of AQ Bio Sanitizer to kill germs and viruses in the air. It will also
decompose VOCs and eliminate odor caused by organic contaminants, e.g.
formaldehyde, benzene, cigarette, food, garbage, etc.
The effective area of the equipment is about 200 to 1,000 ft2. The operation can
be customized to suit various indoor environments such as homes, offices,
hospitals, schools, etc.
PLEASE READ THIS MANUAL THOROUGHLY BEFORE USE.
Index
Parts & Components
Get Started
Operation Instructions
- Switching between Spray Mode and Standby Mode
- PauseTime
- Timer
- Date & Clock
- Sleep Mode
Atomization Chip Replacement
Safety Guidelines
Maintenance & Cleaning
Specifications
AQ Product Warranty Terms and Conditions
8
9
10
10
11
11
12
12
13
13
14
14

Parts & Components
Mounting Holes
8Mounting Protectors
Atomizer Nozzle
Atomization Chip
LCD Display Screen
Set Button/ Exit Button
Water Inlet
Up/ Down Button
OK Button
Power Button
Speaker
Power Button: Switch between Spray Mode and
Standby Mode
Set Button/ Exit Button: Long press on the main page to
enter the setting page; or press to exit the current page
Up Button: Perform an upward adjustment on the
setting page
Down Button: Perform a downward adjustment on the
setting page
OK Button: Confirm the current selection and move to
the next item at the setting page
1
2
3
4
5
Button
Introduction
12
345
Power Cord Port

Get Started
9
Caution
‧ Please turn off the device and unplug the power cord before refilling the tank to prevent
electric leakage caused by improper operation.
2
1Always place the device vertically. Twist
counterclockwise to open the cover of the water
inlet. Add 1500ml of AQ Bio Sanitizer and then
tighten the cover by twisting clockwise.
If the water level gets too low, there will be a beep
sound as warning. Please refill the tank immediately
to avoid malfunctioning.
Cover of
Water Inlet
When using for the first time or refilling the tank

Operation Instructions
10
Switching between Spray Mode and Standby Mode
‧
‧
‧
‧
Connect the power cord to turn on the device. The initialization
process will be carried out during the animation. Once completed,the
device will enter the Standby Mode.
Press on the main page to enter Spray Mode.
Atomization will start automatically. The volume of each spraying is
around 0.5ml. The volatilization will be affected by the air humidity and
bacterial count.
The screen will pop-up when pressing during Spray
Mode. Press again to switch to the Standby Mode.
Power
ON OFF
Pause Time (Intermittent Spray Mode)
Set the interval time for each spraying
‧
‧
‧
‧
Long press on the main page and select“1. PauseTime”. Press to
enter the setting page.
Press / to adjust the interval time for each spraying
-“0 Min” represents continuous spraying
-“1 Min” represents spraying every 1 minute
-“2 Min” represents spraying every 2 minutes
-“3 Min” represents spraying every 3 minutes, and so on
The maximum interval time for each spraying is 15 minutes. The Pause Time
will be displayed at the bottom of the main page.
Press to confirm the settings. Press to return to the main page.
Special Reminder
If there is a patient at home, it is recommended setting the Pause Time to “0 Min” to continuously
kill germs and purify the environment. This can also prevent cross-infection and boost up the
immune system to speed up recovery.

Operation Instructions
11
Setting the work cycle
Date & Clock
‧Long press on the main page and select“2. Timer”. Press to enter
the setting page.
Week Setting
‧
‧
‧
Select “1. Week”and press to enter the setting page.
Press / to select Monday to Sunday. Press to switch between
“On”and“Off”
-“On”represents the device will be working on that day
-“Off”represents the device will not be working on that day
Once completed, press to return to the main page.
Daytime Setting
‧
‧
‧
Select“2. Daytime”and press to enter the setting page. Two timeslots can be setup in total.
Press / to set the start time and end time of each timeslot. Press to move to the
next field.
Once completed, press to return to the main page.
‧
‧
Long press on the main page and select“3. Date&Clock”. Press to enter the setting
page.
Press / to set the date, week and time. Press to move to the next field until the
setting is completed.
Timer Switch (Turn on/ off Timer)
‧
‧
‧
‧
Select “3. Timer Switch” and press to enter the setting page.
Press to switch between“On”and“Off”
-“On” represents the device will be operating according to the Timer. A“T”
symbol will be showing at the upper left corner of the main page.
-“Off” represents the device will not be operating according to the Timer.
Once completed, press to return to the main page
Timer can also be turned on/ off by long pressing and at the same time on the main
page.
Timer

12
Operation Instructions
Atomization Chip Replacement
Sleep Mode
‧
‧
‧
Long press on the main page, an“S”symbol will be showing at the
upper right corner, which represents the Sleep Mode is on.
In Sleep Mode, the LCD Display Screen will be dimmed automatically
after 30 seconds. Press , the Screen will light up and be dimmed again
after 30 seconds.
Long press again to turn off the Sleep Mode. The“S”symbol will
disappear, and the Screen will light up when operating.
*Note: It will take a few seconds to turn on/ off the Sleep Mode. Please be patient.
Caution
‧ Please turn off the device and unplug the power cord before replacing the atomization
chip to prevent electric leakage caused by improper operation.
Place the device on a stable position. Pull up the cover of the
atomizer nozzle and twist clockwise to remove the atomization chip.
1
Take out the new atomization chip. Please do not touch the core of
the chip to avoid damages.
2
After replacing the atomization chip, close the cover of the
atomizer nozzle. Connect the power cord again and turn on the
device to check whether the atomization functions normally.
4
If the atomization function does not work properly, please repeat the
above steps to ensure the atomization chip is tightened and
installed in the correct way.
5
When inserting the new atomization chip,
please pay attention to the proper position
of (as shown in the figure), and then tighten
the chip by twisting counterclockwise until
the triangular marks on the chip and device
are aligned.
3
CLOSE
OPEN
Atomization Chip

13
Safety Guidelines
Maintenance & Cleaning
Always place the device vertically. After refilling the tank, do not operate on any inclined surface or shake
the device to avoid liquid leakage. Otherwise, it may damage the device or cause electric leakage.
Before moving, cleaning, refilling the tank or performing any maintenance, please turn off the device and
unplug the power cord.
The device is only designed for AQ Bio Sanitizer. Do not use any other substances to avoid damages.
Always use the Power Button to operate the device. Do not operate by unplugging the power cord or
disconnecting the power supply suddenly to avoid abnormal situation or damage to the device.
This device is a precision device. Children should not operate the device without adult’s supervision.
If any leakage, burning smell or abnormal situation is founded, please turn off the device and unplug the
power cord immediately. Do not disassemble or perform any maintenance on your own. Please contact the
AQ Customer Service Center (+852) 3691 9991 if you need any assistance.
‧
‧
‧
‧
‧
‧
‧
‧
‧
‧
‧
Always slowly move the device and never place it on any inclined surface. It is recommended
removing all liquid in the device to avoid liquid leakage.
Only use a slightly damp towel to clean the surface of the device, and then wipe it with a dry towel.
Slightly clean the atomization chip every day with a cotton stick soaked in hot water.
Clean the water tank every 1 - 2 months. Remove all the liquid in the tank and add hot water
(around 50-70°C) until the tank is half full. Wait for 15 minutes and remove the water. Add the
hot water again and turn on the continuous spray mode for 15 minutes and remove the water.
Please refill the tank by AQ Bio Sanitizer after the device is completely cooled down.
Never rinse the device or internal parts to avoid damages.
‧ Please turn off the device and unplug the power cord before cleaning the device or performing
any maintenance to prevent electric leakage caused by improper operation.
Caution
15°

www.aq-bio.com
(852) 9745 0138
艾橋生物科技製造有限公司
AQ Bio Technology Manufacturing Ltd.
AQ產品保養條款及細則
AQ Product Warranty Terms and Conditions
1.
2.
3.
4.
5.
6.
7.
8.
Customers who have successfully registered this product on AQ official website within 30 days from the purchase date indicated
in the sales receipt can enjoy a one-year maintenance and repair service. The warranty period starts from the purchase date
indicated in the sales receipt.
When customers make any claims under this warranty service, they must provide the original sales receipt (the receipt must
clearly show the date of purchase of the product).
Customers must follow the instructions in the user manual when using the product. The maintenance service is only applicable
to the product damages or malfunctions that have been confirmed to occur under normal situation by AQ. They do not
include accidents, operation mistakes, intentional damages, negligence, unauthorized repairs and maintenance, and/or
malfunction and damage caused by unauthorized modification.
This warranty service is only applicable to products supplied by AQ or its authorized distributors.
If the customers need to use the product maintenance service during the warranty period, please contact the AQ Customer
Service Center and provide the product name, quantity, photo and copy of the sales receipt, otherwise, the application will
not be accepted.
For details, please refer to the "Warranty Registration Terms and Conditions" on the AQ official website.
AQ reserves the right to modify the above terms and conditions at any time without prior notification.
In case of any dispute, AQ reserves the right of final decision.
1.
2.
3.
4.
5.
6.
7.
8.
D2011
顧客於銷售收據所示購買日期起計30日內成功於AQ官方網站為本產品進行網上保養登記,便可享有一年保養維修服
務,此保養期由銷售收據所示之購買日期開始計算。
當顧客根據本保養條款提出任何申索時,必須提供購買產品時之銷售收據正本(收據上需清楚顯示該產品之購
買日期)。
顧客須遵照說明書內指引使用產品,本保養服務只適用於經本公司證實為在正常使用情況下發生之產品損壞或故障,
並不包括由於意外、錯誤操作、故意損壞、疏忽使用、擅自修理或未經授權改裝而導致之故障及毀壞。
本保養服務只適用於由AQ或其授權銷售商所供應之產品。
如顧客於保養期內需要使用產品維修服務,請與AQ客戶服務中心聯絡,並提供需要申請維修服務之產品名稱、數量、
完整照片及銷售收據副本,否則申請將不獲受理。
詳情可瀏覽AQ官方網站之「保養登記條款及細則」。
本公司保留隨時修改上述條款及細則之權利。
如有任何爭議,本公司將保留最終決定權。
Specifications
AD3880
20cm(L) x 9.9cm(W) x 24.3cm(H)
5V
200-1000ft2
3W
1500ml
Model No.
Dimension
Input Voltage
Effective Area
Power
Maximum Capacity
14
Table of contents
Popular Accessories manuals by other brands

Steelcase
Steelcase eno play Installation and operation guide

IFM Electronic
IFM Electronic Efector 200 operating instructions

S+S Regeltechnik
S+S Regeltechnik AERASGARD RFTM-LQ-CO2-Modbus Operating Instructions, Mounting & Installation

Enginko
Enginko MCF-LW12CO2E operating manual

Mr Fothergill's
Mr Fothergill's GROW POD User instructions

SunSetter
SunSetter PRO Replacement manual