Aqua Cooler AC-M8WREBFY User manual

Your Partner in Cool.
Usage and Care
Manual
Models: AC-M8WREBFY
WALL-RECESSED
HYDRATION STATION

32 Your Partner in Cool.
PRODUCT DIAGRAM
IMPORTANT INFORMATION ABOUT GROUNDING
• To provide additional protection from the risk of shock, this unit must always be connected to
a residual-current device (RCD) or a breaker. Use of joint cable should be avoid.
• This appliance must be grounded. Improper use of the grounding plug can result in a risk of
electric shock, causing serious injury and possibly death.
• This appliance is equipped with the power terminal or power cord. A ground connection
must be connected into a properly grounded, polarised outlet.
• Consult a qualied electrician if the grounding instructions are not completely understood, or
if doubt exists as to whether the appliance is properly grounded.
• Do not under any circumstances cut or remove the third (ground) prong from the power cord
plug (if provided). Do not use an adapter plug with this appliance.
INSPECTION
Inspect the cartons and various components for evidence of rough handling and concealed
damage. Damage claims should be led with the carrier.
IMPORTANT SAFETY INSTRUCTION
When using electrical appliances, basic safety precautions should be followed to reduce the risk
of re, electric shock and injury to persons or property. Read all instructions before using any
appliance.
• Keep combustible material such as furniture, bedding, pillows, clothes and/or papers away from
the unit.
• Do not operate this, or any other appliance, with a damaged power cable.
• No other appliance should be connected into the same power supply.
• Do not run the power cable over carpeting or other heat insulators.
• Keep the power cable away from high trafc areas.
• Do not submerge the power cable in water.
• We do not recommend the use of joint cables as they may overheat and increase the risk of re.
• Exercise caution and use reasonable supervision when the appliance is used by or near children.
• Keep a minimum distance on each air-louvre side free.
• Do not use this product to dispense anything other than water.
• This appliance must be installed on an even and at surface or wall.
• If the power cable or terminal is damaged, one of its service agents or a similarly qualied person
must replace it to avoid hazard.
• Switch off the main power source before servicing the appliance.
• Warranty will be voided if installation is not carried out as detailed in this instruction manual.
• The compressor motor is equipped with an automatic reset protector which will disconnect the
motor from the line in case of an overload.

54 Your Partner in Cool.
INSTALLATION
The installation must be in accordance with AS/NZS 3500.1 and AS/NZS 3500.2, as well as the
instructions below. Pipe jointing and installation is a trade skill and Aqua Cooler recommended
this process is performed by qualied personnel only.
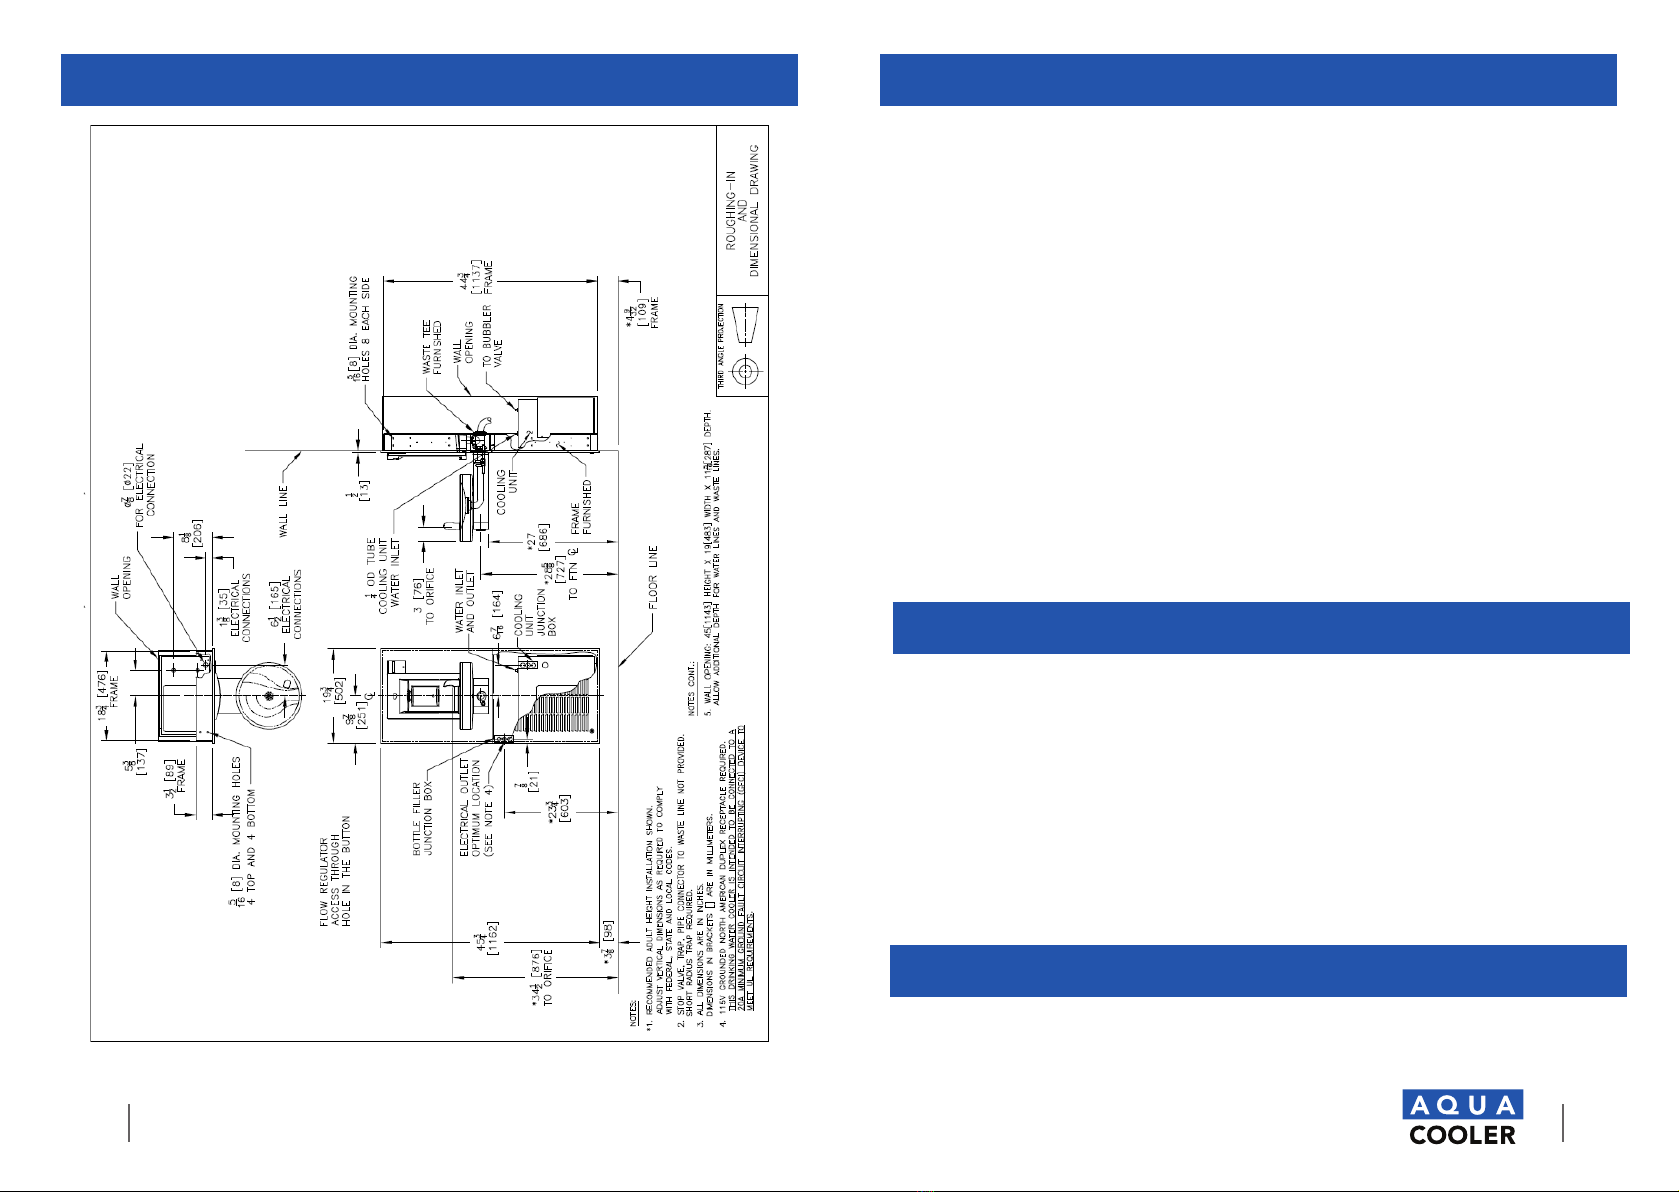
Plumbing rough-in and wall opening should be prepared as shown on Roughing-in drawing. This
drinking water cooler is designed to be operated at a water supply line pressure of up to 100
psi (690 kPa). A pressure regulator must be installed in front of the unit’s water inlet if the water
pressure (including any possible pressure spikes) could exceed 100 psi (690 kPa).
Insert frame assembly into wall opening and secure to studs. NOTE: FRONT FLANGE OF
FRAME(S) MUST BE FLUSH WITH THE FINISHED WALL SURFACE.
Models with cooling unit, attach cradle mounting angles to unit mounting cradle with 4 screws
provided. Slide unit mounting cradle into frame and secure in place with 4 screws, provided.
(Cradle is used only when cooling unit is to be installed.) NOTE: BOTTOM FLANGE ON CRADLE
IS TO BE BEHIND FRAME FRONT FLANGE.
Slide cooling unit onto cradle.
It is recommended that exible conduit be used to supply power to cooling unit (and when
applicable to electronic bottle ller electrical box in frame). Check electric current available. Type
and voltage must be the same as listed on unit data plate. This drinking water cooler is intended
to be connected to a 20A minimum ground fault circuit interrupting (GFCI) device to meet UL
requirements.
Install provided waste tee to bottle ller tailpiece.
Install the fountain mounting plate to the frame assembly using provided screws.
Prior installing upper panel assembly with electronic bottle ller: This is a good time to change
units from gallons (default setting) to liters, if preferred, when program is set as FILTERED unit,
slide switch on back of circuit board to side marked “Liter”. To ease access to the remote toggle
button for programming once the panel assembly and fountain is installed, feed the remote
toggle button through the fountain mounting plate noted in step 6h. After unit is completely
assembled, refer to the “Set-Up Guide for Oasis® Hands-Free Bottle Filler Electronics” item
number 030099-482 to change program settings.
Place upper panel(s) in place on frame top angle and fasten with 2 at head screws, provided, at
the bottom.
Remove bottom plate(s) from fountain arm(s). Save the screws.
Snap reveal gasket(s) over back end(s) of fountain arm(s).
Add compression connector(s), furnished by others, to fountain waste tube(s) and slide back
approximately 3” out of way. Use a 3/8 compression tting for water line connections, provided
by others. An internal strainer is provided for water line connection. For dielectric isolation of
fountain(s) a non-metallic water line connection can be used.
Hang fountain(s) on mounting plate studs. NOTE: AS THE FOUNTAIN IS HUNG, FEED THE
WASTE TUBE INTO THE WASTE STUB ON THE WALL SIDE.
INSTALLATION CONT.
Tighten fountain(s) to mounting plate(s) with the 5/16-18 nuts and washers and the 1/4-20 bolts
and washers provided.
Complete plumbing to fountain(s) and bottle ller. Tighten waste connection(s) and then connect
water supply line(s) with the 3/8 compression tting. When installing split level models, hang
upper fountain rst, then connect water tube assembly provided to its water inlet. Hang lower
fountain next and connect the tube to its water inlet supply line. For combination units with
chillers, hang upper unit rst and connect chiller tube, provided, containing tee to fountain water
inlet tube with compression tting, provided, and then to chiller unit water out tting. Hang lower
unit next and connect long connecting tube, provided, to tee and then to fountain with other
compression tting.
Where applicable, secure bottom panel(s) top edge(s) behind frame middle cross member(s) and
fasten panel(s) at bottom to frame with at head screws, provided.
Slide reveal gasket(s) back into notch between panel and arm. The gasket serves as an appearance
item only (to close up any opening around panel and mounting plate).
Check plumbing connection for leaks. On new plumbing installations, run water through the
bubbler(s) until water taste is satisfactory. Adjust regulator to achieve desired stream height. Add
bottom plate(s) back to fountain arm(s).
MAINTENANCE
The only maintenance required is the removal of dirt and lint from the condenser. Inspection
should be made at 3 mount intervals. Remove the grille and clean the condenser with a vacuum
attachment.
Outside of unit can be wiped clean with mild soap and water mixture. Never use harsh chemicals
or abrasive cleaners, including any chlorine solutions. Rinse thoroughly with clean water, then dry
surfaces.
OVERLOAD PROTECTION
The compressor motor, where used, is equipped with an automatic reset protector which will
disconnect the motor from the line in case of an overload.
LUBRICATION
TThis unit is equipped with a hermetically sealed compressor and requires no additional
lubrication. The fan motor, where used, on this unit seldom needs oiling, but if required, a few
drops of SAE 10 oil should be used.

6Your Partner in Cool.
DISCONTINUED USE
TO DISCONTINUE USE OF WATER COOLER AND WATER FOUNTAIN
1. Drain cooler when removed from service:
2. Remove grille,
3. Close supply valve,
4. Provide container to catch water, and remove drain plug,
5. Remove bubbler
WARRANTY & SERVICE REGISTRATION
For All Aqua Cooler Water Cooler and Fountain Products
Effective July 2017
Aqua Cooler Pty Ltd warrants this appliance to the rst purchaser as follows and subject to the
stated conditions.
12 Month Comprehensive Warranty - Any defect in the appliance occuring within the rst
twelve months from the date of purchase will be rectied free of change by Aqua Cooler Pty Ltd
or by any authorised independent Service Agent.
24 Month Extended Warranty - Aqua Cooler Pty Ltd agrees to replace any part of the
hermetically sealed refrigeration system which becomes inoperative in the two years following
the rst years comprehensive warranty. This extended warranty covers the compressor,
condensor, and interconnecting refrigeration pipework. It excludes compressor relays, overloads
and all other components of this appliance. This extended warranty does not include service,
repair or labour costs or any pickup and/or freight charges. Aqua Cooler at its sole discretion
may replace the cooler with a new or refurbished cooler of a similar age.
Warranty Exclusions
1. Any costs associated with the removal and reinstallation of repaired or replaced units.
2. Travel expenses to locations further than 100km from any Australian Capital City CBD or
further than 100km of a registered Service Agent.
3. Damage to units where mains connected pressure is higher than 700kPa and a pressure
limiting valve is not installed.
4. Where the unit is not installed as per installation instructions found within the supplied user
manual.
5. The warranty does not cover defects occasioned by misuse, alterations, accident or where the
water cooler has been stored on its side.
FOR ANY CLAIMS UNDER THIS WARRANTY PLEASE CONTACT AQUA COOLER PTY LTD
PHONE: +61 (02) 9721 9300 OR EMAIL: support@aquacooler.com.au
Thank you for your custom and we hope our product provides many years of fault free
operation. To enable us to register your warranty and provide the best possible service should a
problem occur, we recommend you ll out the section below and return it to us immediately.
This warranty is provided in addition to other rights and remedies you have under law: Our
goods come with guarentees which cannot be excluded under the Australian Consumer Law.
You are entitled to replacement or refund for a major failure and to compensation for other
reasonably foresseable loss or damage. You are also entitled to have the good repaired or
replaced if the goods fail to be of acceptable quality and the failure does not amount to a major
failure.
Warranty & Service Registration Form
Please ll in this form and mail to us or send via email to support@aquacooler.com.au. If this form is not completed and
returned the warranty period will be deemed to have commenced from date of manufacture.
COMPANY NAME (if applicable):
CONTACT NAME: PHONE NUMBER:
ADDRESS:
SUBURB: POSTCODE:
MODEL NUMBER: SERIAL NUMBER:
PURCHASED FROM:
DATE OF PURCHASE:

Your Partner in Cool.
Phone Numbers
Sales: 1300 278 226
Service: 1800 278 226
Address
U14, 2-12 Knobel Court
Shailer Park QLD 4128
Internet
www.aquacooler.com.au
info@aquacooler.com.au
This document is available digitally on our website at www.aquacooler.com.au/doc/m0002
m0002
Table of contents
Other Aqua Cooler Water System manuals
Popular Water System manuals by other brands

Aquatec
Aquatec Watermaker AC 65 user manual

BWT
BWT Rondomat Duo Series Installation and operating manual

American Granby
American Granby Aquamatics Aquamate instruction manual

GE
GE MERLIN 1255052 Installation and maintenance manual

Spectra Watermakers
Spectra Watermakers Aquifer 200 DC Operation manual

CB Tech
CB Tech WATER GUARDIAN MPADC user guide