ARB Touring Esperance User manual
BR 2021–Rev 1
Congratulations on purchasingyour
ARB TOURING ROOFTOP TENT - the quick and easy way to enjoy camping.
Included in this leaflet is all the information that you require to obtain the maximum enjoyment and benefit from
your rooftop tent. Given proper care your rooftop tent will give you many years of trouble-free camping.
ARB Esperance
Tent

ARB ESPERANCE TENT
•If you have any back, knee or any other health complications,
do NOT attempt to mount the tent on your vehicle.
•Your vehicle MUST have suitable roof bars, a suitable roof rack
or THULE roof racks installed in order to mount this tent.
•If Installing to the ARB Base rack, please make sure to use the correct
bridging brackets to secure this tent to the ARB Base rack.
•The cross bars MUST have a dynamic weight load of at least 75kgs and
MUST be at least 76cm apart.
•Under no circumstance should any flame sources or heating devices be
used inside the tent. When camping, keep all flame source away from the tent
and watch out for any airborne burning embers that may come into contact with
the tent.
Main Accessories
Before commencing installation of the Esperance tent, please make sure it contains the
following accessories.
•One Hard shell tent with the ladder
installed;
•2 xAluminum mounting Rails
(including four M6*40mm bolts and
four self-locking nuts); Installed.
•One tool kit (contains one 13/10mm
spanner, four U-shaped mounting
brackets, eight M8*50mm bolts and
eight nyloc nuts)
•1xStorage bag, 1xShoe Pocket
•1xStorage bag for steel rods
•6xSteel rods for the window awnings and the entrance canopy.
•Repair kit & Cig plug to USB adaptor
Condensation & Weather.
In foul weather it is always recommended to have all the windows done up and awnings
pulled down in strong winds, or in very bad weather you should pack down the tent
completely and seek shelter in a safe area.
In wet weather and humid conditions, you should leave the top of your windows open
slightly to allow air flow, this can assist in reducing condensation inside the tent, keeping
windows and doors slightly open will assist in providing cross flow ventilation and reduce
the ability for water vapor to build up. Condensation occurs when the inside of the tent is
warm and the outside is cold, the temperature variations cause water vapor to form
droplets which will appear on the internal structure of the tent. The tent is not leaking this
is condensation. Keeping windows and doors slightly open will dramatically reduce
condensation and make your time away more enjoyable.
2021 V1 BR
Installation (applicable to separated vertical bars)
The ARB Esperance tent can only be mounted in “Off the side” configuration,
this allows the tent to fold out from the side of the vehicle, the entry point of
the tent will be the RHS of the vehicle (looking from rear). If fitting to an ARB
Baserack, please refer to the fitting instructions included with the Base rack
mounts.
1. Have two people stand at the front of the tent, and two people at the
back.
2. Grab the base panel on the bottom of the tent and lift up to your waist and
then above your shoulders. Make sure the correct lifting techniques and
manually handling are followed, or seek mechanical aids.
3. Gently slide the tent onto your cross bars or mounting area.
4. Make sure the tent is centered on the vehicle, and check clearances for
Awnings and window openings for canopies.
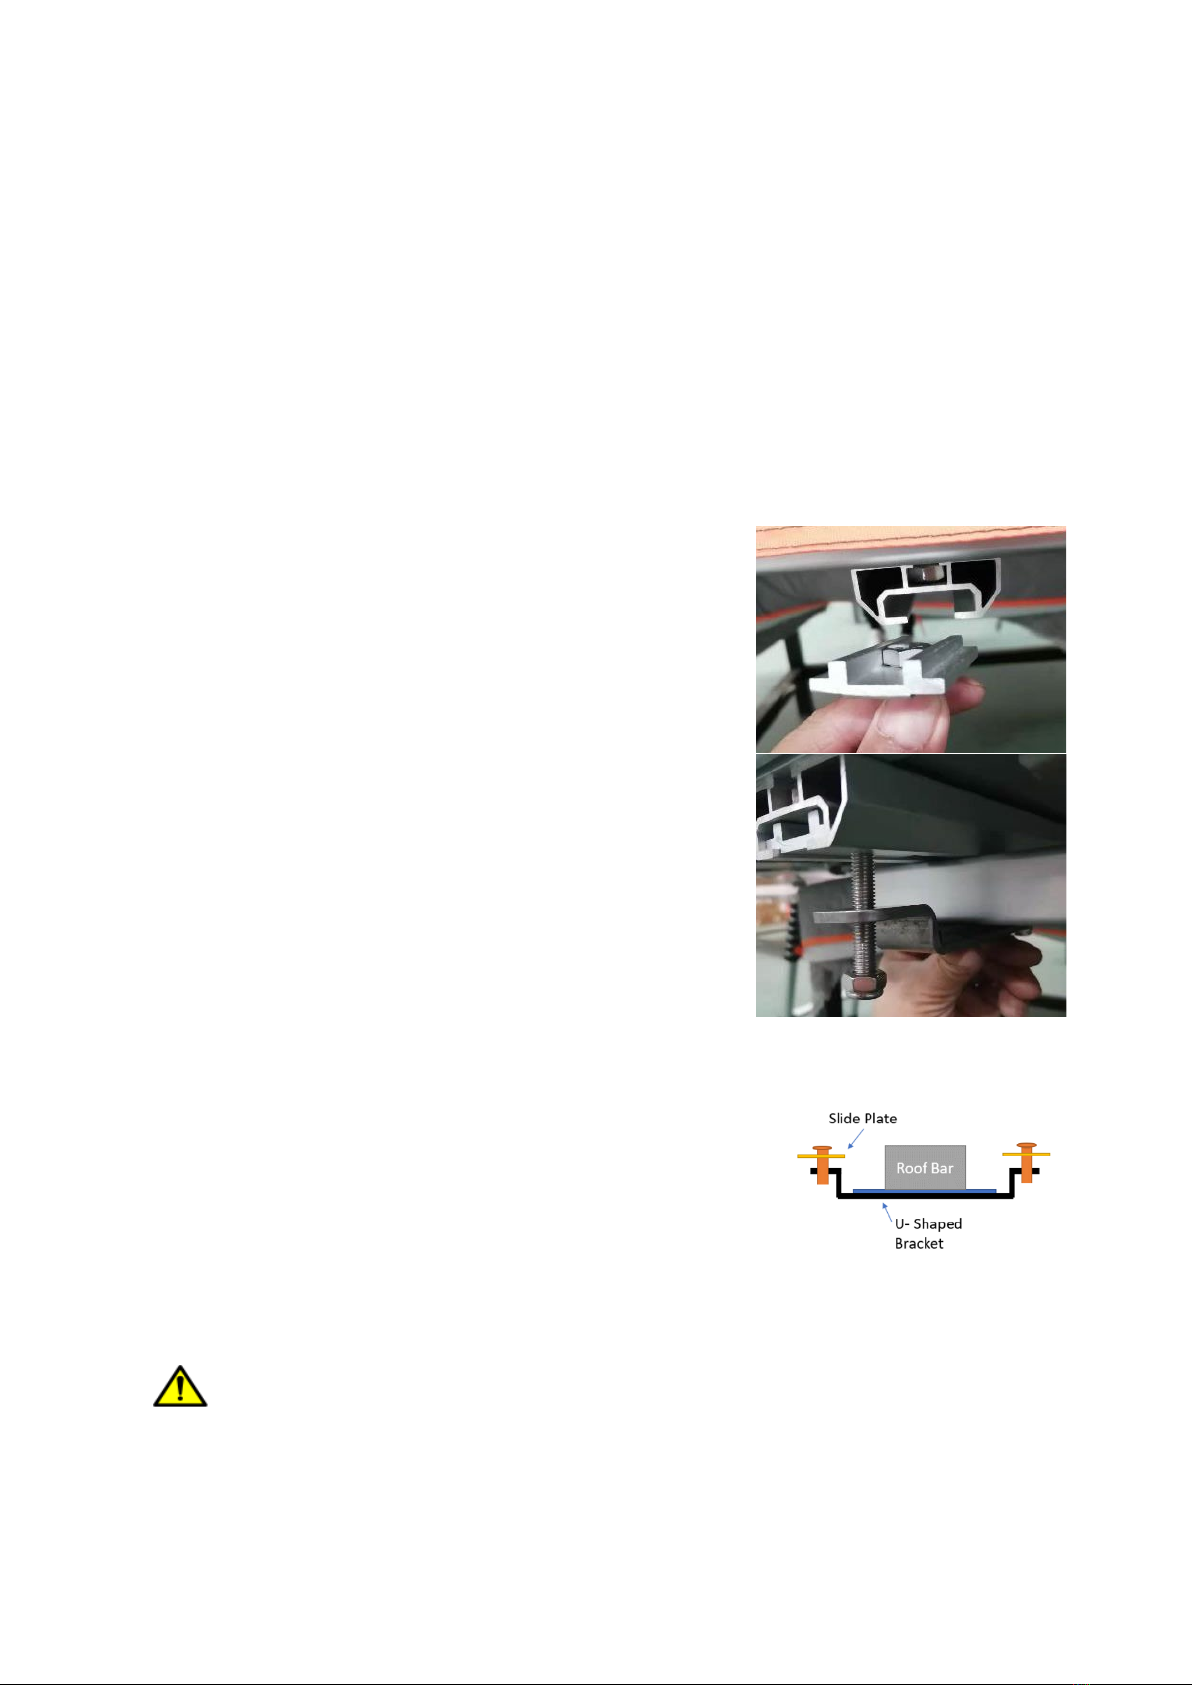
5. Insert bolts through slide plate as pictured,
you will need to set up 8 x plate/bolt
combinations. 2 x plates and 2 x bolts will be
required for each corner of the tent. Slide the
plate (containing the bolt) into the rail under
the tent., A plate/bolt combination should be
positioned on either side of the roof bar that
the tent will be mounted to. Make sure not
to make contact with any paintwork on the
vehicle and check clearances.
6. Have one person lift the tent, while another
person slides the plate/bolt combination past
the roof bar, so that one bolt is on each side
of the roof bar
7. Take the U-shaped bracket and fit it under
your cross bar so that the bolts go through it
or refer to the ARB Base rack fitting
instructions if mounting to an ARB Baserack.
8. Attach one nut on each bolt and tighten them
using the 13mm spanner provided.
a. IMPORTANT: Tighten the bolts
together by alternating between the
two bolts to get an even distribution on
the mounts. Torque setting to be
22nm
9. Repeat 7-9 for the remaining 3 brackets.
IMPORTANT: WHEN MOUNTING THE TENT ON YOUR VEHICLE,
MAKESURE THAT EACH BRACKET IS SECURELY FASTENED.
FAILURE TO DO SO COULD CAUSE DAMAGE, INJURY OR EVEN
DEATH. SEE ABOVE TORQUE SETTINGS
NOTE: check that the tent is securely attached after a short distance
of driving, and thereafter at regular intervals. Tighten the mounting
brackets whenever necessary. Checking and tightening the brackets
is always part of good trip preparation, and will reduce the risk of
damage and injuries.

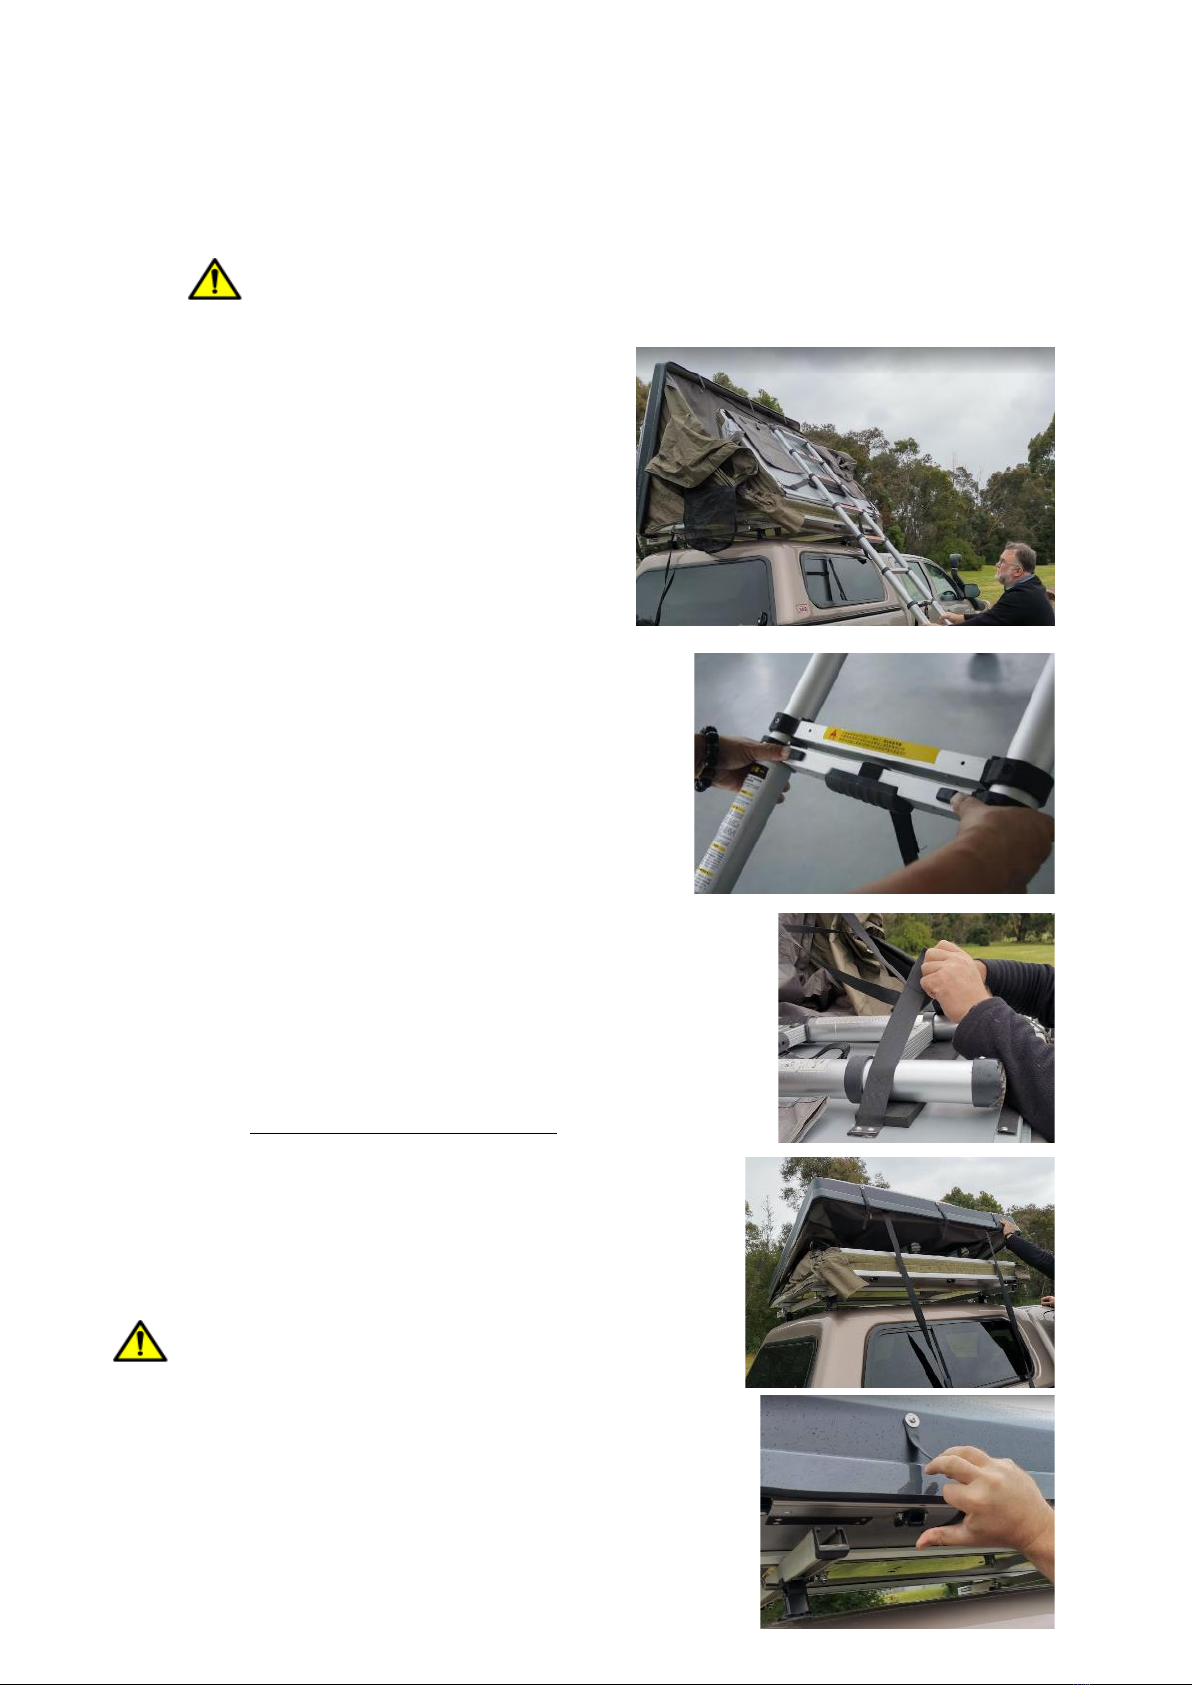
OPENING THE HARD SHELL
1. Unlock the 3 fastening straps as
picture below;
2. With one hand, push up the hard
shell. The gas struts will assist in
opening the shell. You may need to
provide some assistance lifting to
get the struts to commence
opening.
3. Once the top has fully opened,
reach up and undo the strap
securing the ladder.
4. Remove the protection cover off the ladder and fully extend the ladder out
from the vehicle and tent
5. Disconnect the fabric tensioning elastic strap & Pull down on the
ladder, as it acts as a lever and extends the floor.
6. Do not Climb the ladder, See next page on operation of the ladder.
Operation of Ladder
CAUTION: FAILURE TO PROPERLY SECURE THE LADDER COULD
CAUSE SERIOUS INJURY. CAREFULLY READ THE INSTRUCTIONS
BELOW BEFORE ATTEMPTING TO USE THE LADDER.
1. When opening the ladder, extend all rungs and ensure each rung is
locked from the bottom to the top.
2. Make sure the base of the ladder is placed oneven, solid ground.
a. If theterrain does not allow theladder to have a stable, even
base,move your vehicle toanother spot or level the ground. Do
NOT install the ladder on uneven ground, or on rocks, sand, or
mud. Afirm base is recommended.
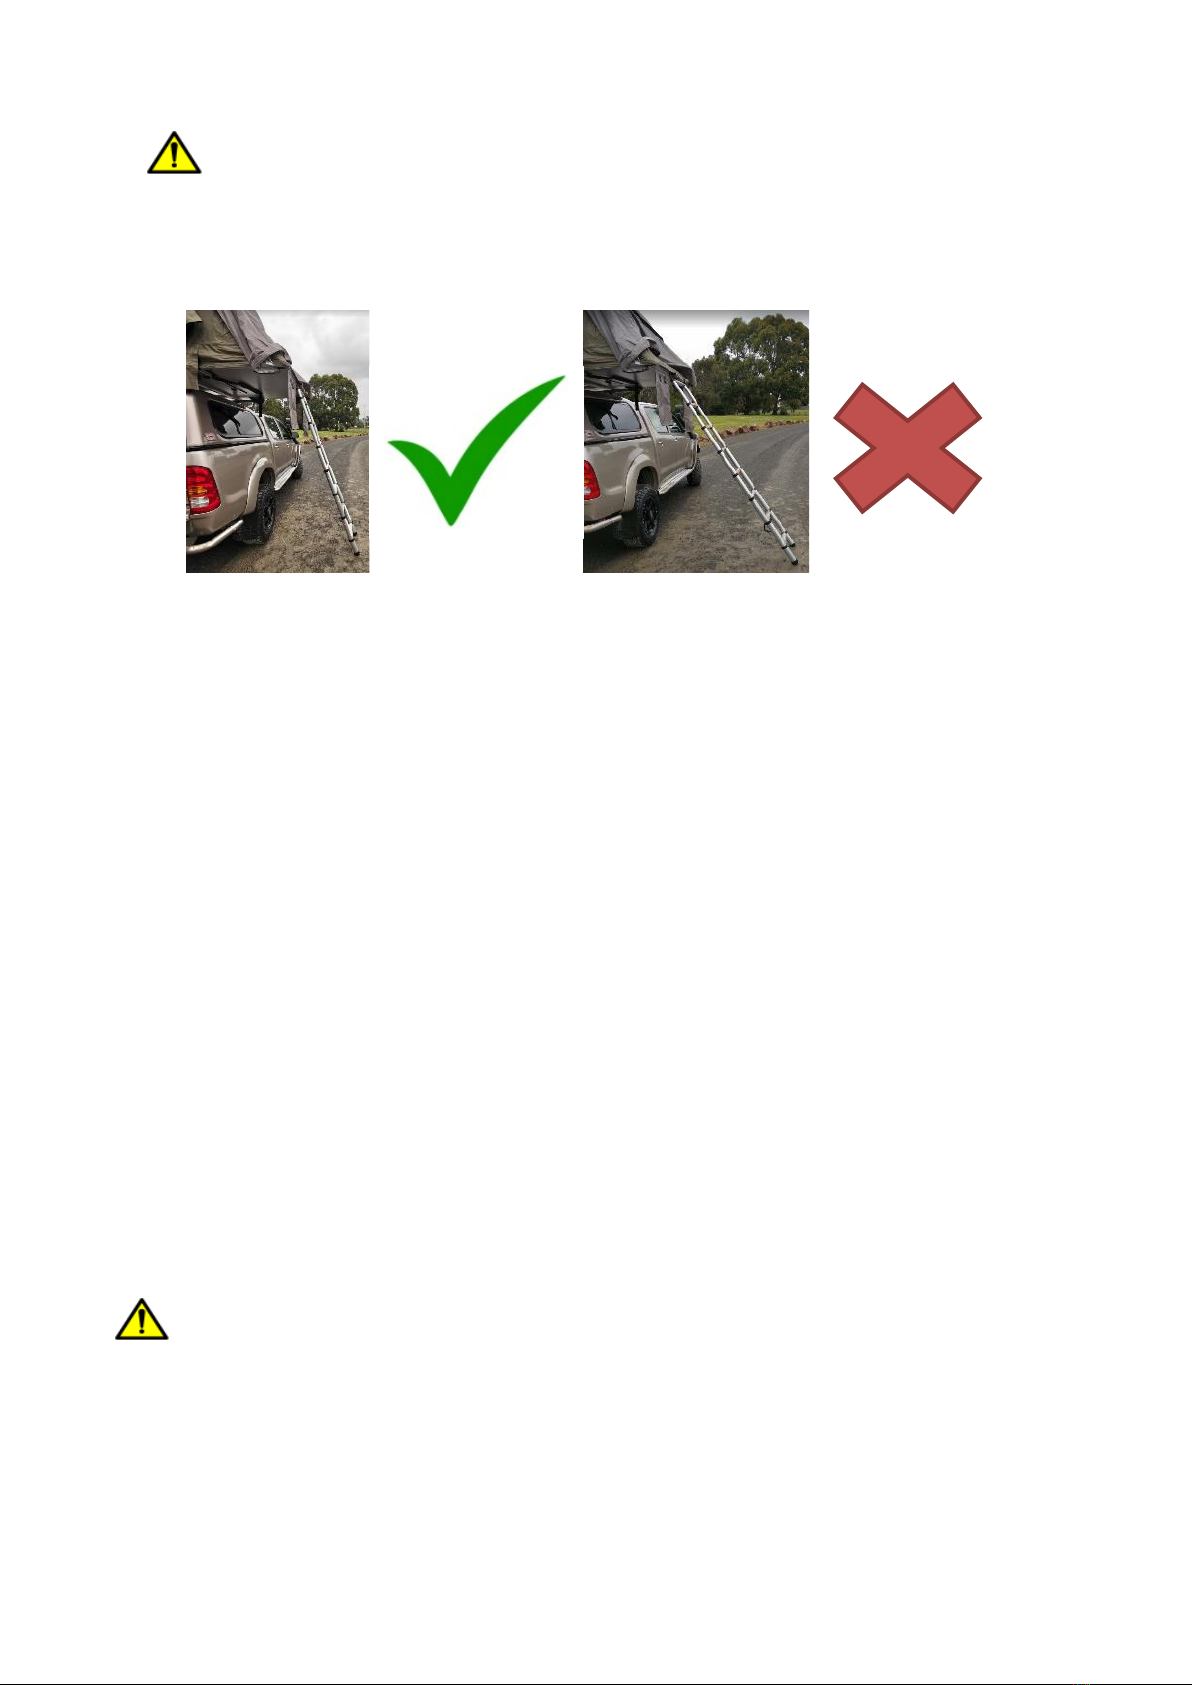
3. Place the ladder atan approximate 70° angle as pictured above,and
make sure it is firmly planted on the ground. If angle is required to be
adjusted see below.
a. The ladder should beable to offer support to the extension
panel and the tent’s occupants. The main panel (floor) and
extension panel (attached toladder) should be horizontal
b. The ladder should NOT beover-extended asit does not offer
enough support,and is should not betoo vertical either.
4. Ladder Angel Adjustment – To achieve the correct ladder angle,
shorten the ladder bydepressing the top locking buttons and collapse
the toprung to shorten theladder. Repeat for further rungs ifrequired.
5. Prior toclimbing the ladder, double check that each rung issecured
and locked into position. Always face the ladder when climbing in and
out of the tent.
Caution - if the ladder is positioned at too great an angle, the support for the
extension panel and the tent will beinsufficient and will cause injury and
damage to you and your property. Refer tothe above image with green
tick.

ERECTING THE CANOPY
1. The entry canopy should be erected using the two spring steel rods
included with your tent.
2. Climb half-way up the ladder, take one rod, and gently insert the straight
end (no hook) into one of the holes located to the left or right of the ladder
attachment point. (Pictured below). The hook at the top end of the rod
should be facing down.
3. Hold the rod with one hand, and with the other, hold the cornerof the
canopy and insert the rod’s hook, facing down, into the metal grommet.
Repeat on other side.
4. Check the ladder is positioned correctly and enter the
Tent,
5. The window awnings can be extended using the remaining
spring steel rods
6. Hinge cover flaps can be secured to the touch tape pads
under the tent base and secure all other loose straps.
7. Repeat the process on the other side of the tent.
8. Using the two aluminum C-Channels included, please
place these in the struts section to lock the tent in case of
bad weather.
Lighting
Attach included cables and pass cable through hinge cover flap on side of tent to outside of tent
and then to a suitable 10amp 12V power plug. Make sure to remove cable and place into pocket
before closing the shell orhinge toreduce pinching or cutting the cable. Before closing the tent
remove cable and store.
CLOSING THE HARD SHELL
WARNING: Before closing the tent, you MUST remove the two C-
Chanel rods on the gas struts.
1. Remove steel rods of canopy & windows, remove
electrical cable and store. – Remove C Channels
2. Using the ladder, push the extension panel
upward and then have the extension panel lay
on the top of the base panel, Bedding may be
required to be pushed to the opposite end of
the shell.
3. Retract the ladder, starting with the bottom
steps. Make sure to press the release buttons
with your thumbs and be careful not to get any
fingers caught between the rungs. Secure the
ladder with the straps provided.
4. Cover the ladder with the ladder cover.
5. Secure the canvas tent body with the elastic fabric
tensioning strap, refer step 5 of opening the shell.
6. Grab the thick black nylon strap attached to the top
of the shell(you may need to use the spring steel
canopy rods to reach the strap). Pull down on the
strap to close the hardshell.
7. As you are closing the tent, you may need to tuck in some
excess fabric.
8. Reconnect the 3 fastening straps that lock the shell to the
base and pull inwards firmly to the vehicle to lock the strap.
9. The fastening straps keep your tent closed. ALWAYS make
sure that the hard shell is completely closed and the
straps are securely fastened before driving. Checking the
straps at regular intervals is also good practice.
10.If you find it difficult to completely close the tent, it may
be due to excess bedding left inside the tent. In this case,
remove some of the bedding and try again.
All technical data and photos are subject to change due to
upgrading without notice.
Note: the recommended speed limit to not
exceed when having the tent on your vehicle is 110kph.
(68 MPh) Driving speed should always be adjusted
according to the current driving conditions, such as road
type and quality, weather (wind conditions, rain), and
applicable state speed limits. Drive slowly on speed
bumps and bumpy roads.

Cautions, Storage and Care guide lines
-Do not use excessive force on 3 fastening straps that lock the shell to base when closing the
tent. These straps are designed only to hold the tent base and shell together, and are not
designed to be used to pull/ratchet the bases together. When you are closing the tent, hold
down the top shell firmly to compact the tent, then use the 3 fastening straps to secure the
bases in this position.
-Do not store the tent wet. If you do have to pack away when the tent is wet, zip close all
canvas doors and windows to protect the inside of the tent, and pack away till weather has
improved. As soon as you can, open the tent and let it dry out thoroughly to prevent mold,
mildew and rot. If the tent is to be closed up for extended periods of time it is very important
that the tent is completely dry. Mold is not covered by warranty if found to be from the tent
being stored or packed up wet or damp. Dry your tent completely before storing.
-Be aware that with a rooftop tent fitted to your vehicle the overall height is increased. You
should measure the overall height of your vehicle with the rooftop tent fitted as you will need
this information to decide if the vehicle can enter carparks etc. This is not covered by
warranty, know your height before moving your vehicle.
-Centre of gravity. The attachment of a rooftop tent to your vehicle (similar to any other load
on your roof rack) will alter its center of gravity. Adjust your driving accordingly.
-In trip inspections. Regularly check that all nuts and bolts attaching your rooftop tent to the
roof of your vehicle are tight and in good repair. Check the ladder is securely fastened and
locking strap is applied and in good working order.
Warranty Terms and Conditions
The ARB Touring Rooftop Tent comes with a 3-year (36 month) warranty, effective from the
date of purchase.
The warranty covers all aspects of workmanship, finish and fabric.
Our goods come with guarantees that cannot be excluded under the Australian Consumer
Law. You are entitled to a replacement or refund for a major failure and compensation for any
other reasonably foreseeable loss or damage. You are also entitled to have the goods
repaired or replaced if the goods fail to be of acceptable quality and the failure does not
amount to a major failure. If this product requires warranty, please return to your closest ARB
store accompanied with your receipt of purchase and batch code number located on the
internal pole of the tent.
Warranty period of 3 years from Date of purchase applies to this product.
ARB Corporation Limited Ph: +61 3 9761 6622
www.arb.com.au
Table of contents
Other ARB Touring Tent manuals


Popular Tent manuals by other brands

Ohenry Productions
Ohenry Productions Premium 10x40 quick start guide

skandika outdoor
skandika outdoor FRONTIER Assembly instructions

sotecc
sotecc canopy flash User's manual & installation instructions

Texsport
Texsport Authentic Adventure Gear 01250 instructions

Dometic
Dometic Mobil AIR PRO 361/391 Installation and operating manual

Ohenry Productions
Ohenry Productions Premium 15x40 quick start guide


