arbane APG SPOT 2.6 User manual

SPOT 2.6
User manual
User manual - SPOT 2.6 User manual - SPOT 2.6
06/2022 06/2022DOP_1590_A DOP_1590_A2 3
General information
SPOT 2.6 - User manual
06/2022 - EN
APG France (Active Audio / Arbane Groupe)
8 Rue Johannes Gutenberg - 44340 Bouguenais- France
Tél : 02.40.46.66.64
www.apg.audio/en
1. Remarques de sécurité et informations générales 5
2. Enceinte passive SPOT 2.6 7
2.1 Description du produit 7
2.2 Connexions 8
2.3 Amplificateurs 9
2.4 Rotation du pavillon 10
2.5 Exemples de configurations 11
2.6 Rigging 14
2.7 Maintenance - Pièces détachées 19
2.8 Spécifications techniques 20
User manual - SPOT 2.6 User manual - SPOT 2.6
06/2022 06/2022DOP_1590_A DOP_1590_A4 5
1. Safety note and general information
• Information on the risk of exposure to high sound level
• APG loudspeakers are liable to generate levels of sound pressure hazardous to health, which may
cause hearing impairment. It is recommended that you never stand in the immediate vicinity of the
loudspeakers in operation and wear hearing protection when necessary. Observe the maximum
exposure time to noise according to the noise level and the regulations in force in your country.
Pay attention to the hearing protection of listeners when using APG systems.
• Read this manual before use and keep it.
• Read all documents relating to the product to be used before setting up and using it. Please
contact APG with any questions relating to the product.
• Obtain the latest version of the user manual from the APG website: www.apg.audio .
• Consider all warnings and follow the instructions and recommendations for use.
• Make sure you know the safety rules for hanging, stacking or setting up on a pole or tripod. Failure
to follow these rules may expose people to potential injury or death.
• Ensure the safety of operators and spectators.
• Staff must wear personal protective equipment (PPE) during each step of installing the product
(helmet, gloves, safety shoes at a minimum).
• Installation of APG products should only be carried out by qualified staff trained in rigging
techniques and aware of the safety recommendations set out in this manual.
• Always check the stability, resistance to weight, flatness and horizontality of the support. Prevent
access to the spectators around the system, prevent it being possible to push or climb the stack
of speakers. Use straps to prevent tipping.
• Do not store the product on an unstable cart, stand, tripod, bracket or table.
• Use the products with the specified accessories by the manufacturer.
• Inspect lifting products and accessories before each use.
• Do not install equipment that is faulty or presents a risk of breakage and have it repaired by
qualified personnel or by APG.
• Entrust all repairs to qualified staff or by APG. Repairs are mandatory if the device is damaged in
any way, for example: damaged power cord or plug, spilled liquid or object dropped inside the
device, exposure of the device rain or moisture for long periods of time, appliance that does not
operate normally or that has been dropped.
• Any unauthorized maintenance operation will void the product warranty.
• Perform safety and compliance checks of accessories, enclosures, and third-party accessories
periodically at least once a year.
• Respect the maximum load capacity of each configuration and carry out conformity simulations
using the tools APG Tools, APG Uniline Aiming Tool, AFMG EASE Focus 3.
• Use only with a cart, tripod, bracket, or table specified by the manufacturer, or sold with the
apparatus. If a cart is used, move the cart-apparatus combination carefully so as not to tip it over,
which could cause personal injury.
• Do not install near a heat source such as an open flame, radiator, heat register, stove or any other
device that produces heat (including amplifiers).
• Do not expose the product to extreme conditions such as humidity (rain, sea water, condensation,
ambient humidity, etc.), excessive heat (sun, heating, etc.) over a long period.
• Take into account the effects of the wind. Flying loudspeakers overhead at wind forces higher
than, 16 mph (25km/h) is not recommended. If the wind force exceeds 46 mph (72km/h):
- Make sure that no person remains in the vicinity of the loudspeaker array.
- Lower and secure the array.
• During an outdoor performance, it is advisable to find out about the weather conditions and
to follow the local weather report and the recommendations of the competent authorities. An
anemometer can be used at the top of the system.
User manual - SPOT 2.6 User manual - SPOT 2.6
06/2022 06/2022DOP_1590_A DOP_1590_A6 7
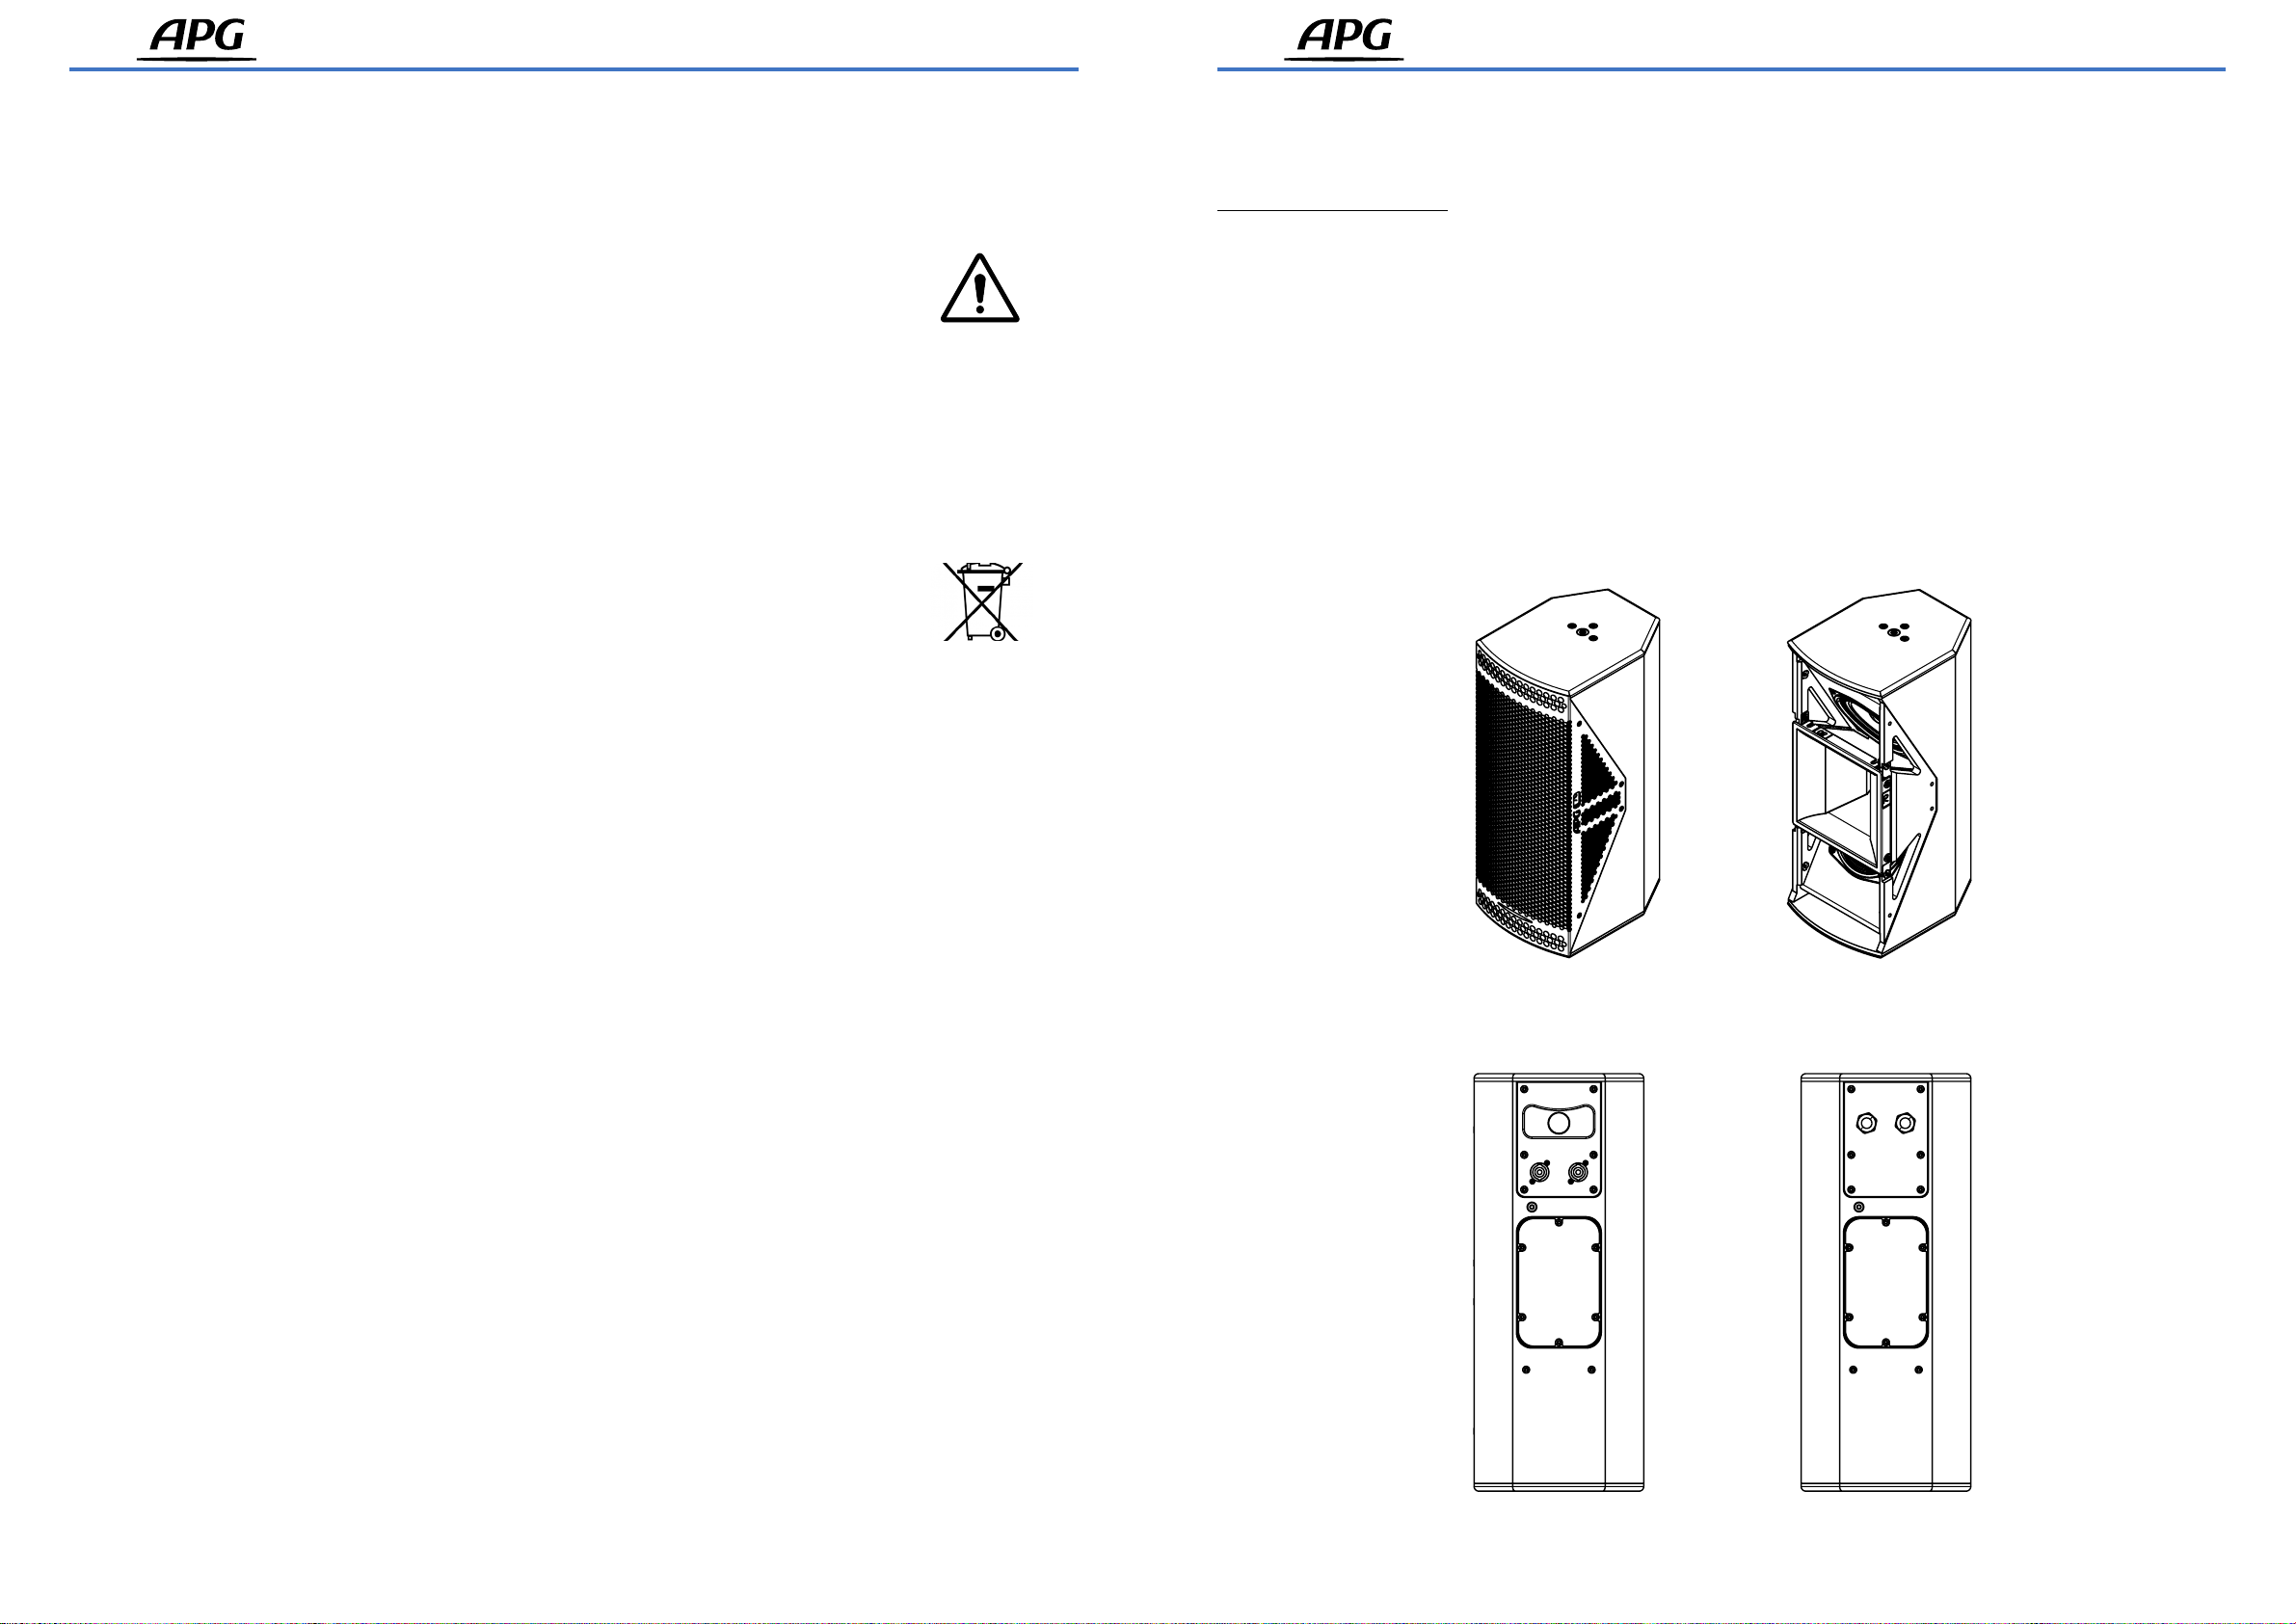
2. Passive loudspeaker SPOT 2.6
2.1 Product description
SPOT 2.6 is a passive full-range loudspeaker equipped with 2x6.5’’ speakers and a compression driver loaded by a 70° x
50° constant directivity horn. SPOT 2.6 offers perfect directivity control over a wide frequency range thanks to the 2 low-mid
transducers d’Appolito mounting and the use of a rotating horn for the high frequencies. It has been designed to work with
APG subwoofers thus providing powerful and precise systems while being particularly compact.
SPOT 2.6 can be powered by Canali or DA amplifiers. Dedicated presets for ArmoniaPlus and APG Live Manager softwares
make the performances easy to achieve. They also include powerful and musical protection parameters.
A wide range of optional accessories accompanies the SPOT 2.6: base for stands, U brackets for horizontal and vertical
mounting, link plates for clusters building (2 or 3 loudspeakers). SPOT 2.6 is available in 4 Ohm (SPOT2.6/4) and 16 Ohm
(SPOT 2.6/16) versions. An optional external 200W transformer allows SPOT to be connected to 100V line set up.
SPOT 2.6-i is the reference for installation version (figure 2) and also available only in 16 ohm , with the only difference being
the absence of the handle at the rear of the enclosure.
Figure 2 :
Installation version
Figure 1 : Touring
version
• Use a secondary safety system for any APG speaker rigging.
• The product is intended for be used by professionals trained in professional audio work.
• APG declines all responsibility in the event of the use of non-validated accessories or non-
compliance with safety instructions and rules.
• APG products are guaranteed for 5 years. The full five-year warranty covers filters and transducers
against manufacturing defects under normal product use.
• APG pursues a research and development policy aimed at improving its products. For this reason,
new materials, manufacturing methods and changes in principle may be introduced without prior
warning. As a result, an APG product may differ in some aspects from its published description,
however, unless otherwise indicated, its characteristics will be greater than or equal to those
published.
• Disposal of electrical or electronic equipment
• This symbol on the product or on its packaging indicates that it will not be treated as household
waste. Instead it will be delivered to the applicable collection point for the recycling of electrical
and electronic equipment. By ensuring recycling, you will help prevent potential consequences
for the environment and human health. Recycling of materials will help conserve natural resources.
For more detailed information on recycling this product, please contact your local office, waste
collection agency or dealer.

User manual - SPOT 2.6 User manual - SPOT 2.6
06/2022 06/2022DOP_1590_A DOP_1590_A8 9
The rear panel of the SPOT 2.6 Touring is equipped with two NL4 connectors unlike the SPOT 2.6 Installation which is
equipped with cable gland connectors. The four pins of the two connectors are connected in parallel. The speakers occupy
points 1+/1-.
The IN connector is used to receive the audio signal. The LINK connector allows to redistribute it to another SPOT 2.6
connected in parallel.
SPOT 2.6 wiring in the table below :
NL4 / Gland connector 1+ 1- 2+ 2-
Rear panel connector Hot (+) Cold (-) THRU THRU
IN LINK
Wiring
1+ Hot 2+ THRU
1- Cold 2- THRU
2.2 Connections
APG speakers must be powered by APG or Powersoft amplifiers with the corresponding speaker preset. Failure to heed
this warning may cause damage to speaker components and the user experience will not be optimal. Refer to the amplifier
manual fot its connection to the speakers.
DA8 DA12
SPOT 2.6 Touring / 4 ohms 8 8
SPOT 2.6 Touring / 16 ohms 8 16
SPOT 2.6 Installation / 16 ohms 8 16
In order to maintain sound quality, the wiring will be carried out with flexible deoxyged-copper speaker cable with a minimum
2.5mm2 section for lengths of up to 70m maximum for one speaker per channel.
Section recommandé [mm2] Longueur maximum recommandé [m]
SPOT 2.6 Touring / 4 ohms 2.5mm215m
SPOT 2.6 Touring / 4 ohms x 2 2.5mm25m
SPOT 2.6 Touring / 16 ohms 2.5mm270m
SPOT 2.6 Touring / 16 ohms x 2 2.5mm235m
SPOT 2.6 Installation / 16 ohms 2.5mm270m
SPOT 2.6 Installation / 16 ohms x 2 2.5mm235m
Table : Wiring of loudspeakers /
amplifiers
Table : Recommended cable section & length depending
on the configuration
2.3 Amplifiers
IN LINK
Touring version Installation version
User manual - SPOT 2.6 User manual - SPOT 2.6
06/2022 06/2022DOP_1590_A DOP_1590_A10 11
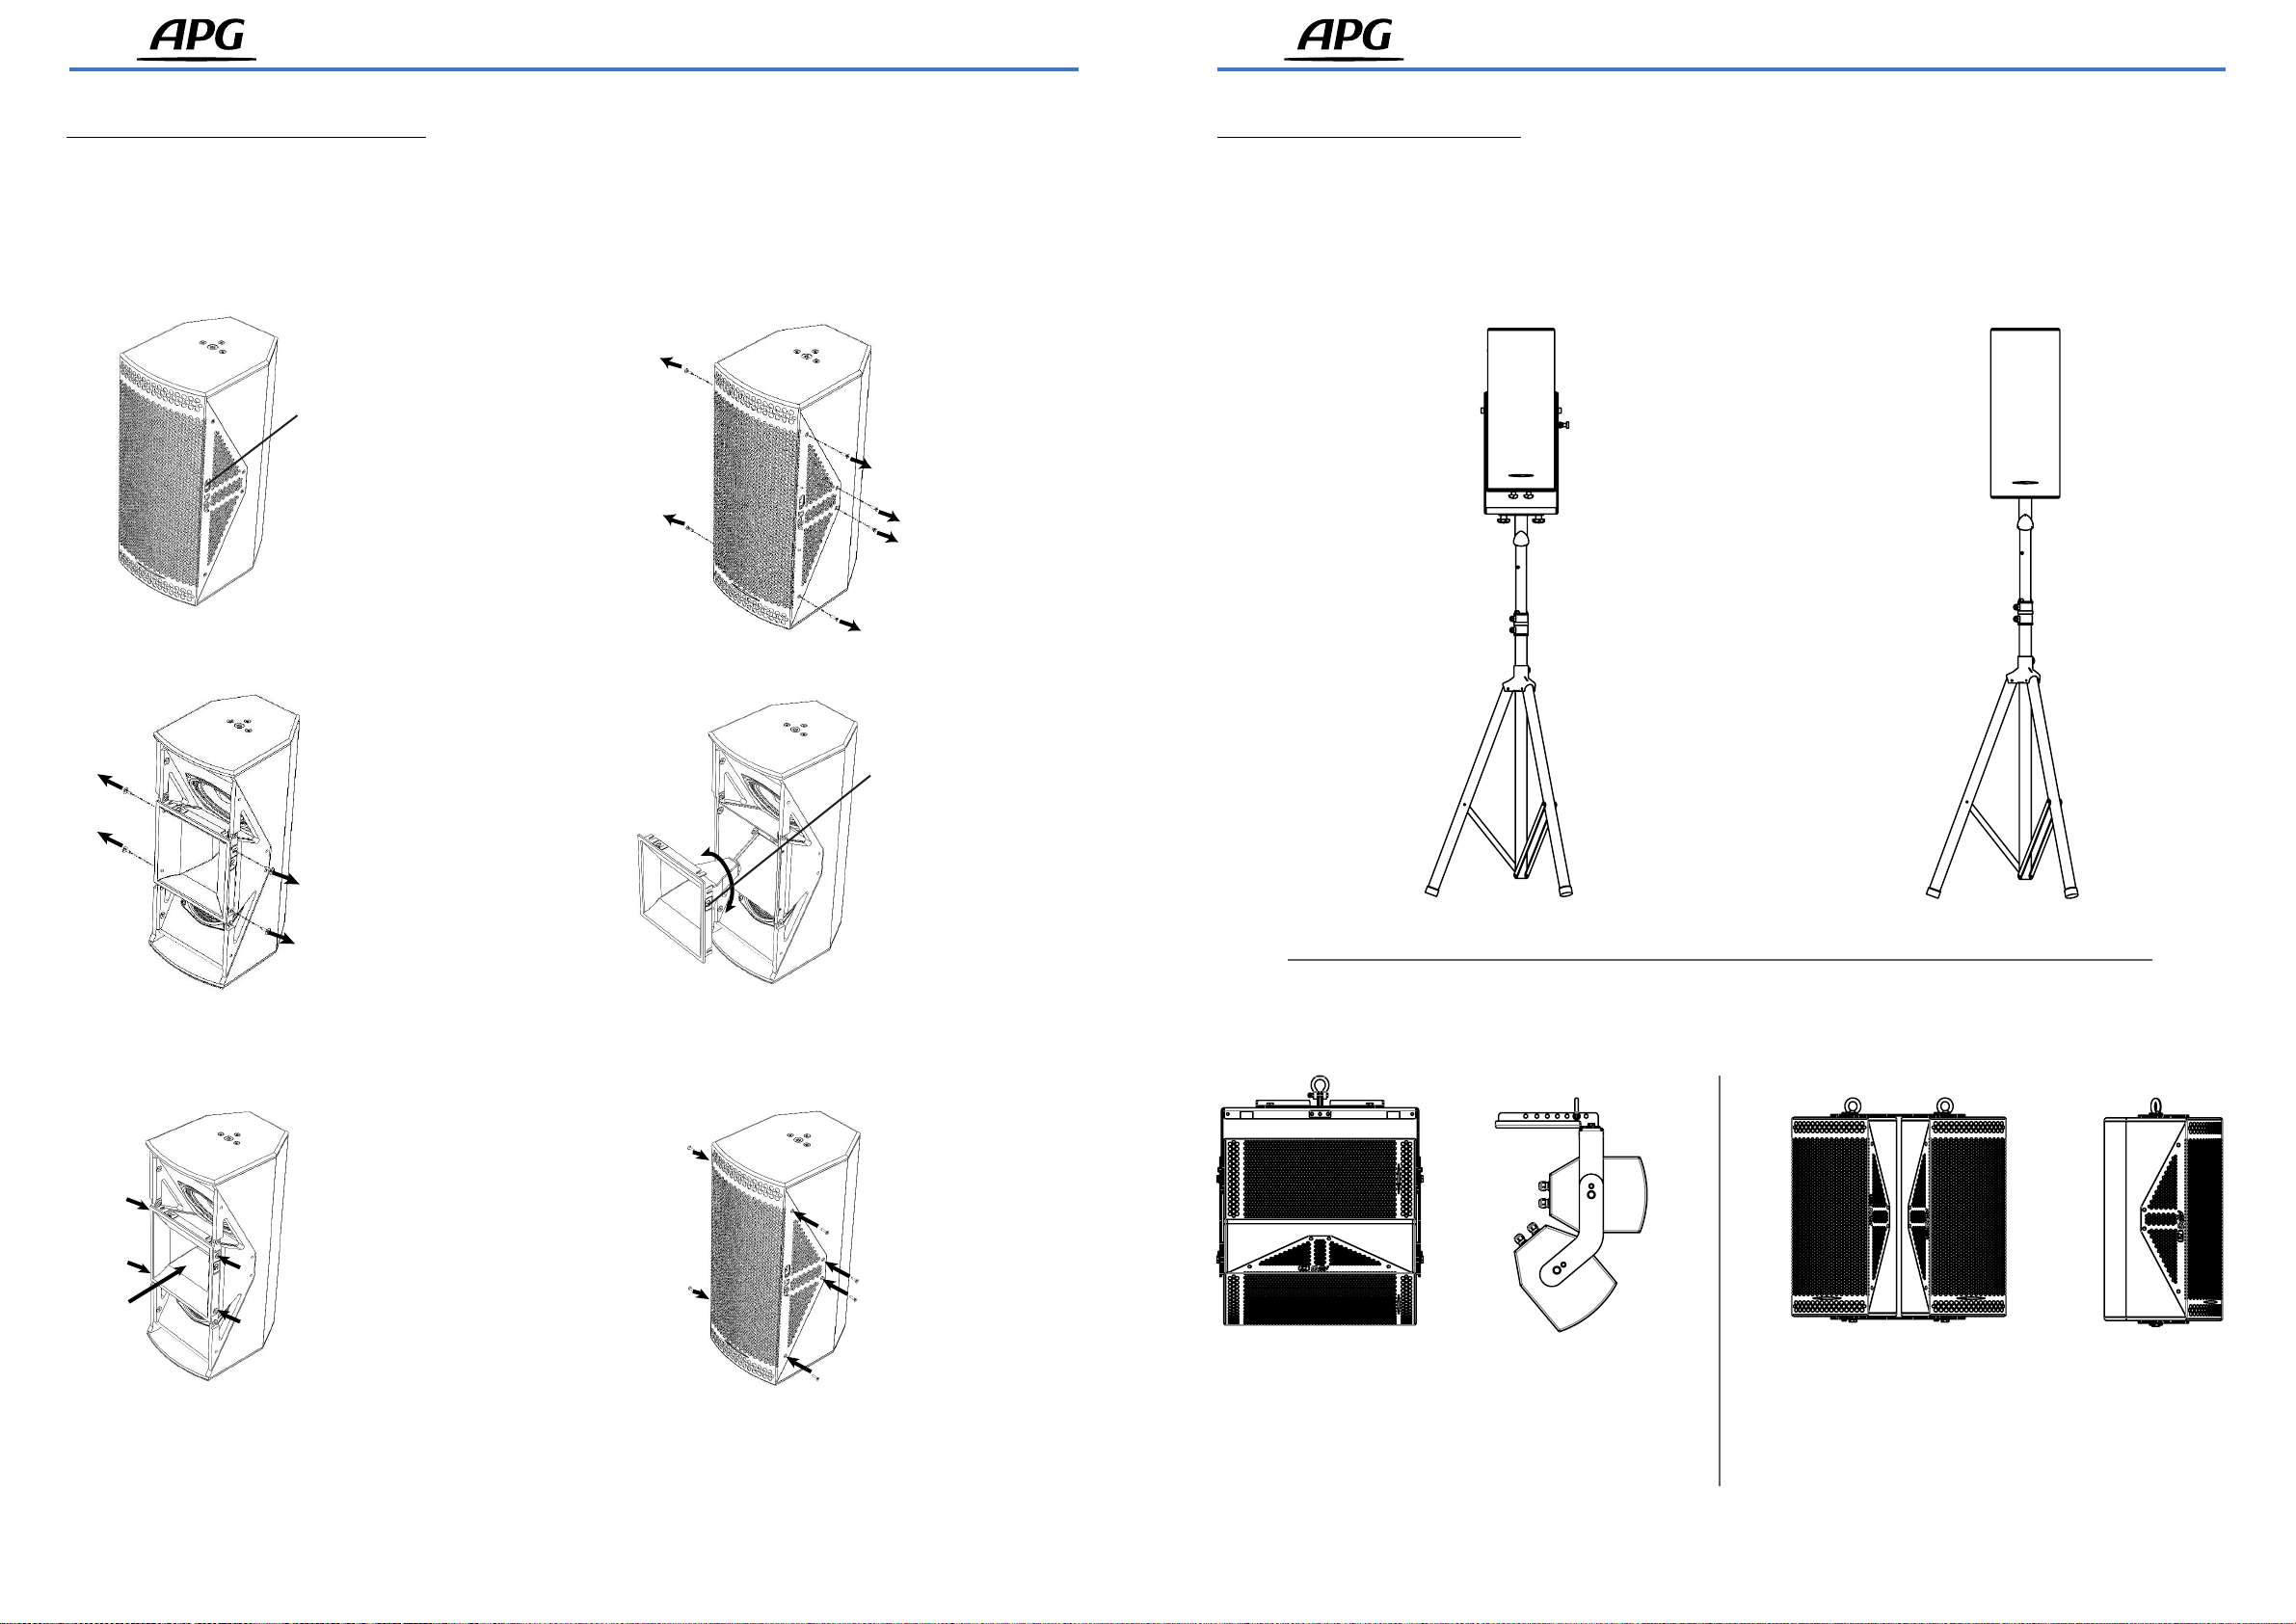
2.5 Examples of configurations2.4 Constant directivity horn rotation
With SPOT 2.6 you can choose the directivity.
Thanks to the assembly/disassembly of the horn, the directivity can be 50° or 70° by following the steps below.
Here the value of
the angle is 70°
(inscription on the
side)
Rotate the horn to
have the value 50°
on the side.
1. 2.
3.
5.
4.
6.
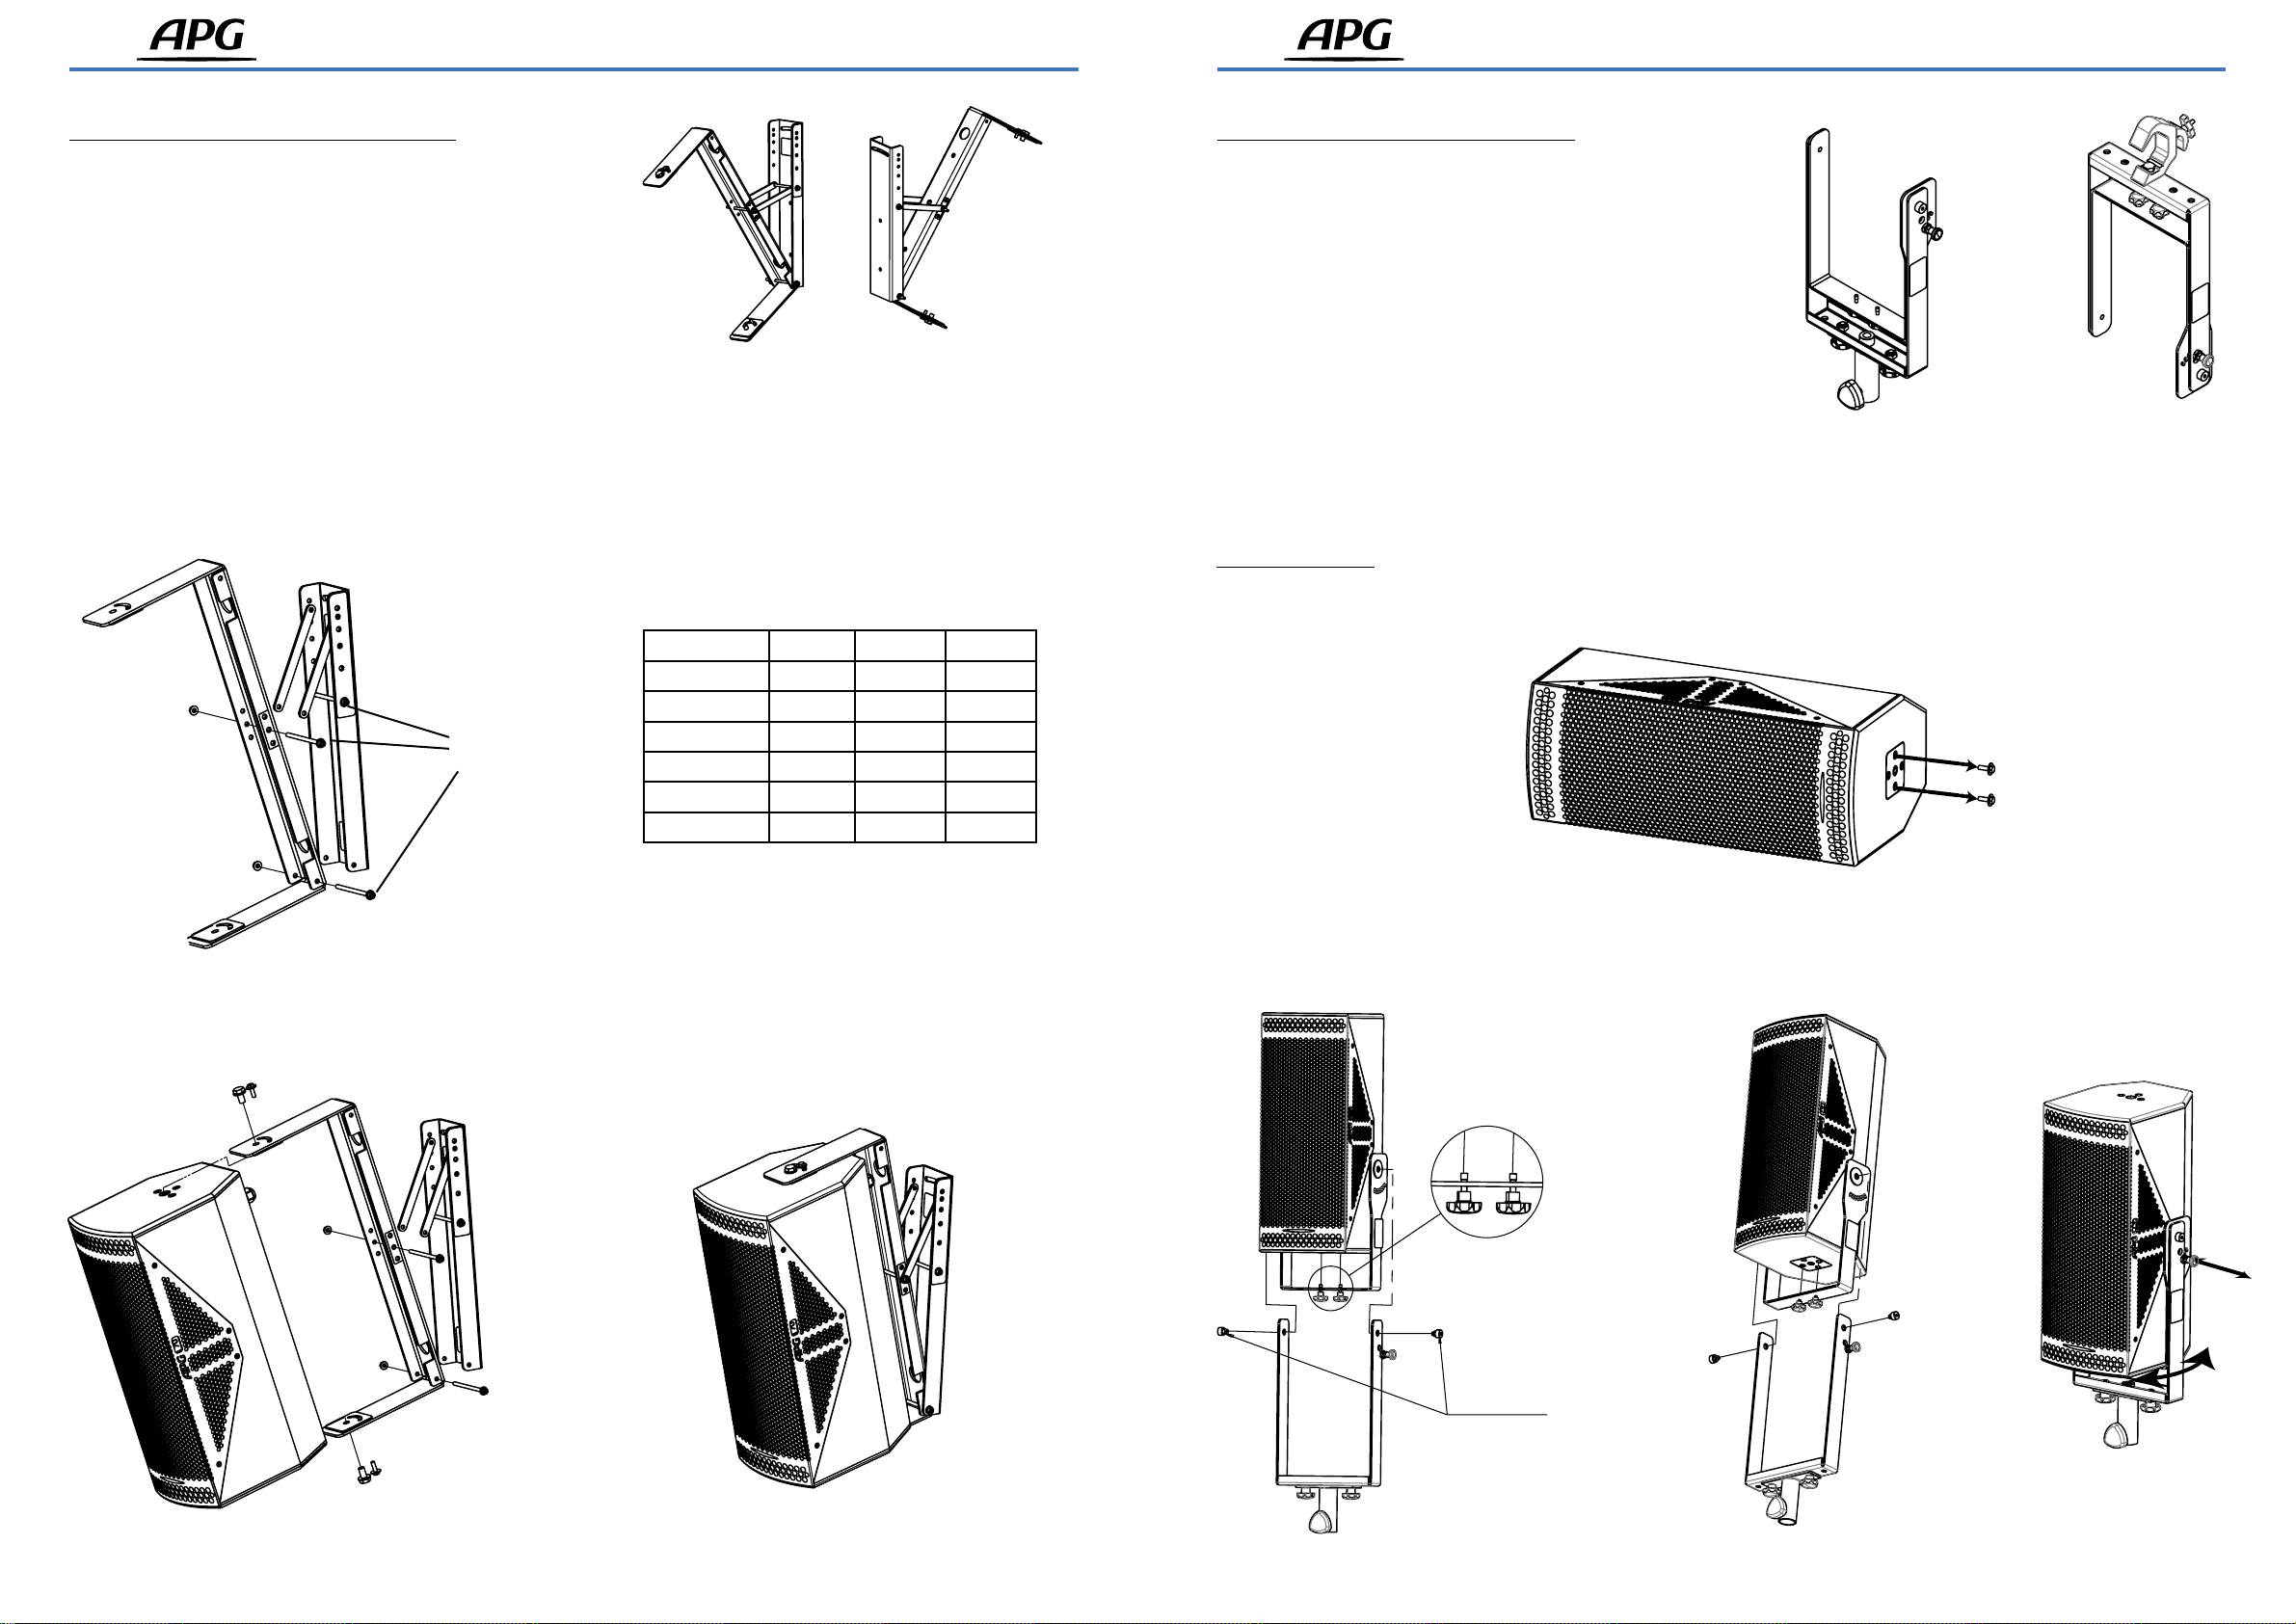
Use on a stand is possible with and/or without bracket :
- With SPOT2.6BV bracket : use K&M 24281 adapter
(see page 15)
- Without bracket : use K&M 24521 M10 to 35mm
adapter
Use in horizontal and/or vertical cluster configuration
Horizontal cluster Vertical cluster

User manual - SPOT 2.6 User manual - SPOT 2.6
06/2022 06/2022DOP_1590_A DOP_1590_A12 13
1. Position the enclosure then remove the bottom and top screws as shown in the diagram below.
2. Approach the fixing bracket on one of the sides of the enclosure then fix it using screws and M6x20 and M10x20 washers
provided for this purpose.
M6 x 20
M10 x 20
Horizontal mounting bracket SPOT2.6BH
The SPOT 2.6 can be installed horizontally using the
SPOT2.6BH mounting bracket.
2.6 Rigging
Horizontal mounting
bracket SPOT2.6BH
2 x iS115
2 x SPOT 2.6
1 x DA12
2 x UC118i
2 x SPOT 2.6
1 x DA12
User manual - SPOT 2.6 User manual - SPOT 2.6
06/2022 06/2022DOP_1590_A DOP_1590_A14 15
Angle part for wall bracket SPOT2.6BVAP
A wall angle piece is also available with the SPOT 2.6.
Compatible with the SPOT2.6BH bracket, this part allows the
speaker to be positioned at several inclinations.
1. Assembly he SPOT2.6BH bracket to the wall mounting piece using the M6x100 screws with nut and washers. Choose the
desired angle using the reference marks and the table below.
2. Fix the loudspeaker at SPOT2.6BH.
M6x 100
A B A
1- 10° -
25° 15° 5°
3- 20° -
4- 25° -
5- 30° -
6- 35° -
SPOT2.6BH horizontal bracket with
SPOT2.6BVAP
Vertical mounting bracket SPOT2.6BV
The SPOT 2.6 can be positioned vertically thanks to a
U-shaped bracket fixed to the enclosure and a mobile bracket
with angular adjustment via the indexing pin. Both for use on
a stand thanks to the K&M 24281 adapter, and for suspended
use with a fixing hook.
For standing use
1. Position the enclosure then remove the bottom screws as shown in the diagram below.
2. Attach the U-shaped bracket to the bottom of the enclosure using the M6 knobs, assemble the mobile bracket to it from
below with the pins and the indexing finger then attach the K&M 24281 adapter to the using two M10 joysticks.
Choose the desired angle using the index finger (5° ).
Position for standing
use
Position for
suspended use
1. Unscrew the
pins and pull the
index finger to
move the mobile
bracket.
2. Captive knobs: Unscrew
completely from the speaker
until the knobs are «trapped»
in the bracket.

User manual - SPOT 2.6 User manual - SPOT 2.6
06/2022 06/2022DOP_1590_A DOP_1590_A16 17
For suspended use
1. Same step as for the stand use, except that the mobile bracket must be assembled from the top and the fixing hook must
be attached. Select the desired angle with the index finger (5° notch).
1. Unscrew the
pins and pull
the index finger
to move the
mobile bracket.
2. Captive knobs:
Unscrew completely
from the speaker
until the knobs are
«trapped» in the
bracket.
REPERE REFERENCE DESIGNATION
1 PRS_1216 Black steel SPOT 2.6
2 PRS_1217 White steel SPOT 2.6
3 PRS_1218 HP PST_1742 complet
4 PRS_1219 Recone kit for PST_1742
5 PRS_1220 Diaphragme 1.75 pouce 16 ohms
6 PRIS_1221 Constant directivity horn PST_2135
2.7 Maintenance - Spare parts
SPOT 2.6 loudspeaker
12
3
6
5
4
Arbane Groupe
8 Rue Johannes Gutenberg - 44340 Bouguenais- France
Tél : 02.40.46.66.64
www.apg.audio
User manual - SPOT 2.6
06/2022DOP_1590_A 18
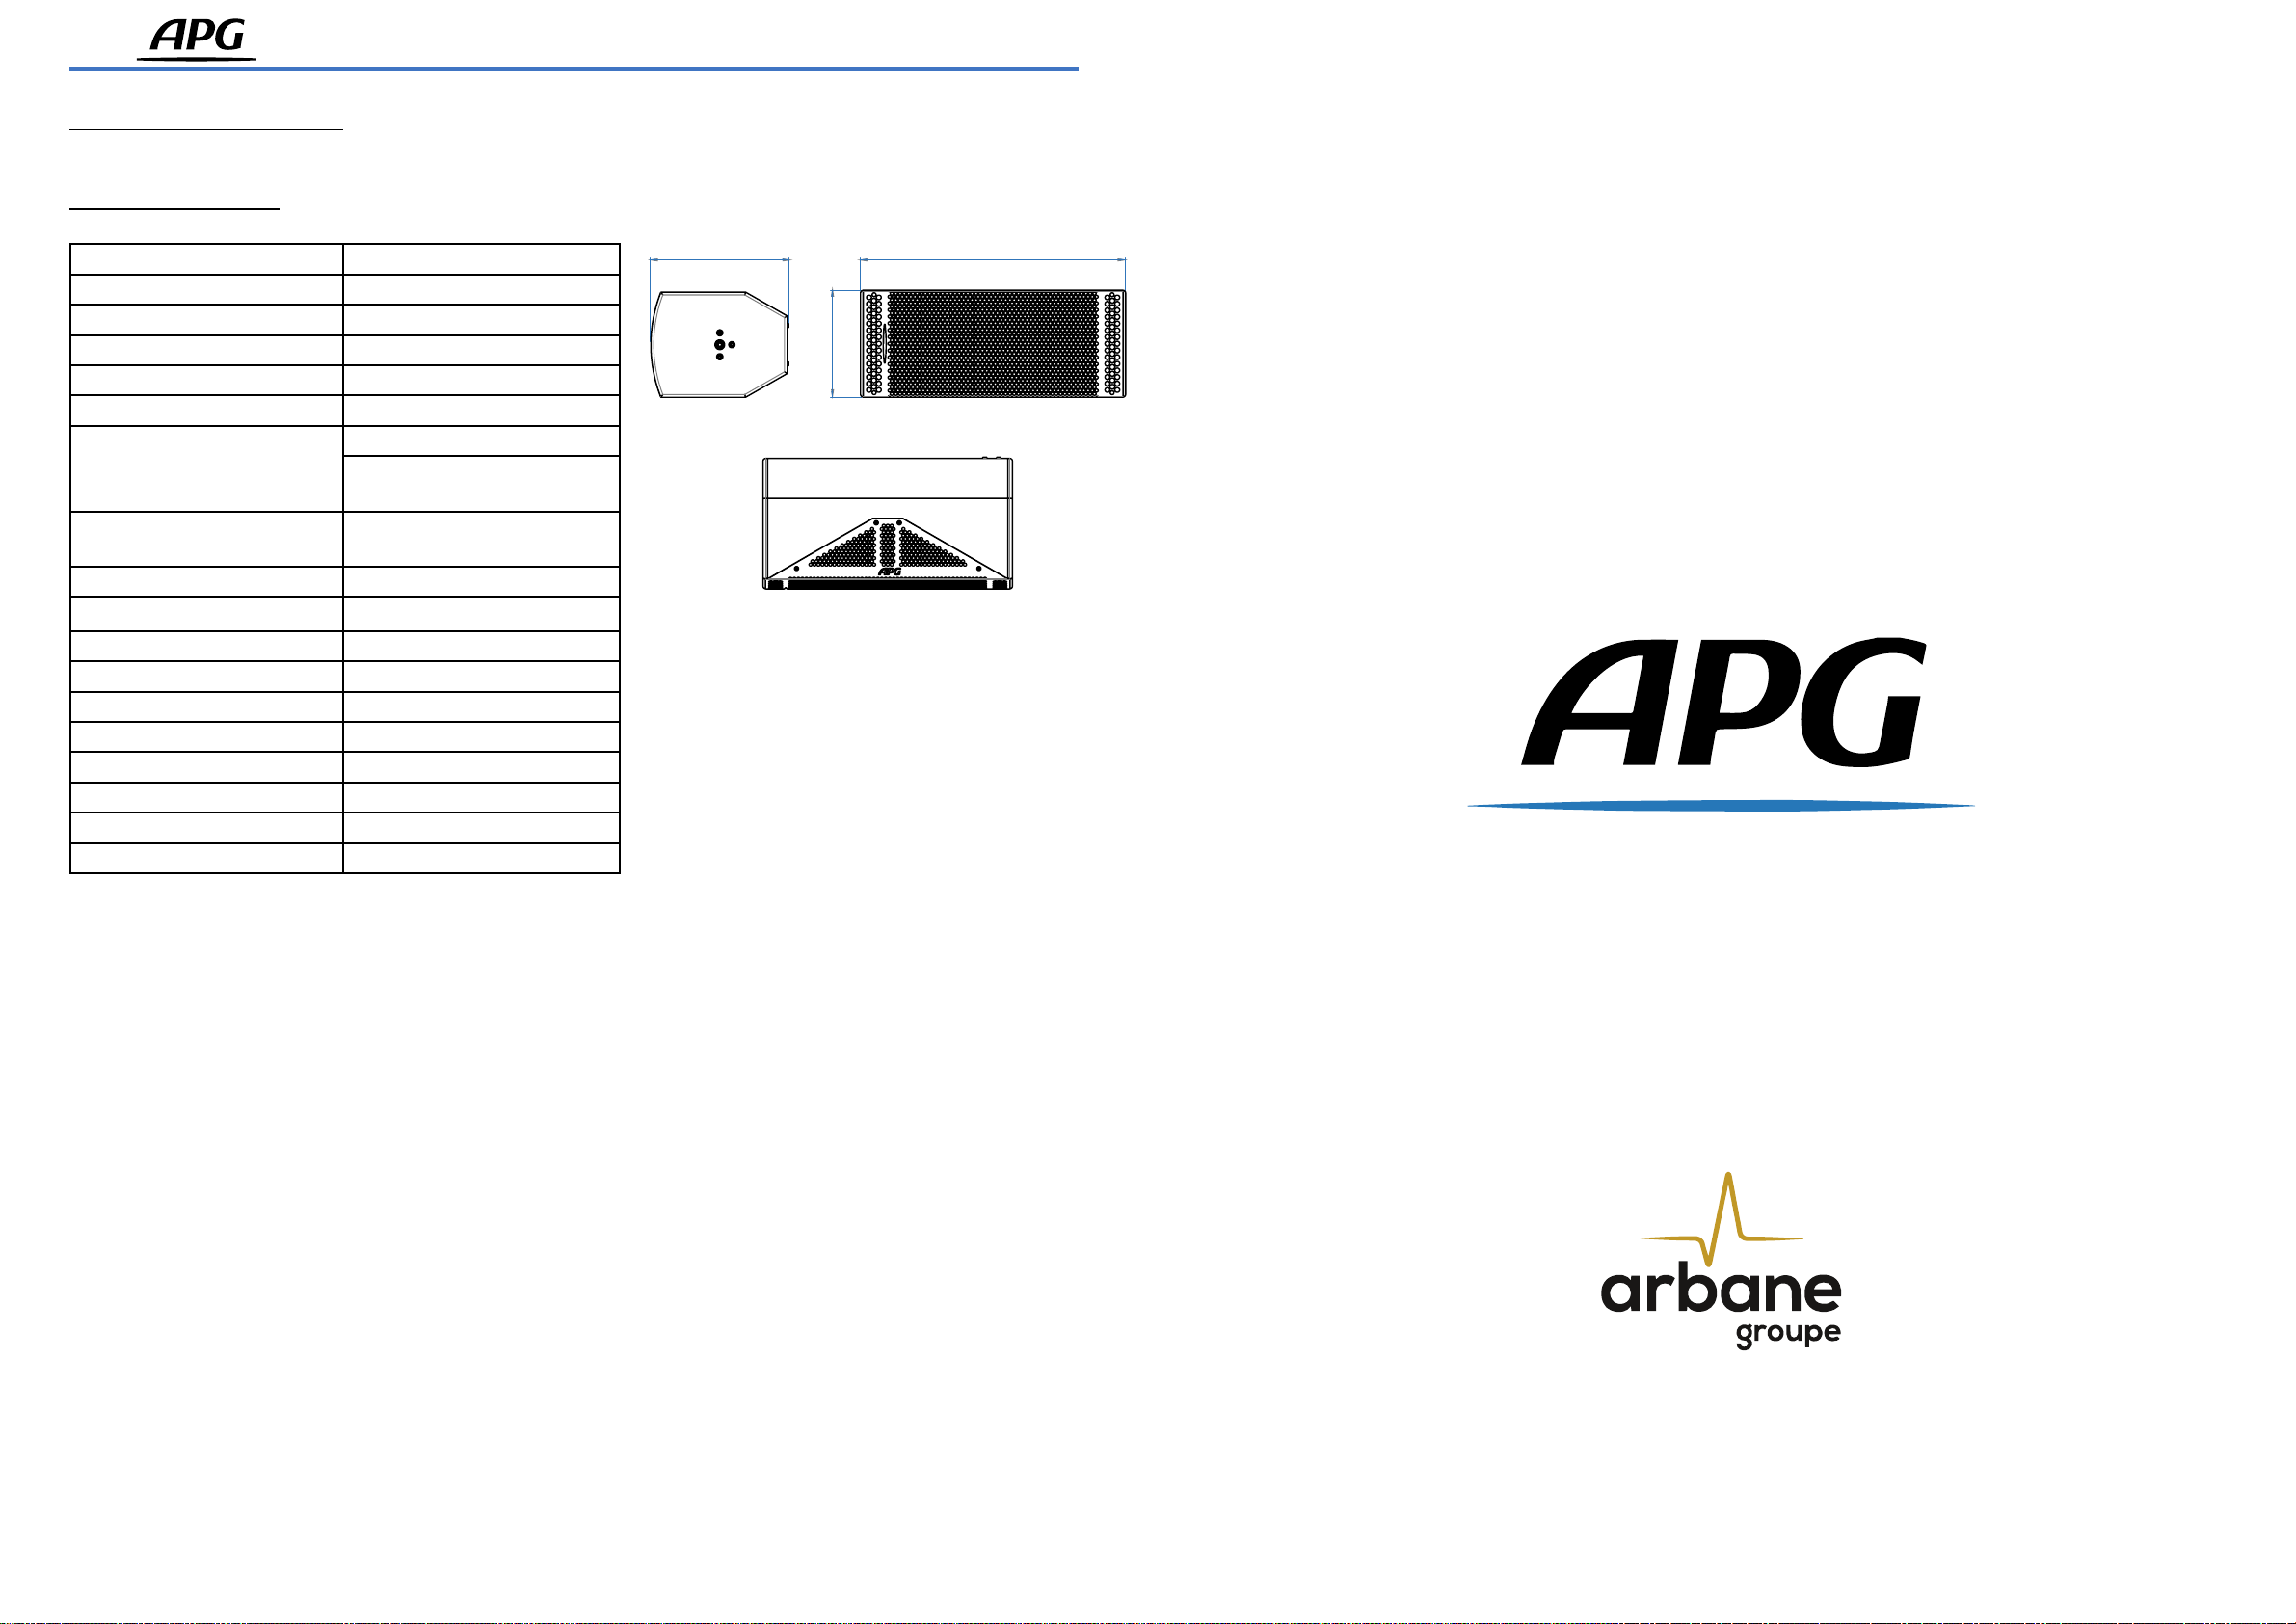
2.8 Technical specifications
Features
Usable bandwidth (± 10 dB) 65 Hz - 19 kHz
SPL max @ 1m 131 dB SPL (1)
Nominal directivity (H° x V°) 70° x 50° (2)
Nominal impedance 4 or 16 ohms
Components
Transducers 2 x 6,5’’ low frequency driver
1 x 1,75’’ diaphragm
compression driver
Topology MTM (Medium - Tweeter -
Medium
Acoustical load Bass Reflex - Constant directivity
Ways and amplification type 2 ways, mono amplified
Power
AES (W) 550 W (3)
Maximum power (W) 2200 W (4)
Constructions
Dimensions H, W, D (mm) 504 x 220 x 283 mm
Weight (kg) 33 lb (15,7 kg)
Connectors 2 x Speakon NL4MP (5)
IP 43
(1) Peak level @ 1m, 2πsr using 12dB crest factor pink noise with
APG preset
(2) Nominal directivity @-6dB
(3) Continuous power according to AES2-2012 in DCR
(4) Peak power according to AES2-2012 in DCR
(5) SPEAKON connectors are wired hot pin 1+, cold pin1-
(2+, 2- THRU)
SPOT 2.6 loudspeaker
283 540
220
This manual suits for next models
1
Other arbane Speakers manuals


Popular Speakers manuals by other brands


PROCELLA AUDIO
PROCELLA AUDIO P1 user guide

Compaq
Compaq CQ2100 - Desktop PC Important safety instructions

Klipsch
Klipsch IC-5T IC-6T owner's manual

Valcom
Valcom VIP-412-DF manual

Altec Lansing
Altec Lansing A7 owner's manual

Atkinson Dynamics
Atkinson Dynamics AD-SF-25 Installation and service instructions


