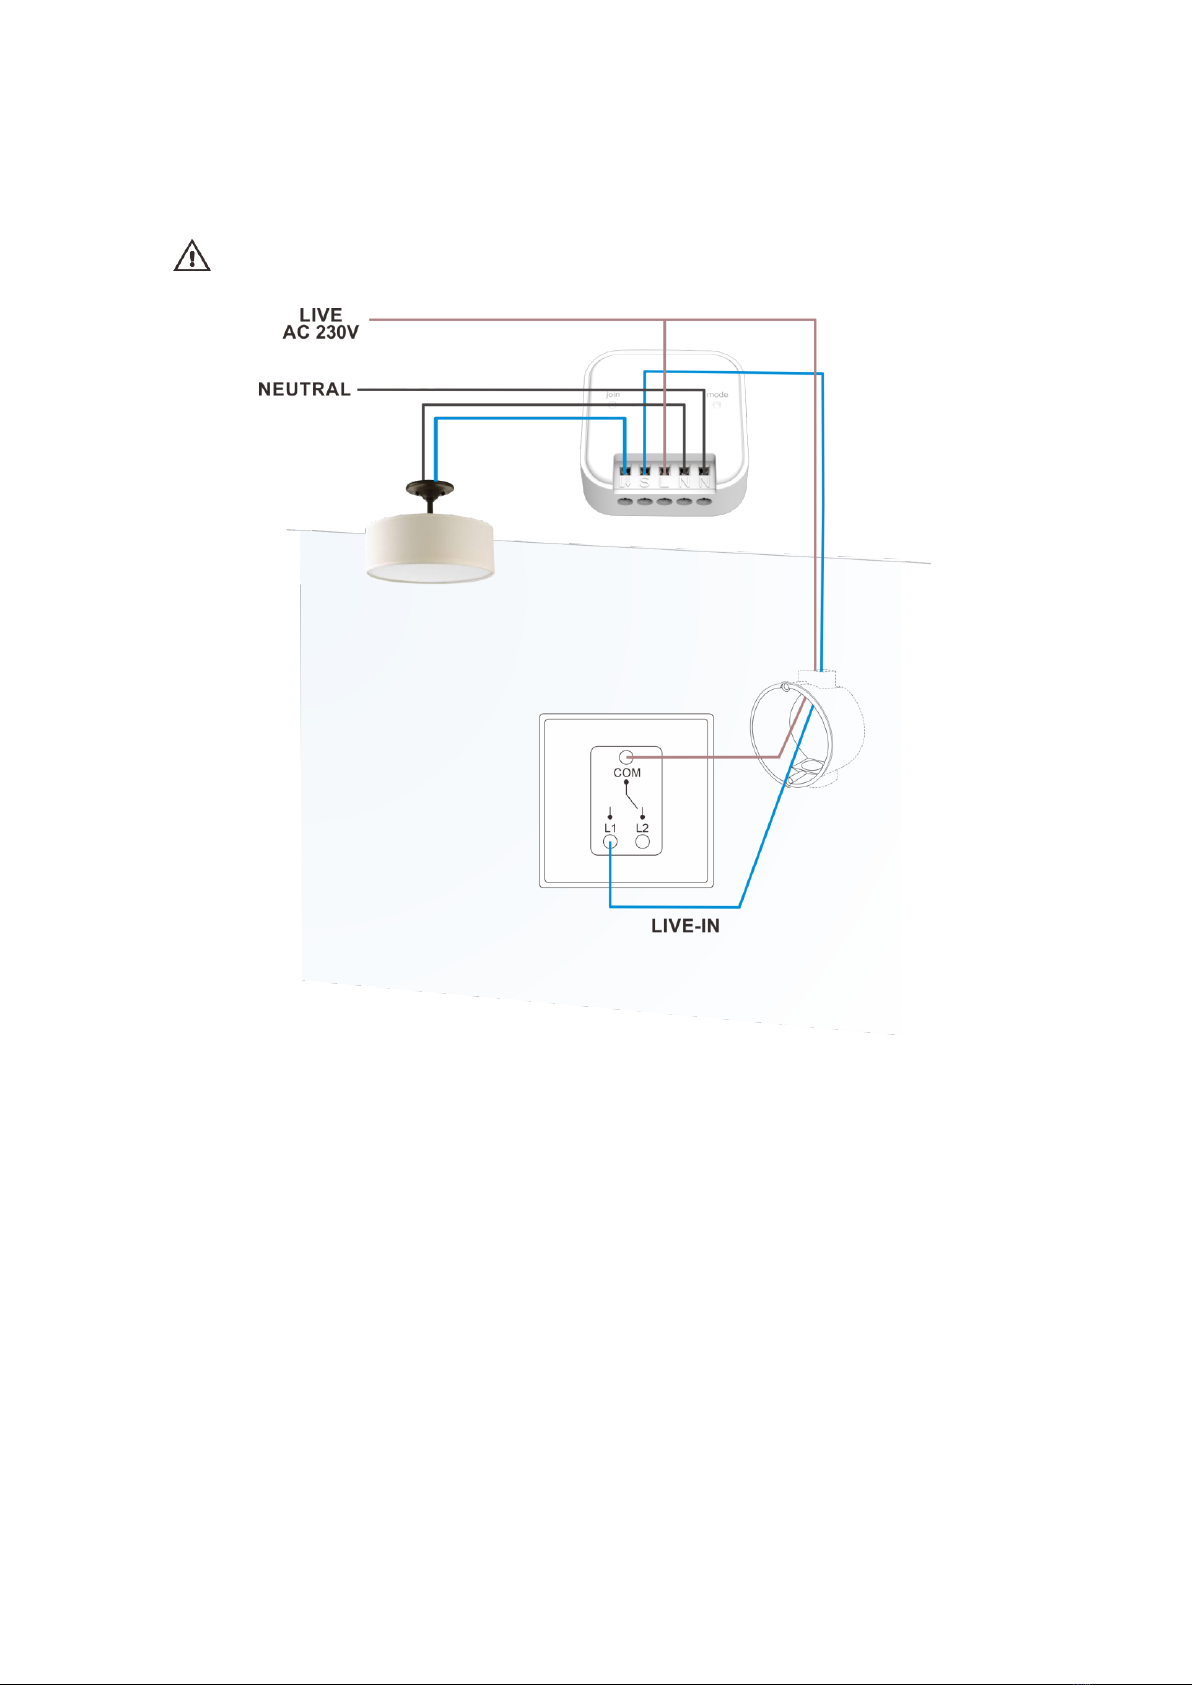
ARC ZBCMR-300 User manual

1
Issue Date: 18/04/2022
ZIGBEE DIMMER MODULE
RECEIVER
ZBCMR-300
CONTENTS
1. Overview and features Page 2.
2. Diagrams Page 3.
3. Installation-wiring Page 4.
4. Pairing / Factory reset Page 5.
5. Trailing & Leading edge / Filament LED bulb mode Page 7.
6. Minimum brightness setup Page 7.
7. Operation Page 8.
8. LED & Output indication Page 9.
9. Specifications Page 10.

2
Issue Date: 18/04/2022
1.Overview and features
ZigBee dimmer module receiver, controlled by control panel app, wired wall
switch or directly by ZigBee remote.
Main features;
•ZigBee dimmer module based on latest ZigBee 3.0 protocol.
•Simple Join Mode application or TouchLink commissioning.
•Supports self-forming Zigbee network without coordinator.
•Trailing / Leading Edge and filament LED bulb mode selection.
•Minimum brightness setup for different kinds of dimmer outputs.
•Compact in size, easy to be installed into a standard wall box.
•Use in conjunction with standard wired rocker wall switch.
OVERVIEW AND FEATURES

3
Issue Date: 18/04/2022
2.Diagrams
Notes for the diagrams:
⚫Strip wires at least 7mm then connect the wires as per diagrams below,
ensure terminals are properly tightened and no bare wire is visible.
⚫Suitable wire size for terminal is 1.6mm2 to 2mm2
DIAGRAMS

4
Issue Date: 18/04/2022
3.Installation –Wiring
Do wiring according to connection diagram correctly.
Cut off main power before installing and wiring.
1. Remove current Live-in AC 230V wire & Neutral-in AC 230V wires from the
existing wall switch.
2. Connect Live-in AC 230V wire & Neutral-in AC 230V wires into module
terminal ‘L & N’.
3. Connect wire from module terminal ‘S’ into wall switch ‘L1’ terminal.
4. Connect Live-in AC 230V wire into wall switch ‘Com’ terminal.
5. Connect output into ‘L& N’ terminal.
6. Tighten terminal screw, tidy wires then install module into wall box making
sure no bare wires are in front of the module receiver.
7. Connect back mains power supply.
8. Before installing the wall switch back onto the wall, please proceed to
“Pairing” section.
INSTALLATION - WIRING

5
Issue Date: 18/04/2022
4.Pairing / Factory Reset
PAIRING
2 Ways of pairing.
Join Mode - ZigBee Network Pairing through Coordinator or Hub
1. Remove the device from previous ZigBee network if it has already been
added to, otherwise pairing will fail. (please refer to “Factory Reset Manually)
2. From your ZigBee Controller or hub interface, choose to add module
receiver and enter Pairing mode as instructed by the controller.
3. Power ON module receiver, LED on module will flash green every 5 seconds,
once connection is successful, connected output will flash twice to confirm.
4. Note that there is a 1 minute timeout, so to enter Join Mode again or
manually exit Join Mode to Standby Mode simply press the ‘join’button
once.
5. Once module receiver is connected, it will appear in your controller’s menu
and can be controlled through controller or hub interface.
TouchLink with a ZigBee Remote
1. Should not be in any network of Zigbee coordinator or hub.
2. With the module receiver in Standby Mode, bring the remote within 10cm of
module receiver.
3. Set the remote into TouchLink commissioning, please refer to the
corresponding remote manual to operate.
4. There shall be an indication on the remote for successful link and at the
same time connected output will flash twice to confirm.
PAIRING / FACTORY RESET

6
Issue Date: 18/04/2022
FACTORY RESET
Removing from a ZigBee Network through Coordinator or Hub Interface
1. From your ZigBee controller or hub interface, choose to delete or reset the
module receiver as instructed.
2. Once successful reset, the connected output will flash twice to confirm.
Factory reset thru a ZigBee Remote (TouchLink Reset)
1. With the module receiver in Standby Mode, bring the remote within 10cm of
the module receiver.
2. Set the remote into TouchLink Reset procedure to reset the device, please
refer to the corresponding remote manual to operate.
3. There shall be an indication on the remote for successful reset and at the
same time connected output will flash twice to confirm.
Factory reset from the Module Receiver
1. With the module receiver in Standby Mode, hold down ‘join’button for 6
seconds, LED on module will quick flash in green.
2. Release button then short press ‘join’button again.
3. LED on module will flash red / green twice and connected output will flash
twice to confirm.
4. Module receiver will then return to Join Mode.
PAIRING / FACTORY RESET

7
Issue Date: 18/04/2022
5.Trailing & Leading Edge / Filament LED Mode
Setup
Initial factory pre-set is at ‘Trailing Edge’.
Depending on the output you are using, please use the appropriate setting.
To change between the 3 modes, please follow below setup.
Switch in-between Trailing & Leading Edge / Filament LED bulb Mode
LED on module will flash:
⚫Leading Edge: Red LED once.
⚫Trailing Edge: Red LED twice.
⚫Filament LED bulb Mode: Red LED 3 times.
1. With the module receiver in Standby Mode and output in OFF status.
2. Short press “mode” button each time to change mode.
3. Default cycle from Trailing edge →Filament LED bulb →Leading edge →
Trailing edge and so on…
4. Once you have decided the mode, hold down ‘mode’ button for over 5
seconds until red LED flash then release button. This will confirm the setup
is complete.
6.Minimum Brightness Level Setup
There are total 4 level brightness to choose from.
To adjust the brightness level, please follow below setup.
1. Turn output on at 100% brightness.
2. Hold down ‘join’button for 3 seconds, output will be at the 4th highest level.
3. Short press ‘join’button again to switch minimum brightness level.
4. Minimum brightness level will cycle from 4 →3 →2 →1 →2 →3 →4 and
so on…
5. Once you have decided the suitable minimum brightness level, hold down
‘join’button for 3 seconds, connected output will flash twice to confirm.
TRAILING & LEADING EDGE / FILAMENT LED BULB MODE SETUP
MINIMUM BRIGHTNESS LEVEL SETUP

8
Issue Date: 18/04/2022
7.Operation
Depending on the mode you have set up in, when turning ON the Dimmer
module the LED on module will flash differently representing Trailing & Leading
Edge / Filament LED bulb mode.
⚫Leading Edge: Amber LED →then ending in Green LED.
⚫Trailing Edge: Amber LED →Green LED →Amber LED →then ending
in Green LED.
⚫Filament LED bulb Mode: Amber LED →Green LED →Amber LED →
Green LED →then ending in Red LED.
When turning OFF the dimmer module the LED will flash green only.
1. Manual ON and OFF: Press the ‘join’button once to turn ON or OFF.
(Make sure the module receiver already added to a network in order to manually
turn ON and OFF)
2. Operate via control panel app with ON / OFF / Dimmer or define Scene
Control.
3. Control ON / OFF / Dimmer with ZigBee remote control.
4. Control ON / OFF / Dimmer via wired wall switch.
*Please note, when operating ZigBee remote control in conjunction with a wired
wall switch, the ON and OFF status on wired wall switch will feature as toggle
control.
OPERATION

9
Issue Date: 18/04/2022
8.LED & Output Indication
Mode LED Indication Output Indication
1
Initial power ON before entering network, module
will enter join mode.
Green LED on module will flash every 5 seconds
Time out in 60 seconds No indication
Network Successful Connection.
Minimum brightness setup successful.
3
Switch in-between Trailing & Leading Edge /
Filament LED bulb Mode.
Leading Edge: Red LED once.
Trailing Edge: Red LED twice.
Filament LED bulb Mode: Red LED 3 times.
No indication
4
Turning ON using: APP、Touchlink、external
switch, and join button (in network).
Leading Edge: Amber LED →then ending in green LED.
Trailing Edge: Amber LED →Green LED →Amber LED →then ending in green LED.
Filament LED bulb Mode: Amber LED →Green LED →Amber LED →Green LED →then
ending in Red LED.
ON
5
Turning OFF using: APP、Touchlink、external
switch, and join button (in network).
Green LED will light up approx. 2 seconds OFF
6
Already in network then power ON module again. Green LED will light up approx. 2 seconds No indication
7
Remove from a network (touchlink、join、app). Amber LED →Green LED →Amber LED →ending in Green LED
ON→OFF→ON→OFF (last status is
OFF)
8
Factory New:
1. At standbymode, press and hold button >= 6
seconds
2. release button then within 12 second press button
once
1. Green LED quick flash for approx. 12 Seconds
2. Amber LED →Green LED →Amber LED →ending in Green LED
1. No indication
2.ON→OFF→ON→OFF (last status is
OFF)
9
TouchLink Commissioning:
1. During data exchange
2. After data exchanged confirm
1. Green LED flash 0.5 seconds once
2. Amber LED →Green LED →Amber LED →Green LED →Amber LED →ending in Green
LED
1. No indication
2. ON→OFF→ON→OFF→ON (last
status is ON)
10
Dimming using:
APP、Touchlink、external switch No indication Output to the corresponding dimlevel
2
ON→OFF→ON→OFF→ON (last status
is ON)
⚫Factory pre-set in Trailing Edge.
Leading Edge: Green LED twice and Red LED 3 times.
Trailing Edge: Green LED twice and Red LED 4 times.
Filament LED bulb Mode: Green LED twice and Red LED 5 times.
LED & OUTPUT INDICATION

10
Issue Date: 18/04/2022
9.Specifications
Input Rating: 230V~50Hz
Output Rating: 3~24W Max. LED
300W Max. Incandescent Lamp
Radio Frequency: 2.4GHz
Power consumption: 1W
Environment Temperature: 0-40 ºC
Dimension (L x W x H) 47 x 47 x 18mm
Weight: 20 g
NOTE
⚫When inserting module into back box make sure excess wires do not cover
module’s back side. This may reduce the performance of transmission.
⚫During standby mode, LED on module will not illuminate.
OPERATION / SPECIFICATION
Table of contents
Other ARC Receiver manuals