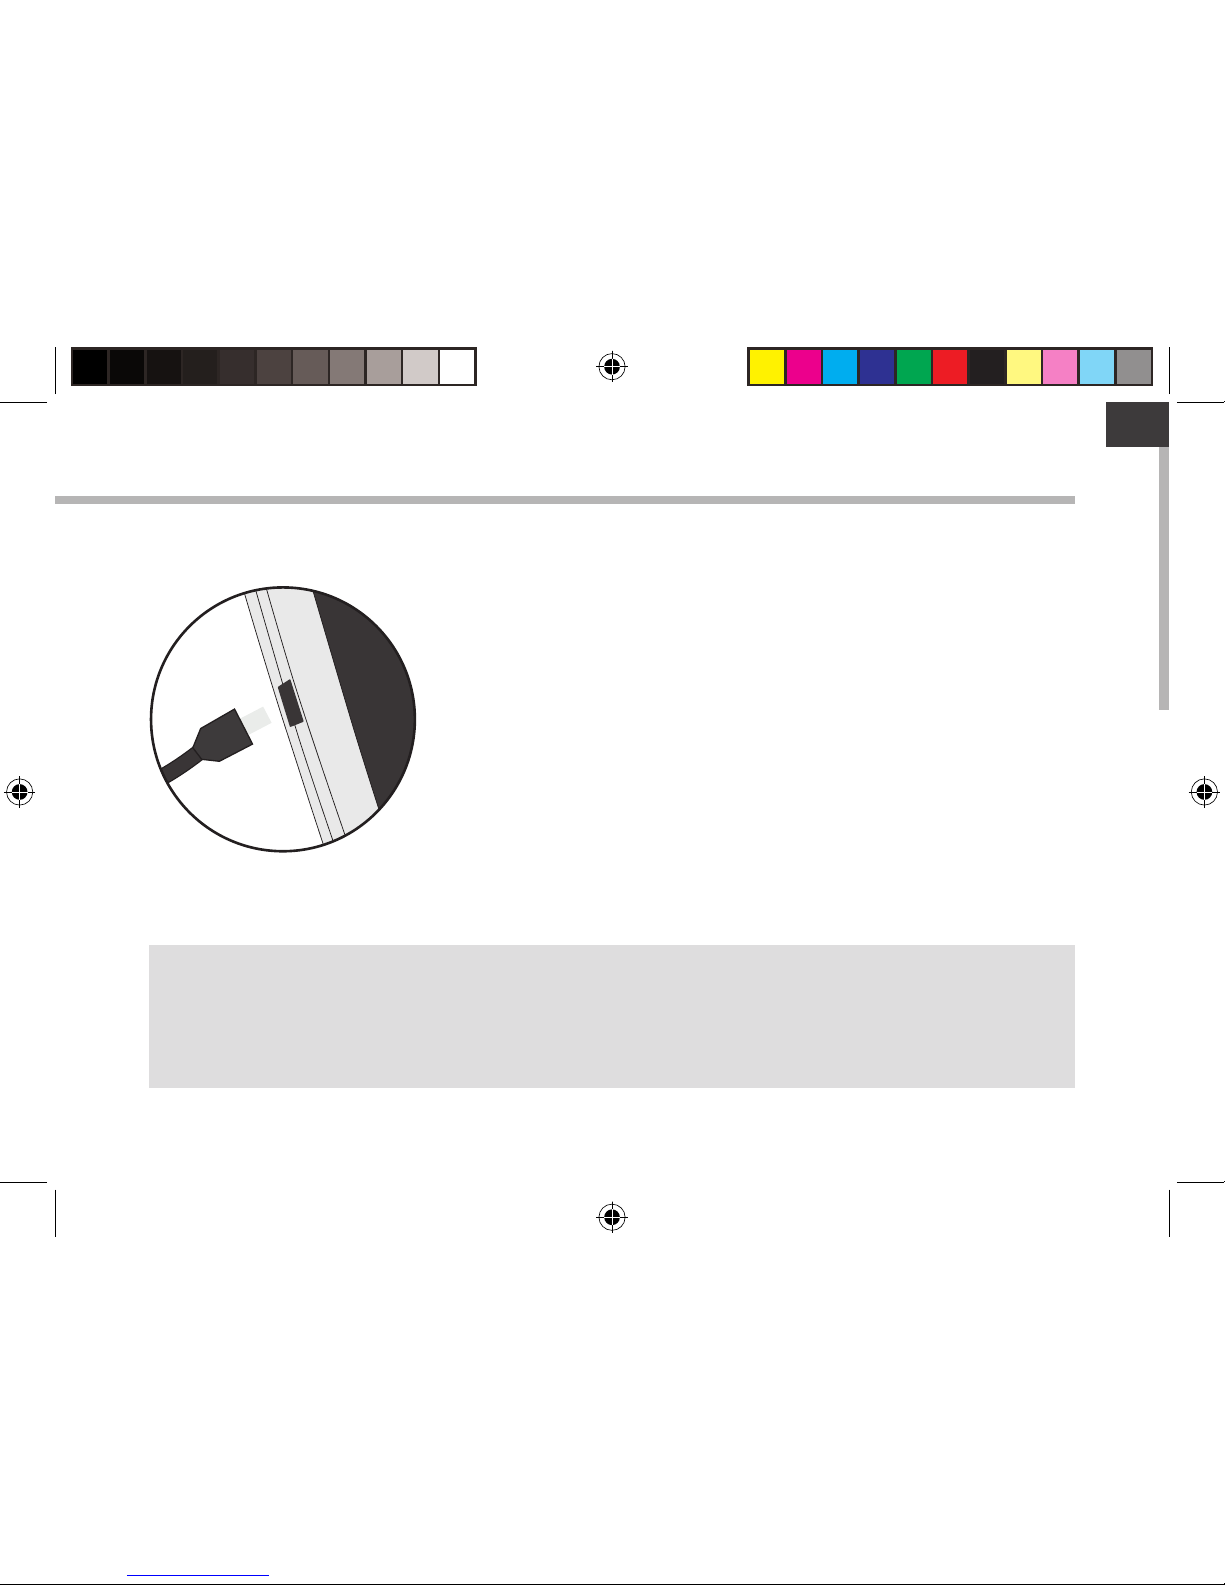
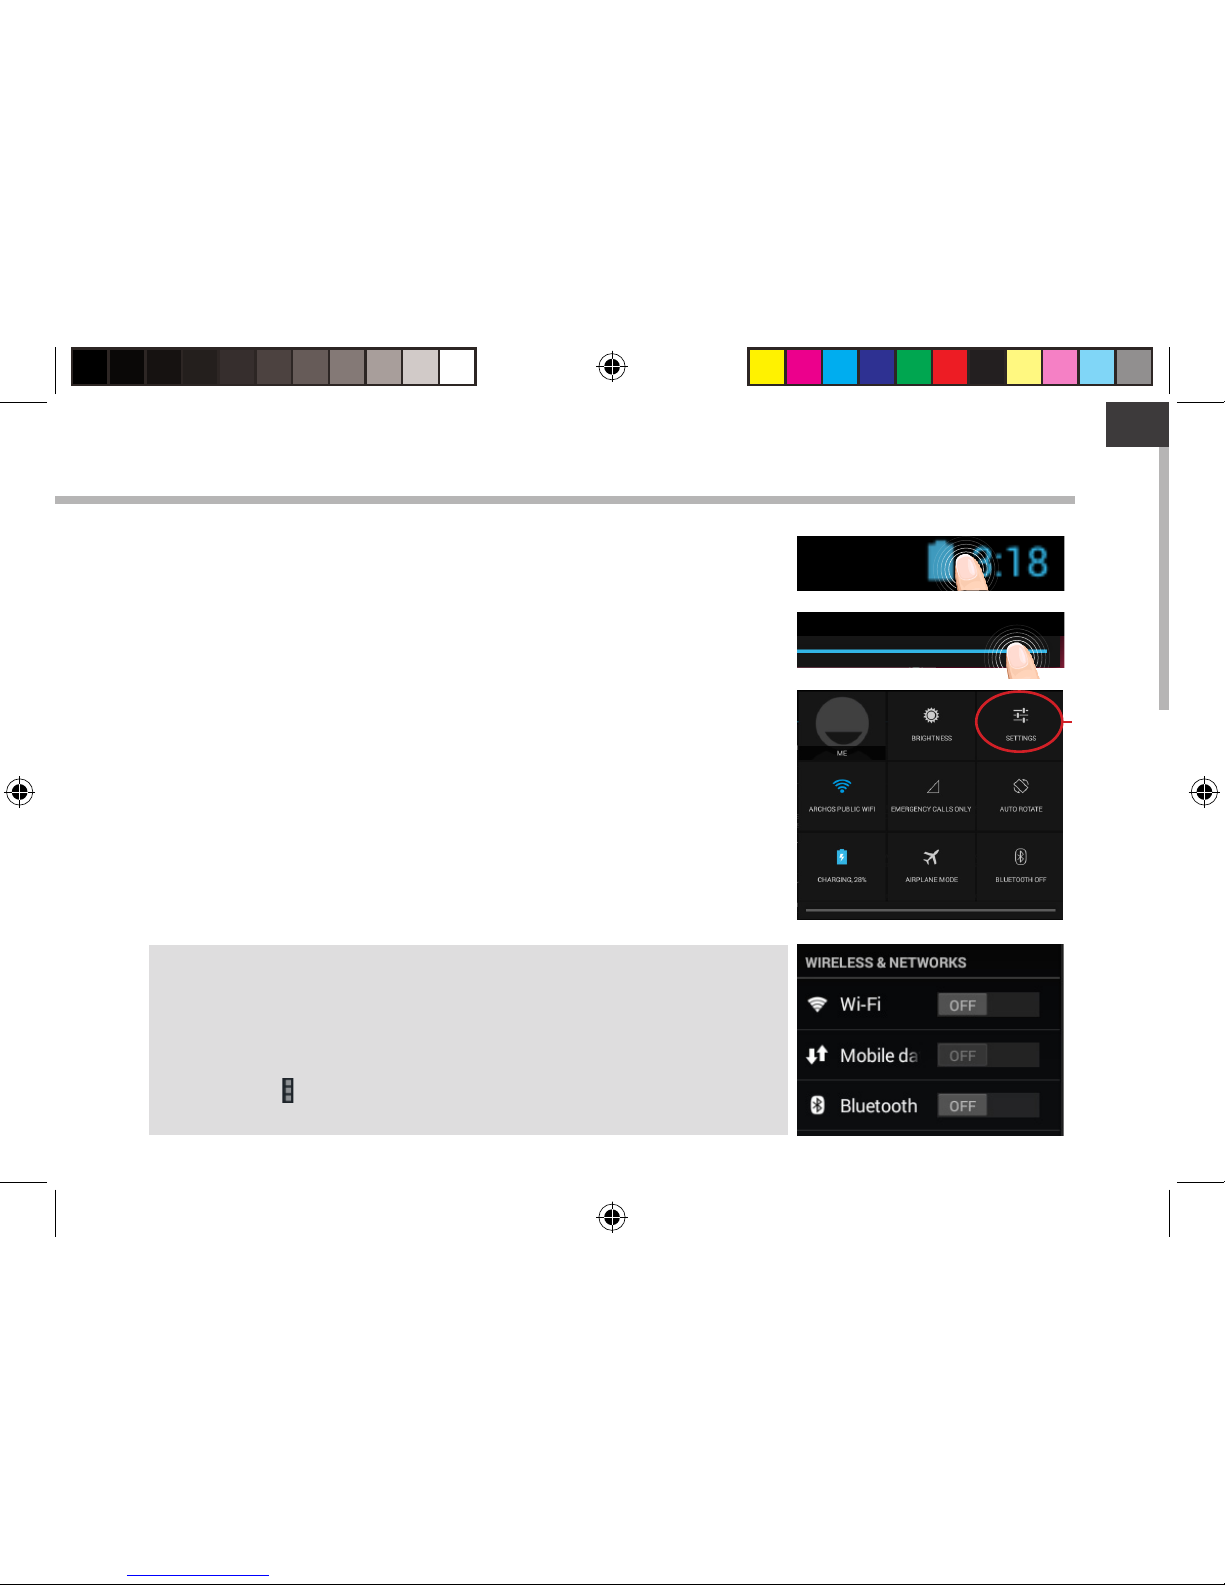
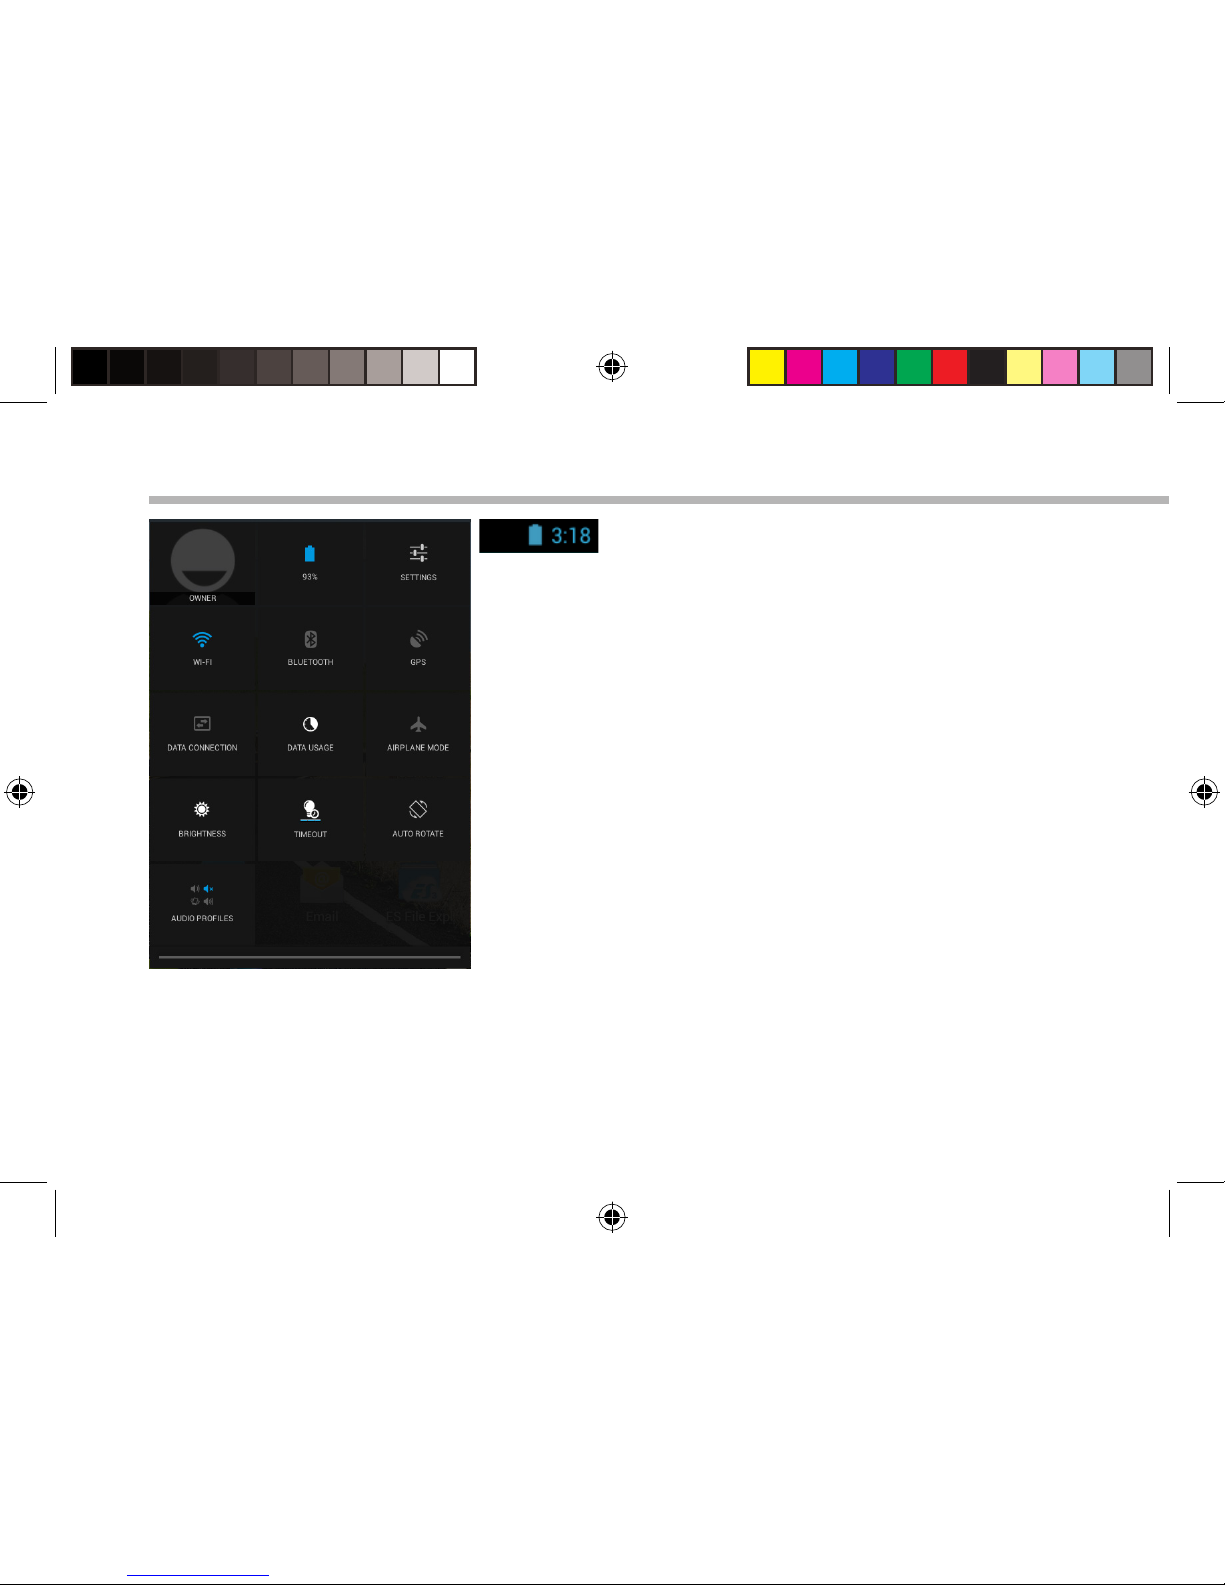
Archos 80 Helium User manual

1
ENEN
Table of contents
For more information, please consult the FAQs on www.archos.com. Make sure to read them before considering any
product return. Your deal may be no big deal. As we are often updating and improving our products, your device’s
software may have a slightly dierent appearance or modied functionality than presented in this Quick Start Guide.
Package contents...................................................................................................................................
Getting started........................................................................................................................................
Description of the device.....................................................................................................................
Inserting SIM & Micro-SD cards.........................................................................................................
4G & WiFi connection...........................................................................................................................
The AndroidTM interface.......................................................................................................................
Getting familiar with AndroidTM......................................................................................................
Troubleshooting...................................................................................................................................
2
3
4
5
6
8
12
14
ARCHOS_80_Helium_QSG_book.indd 1 15/07/2014 11:01:40

2
Warranty
Warranty
USB cable Charger
QSG booklet
Warranty,
legal & safety booklet
Package Contents
ARCHOS 80Helium
ARCHOS_80_Helium_QSG_book.indd 2 15/07/2014 11:01:40

3
ENEN
Getting Started
TIP:
To receive more complete service, please register your product.
From a computer, go to www.archos.com/register.
Charging 1. Charge your device by plugging your power cable into the
power connector. The ARCHOS device will start charging.
2. Press the Power button to turn on the device.
The charging indicator light is on when the battery is charging.
-You can use your ARCHOS whilst it charges.
-Let your device charge completely the rst time you use it.
-Use only the supplied charger.
When your device is completely discharged, you need to
charge it for at least 10 minutes before the charging battery
icon can be displayed.
ARCHOS_80_Helium_QSG_book.indd 3 15/07/2014 11:01:40

4
2
11
9
34
5
6
78
10
1
Description of the device
Charging indicator
Webcam
Reset button
ON/OFF button
1
2
3
4
5
6
7
Volume buttons
Microphone
Micro-USB port
Headphone jack
9
10
8
Camera
SIM card & Memory card slots
Loudspeakers
11
ARCHOS_80_Helium_QSG_book.indd 4 15/07/2014 11:01:41

5
SIM TIF
SIM TIF
SIM TIF
ENEN
Inserting SIM & Micro-SD cards
WARNING: Make sure to turn o your device before inserting the SIM & memory cards.
Opening
Use the notch to remove the back cover.
Inserting a SIM card
For your 4G SIM card, slide it facing downwards in the 4G slot (slot 1).
Inserting a Memory card
Slide it facing downwards in the slot 2.
Closing
Replace the back cover clicking it back into position.
14G SIM card
2Memory card
ARCHOS_80_Helium_QSG_book.indd 5 15/07/2014 11:01:41

6
4G & WiFi connection
4G connection
To be able to access Internet, the mobile data icon must be
activated.
Activating the mobile data
1. Touch and hold the time & battery icons to reveal the status bar.
2. Pull the blue line down to display the status dashboard.
3. Touch the “Settings” icon to open the settings menu.
4. Touch the mobile data icon to activate it.
When the mobile data is activated, it turns blue.
If your device does not connect to your 4G provider’s network
Contact your 4G provider to obtain the connection parameters.
On your device, tap Settings.
Select Wireless & networks > More... > Mobile networks.
In Network operators, select your operator.
In Access Point Names, select the correct access point name and
enter the exact connection parameters.
TIP:
When you encounter connection problem’s, see the FAQs on www.
archos.com or contact your 4G network connection provider.
ARCHOS_80_Helium_QSG_book.indd 6 15/07/2014 11:01:41

7
ENEN
WiFi connection
WARNING: Make sure that you are in a WiFi zone.
1. Touch and hold the time & battery icons to reveal the status
bar.
2. Pull the blue line down to display the status dashboard.
3. Touch the “Settings” icon to open the settings menu.
4. In the“Wireless&networks”section, if the WiFi is o, slide the
WiFi switch to the “ON”position. Once the WiFi is on, the ARCHOS
will scan for WiFi networks in range.
5. Touch “WiFi” to display available networks.
6. Touch the name of network you want to connect to.
Private networks are shown with a lock icon and will require you
to enter your password.
TIPS:
-When entering a WiFi password, we recommend that you select
“Show password” so you can see the characters you are typing. To get
the correct WiFi password (or settings) for the network, contact the WiFi
network provider.
-To keep your WiFi connection ON when the device is on sleep, select
the Menu icon in the“WiFi” page. Then, select Advanced > Keep WiFi on
during sleep > Always.
ARCHOS_80_Helium_QSG_book.indd 7 15/07/2014 11:01:41

8
33
5
2
1
7
8
4 6
The AndroidTM Interface
ARCHOS_80_Helium_QSG_book.indd 8 15/07/2014 11:01:42

9
ENEN
GoogleTM Search
>Touch "Google" for text search or touch the microphone icon for voice search.
AndroidTM apps shortcuts
> Touch to start an application.
Permanent AndroidTM apps shortcuts
> Touch to start an application
Back button
Home button
Recent apps buttons
All Apps button
> Touch this icon to show all the applications and widgets installed on your ARCHOS. All
your downloaded applications are here.
The status bar
> Displays notications and quick settings
1
2
3
4
5
6
7
8
ARCHOS_80_Helium_QSG_book.indd 9 15/07/2014 11:01:42

10
12
4 6
7 9
3
5
8
10 1211
13
The AndroidTM Interface
The Quick settings
1Current user*
2Percentage of battery remaining
3To access all your settings.
4To turn on/o your WiFi connection.
5To turn on/o your Bluetooth connection.
6To activate/deactivate your GPS location system.
7To activate/deactivate the data connection.
8To see how much data have been used
9To activate/deactivate all wireless connections,
especially when ying.
10 To adjust the screen brightness.
11 To set the screen timeout.
12 To activate/deactivate automatic screen orientation
as you turn your ARCHOS.
13 To set an audio prole.
*New multi-user support for tablets
lets different users have their own
separate, customizable spaces on a
single device. Add users in Settings
> Device.
ARCHOS_80_Helium_QSG_book.indd 10 15/07/2014 11:01:42

11
ENEN
Opens a list of thumbnail images of apps you’ve worked with recently:
The Recent Apps
Touch: to open an app.
Swipe up or down: to close an app.
Hold down: to display options
ARCHOS_80_Helium_QSG_book.indd 11 15/07/2014 11:01:42

12
Getting familiar with AndroidTM
The extended home screen:
Navigate between dierent home screen panels by swiping left and
right.
Moving a home screen item:
Touch and hold your nger onto it until the positioning gridlines
appear, then slide it to the desired location, and release your nger.
Removing a home screen item:
Touch and hold it, slide your nger towards the top of the screen and
drop it over the Remove icon.
Uninstalling an item:
From the All apps screens, touch and hold it, slide your nger towards
the top of the screen and drop it over Uninstall bin.
ARCHOS_80_Helium_QSG_book.indd 12 15/07/2014 11:01:43

13
ENEN
Creating application folders:
Drop one app icon over another on a home screen and the two icons
will be combined.
Widgets:
Touch the All Apps icon on your home screen. Touch Widgets at
the top of the screen. From the main Widgets screen, you can move
around widgets just as you do for app icons.
Changing your wallpaper:
Hold your nger on a home screen at an empty location, then choose
from the list.
Locking the touchscreen:
In Settings, scroll down and touch security. Touch Screen lock. Touch
the type of lock you would like to use. After you set a lock, a lock
screen is displayed whenever your screen wakes up, requesting the
pattern, PIN or other specied key.
ARCHOS_80_Helium_QSG_book.indd 13 15/07/2014 11:01:43

14
Troubleshooting
If your device is frozen:
Press the ON/OFF button for 10 seconds.
If your device doesn’t turn on:
1. Charge your device for at least 10 minutes.
2. Press the ON/OFF button for 10 seconds.
My tablet cannot connect to a network or “No service” is displayed
Try connecting in another location. Verify the network coverage with your operator.
Unable to make outgoing calls
Make sure your phone is connected to a network, and the network is not overloaded or
unavailable.
Unable to receive incoming calls
Make sure your phone is switched on and connected to a network (check for overloaded or
unavailable network).
SIM card PIN locked
Contact your network operator to obtain the PUK code (Personal Unblocking Key).
If your WiFi reception is too low:
Make sure you are not far from the WiFi hotspot.
Update the rmware of the device: http://www.archos.com/support.
Reset and redene your connection parameters.
Contact your WiFi connection provider.
ARCHOS_80_Helium_QSG_book.indd 14 15/07/2014 11:01:43

15
FR
Table des matières
16
17
18
19
20
22
26
28
Pour plus d’informations, consultez-les FAQs sur www.archos.com. Consultez-les avant d’envisager un éventuel retour
du produit. Le problème que vous rencontrez peut être résolu facilement. Comme nous mettons à jour et améliorons
régulièrement nos produits, le logiciel de votre appareil peut présenter une interface ou des fonctionnalités légèrement
diérentes de celles décrites dans ce guide.
Contenu de la boîte.............................................................................................................................
Mise en route..........................................................................................................................................
Description de l’appareil....................................................................................................................
Insertion de carte SIM & carte mémoire.......................................................................................
Connexion 4G & WiFi..........................................................................................................................
L’interface AndroidTM...........................................................................................................................
Se familiariser avec AndroidTM.........................................................................................................
Dépannage.............................................................................................................................................
ARCHOS_80_Helium_QSG_book.indd 15 15/07/2014 11:01:43

16
Warranty
Warranty
Contenu de la boîte
Câble USB Chargeur
Guide d’utilisation
rapide
Guide des garanties et
des mentions légales
ARCHOS 80Helium
ARCHOS_80_Helium_QSG_book.indd 16 15/07/2014 11:01:43

17
FR
Mise en route
ASTUCE :
Pour bénéficier d’une assistance complète, enregistrez votre produit.
A partir de votre ordinateur, allez sur www.archos.com/register.
Charger la batterie 1. Connectez le câble d’alimentation à votre produit via le
connecteur d’alimentation. La tablette commence à se charger.
2. Appuyez sur le bouton On/O pour allumer l’appareil.
Le témoin de charge s’allume lorsque la tablette est en charge.
-Vous pouvez utiliser votre tablette pendant le chargement.
-Lors de la première utilisation, chargez complètement la batterie.
-Utilisez uniquement le chargeur fourni.
Lorsque votre tablette est complètement déchargée,
il faut la laisser charger pendant 10 minutes minimum
avant que l’icône de charge ne puisse s’acher.
ARCHOS_80_Helium_QSG_book.indd 17 15/07/2014 11:01:44

18
2
11
9
34
5
6
78
10
1
Description de l’appareil
Appareil photo
Emplacement carte SIM & Sd
Haut-parleurs
Témoin de charge
Webcam
Bouton Reset
Bouton ON/OFF
Boutons de volume
Micro
Port micro-USB
Entrée jack audio
1
2
3
4
5
6
7
8
9
10
11
ARCHOS_80_Helium_QSG_book.indd 18 15/07/2014 11:01:44

19
SIM TIF
SIM TIF
SIM TIF
FR
Insertion de carte SIM & carte mémoire
ATTENTION : Bien éteindre la tablette avant d’insérer les cartes SIM et la carte mémoire.
Ouvrir
Utilisez l’encoche pour enlever la coque arrière.
Insérer une carte SIM
Glissez-la dans l’emplacement 4G en orientant la face magnétique vers le bas (emplacement 1).
Insérer une carte mémoire
Pour insérer la carte mémoire, glissez-la dans l’emplacement 3 en orientant la face magnétique
vers le bas (emplacement 2).
Fermer
Remettez en place la coque arrière.
1carte SIM 4G
2carte mémoire
ARCHOS_80_Helium_QSG_book.indd 19 15/07/2014 11:01:44

20
Connexions 4G & WiFi
Connexion 4G
Pour accéder à Internet, l’icône Données mobiles doit être activée.
Activer les données mobiles
1. Sélectionnez les icônes Heure et Batterie en maintenant votre
doigt appuyé an d’acher la barre de statuts.
2. Tirez vers le bas la barre bleue.
3. Sélectionnez “Paramètres” pour acher la page des
paramètres.
4. Sélectionnez l’icône Données mobiles pour l’activer.
Si la tablette ne se connecte pas au réseau 4G de votre opérateur
Contactez votre opérateur 4G pour obtenir les paramètres de
connexion.
Sur l’écran d’accueil de la tablette, sélectionnez Paramètres.
Sélectionnez Sans l et réseaux > Plus... > Réseaux mobiles.
Dans Opérateur de réseau, sélectionnez votre opérateur.
Dans Noms des points d’accès, sélectionnez le nom de point
d’accès et saisissez les paramètres de connexion.
ASTUCE :
Des difficultés pour vous connecter? Consultez la foire aux questions sur
www.archos.com ou contactez votre opérateur mobile.
ARCHOS_80_Helium_QSG_book.indd 20 15/07/2014 11:01:44
Table of contents
Languages:
Other Archos Tablet manuals

Archos
Archos T70 User manual

Archos
Archos AN7G4 User manual

Archos
Archos FamilyPad 2 User manual

Archos
Archos 501590 User manual

Archos
Archos 9 pctablet User manual

Archos
Archos 502078 User manual

Archos
Archos 70b Copper User manual

Archos
Archos 97 Carbon User manual

Archos
Archos 80 Oxygen User manual

Archos
Archos T101 WiFi User manual

Archos
Archos Arnova 9 G2 User manual

Archos
Archos 70b Cobalt User manual

Archos
Archos 5 160GB User manual

Archos
Archos 70 Titanium User manual

Archos
Archos AC80CP User manual

Archos
Archos 48 Internet Tablet User manual

Archos
Archos ARCHOS 97XS User manual

Archos
Archos 80b Xenon User manual

Archos
Archos 101 helium series User manual

Archos
Archos 501353 User manual