Archos AV 700 TV User manual

1
ARCHOS
ARCHOS
™
™
MOBILE TV & RECORDER
AV 700 TV
AV 700 TV
Mobile TV & Recorder / Video Player & Recorder / Music Player & Recorder / Photo Viewer / USB 2.0 Hard Drive
English Language User Manual
User Manual for ARCHOS™AV 700 TV series
Version 1.2
Please visit www.archos.com to download the most recent manual and software for this product.
®
2
2
Dear Customer,
ARCHOS™thanks you for your choice of this exciting AV 700 TV product. The AV 700 TV is designed to be the
companion to your home entertainment system. With the optional docking pod connected to your television,
you can easily connect your AV 700 TV to the pod as desired. Optionally, you can connect it to your computer
with the included USB Cable. By connecting to a computer, you get the advantage of being able to download
legal music and video content from the Internet. Since it is a PlaysForSure™device, you have a wide choice of
music and video content available on the Internet. For more information about the PlaysForSure™program, see
www.playsforsure.com.
This manual will explain, in detail, the functionality of your device. The better you know how to use it, the more
enjoyment you will get from it. Remember, with the AV 700 TV, you can…
• Watch Digital TV on the built-in screen, a television or video projector
• Record your favorite Digital TV programs directly onto yourAV 700 TV
• Play MPEG-4 & WMV video files on the built-in screen, a television or video projector
• Record and edit MPEG-4 video files from a television or other video device (with optional accessories)
• Listen to MP3, WMA, or WAV music files or PlaysForSure™downloaded music files
• Record music files into digital format directly from your hi-fiwithout a computer (with optional accessories)
• Synchronize your Windows®Media Player music and video library to your AV 700 TV
• View JPEG and BMP digital photos and create slide shows
• Copy Pictures from your digital camera via the built in host USB port
• Store .DOC, .PDF, or any type of data files – it’s a portable hard drive too!
We wish you many years of enjoyment from your AV 700 TV product. Please do register your product at our
website www.archos.com/register/products.html to ensure that you get access to our help line and to be informed
of free software updates for your product.
Wishing you the best TV, Video, Music, and Photo experience,
The ARCHOS™TEAM
Please take the time to read though this manual. There are many things that this device can do that you may not be aware of.
__________
As our engineers are always updating and improving the software, your device’s software may have a slightly
different appearance or modified functionality than presented in this manual.

3
3
T
T
able of Contents
able of Contents
1 INTRO – Buttons and Connections 7
1.1 Remote Control Description 9
2 INTRO – First Time Usage 10
2.1 Plugging in the AC Adapter 10
2.2 Turning on the AV 700 TV 10
2.3 Shutting off theAV 700 TV and Battery saving features 10
2.4 Changing the Interface Language
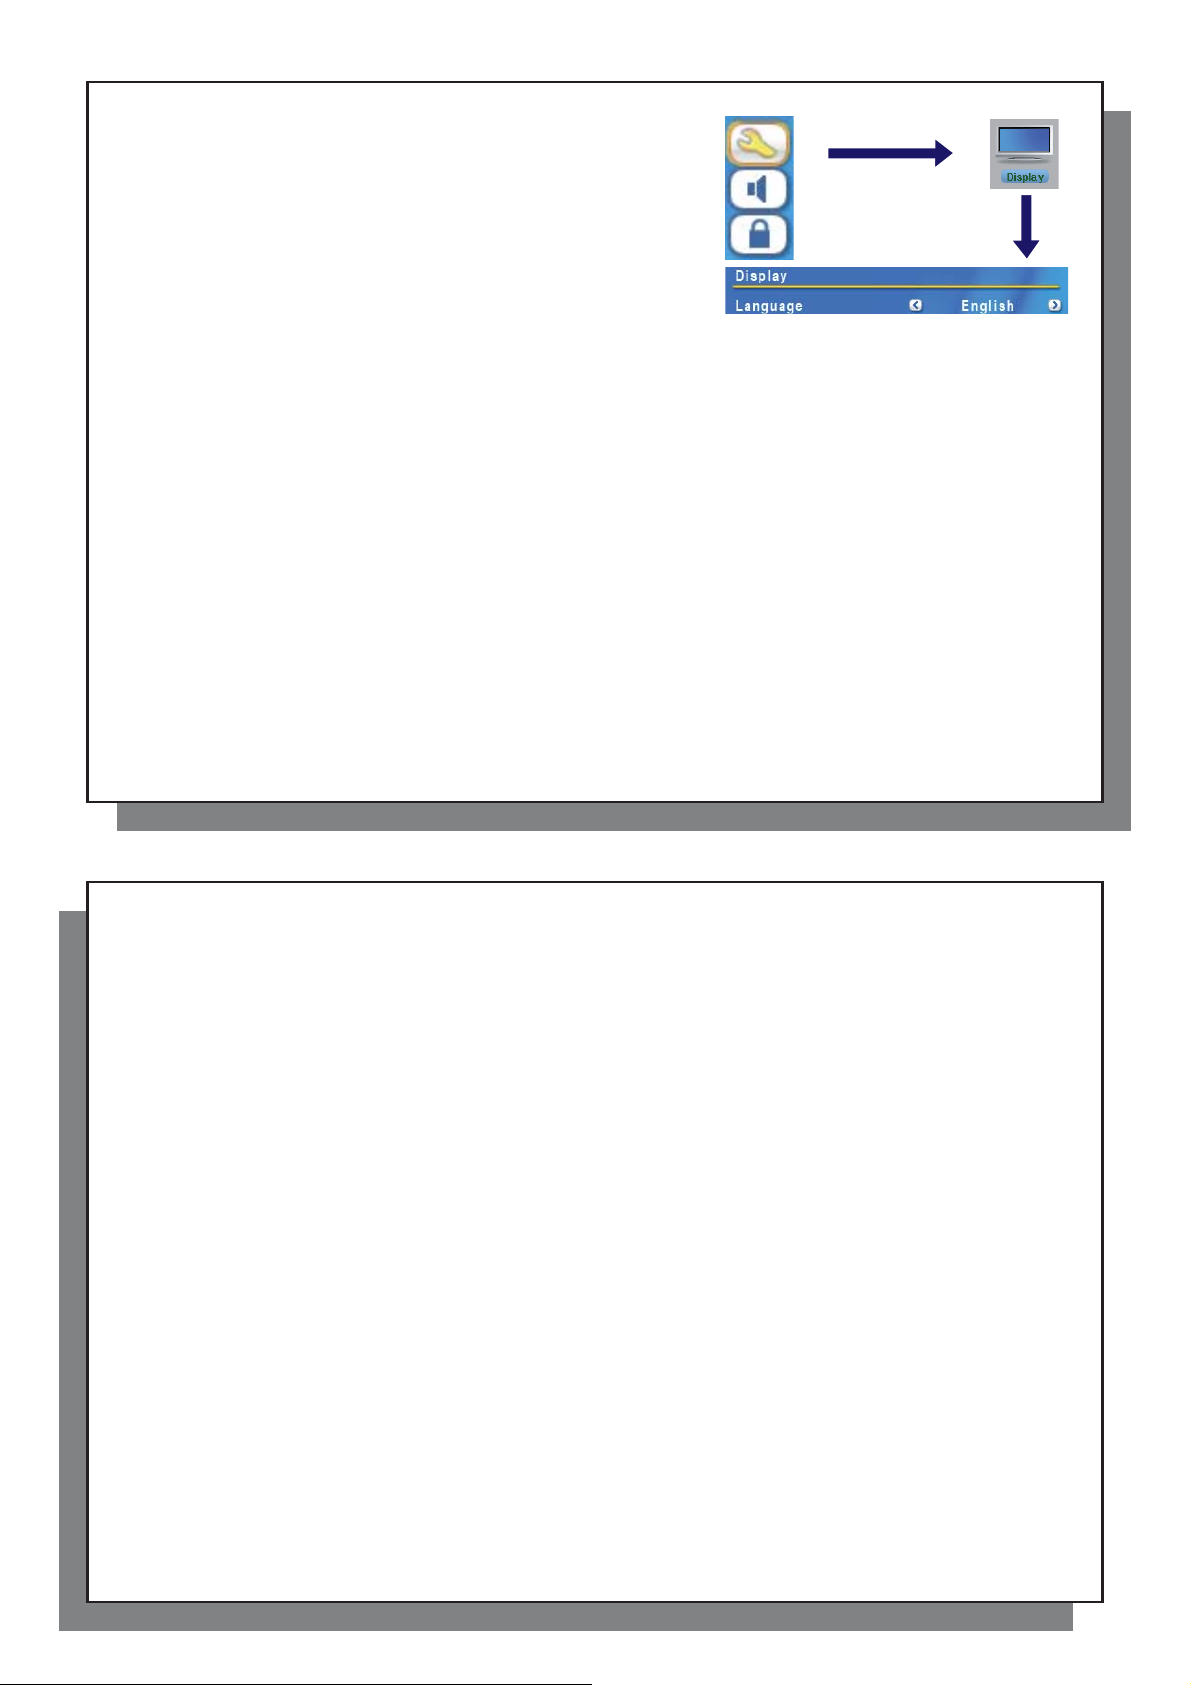
 11
2.5 Foreign Character Sets 11
2.6 Caring for the AV 700 TV 11
2.7 Hardware Reset 12
3 TV –Watching Digital TV 13
3.1 Tuning Digital TV on the AV 700 TV 13
3.2 Watching Digital TV 16
3.3 Digital TV Action Icons 17
3.4 Watching Digital TV in your Car* 19
4 TV – Recording Digital TV 21
4.1 Recording Digital TV with theAV 700 TV 21
4.2 Setting the Scheduler 21
4.3 Viewing Digital TV recordings on your computer 22
5 VIDEO – Playing Video Files 23
5.1 Video PlaybackAction Icons 24
5.2 Resume Function 25
6 VIDEO – Playing Video Files from the Internet 26
6.1 Protected Internet Video content 26
6.2 Non Protected Internet Video Content 26
4
4
7 VIDEO –Recording Video Files 27
8 VIDEO – Creating MPEG-4 Video Files with your Computer 28
8.1 Installing the PC Software 29
8.2 Using MPEG-4 Translator 31
9 MUSIC – Playing Music Files 33
9.1 Button Control 34
9.2 Play Screen Icons 35
9.3 Browsing through your Music Library 36
9.4 Playing Through your Stereo System 37
9.5 Setting a Bookmark 37
9.6 The Resume Function 38
10 MUSIC – Putting Music onto your AV 700 TV 39
10.1 Synchronizing Music from Windows Media®Player (WMP) to the AV 700 TV 39
10.2 Comparison of Windows Media Player 10 to Windows Media Player 9 40
10.3 Transferring your CD collection to the AV 700 TV 41
10.4 Installing Windows Media®Player 10 (WMP10) 41
11 MUSIC – Playlists 42
11.1 Playing a Playlist 42
11.2 Creating a Playlist 42
11.3 Saving a Playlist 43
11.4 Adding songs to a Playlist while listening to Music 44
12 MUSIC –Recording Music 45
13 MUSIC – Using iTunes
™
with your AV 700 TV 46
14 PHOTO – Viewing Photos 47
14.1 Viewing Photos 47
14.2 Viewing a slideshow 49
14.3 Transferring photos to your AV 700 TV 49
15 GAMES – Playing Mophun
®
Games 51

5
5
16 BROWSER – Using the Browser 52
16.1 Navigating the Directory Structure 53
16.2 File and Folder Operations 54
16.3 Using the Virtual Keyboard 57
17 Connecting/Disconnecting the AV 700 TV to/from your PC 58
17.1 USB Connection Type (‘Hard Drive’ or ‘Windows Device’) 58
17.2 Connecting the AV 700 TV 58
17.3 Disconnecting the AV 700 TV from your Computer 60
18 Connecting Devices to the USB Host Port 62
19 SETTINGS 63
19.1 Sound Settings 63
19.2 Play Mode Settings 64
19.3 Clock Settings 65
19.4 Display Settings 66
19.5 Appearance settings 67
19.6 Power Settings 67
19.7 System Settings 68
19.8 TV control 69
20 Updating the AV 700 TV Firmware Operating System (OS) 70
21 Replacing the battery 72
22 Recording Audio with the Optional Docking Pod/Travel Kit 73
22.1 Docking Pod Cable Connections 73
22.2 Travel Kit Cable Connections 74
22.3 Recording Procedure 75
22.4 Where is the Recording Saved? 77
22.5 Audio Editing 77
23 Recording External Video with the Optional Docking Pod/Travel Kit 79
23.1 Docking Pod Cable Connections 79
6
6
23.1.1 TV Docking Pod Description 79
23.1.2 Connecting the TV Docking Pod to your Television System - Connect & Test Method 80
23.1.3 Connection Diagram 84
23.2 Travel Kit Cable Connections 86
23.3 Recording Video Files from External Sources 87
23.4 Setting the Recording Parameters 88
23.5 Where is the Recording Saved? 90
23.6 Editing Video Files 90
23.7 Copy Protection 93
23.8 Docking Pod-Specific Options 93
23.8.1 Manually Setting the Scheduler 93
23.8.2 Automated Yahoo!® TV Recording Scheduler 95
23.8.3 Setting the Infrared Emitter Code 97
24 Troubleshooting 100
24.1 USB Connection issues 100
24.2 Charging and Power issues 101
24.3 AV 700 TV locks up (freezes operation) or Stops 101
24.4 File issues, corrupted data, formatting, and partitioning 101
25 Technical Specifications 104
26 Legal and Safety Notices 106

7
7
1
1
INTRO – Buttons and Connections
a Move UP (also increases volume during media playback)
b Move DOWN (also decreases volume during media playback)
c Move LEFT (also plays previous song or fast reverse through song or video)
d Move RIGHT (also plays next song or fast forward through song or video)
e Accelerate UP – go up the list of items at high speed
f Accelerate Down – go down the list of items at high speed
g Infrared sensor for the remote control
h Left and right loud speakers
i On indicator
j Hard drive activity indicator (read/write)
k Battery charger indicator (blinks when battery is charged*)
8
8
l TV out indicator (indicates that video is being sent to a connected external television)
mPlay/Enter/On – Hold for 3 seconds to switch on the device
n Stop/Escape/Off – Hold for 3 seconds to switch off the device
o UP action button (move up on the list of action icons)
p SELECT action button (select the highlighted action icon)
q DOWN action button (move down on the list of action icons)
a Antenna connector for Digital TV
b LCD/TV button – Hold down to switch between the LCD and an external TV display
c USB 2.0 Full speed USB Host port – to connect compatible devices
d Multi-connect jack* – for headphones, TV Docking Pod, andAV in/out connections
e USB 2.0 High speed device port (USB 1.1 compatible) to connect to your computer
f Power Connector (Use only the supplied ARCHOS™power charger/adapter)
g Battery latch

9
9
1.1 Remote Control Description
Numeric entry: to access a Digital TV
channel directly, enter its number.
Switch between Built-in & External Video
Increase / Decrease Volume
Mute sound
This group of buttons acts as the
navigation and acceleration buttons on
the left of the AV 700 TV and the Play &
Stop buttons on the right side.
Action icon select and execute buttons
Displays Action icon descriptions,
if activated (Setup > Display)
Standby / Wake Up
10
10
2
2
INTRO – First Time Usage
2.1 Plugging in theAC Adapter
2.1 Plugging in the AC Adapter
• Use only the included ARCHOS™charger/adapter.
• You can charge the internal battery of theAV 700 TV by plugging the included adapter/charger directly into the
device, or you can charge it by plugging the adapter/charger into the optional TV Docking Pod and connecting
your AV 700 TV to the optional TV Docking Pod.
• Before using for the first time, charge the batteries completely. The charge indicator (CHG) light just below the
navigation pad will start to blink when the battery is charged.
2.2 Turning on the AV 700 TV
• Hold the PLAY/ON button for 3 seconds. The green “On” indicator light will turn on. Be patient, it will take a
few seconds for the operating system to boot up.
• If the unit shuts off after holding the ON button for several seconds, plug in theARCHOS™adapter/charger to
make sure the batteries get charged.
2.3 Shutting off the AV 700 TV and Battery saving features
To shut off the unit, press and hold the STOP/ESC/OFF button for 3 seconds.
In the Power menu [Display setup screen Power: Battery Operation] there is a Power Off parameter. It is
factory set to 6 minutes. Thus, if your AV 700 TV is idle for 6 minutes, it will shut itself off. This setting can be
changed from one to nine minutes or to never.
In the Power menu [Display setup screen Power: Battery Operation] there is a
Backlight Off parameter to save battery power (the lighting of the screen consumes
a lot of the battery power). It is factory set to 60 seconds. That is, if the AV 700 TV is
not being used, the screen will shut off in order to save battery life. To turn the screen
back on, just click once on any button. See the section Power in the Settings chapter
for a complete explanation.
Table of contents
Other Archos TV Receiver manuals