Argo TABLO EVO User manual

12
V 01/21
OPERATING INSTRUCTIONS
Read the instructions carefully before operating the appliance or carrying out maintenance operations.
Observe all the safety instructions; failure to observe the instructions may lead to accidents and/or damage.
Keep these instructions in a safe place for future reference.
TABLE FAN
EN
TABLO EVO BLACK TABLO EVO WHITE

13
V 01/21
GENERAL SAFETY INFORMATION
Use this fan only as outlined in this manual. Any other use not
recommended by the manufacturer may cause fire, electric shock or
injury to people.
Ensure that the mains power complies with the voltage specified on
the fan ’s data plate (220-240V~/50Hz).
This product is not a toy. Children should be adequately supervised
to ensure that they do not play with the appliance.
This appliance is not suitable for use by people (including children)
with reduced physical, sensory or mental abilities, or without the
necessary experience and knowledge, unless they have been
adequately supervised and instructed concerning use of the
appliance by a person responsible for their safety.
Do not restrict the air inlet and outlet grilles.
Disconnect the mains power when the appliance is not used or for
cleaning operations.
Do not place anything on the appliance, use the appliance to dry
clothing.
Avoid placing fingers or foreign objects in the air inlet/outlet grilles,
as this may lead to electric shock or fire and may damage the
appliance.
To avoid the risk of fire, do not block the grilles or tamper with them
in any way while the fan operates.
Do not use the appliance if the cord or plug are damaged. If the
power supply cord is damaged, it must be replaced by the
manufacturer, dealer or a similarly qualified person so as to avoid
any safety risks.
Do not operate the appliance if it has fallen from a height or has
suffered damage in any way. Contact qualified technical personnel
to examine the appliance or perform any electrical or mechanical
repairs.

14
V 01/21
The most common cause of overheating is the build-up of dust in the
appliance. Remove dust deposits by unplugging the appliance and
cleaning the air outlets and grilles with the aid of a vacuum cleaner.
Do not use abrasive detergents for cleaning this appliance. Clean
the appliance with the aid of a damp (not wet) cloth rinsed in hot
soapy water. Always remove the plug from the mains socket before
cleaning.
To disconnect the fan, push the switch to OFF and remove the plug
from the socket. Pull on the plug only. Avoid pulling on the cord
when disconnecting the fan.
Do not place any objects on the cord and do not bend it.
It is not advisable to use extension cords, as these may overheat
and cause the risk of fire. Do not use a single extension cord to
operate multiple appliances.
Do not immerse the cord, plug or any other element of the appliance
in water or other liquids.
Do not touch the plug with wet hands.
Do not place the fan above or near another heat source such as
radiators, stoves or other products that produce heat.
Do not connect the appliance to the mains power before it has been
properly assembled and positioned.
Do not run the cord under carpets. Do not cover the cord with
blankets, carpets or similar materials. Place the cord far away from
busy areas or where it cannot be accidentally pulled-out.
Do not position the fan below a socket outlet.
Do not operate the appliance outdoors.
WARNING: DO NOT DEPEND ON THE ON/OFF BUTTON SWITCH
AS THE SOLE MEANS OF DISCONNECTING POWER. WHEN
SERVICING OR MOVING THE FAN, ALWAYS UNPLUG THE
POWER CORD.
A fan has hot and arcing or sparkling parts inside. It must not be
used in potentially dangerous locations such
as flammable, explosive, chemical-laden or wet atmosphere.

15
V 01/21
Do not place the fan on soft surfaces, like a bed, where openings
may become blocked. Always place the fan on a stable, flat, level
surface when operating, to avoid the chance of the overturning.
Locate the power cord so the fan or other objects are not resting on
it.
Always unplug the fan when not in use.
In order to avoid accidents turn unit off if unattended.
In the event of any problems (abnormal noise or a strange smell)
switch off the appliance immediately, do not attempt to repair it and
take it to your local after sales service.
To move the product, use the handle on the back of the product.
DESCRIPTION OF PARTS
Fan assembly components:
1. Front grill
2. Grill ring
3. Rear grill
4. Blade cap
5. Blade
6. Plastic mounting nut
Fan
assembly
Control
p
anel
Remote contol
Fan assembly
connector
Handle

16
V 01/21
FAN ASSEMBLY INSTRUCTIONS
The device does not require installation. For its use it is necessary to assemble the parts, as per the instructions below.
Open the package and take out the parts of the appliance.
Remove the Blade Cap from the Motor Shaft by turning it clockwise, and remove the Plastic Mounting Nut from the Fan
Head by rotating anti-clockwise. Put the Rear Fan Grill on the Fan Head by align the Position Holes and Lock the Plastic
Mounting Nut on to the Fan Head to fix the Rear Fan Grill on to the Fan Head. Do not over force the Plastic Mounting Nut.
Make the fan blade Groove aligns with a T-bar on the motor shaft to ensure correct positioning and fix the fan blade into
place by hand tightening the blade cap anticlockwise gently onto the end of the motor shaft.
Finally, before place the front fan grill into right position of the guard ring with guard self-clip, please make sure the Limit
groove of guard Ring is on the upward side and the guard self-clip is on the downward side. The screw at the bottom of the
guard ring must be fixed after the assembly of front fan.

17
V 01/21
BASE ASSEMBLY INSTRUCTIONS
Place the power cable in the appropriate groove (between points E F in figure 1), then assemble the 4 points (figure 1) by
rotating the base clockwise. Make sure that the base is correctly assembled, as shown in figure 2.
Figure 1
Figure 2

18
V 01/21
Connect the power cable to an appropriate power socket (220-240V ~).
Place the fan upright on a flat, stable surface.
Do not use this fan in an area with high humidity, rich in dust or water.
Press ON / OFF on the control panel or remote control. The emission of a sound will indicate that the device is on, the
ventilation speed will be high for 1 second, and then switch to low ventilation speed, which will remain so until a different
ventilation speed is selected.
This ventilator can be used in 3 ventilation modes: NORMAL, NATURAL and SLEEP.
In each of the 3 modes by pressing the SPEED button you can change the fan speed between low, medium and high.
CONTROL PANEL
ON/OFF BUTTON
Press ON/OFF on control and on remote control to switch of or switch off the appliance.
After turning on the unit, it will start to operate at high fan speed for 1 second (H icon will light up), then switch to low fan
speed (L icon will light up).
It will then be possible to select the desired fan speed by pressing the Speed button.
SPEED BUTTON
Repeatedly press the Speed button on the control panel or remote control to adjust the fan speed in the following
sequence: low - medium - high
On the control panel the corresponding LEDs will light up according to your selection and will be visible as follows:
L=low speed M=medium speed H=high speed
SWING BUTTON
To activate or deactivate the swing function, press the button on the control panel or the SWING button on the remote
control.
HOW TO USE THE APPLIANCE
Speed button
ON/OFF button
Swing button
Timer button

19
V 01/21
It is possible to adjust the angle of inclination of the fan assembly. Turn off the fan, slightly loosen the adjustable screw by
turning it counter-clockwise. Place the fan assembly in the desired angle, then tightly screw the adjustable screw by turning
it clockwise.
TIMER BUTTON
Press the button on the control panel or the TIMER button on the remote control to select the fan shutdown interval in
the following sequence: 1 hour, 2 hours, 4 hours up to a maximum of 7 hours. The LEDs on the control panel will light up
according to your selection.
MODE BUTTON (activated only by remote control)
Press this button on the remote control (function not present on the control panel) to select the desired ventilation mode
between Normal, Natural and Sleep:
- Normal Mode: By pressing the Mode button on the remote control once, the ventilation speed is constant and the L icon
remains lit on the control panel. It is possible to select the ventilation speed between high, medium and low (the
corresponding LEDs light up according to the speed in progress).
- Natural mode: By pressing the Mode button on the remote control twice, the fan speed varies according to a predefined
program. It is possible to select the ventilation speed between high, medium, low, stop, the icons light up according to the
current ventilation speed. The corresponding icon on the control panel is NAT.
- Sleep mode: Press the Mode button on the remote control three times, the fan speed varies according to a preset
program. It is possible to select the ventilation speed between high, medium, low, stop, the icons light up according to the
current ventilation speed. The corresponding icon on the control panel is SLP.
REMOTE CONTROL

20
V 01/21
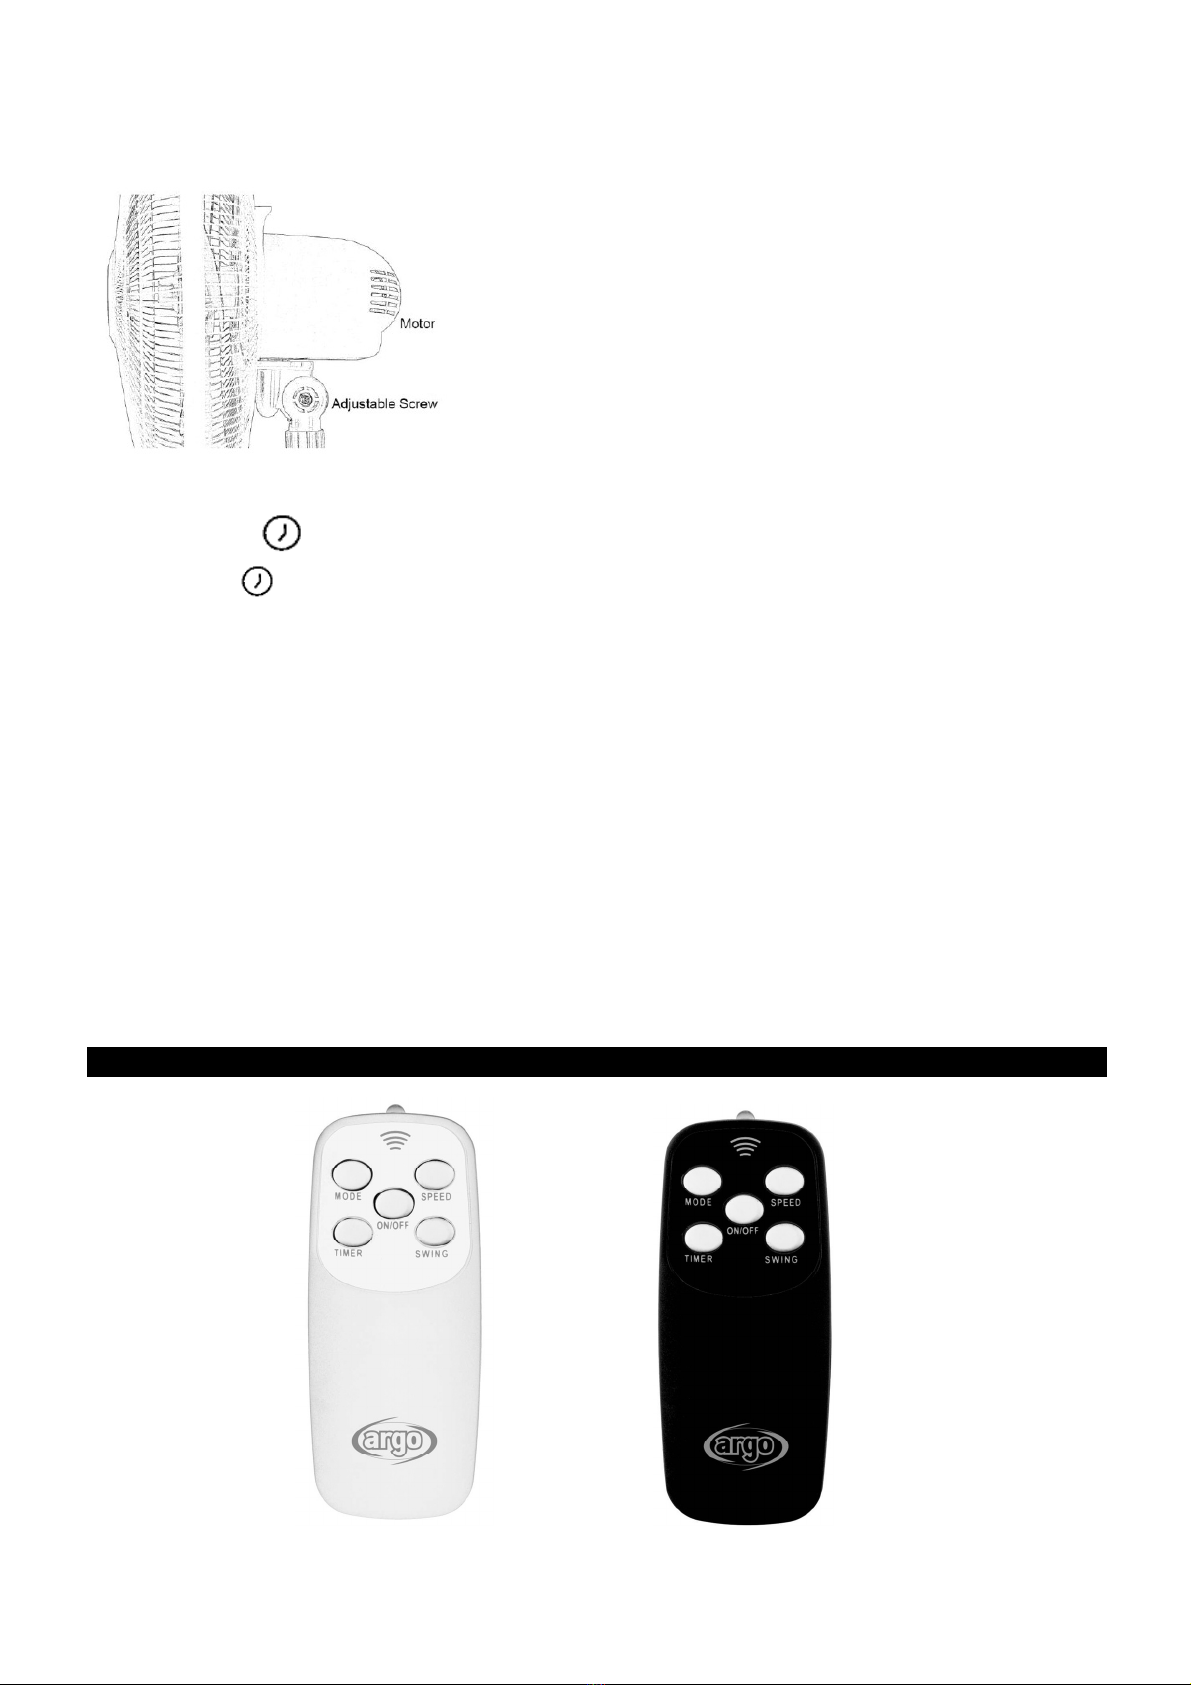
The functions on the remote control correspond to the functions on the control panel.
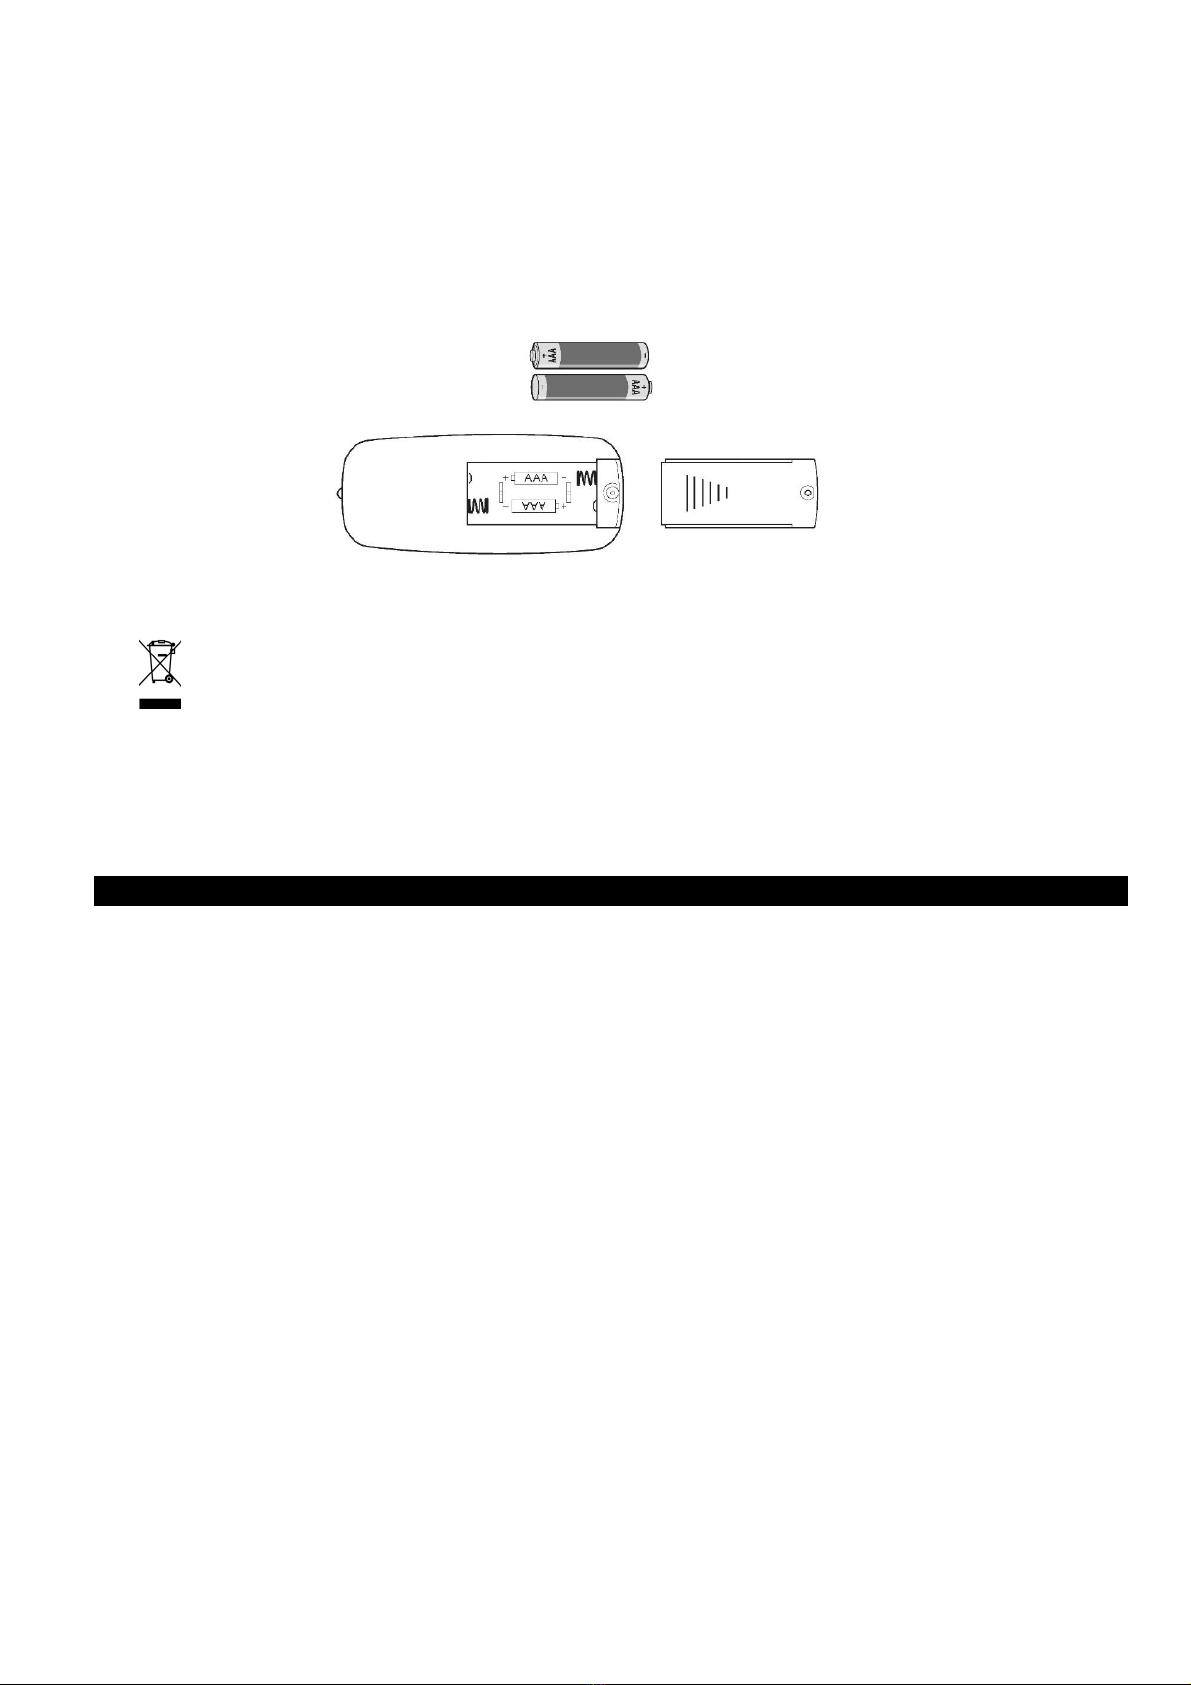
HOW TO INSERT / REMOVE THE REMOTE CONTROL BATTERIES (refer to the drawing below).
Open the battery door on the back of the remote control and remove the door. Insert the batteries in the remote control
(not supplied), taking care to check the correct positioning of the polarity. Replace the cover in the remote control.
Use 2 LR03 (AAA) 1.5V batteries compliant with Battery Directive no. 2006/66 / EC and amendments to Directive 2013/56
/ EC.
Remove the batteries if the remote control is not used for a long time.
INFORMATION FOR CORRECT DISPOSAL OF THE BATTERIES IN ACCORDANCE WITH EUROPEAN
DIRECTIVE 2006/66/EC and amendments Directive 2013/56/EC
Please replace the battery when its electrical charge has been exhausted: at the end of its useful life, it must not
be disposed of together with unsorted waste. It must be must be delivered to appropriate separated waste
disposal plants or to dealers that provide a similar service. Separate waste disposal of batteries prevents
potential negative effects on the environment and human health resulting from inadequate disposal, and also
allows the materials from which it is made to be recovered and recycled in order to achieve significant savings in
terms of energy and resources. The separate disposal obligation is underlined by the crossed-out dustbin
symbol appearing on the battery. Illegal disposal of the product by the user shall result in the application of
of administrative sanctions as defined by current regulations.
ALWAYS UNPLUG THE APPLIANCE BEFORE CLEANING OR MAINTENANCE.
IMPORTANT: DO NOT SUBMERGE THE FAN IN WATER.
Cleaning the outside surface of the appliance
Turn the switch off and unplug before carrying out any maintenance work or moving the appliance.
Use a soft cloth to remove any dust from the fan.
If the fan is excessively dirty, use a soft cloth moistened with water and a mild detergent at a temperature lower than 50°C.
Let the fan dry completely before use.
Do not use corrosive detergents or solvents such as petrol. Do not wash the appliance with water. Do not use oils,
chemical substances or other items to clean that may damage the surface.
Use a vacuum cleaner to remove dust from the air inlet/outlet grilles.
STORAGE
If the appliance is not used for prolonged periods, disconnect the power cord and store the appliance with this manual in
its original packaging, in a cool and dry place.
Remove the batteries if the remote control is not used for a long time.
MAINTENANCE AND STORAGE

21
V 01/21
INFORMATION FOR THE CORRECT DISPOSAL OF THE PRODUCT IN ACCORDANCE WITH EUROPEAN DIRECTIVE
2012/19/EU
This appliance may not be scrapped with domestic waste at the end of its life cycle. We call your attention to the crucial role
played by the consumer in the re-use, recycling and other forms of recovery of such waste.
The appliance must be scrapped by a sorted waste disposal centre or by returning it to the retailer (no charge is levied for
this service), when you purchase a new equivalent appliance.
Sorted disposal of electric and electronic equipment prevents the negative effects on the environment and human health
resulting from improper scrapping, and also allows the materials from which it is made to be recovered and recycled, with
significant savings in terms of energy and resources.
The sorted disposal requirement is indicated by the crossed waste bin label affixed to the appliance.
www.argoclima.com
Table of contents
Other Argo Fan manuals
Popular Fan manuals by other brands

Hunter
Hunter 28698 Parts guide

Parrot Uncle
Parrot Uncle F3501 Installation & operating instructions

KDK
KDK X48XG / X48XGMN Operating and installation instructions

Monte Carlo Fan Company
Monte Carlo Fan Company 5DS34 Series Owner's guide and installation manual

KUULAIRE
KUULAIRE KA55 owner's manual

Omega Altise
Omega Altise OP408R Operation, maintenance and safety instructions

Xpelair
Xpelair WX6 Installation and maintenance instructions

Pro Breeze
Pro Breeze PB-F16-US instruction manual

Pro Breeze
Pro Breeze PB-01 instruction manual

flowair
flowair OXeN X2-W-1.2-V Technical documentation operation manual

Ebmpapst
Ebmpapst A4D400-AP12-01 operating instructions

Air King
Air King 5AU42/9215 operating manual