argon audio Stream3M User manual

www.argonaudio.com
1
Stream3 M
Dear Customer,
Quality has always been our driving force and founding Argon Audio is
a natural extension of this philosophy.
We have 20 years’ experience in creating and specifying high quality products,
manufacturing them and selling them on to end users with Value-for-Money as the
primary aim. And Argon Audio is a brand fully compliant with these values. Design,
features and quality standards are all specified in Denmark and manufacturing takes
place in the Far East, where quality vendors are highly competitive - and as a result
supply outstanding Value-for-Money products.
- To the delight of both ourselves and our customers!
Congratulations with your Stream3M, may it bring years of enjoyment.

www.argonaudio.com
2
Stream3 M
Table of content
1
Introduction
3
1.1
Safety
1
1.2
Features
1
1.3
Box contents
1
1.4
External resources
4
1.5
Conventions used in this
manual
4
2
Controls, connectors and
display
4
2.1
Main controls
4
2.2
Spotify Connect
6
2.3
Connectors
6
2.4
Screens
6
3
Getting started/setup
8
3.1
Setup wizard
8
3.2
Other settings
11
3.3
Internet radio portal
registration
12
3.4
Setting up a music server
12
3.5
Sharing media with
Windows Media Player
13
3.6
Setting up Stream3M for
“Play To” Windows 7
streaming media feature.
14
4
Internet radio mode
14
4.1
Last listened
15
4.2
Presets
15
4.3
Favourites
15
4.4
Browse
15
4.5
Search
16
4.6
My added stations
16
4.7
Now playing information
16
5
Music player mode
(network)
17
5.1
Shared media (UPnP
media server)
17
5.2
Playlists
18
5.3
Repeat/shuffle
18
5.4
Now playing information
18
6
“Play To” or “Cast to”
function to stream media
19
6.1
Use “Play To” or “Cast to”
in Windows Media Player
19
6.2
Use “Play To” elsewhere in
Windows
19
6.3
Now playing information
20
7
DAB radio mode
20
7.1
Scanning for stations
20
7.2
Selecting stations
20
7.3
Now playing information
20
7.4
Settings
21
8
FM radio mode
21
8.1
Selecting stations
21
8.2
Now playing information
21
8.3
Settings
21
9
Bluetooth mode
22
10
Alarms and sleep
22
10.1
Alarms
22
10.2
Sleep
22
11
UNDOK Wireless Remote
Control
23
11.1
Obtaining and installing the
UNDOK Wireless Device
Remote Control application
23
11.2
Setting up the connection
to the Stream3M
24
12
Inactive standby
24
13
Software upgrade and
factory reset
24
13.1
Software upgrade
24
13.2
Factory reset
25
14
Troubleshooting and
error messages
25
14.1
Error messages
25
14.2
Troubleshooting
26
Glossary
Specifications
Audio Codec
27
27
27

www.argonaudio.com
3
Stream3 M
1. Introduction
1.1 Safety
Safety Instructions
Please store this instruction manual for future reference.
•Do not use this product near water or moisture.
Clean only with a dry cloth.
Unplug this product from the wall outlet before
cleaning.
•Place the unit on a solid surface.
•Do not put it in a closed bookcase or a cabinet that
may keep air from flowing through its ventilation
openings.
•Do not install near any heat sources, such as
radiators, heat registers, stoves or other appliances
that produce heat.
•Protect the power cord from being walked on or
pinched, particularly at plugs and the point where
they exit from the product.
•Servicing is required when the product has been
damaged. Do not attempt to service this product
yourself. Opening or removing covers may expose
you to dangerous voltages or other hazards. Please
contact the manufacturer to be referred to an
authorized service center near you.
•To prevent risk of fire or electric shock, avoid over
loading wall outlets, extension cords, or integral
convenience receptacles.
•Do not let objects or liquids enter the product.
•Use proper power sources. Plug the product into a
proper power source, as described in the operating
instructions or as marked on the product.
1.2 Features;
This manual describes how to use the Argon Stream3M,
an advanced but easy-to-use Wi-Fi connected audio
system with the following modes:
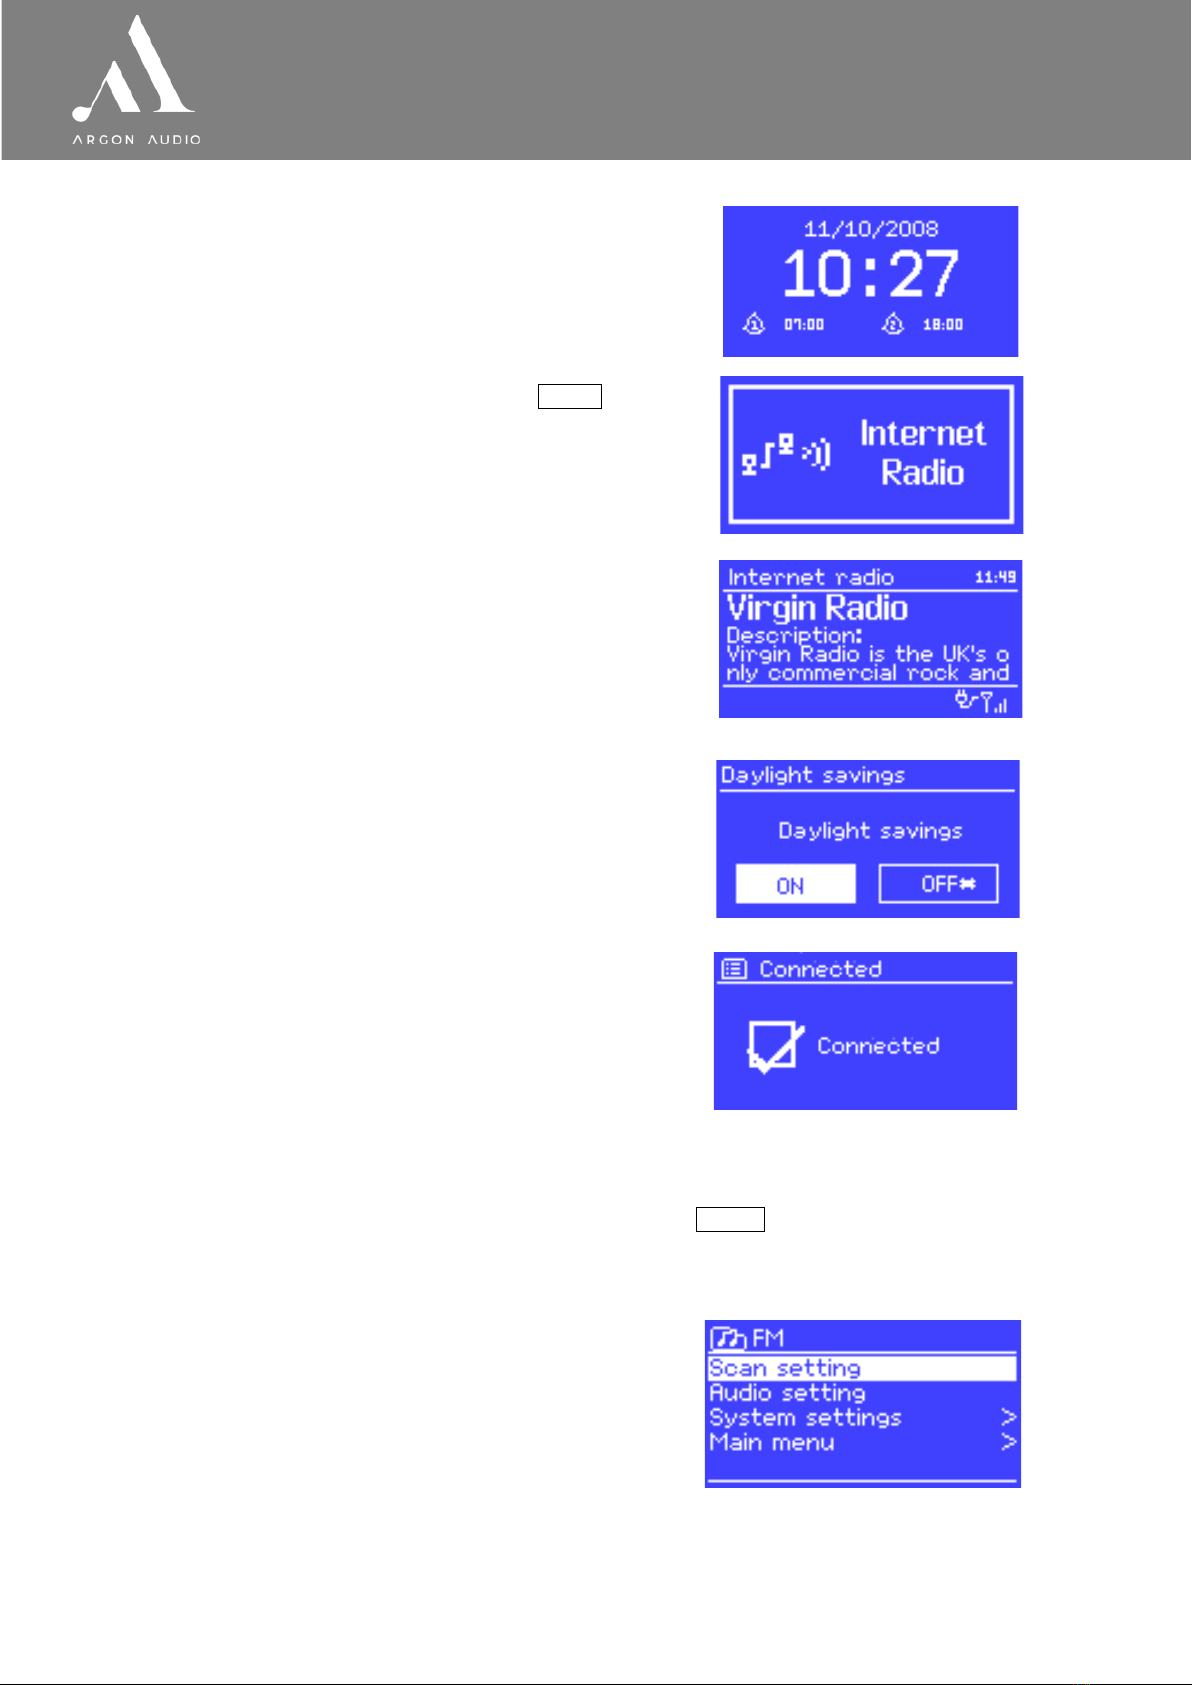
• Internet Radio with access to over 20,000
stations, ‘Listen again’ broadcasts and podcasts
• Music player allowing easy navigation and
playback through a network-stored library of
music files including AAC+, MP3, WMA, WAV,
FLAC.
• Mediaplayer, “Play To” feature allowing media
to be pushed from a PC running Windows 7 to
Stream3M operating in Digital Media Renderer
(DMR) mode.
• DAB/DAB+ digital radio with a wide choice of
channels and digital quality sound broadcast
free-to-air
• FM with RDS (Radio Data System)
• Spotify Connect play back and control. Via app.
• Aux in for external music sources such as Mobile
phones and laptop
• Bluetooth for wireless connection with music sources
Mobile phones and laptop
Stream3M also provides the following features:
• Large 2.7 inch color display for easy control and
clear information display, with up to six lines of
text plus status icons.
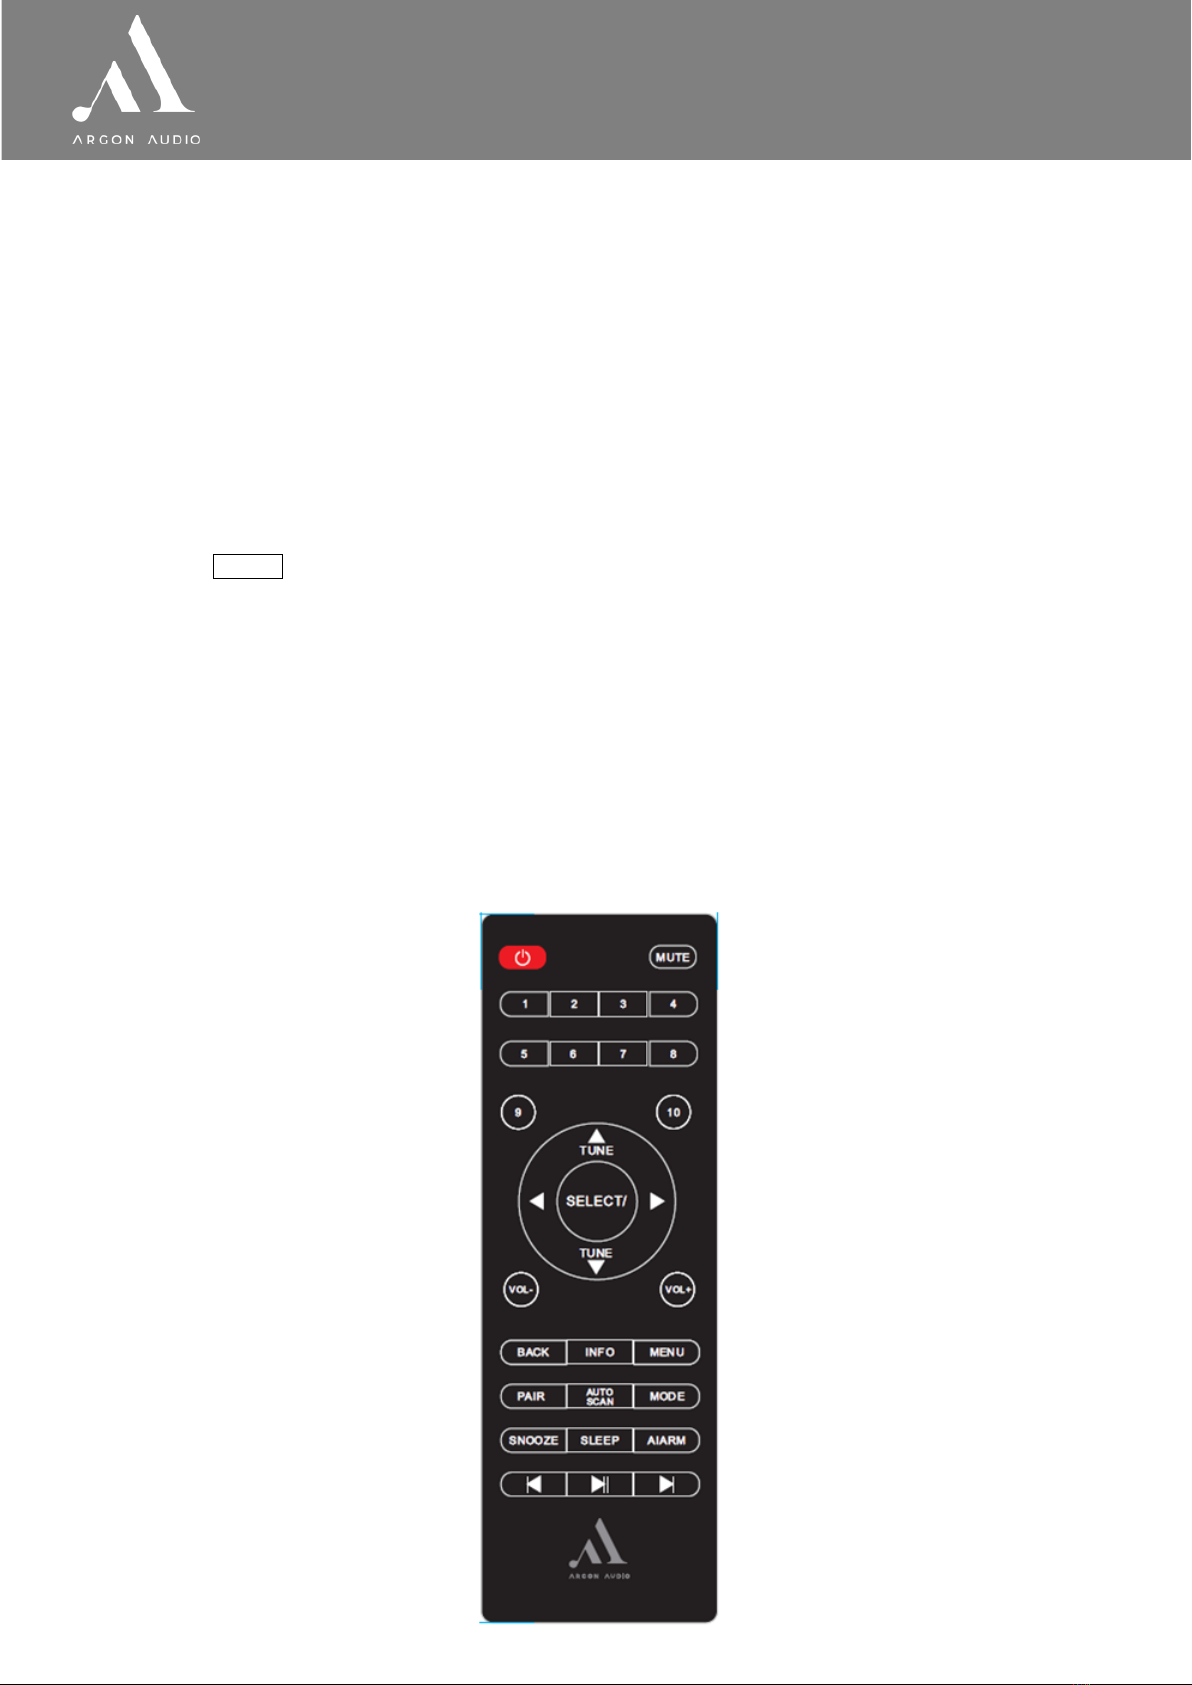
• Wi-Fi Remote control from an Apple iPhone, iPad
iPod touch and Android, using the UNDOK Device
Remote Control application
• Clock with auto-update capability and dual
independent alarms
• Sleep/snooze
• UPnP Music player modes
• Multiple network profiles for easy setup and
portability
• Multiple operating languages
1.3 Carton contents;
We have during production and packing carefully
checked and inspected the unit.
After unpacking please check for any damage from
transport.
We recommend that you keep the original carton box
and packing material for any future shipping.
In the carton box you will find:
• ARGON Stream3M
• DC 5V power adapter
• Antenna cable
• Quick Start Guide
• Remote control
• RCA connection cable

www.argonaudio.com
4
Stream3 M
1.4 External resources
To operate Stream3M, the following external resources are needed:
•A power source (100-240 V mains supply)
•A wireless (Wi-Fi) or wired (LAN) network (provided through a router) with appropriate permissions
and password if necessary (for Internet radio and Network Music player modes)
•Broadband Internet access (for Internet radio mode and Internet Software Update)
•A music library stored on the network
•An Apple iPhone, iPad, iPod touch or Android device (for using the Wireless Device Remote Control
application UNDOK)
•An external audio source (for Aux in mode)
1.5 Conventions used in this manual
Button (press) Physical button on the keypad
Option (select) Menu option shown on the display
Name Menu, screen or other name
2. Controls, connectors and display
2.1 Main controls
The Stream3M is fully and only controlled from the remote control.
(There are no operating controls on Stream3M itself).
Operations can also be done via UNDOK app for IOS and ANDROID (see page 23)
For basic first time set-up the included remote has to be used. (For button functionality see page 4)

www.argonaudio.com
5
Stream3 M
[1] Some buttons have alternate functions depending on whether they are pressed quickly or held down.
Remote
Buttons
Function/usage
Power
Red button top left - Standby: Turn on or back to standby mode (showing clock and date).
Cancels sleep function.
MUTE
Press to mute or unmute the sound
Buttons 1-10
Presets to stores stations: Press for the Preset recall/Save menu.
Arrow-TUNE/SELECT
Press to scroll through a menu or station list. The chosen option is highlighted in reverse
text (dark characters on a white background). Press to select.
VOL+/-
Turn to adjust the volume up or down
BACK
Return to previous screen. In play mode, this button may be used to return
the last track list or station list
INFO
View more information about the station or track playing. Press again to cycle through
further information screens then return to the normal Now playing screen
MENU
Show menu for the current mode. Press again to show Now playing screen.
PAIR
Press to pair a Bluetooth device
AUTO SCAN
Press to scan stations in DAB or FM mode
MODE
Cycle through the modes: Internet Radio, Music player, DAB, FM, Bluetooth
SNOOZE
Press Sleep/snooze: When playing, standby after a set time
SLEEP
Set time interval for the Stream3 to turn off automatically
ALARM
Enters alarm wizard, turns off alarm (when alarm is sounding) and toggles between
alarms in standby.
Skip/play/pause
Symbol buttons at the bottom of the remote. Skip, stop or play in Music player mode.

www.argonaudio.com
6
Stream3 M
2.2 Spotify Connect Control and play back
Listen out loud with Spotify Connect
1. Connect your Stream3M to your wifi network
2. Open up the Spotify app on your phone, tablet or laptop using the same wifi network
3. Play a song and select Devices Available
4. Select your Stream3M and start listening.
The Spotify Software is subject to third party licenses found here: https://www.Spotify.com/connect/third-party-
licenses
Notice: When you stop Play back on your Stream3M device, Stream3M will show “no media” in the display.
To get back to Internet Radio, DAB, FM, Music Player or Aux, you need to press the MODE button on the
Stream3M remote.
2.3 Connectors
As shown below Stream3M has connectors (from left to right) for the following:
•Power on/Off
•DAB/FM Antenna
•Ethernet/LAN cable to Router connection
•Line out (to connect to an external amplifier)
•Spdiff/optical output
•DC power in (5 V)
2.4 Screens The screen shows various menus, dialogues and displays, as described below.
There are basically six types of screen:
•Standby (clock)
•Splash (mode)
•Now playing
•Dialogue
•Error/Information
•Menu
When text is too long to fit on the screen, it is first shown truncated, then, after a few seconds,
slowly scrolls so that you can read it all.

www.argonaudio.com
7
Stream3 M
The Standby screen
shows the time, date and any active
alarm times.
As you cycle through the play modes using Mode ,
Argon Stream3M shows a splash screen for each
mode. After one second, Argon Stream3M enters the
selected mode and tries to start playing the last station
or track that was playing in that mode. If this is not
possible, Argon Stream3M tries to connect to the
selected source by scanning for stations, networks, or
prompting for user input as appropriate.
Now playing screens show information about the audio
source and track now playing, where available.
Dialogue screens are shown to allow the user to
change settings. They vary in complexity from simple
Yes/No options up to the scrollable network password
input screen.
As with menus, the selected item is shown with a white
background.
Dialogue screens mark the current setting with an
asterisk (*).
Error/Information screens give specific messages for a
few seconds, then change automatically to another
screen.
Menus
Argon Stream3M has basically three types of menu. Use the Select control to step through and select
options. A scroll bar on the right of the screen shows if there are further options above or below those
visible.
Each mode has a Mode menu,
with options specific to that mode.
For example, the FM mode menu has just two options:
Scan setting and Audio setting.
In addition, each mode menu has two final options:
System settings > and Main menu >.
The ‘>’ indicates options leading to further menus.

www.argonaudio.com
8
Stream3 M
The System settings menu allows access to system
settings and information such as network, time, language
and software update.
Menus with more options than will fit on one screen have a
scroll bar to the right.
The Main menu allows access to all modes
plus sleep and timer functions.
(note; Last FM and Pandora only available in the US)
Some menus, for example the System settings menu, have several submenus.
3. Getting started/setup
Although the Argon Stream3M is sophisticated, getting started is simple. To play DAB or FM radio, all you
need is a power source (a 100-240 V mains supply).
For Music Player mode, you need a wireless network and a UPnP music server (e.g. a PC).
For Internet-connected modes such as Internet radio, you also need a broadband Internet connection.
To set up the Stream3M:
1. Place Stream3M on a suitable shelf or table
2. Connect the power adaptor between Stream3M and the mains supply.
3. To receive broadcast radio (DAB and FM), extend the telescopic antenna.
The setup wizard starts.
3.1 Setup wizard
When Stream3M is started for the first time, it runs through a
setup wizard to configure settings for date/time and network.
Once this has finished, the system is ready to use in most
modes.
Note: To change these settings later, select Menu > System
settings >. To run the setup wizard again, select Menu >
System settings > Setup wizard.
Select Yes to start the setup wizard.
If you choose No, the next screen asks if you would like to run
the wizard next time Stream3M is started. The system then
starts without configuring time/date and network settings and
enters the Main Menu.
Note: If power is removed while the wizard is in progress, the
wizard will run again next time Stream3M is started.
3.1.1 12/24 hour display
To change between 12 and 24 hour display, select Set 12/24 hour and then select your preference.
3.1.2 Time/date
The time and date can be updated manually or automatically. With auto-update, the time and date are
automatically synchronised with external clocks. Auto-update is generally more accurate.

www.argonaudio.com
9
Stream3 M
Auto-update
Auto-update works with data sent over DAB, FM or the Internet.
The clock is only updated when in a corresponding mode, so it is
best to select a mode you use regularly.
DAB and FM use time signals broadcast with
radio transmissions.
Network uses a time signal sent from the Frontier Silicon Internet
radio portal when in any network-connected mode.
1. Select Update from DAB, Update from FM, Update from Network or No update.
2. If you are updating from the network, set your time zone.
3. If your country uses daylight saving, the automatically updated time from the network may be wrong
by one hour. When daylight savings are in effect (during the winter), turn on the Daylight savings
option to rectify this.
Note that if you are updating the time from DAB or FM, the Daylight savings option has no effect on
the clock’s time.
Stream3M will auto-update from the selected source when time information is available.
Manual set
If you set No update, the wizard now prompts you to set the time and date manually.
The date and time are displayed as dd-mm-yyyy and
hh:mm AM/PM with the first value, dd, active (flashing).
Adjust each value with the Select control. As each value
is set, the next value becomes active and flashes.
3.1.3 Network
Stream3M is compatible with all common network protocols and encryption methods, including Wi-Fi Protected
Setup (WPS).
To connect Stream3M to your network, you need a Wi-Fi wireless router, together with password key if set
Select WLAN region/country > Wi-Fi network
(SSID), and then select a network from the list.
If the network is open (non-encrypted), Spotify connects
without any further ado; see Completion below.
Standard encrypted network
To enter the network’s key (password), use the Select
control to move the cursor through the characters and
select.
As each character is selected, the key is built up near the
top of the display.
There are three options accessible by turning Select
back before the first characters (0123…)
– Backspace, OK and Cancel.
WPS encrypted network
WPS encrypted networks are identified by ‘[WPS]’ at the
start of the network name, and have three methods of
connection. Select one and follow the prompts:

www.argonaudio.com
10
Stream3 M
•Push Button >
Stream3M prompts you to press the connect button on the router.
It then scans for a ready Push Button Connect network and connects.
•Pin > (code number)
Stream3M generates an 8-digit code number which you enter into the
wireless router, access point, or an external registrar
(e.g. advanced versions of Windows Vista).
•Skip WPS >
Enter key as for a standard encrypted network, above.
For more information on setting up a WPS encrypted network, see your WPS router’s instructions.
Completion
Stream3M tries to connect to the selected network.
If connecting fails, Stream3M returns to a previous screen to try
again.
If the network connection is lost, Stream3M automatically tries to reconnect.

www.argonaudio.com
11
Stream3 M
3.2 Other settings
Settings for connecting to premium services such as Last.fm and Pandora are covered in the sections for
those modes. Common settings are covered below.
Notice Last.FM and Pandora are only available in the US.
3.2.1 Network
Stream3M remembers the last four wireless networks it has connected to, and automatically tries to
connect to whichever one of them it can find.
You can see the list of registered networks through Menu > System settings > Network >
Network profile >. From here you can delete unwanted networks by turning and pressing Select then
confirming delete Yes.
There are also other options for viewing and manually altering network settings from Menu > System
settings > Network > (for example setting up a wired network). Users experienced with networking may
find these options useful for diagnosing and fixing network problems.
3.2.2 Language
The default language is English. To change, select Menu > System settings > Language > then select
your language.

www.argonaudio.com
12
Stream3 M
3.3 Internet radio portal registration
Argon Stream3M uses the Frontier Silicon Internet radio portal website that allows you to organise your
favourite’s lists and also listen to Internet radio on a computer.
To register your Stream3M with the portal, switch to Internet
radio mode as described in Section 4, and then obtain your
radio’s unique portal access code by selecting
Menu > Station list > Help > Get access code >.
Write down the access code.
Note: Do not confuse the portal access code with the Radio ID (from Menu > System settings > Info.)
Visit the portal website at www.wifiradio-frontier.com.
If this is your first visit to the portal, register for a new account, entering the following information:
•access code,
•your e-mail address,
•password,
•radio model (Argon Stream3M).
If you already have an account and wish to add an additional radio, log in to your account and select:
My preferences > Add another Wi-Fi radio.
Once your radio is registered with the portal, you can immediately use the Internet radio
favourites and added stations features.
3.4 Setting up a music server
In order for Stream3M to play music files from a computer, the computer must be set up to share files or
media.
UPnP media sharing allows devices like Stream3M to play music from a shared media library,
navigating through tag menus such as Artist, Album or Genre. If you are running a suitable server system
such as a PC with Windows Media Player 10 or later (WMP), and your music library is well-tagged, then it
is recommended to use media sharing. Only the UPnP server needs to be set up.
Notice: iTunes does not currently work as a UPnP media server, but there are add-ons available
to work with an iTunes library.

www.argonaudio.com
13
Stream3 M
3.5 Sharing media with Windows Media Player
The most common UPnP server is Windows Media Player (10 or later). Alternatively, other UPnP
platforms and servers may be used. To set up WMP for media sharing, perform the following steps:
1. Ensure that the PC is connected to the network.
2. Ensure that the radio is powered on and connected to the same network.
3. In WMP, add to the media library the audio files and folders you want to share with Stream3M
(Library > Add to Library…).
4. In WMP, enable media sharing (Library > Media sharing…).
Notice: setup can differ depending on which version of WMP you have
Notice; it may show; Argon Stream3M, “Unknown device”, “Frontier Silicon” or the Jupiter logo as shown below.
Make sure that the radio has access to the shared media by selecting it and clicking Allow. You can
also set a name for the shared media in Settings… Click OK to close the dialogue boxes.
The PC is now ready to stream the music to the radio. The WMP UPnP service runs in the background;
there is no need to start WMP explicitly.
3.6 Setting up Stream3M for “Play To” in Windows 7.(Notice: Windows 10 don’t need
this procedure for setup)
1. To set-up Argon Stream3M to be controlled and to stream music via Windows Media Player 12, perform
the following steps:
2. Ensure that the PC is connected to the network.
3. Ensure that Stream3M is powered on and connected to the same network.
Note: Stream3M must be in an Internet radio mode to be detected.
4. From the Windows main screen,
select Start > Devices and Printers.
5. Select the Add a device tab in the top left of the Devices
and Printers window and follow the instruction prompts given
by the wizard.

www.argonaudio.com
14
Stream3 M
In the Devices and Printers window a icon *) will appear and you are now ready to stream your
Windows media music files to Stream3M.
*) To change the name of your device, right click on icon and choose properties. Then choose UPnP and
click on “device webpage”.
4. Internet Radio mode
Stream3M can play thousands of radio stations and
podcasts from around the world though a broadband
Internet connection.
When you select Internet radio mode, Stream3M contacts
the Frontier Silicon Internet radio portal to get a list of
stations, organised into different categories like Country,
Most popular and Genre. Once you select a station, Stream3M
connects directly to that station.
The portal also enables multiple lists of favourite stations that you can personalise, for example Andy’s
stations, Jo’s favourites, Talkshows. To use the favourites feature, register your radio with the portal
website as described on page 12. If you have several Frontier Silicon radios, you can register them all on
the same account so that each radio has access to your favourite’s lists. It is possible to add favourites
either directly through Stream3M or through any computer with a web browser.
To enter Internet Radio mode, either press Mode until the display shows Internet Radio or select
Menu > Main menu > Internet Radio.
Note: The station list menu is provided from the Internet radio portal, so it is only accessible when
Stream3M is connected to the Internet. Station lists and submenus may change from time to time.
There are several ways of selecting stations.
Directly from the radio:
•Last listened
•Presets
From the portal through the Menu > Station list > menu:
•Favourites lists
•Browse by Country, Genre, Most popular, Newest
•Search by keyword
•My added stations
If you are already listening to an Internet radio station, you can press Back rather than Menu to quickly
return to the last visited branch of the menu tree. For example, suppose you were listening to New Orleans
Radio through the browse facility as described in section 4.4 below. Pressing Back would return you to
the Highlighted Blues stations menu. Pressing Back again would return you to the Blues menu, and
so on.

www.argonaudio.com
15
Stream3 M
4.1 Last listened
When Internet radio mode restarts, the last-listened station is selected. To select another recently used
station, select Menu > Last listened then one of the stations listed. Most recent stations appear at the top
of the list.
4. 2 Presets
Presets are stored in the radio and cannot be accessed from other radios.
To store an Internet radio preset, press and hold Preset until the display shows the Save preset screen.
Select one of the presets to save the currently playing station.
To select a preset, press Preset briefly, then select one of the listed preset stations. When a preset
station is playing, it shows Pn(P1, P2 etc) in the bottom of the screen.
Note: Operation of presets is identical for Internet radio, DAB and FM.
4.3 Favorites
Favourites are stored on the Internet radio portal. Before you set up an account on the portal from its Web
interface (www.wifiradio-frontier.com), the favourites are associated solely with the radio on which you set
them. After you set up a portal account, all the favourites from your different radios are merged into a
combined favourites list. This combined list is available to all the radios on your account.
To store a playing station as a favourite, press and hold Select until the display shows ‘Favourite added’.
The station appears in the default favourites list Stations.
To select a favourite, select Menu > Station list > My favourites > [Favourites list] > [Station].
4. 4 Browse
To browse Internet broadcasts, select
Menu > Station list > then either Stations > or Podcasts >.
Browse through the menus to find broadcasts.
Note:
BBC radio ‘Listen Again’ programmes are accessible
through the Podcast menu, for example
Menu > Podcasts > Location > Europe >
United Kingdom > All shows > BBC Radio 4 >
You and Yours > 20/10/2008 - October 2010.

www.argonaudio.com
16
Stream3 M
4. 5 Search
You can also search through Internet broadcasts for stations or podcasts with particular keywords in their
title.
To search, select Menu > Station list > then either Stations >
or Podcasts >
Enter a keyword by selecting characters then OK.
The search entry screens are similar in operation to the Wi-Fi
password entry screen.
Select a broadcast from the list.
For podcasts, you may be able to select a particular episode.
4.6 My added stations
Even though the Internet radio portal contains thousands of stations, you may want to listen to stations not
listed. You can add your own stations via the portal. These added stations are accessible from Stream3M
by selecting Menu > Station list > My added stations > [Station].
4.7 Now playing information
While the stream is playing, the screen shows its name and description. If artist and track information is
available, this is also shown. To view further information, press Info .
Each time you press Info , another set of information is displayed, cycling through the following details:
•Artist and track name (default; where available)
•Station description
•Station genre and location
•Signal reliability
•Codec and sampling rate
•Playback buffer
•Today’s Date

www.argonaudio.com
17
Stream3 M
5. Music player mode (network)
Music player mode plays audio files such as MP3s, AACs,
WMAs or FLACs from a computer on the local network.
To enter Music player mode, either press Mode until the
display shows Music player, or select Menu > Main
menu > Music player
Once in music player mode, press Menu , then select
Shared media.
Note: Stream3M does not support USB playback
as shown in the picture.
If you are already playing a music file, you can press Back rather than Menu to quickly return to the
last visited branch of the menu tree. For example, suppose you were listening to the track Heat by the
artist 50 Cent through browsing shared media as described in section 0 below. Pressing Back would
return you to the track listing for the album Get Rich or Die Tryin’. Pressing Back again would list all
50 Cent albums. Pressing Back again would list all album artists, and so on.
You can use << and >> to move through tracks. Press and hold to rewind or fast forward and press
quickly to select previous or next track.
5.1 Shared media (from UPnP media server)
Select Menu > Shared media >
If you have set up shared media (as described on page 12-13), you should see an entry consisting of
<computer name>: <Shared media name>, for example JB-Laptop: Audio. If you have more than one
computer sharing media, the alternatives are listed. Select the shared media you want to play.
From this point on, the menus are generated from the shared
media server (typically Windows Media Player). The first menu
shows a list of media types, for example Music, Video, Pictures and
Playlists. Stream3M can only play music and playlists.
There is also a search function, which finds tracks in a similar
way to Internet radio search, as described on page 16.
From Music, there are numerous ways of selecting tracks, including:
•Genre
•Artist
•Album
•Composer
•Rating
Once you have found a track you want to play, press Select .
A short press plays the track immediately and a long press adds
the track to the playlist. You can also add entire albums to the playlist.
Stream3M plays either the selected track or the playlist.

www.argonaudio.com
18
Stream3 M
5.1.1 Wake-on-LAN
If shared media is selected a list of available music servers will be displayed.
If a question mark appears before the server name, this indicates that the server has been seen before
and supports Wake-on-LAN functionality, but cannot currently be found on the network.
If a server with a question mark is selected by the user, the device will try to wake the server up and
connect to it. In some instances this may not be possible as the server may not be connected to the
network any more or may be switched off.
5.1.2 Prune servers
From time to time it may be necessary to remove servers displaying question marks in front of the server
name from the server list. For example, if the device is moved to a new network or if a Wake-on-LAN
server is removed from your current network.
To perform this function go to Menu > Prune servers > Yes
5.2 Playlists
Stream3M holds a queue of up to 500 tracks in the playlist. Playlist
tracks can be mixed from multiple UPnP servers. To manage the
playlist, select
Menu > My playlist.
•To view the playlist, scroll though it by turning
Select . UPnP tracks show their track name.
•To play the playlist from a certain track, quick
Select .
•To erase a track from the playlist, long Select .
then confirm YES.
If you select a track/album/folder for instant playback (without using the playlist), the playlist is preserved.
The playlist is also preserved during standby.
5.3 Repeat/shuffle
You can repeat tracks or play them in random order by selecting Menu > Repeat play or Menu >
Shuffle play.
5.4 Now playing information
While a track is playing, the screen shows its track and artist (UPnP). There is also a progress bar with
figures for elapsed and total track time. At the bottom of the screen, an icon indicates UPnP. To view
further information, press Info .
Each time you press Info , another set of information is displayed, cycling through:
•UPnP: playback progress bar (default), album, codec/sampling rate, playback buffer bar,
today’s date

www.argonaudio.com
19
Stream3 M
6. “Play To” or “Cast to” in Windows 7 and 10
Windows 7 and 10 features “Play To” in Win 7 and “Cast to” in Win 10. This lets your PC control
Stream3M to push media and use as a universal remote control for your media collection.
Stream3M supports the industry standard DLNA (Digital Living Network Alliance) 1.5 digital media
renderer. This allows you to "Play To"/”Cast to” other devices around your home and combine media
streaming with controlling a connected media receiver while streaming content to it from another
Windows 7/10 PC on a home network.
Before you can use the “Play To”/”Cast to” feature you need the set-up Windows for streaming media.
1. As a first and one time only action, you need to (network)-share the folder or files you want to stream
to Stream3.
•Open File Explorer (Windows key + E).
•Browse to the folder with files that you want to share.
•Select the whole folder, or file(s) in the folder, or all the files (Ctrl + A).
•Right click on folder/file (Win7) Click the Share tab (Win 10)
•Choose “Share with” (Win7) Click the Share button (Win10)
•Select the sharing method, we recommend “Homegroup”
6.1 Use “Play To/Cast to” in Windows Media Player
Windows Media Player makes it easy to manage your media, find items that you want to play, and open Play
To. To select items that you want to play, follow these steps:
1. Click the Start button, click All Programs, and then click Windows Media Player.
If the Player is currently open and you’re in Now Playing mode, click the Switch to Library button in
the upper-right corner of the Player.
2. If the list pane is closed or if the Burn or Sync tabs are exposed, click the Play tab.
3. Find the items that you want to play in the Player Library, and then drag those items from the details
pane into the list pane.
4. Click the Play to button at the top of the list pane, click the device on your network that will receive
the media.
5. In the Play To dialog box, use the playback controls to play, pause, or stop the media stream, and to
change to the next or previous item in the list.
6.2 Use “Play To” elsewhere in Windows 7 and 10
Outside of Windows Media Player, you can stream media to Stream3M with “Play To/Cast to” by right-clicking
music files. To select music files and stream them to Stream3M, follow these steps:
•As a first and one time only action, you need to (network) share the folder or files you want to stream to
Stream3.
•Open File Explorer (Windows key + E).
•Browse to the folder with files that you want to share.
•Select the whole folder, or file(s) in the folder, or all the files (Ctrl + A).
•Click the Share tab.
•Click the Share button
•Select the sharing method, we recommend “Homegroup”
•Right-click the selected files, point to “Play to/Cast to”, and then click the device on the network that will
receive the media.
•In the “Play To/Cast to” dialog box, use the playback controls to play, pause, or stop the media stream,
and to change to the next or previous item in the list.

www.argonaudio.com
20
Stream3 M
6.3 Now playing information
While a track is playing, the screen shows its trackname (UPnP).
There is also a progress bar with figures for elapsed and total track
time. At the bottom of the screen, an icon indicates UPnP.
To view further information, press Info .
Each time you press Info , another set of information is displayed,
cycling through the following:
•Artist, album, codec/sampling rate, playback buffer
7. DAB radio mode
DAB radio mode receives DAB/DAB+ digital radio and displays
information about the station, stream and track playing.
To enter DAB mode, either press Mode until the display shows:
DAB Radio or select; Menu > Main menu > DAB.
7.1 Scanning for stations
The first time you select DAB radio mode, or if the station list is
empty, Stream3M automatically performs a full scan to see what
stations are available. You may also need to start a scan manually
to update the list of stations for one of the following reasons:
•Available stations change from time to time.
•If reception was not good for the original scan
(for example the antenna was not up), this may result in
an empty or incomplete list of available stations.
•If you have poor reception of some stations (burbling),
you may wish to list only stations with good signal strength.
To start a scan manually, select Menu > Scan.
Once the scan is complete, the radio shows a list of available stations.
To remove stations that are listed but unavailable, select Menu > Prune invalid.
7.2 Selecting stations
To listen to or change a station, turn the Select control to view a list of stations and press to select. Once
selected, the station plays and the screen shows information about the station, track or show as broadcast.
Presets
To store a DAB preset, press and hold Preset until the display shows the Save preset screen. Select one
of the 10 presets (on the remote) to save the currently playing station.
To select a preset, press Preset briefly, then select one of the listed preset stations. When a preset
station is playing, it shows Pn(P1, P2 etc) in the bottom right of the screen.
7.3 Now playing information
While the stream is playing, the screen shows its name and DLS (Dynamic Label Segment) information
broadcast by the station giving real-time information such as programme name, track title and contact
details. Stereo broadcasts are indicated with an icon at the top of the screen. To view further information,
press Info .
Each time you press Info , another set of information is displayed, cycling through DLS text, programme
type, ensemble name/frequency, signal strength/error rate, bit rate/codec/channels and today’s date.
Table of contents
Other argon audio Media Converter manuals
Popular Media Converter manuals by other brands

CTC Union
CTC Union FRM220-10/100iS-2 user guide

Keyscan
Keyscan NETCOM2 installation guide

METRObility Optical Systems
METRObility Optical Systems 2131-13-01 Installation & user guide

AMI Marine
AMI Marine Quark-Elec QK-A032 manual

Extron electronics
Extron electronics RGB to DVI Scaler RGB-DVI 300 Setup instructions

DOD
DOD AC 260 instruction manual