manuals.online logo
Brands
  1. Home
  2. •
  3. Brands
  4. •
  5. Argos
  6. •
  7. Outdoor Light
  8. •
  9. Argos 432/0315 User manual

Argos 432/0315 User manual

Simple Assembly Instructions - Please keep for future reference
IMPORTANT
1. Read these instructions carefully and
familiarise yourself with the procedure
before assembling the unit.
2. Check that you have all the component
parts following the list on the back
cover and familiarise yourself with
each part before proceeding.
3. Take all the fittings out of the plastic bag
and separate them into their groups.
4. Ensure you have enough space to lay out
all the parts before assembly.
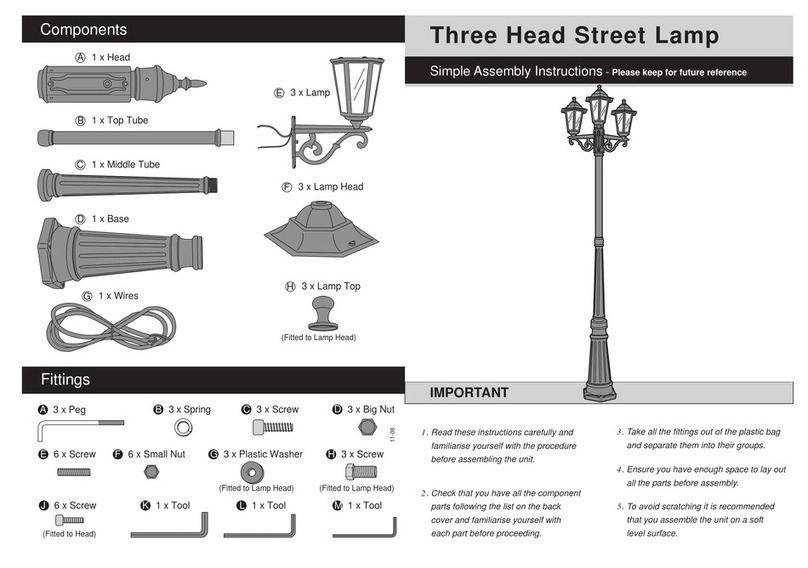
1M Black Garden Post
Components
5. To avoid scratching it is recommended
that you assemble the unit on a soft
level surface.
4-04
1 x Cover
B
1 x Lamp
A
2 x Tube
D
6 x Decoration Glass
F
C1 x Top
Fittings
A2 x Long Screw B2 x Wall Plug C6 x Short Screw
D6 x Plastic Plug E2 x Screw
1 x Base
E
F6 x Bracket G1 x Top Screw
Assembly Instructions Assembly Instructions
Stage 1 – Fitting the Lamp
D
A
E
fig. 1
fig. 3
1. Screw the Lamp A into the Tube
D. Ensure all the wires fit to the
tube and they are not trapped.
See fig. 1.
3. Screw the unit onto the Base E.
See fig. 2.
E
fig. 2
D
D
Stage 2 – Fitting the Base
1. Open the Terminal Block at the
Base E. Connect the wires of the
Lamp to the Terminal Block.
See fig. 3.
MAINS
BROWN or RED
BLUE or BLACK
GREEN /YELLOW
LIVE
NEUTRAL
LIGHT
EARTH
2. Assemble the other Tube D by
screwing into place. 
See fig. 2.
NOTE: Take care when assembling
and screwing into place, taking
care not to damage the wires
and light fitting.
2. Use Terminal Block to connect
the mains supply, ensure all the
wires are firmly fixed in place.
See fig. 4 .
NOTE: Ensure electricity is
switched off at the mains before
installing or maintaining any
light fixture.
NOTE: Ensure electricity is
switched off at the mains before
installing or maintaining any
light fixture.
fig. 4
Assembly Instructions Assembly Instructions
3. Ensure the power is off at the
mains. Screw the Bulb (ES GLS
Max 60W, not included) into the
unit, then turn the power back on. 
See fig. 8.
fig. 7
NOTE: Ensure Decoration Glasses
are facing out and located in
place.
2. Locate the Brackets F onto the
top of the Base A. Use the Short
Screws C to fix the Decoration
Glasses Finto the Lamp. 
See fig. 7.
NOTE: Ensure the Plastic Plugs
are firmly located on the Base,
as these fix the Decoration
Glass in place.
NOTE: Glass is very fragile. Handle
it carefully and keep away from
children.
Stage 3 –
fig. 5
fig. 8
C
F
A
fig. 6
A
F
F
1. Locate the Decoration Glasses F
into the Lamp A. Then place the
Plastic Plugs Donto the small
tubes located at the bottom of the
Base A. 
See fig. 6.
Stage 2 – Fitting the Base
B
E
A
D
Fitting the
Decoration
Glass
Stage 3 – Fitting the Decoration Glass
NOTE: Before drilling into any
location carefully check to avoid
any hidden pipes or wires. Also
check the desired location.
Consult a qualified trades
person if you are not sure.
3. Position the Base E in the
desired location and mark the
drill hole locations. Then drill
holes at marked locations and
insert the Wall Plugs B. Then
fix the unit using Screws A. 
See fig. 1.
F
NOTE: Ensure electricity is
switched off at the mains before
installing or maintaining any
light fixture.
Assembly Instructions Assembly Instructions
Stage 4 – Fitting the Top
Bulb Replacement
Technical DataCaution
1. Switch off the mains power supply.
2. Before replacing the bulb, allow it
to cool down for at least 10
minutes.
3. Never touch the bulb with your
fingers directly, cover it with a cloth.
4. Loosen the bulb and remove it
from the lamp.
5. Replace a new bulb with same
voltage and wattage.
Model No.
Input Voltage
Max. Wattage
Bulb
432/0315
230V~240V~, 50Hz
60W
Max. 60W ES GLS 230V-240V~
fig. 11
2. Switch on the mains power supply. 
See fig. 11.
1. Indoor and outdoor use.
2.  Connect to 230V/240V~, 50Hz.
3. If in doubt about fitting this product. Please
consult a suitably qualified electrician.
4. The temperature of the spot lamp rises very
quickly. Do not touch the metal parts or glass
of the spot lamp after the light is turned on.
C
B
G
fig. 9
1. Use Top Screw G to fix Top C
onto the Cover B. 
See fig. 9.
2. Use Screws E to fix the Cover
Bonto the Lamp.  
See fig. 10.
fig. 10
EE
B
Stage 5 – Finishing the unit

Other Argos Outdoor Light manuals

Argos DK-00234 Manual

Argos

Argos DK-00234 Manual

Argos Elega 432/5217 User manual

Argos

Argos Elega 432/5217 User manual

Argos BELIZE TABLE LAMP User manual

Argos

Argos BELIZE TABLE LAMP User manual

Popular Outdoor Light manuals by other brands

LIGMAN STEAMER 2 installation manual

LIGMAN

LIGMAN STEAMER 2 installation manual

Promate Snorky user guide

Promate

Promate Snorky user guide

LIGMAN GA-51088 installation manual

LIGMAN

LIGMAN GA-51088 installation manual

modway EEI-5622 Assembly instructions

modway

modway EEI-5622 Assembly instructions

Tracon Electric TLFV E Series user manual

Tracon Electric

Tracon Electric TLFV E Series user manual

Gama Sonic 12201 instruction manual

Gama Sonic

Gama Sonic 12201 instruction manual

Kenroy Home HARBOUR 33155 Use and care guide

Kenroy Home

Kenroy Home HARBOUR 33155 Use and care guide

Ares 534002 Assembly instructions

Ares

Ares 534002 Assembly instructions

JONATHAN Y JYL1024B manual

JONATHAN Y

JONATHAN Y JYL1024B manual

Cree OSQ HO Series installation instructions

Cree

Cree OSQ HO Series installation instructions

Philips ROADFOCUS RFS installation instructions

Philips

Philips ROADFOCUS RFS installation instructions

LIGMAN MAR 11 installation manual

LIGMAN

LIGMAN MAR 11 installation manual

Allen + Roth LB2901 manual

Allen + Roth

Allen + Roth LB2901 manual

SLV 228100 operating manual

SLV

SLV 228100 operating manual

LED's light 401713 operating manual

LED's light

LED's light 401713 operating manual

LightPro Onyx 30 R1 150D user manual

LightPro

LightPro Onyx 30 R1 150D user manual

VIBIA Suite Assembly instructions

VIBIA

VIBIA Suite Assembly instructions

WE-EF LTM440-AP Installation and maintenance instructions

WE-EF

WE-EF LTM440-AP Installation and maintenance instructions

manuals.online logo
manuals.online logoBrands
  • About & Mission
  • Contact us
  • Privacy Policy
  • Terms and Conditions

Copyright 2025 Manuals.Online. All Rights Reserved.